1987 Starcraft islander 190v?

Status
Not open for further replies.

87Starcraft

Petty Officer 2nd Class
Joined
Sep 15, 2021
Messages
108
a trick for plugging the hole behind the transom core:
  1. put a big chamfer on the interior side of the hole.
  2. give a solid rivet a healthy dose of 5200
  3. buck the rivet
  4. grind the bucktail flush with the transom skin; the chamfer will fill-in with aluminum that gets smashed down and hold the rivet in place even though you're grinding the protruding bucktail away.
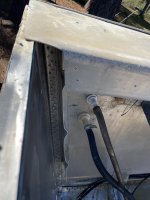
Thanks classic. I was gonna do that just a bit unsure if I could secure a patch like that but I found a post in your thread showing you did that
 

87Starcraft

Petty Officer 2nd Class
Joined
Sep 15, 2021
Messages
108
Wondering if my new one piece transom core will slide in like the three piece came out?
 

Attachments

  • DF166D56-6C74-4BE2-9DAC-C4FB90533928.jpeg
    DF166D56-6C74-4BE2-9DAC-C4FB90533928.jpeg
    1.2 MB · Views: 14
  • FED90B94-EDE0-404B-9F34-22E9958E7BBE.jpeg
    FED90B94-EDE0-404B-9F34-22E9958E7BBE.jpeg
    1.4 MB · Views: 14

MNhunter1

Ensign
Joined
May 12, 2014
Messages
970
You'll need to remove your gunnels, fold up the ends, or cut the ends in order to slide in the new transom.
 

87Starcraft

Petty Officer 2nd Class
Joined
Sep 15, 2021
Messages
108
I think this is a question for watermann. I can’t figure out how to get the gunwhales off. The cabin sits directly on them.
 

87Starcraft

Petty Officer 2nd Class
Joined
Sep 15, 2021
Messages
108
Progress? I should of clamped these pieces together... Thought the big tub of water was gonna be enough.
 

Attachments

  • 9ED75255-EC52-4D02-B298-CD31CEEC1FEB.jpeg
    9ED75255-EC52-4D02-B298-CD31CEEC1FEB.jpeg
    2.2 MB · Views: 140
  • 66375548-A10D-4204-B056-391ACA2B012C.jpeg
    66375548-A10D-4204-B056-391ACA2B012C.jpeg
    2.7 MB · Views: 22
  • A6E69047-2DBC-4D98-AD9F-2E3C6B24F941.jpeg
    A6E69047-2DBC-4D98-AD9F-2E3C6B24F941.jpeg
    2.2 MB · Views: 21
  • 781C8A03-5460-429A-8740-EA944F99FB08.jpeg
    781C8A03-5460-429A-8740-EA944F99FB08.jpeg
    2.6 MB · Views: 21

Watermann

Starmada Splash of the Year 2014
Joined
Jan 12, 2013
Messages
13,747
After the PMs and now looking at your transom set up pics, your splashwell style covers over the gunnels and the transom.

7511d6b2-dde5-4758-bff3-5936ffb202c4-jpeg.350131


The small strip (seen in the upper left of pic below) that you want to bend up can just be cut off or bent up and back down as it won't be visible once reassembled with the SW and caps.

9ed75255-ec52-4d02-b298-cd31ceec1feb-jpeg.352697
 

87Starcraft

Petty Officer 2nd Class
Joined
Sep 15, 2021
Messages
108
Dry fit the transom yesterday. Looks like I won’t be able to put epoxy and cloth on transom unless I cut a quarter inch off the stringers.
 

87Starcraft

Petty Officer 2nd Class
Joined
Sep 15, 2021
Messages
108
Gunnels trimmed out of the way
 

Attachments

  • BDBFBC49-C8B8-4438-9CF9-63449D4E14E8.jpeg
    BDBFBC49-C8B8-4438-9CF9-63449D4E14E8.jpeg
    2.8 MB · Views: 15
  • 93347CBD-339D-44B5-BA34-8F042872DF95.jpeg
    93347CBD-339D-44B5-BA34-8F042872DF95.jpeg
    1.1 MB · Views: 15

87Starcraft

Petty Officer 2nd Class
Joined
Sep 15, 2021
Messages
108
Does anyone have pictures or methods on how they attached their sacrificial anodes?
 

Watermann

Starmada Splash of the Year 2014
Joined
Jan 12, 2013
Messages
13,747
Does anyone have pictures or methods on how they attached their sacrificial anodes?
Not sure I've seen anyone use anodes other than what is on the motor/outdrive. My Islander has one on the transom but I doubt it did anything since they put it on paint and then painted it. You can see it in the pic above the bilge drain.

y4mePhMG0VxE1dSaDQBWPGafxKPLuznISL-K677uc_GLlv4WzFFUgaAR0bnvHyfC8TAxj3Teyg7CGHGIWPVqYSd0X9a229ZjaL2Y9ODbqgbr5kVdJpLTA3x2EVNfANS3Yeb3xY63lLxF27vOxGQ7350MRDbDtIfIrQnHdI890RzptVFKJB9k1odV0KvddDcFOdD
 

87Starcraft

Petty Officer 2nd Class
Joined
Sep 15, 2021
Messages
108
Not sure I've seen anyone use anodes other than what is on the motor/outdrive. My Islander has one on the transom but I doubt it did anything since they put it on paint and then painted it. You can see it in the pic above the bilge drain.

y4mePhMG0VxE1dSaDQBWPGafxKPLuznISL-K677uc_GLlv4WzFFUgaAR0bnvHyfC8TAxj3Teyg7CGHGIWPVqYSd0X9a229ZjaL2Y9ODbqgbr5kVdJpLTA3x2EVNfANS3Yeb3xY63lLxF27vOxGQ7350MRDbDtIfIrQnHdI890RzptVFKJB9k1odV0KvddDcFOdD
I was wondering. I could hardly find any info on here about anodes. I had one attached where the stringers meet the transom. Just wanted to prevent corrosion but this boat is definately a trailer queen
 

87Starcraft

Petty Officer 2nd Class
Joined
Sep 15, 2021
Messages
108
Good morning everyone,

I have been picking away at the islander here and there.

I got the transom done. I did exactly what classiccat did and epoxied with fiberglass cloth, drilled oversized thru holes and used epoxy with cab o sil. I then painted the side that will be exposed to the sun with farm paint from tractor supply with a hardener. And this is the result. Gotta say I’m pretty happy with it. It feels like a piece of granite.
 

Attachments

  • E3CFA113-8D26-4BEC-93FB-554CB9934C5D.jpeg
    E3CFA113-8D26-4BEC-93FB-554CB9934C5D.jpeg
    4.2 MB · Views: 20

classiccat

"Captain" + Starmada Splash Of The Year 2020
Joined
Dec 20, 2010
Messages
3,405
lookin' good 87! it's a little more time & expense but totally worth it. The aluminum will rot out before that transom does! :LOL:
 

87Starcraft

Petty Officer 2nd Class
Joined
Sep 15, 2021
Messages
108
lookin' good 87! it's a little more time & expense but totally worth it. The aluminum will rot out before that transom does! :LOL:
It was a fun process. I’m glad I went that way. I have a couple epoxy projects in be been scared to do, not now. U.S. composites seems like superior product over west systems.
 
Status
Not open for further replies.
Top