1987 Starcraft islander 190v?

Status
Not open for further replies.

87Starcraft

Petty Officer 2nd Class
Joined
Sep 15, 2021
Messages
108
Hello, My name is Shane and I am in Austin tx. I recently bought a 1987 Starcraft islander 190v with a Johnson 110 outboard. Seems like a rare boat from all 222 posts about Starcraft I read here.
 

Attachments

  • C7223C2A-D1F8-4246-9FFE-88C196F9B9B1.png
    C7223C2A-D1F8-4246-9FFE-88C196F9B9B1.png
    8.3 MB · Views: 42

matt167

Captain
Joined
Sep 27, 2012
Messages
3,690
Indeed, very much a unicorn. Most Islanders and Chieftan's are I/O, but the outboard boats are very sought after
 

87Starcraft

Petty Officer 2nd Class
Joined
Sep 15, 2021
Messages
108
Alright so she is a pig with lipstick. A little depressing because I thought I was buying a no hassle lake ready boat. But the PO seemed to be able to hide a lot of things by not wanting to go out on the lake. This is my first boat. So the transom is rotting away because of planning plates leaking. I started smelling gas and she leaned towards the starboard side when my wife sat in the chair. I started tearing foam water logged foam out and when I got to the gas hose I started smelling gas. So then I started pulling gas logged foam out. Also there is a good amount of corrosion.
 

Attachments

  • 7511D6B2-DDE5-4758-BFF3-5936FFB202C4.jpeg
    7511D6B2-DDE5-4758-BFF3-5936FFB202C4.jpeg
    4 MB · Views: 177
  • A470CC1D-7863-4F36-BA2A-56ABDD29F722.jpeg
    A470CC1D-7863-4F36-BA2A-56ABDD29F722.jpeg
    1.3 MB · Views: 46
  • E6D7C763-FEA3-4D1A-BB32-EF99A74F89E9.jpeg
    E6D7C763-FEA3-4D1A-BB32-EF99A74F89E9.jpeg
    3.2 MB · Views: 47
  • D1A4C156-7B86-4831-AF57-1706A1858DF0.jpeg
    D1A4C156-7B86-4831-AF57-1706A1858DF0.jpeg
    4.3 MB · Views: 46
  • B3734E84-78B9-40E5-8658-75AC68D8ED16.jpeg
    B3734E84-78B9-40E5-8658-75AC68D8ED16.jpeg
    3.5 MB · Views: 46
  • 70652676-F453-4669-A0FA-969312BD27E7.jpeg
    70652676-F453-4669-A0FA-969312BD27E7.jpeg
    3 MB · Views: 47
  • 1687D0FD-7671-421B-BDC6-8705951DD1BF.jpeg
    1687D0FD-7671-421B-BDC6-8705951DD1BF.jpeg
    2.8 MB · Views: 48

matt167

Captain
Joined
Sep 27, 2012
Messages
3,690
Nothing alarming on a 34 year old boat.. Tinny's are the cheapest and quickest to restore. You can get that boat water tight in no time.

FWIW, I re did a 'water ready' 1966 Starcraft Holiday 14 over in about 1 months time weekends only, and the only thing I didn't do was the transom as it was still good enough for the summer. Doing the transom would have taken an extra weekend or 2 but boating season was there.. They don't cost that much to redo.. The difference was, the boat I bought in late march, I knew probably floated and would probably be ok but it wasn't to the caliber of niceness that I wanted which is why I tore it down and put about $1k into it and fixed everything that I found I didn't like
 

87Starcraft

Petty Officer 2nd Class
Joined
Sep 15, 2021
Messages
108
Does anyone have good tips at stopping this corrosion. I know I need to get the aluminum to bare metal and apply self etching primer. What is the preferred wire brush to use and is there something I can fill the pitting in with that will keep corrosion from coming back
 

MNhunter1

Ensign
Joined
May 12, 2014
Messages
979
Does anyone have good tips at stopping this corrosion. I know I need to get the aluminum to bare metal and apply self etching primer. What is the preferred wire brush to use and is there something I can fill the pitting in with that will keep corrosion from coming back
After all foam is removed, I used a combination of orange and grey nylox brushes, and stainless steel cup brushes on a cordless drill to remove all the corrosion and clean the hull. Followed with a good pressure wash (used throughout the process as well) and a 50/50 cleaning vinegar/water mixture in a spray bottle to hit all the pits and areas of corrosion. Let sit for about a half hour or so before rinsing well with the power washer again. You'll need to assess the areas of damage and either patch or plug those that go through, or skim the ones that don't require a patch with Marine Tex or similar two part epoxy. I'd then throw a coat of Gluvit or Coat-it over all areas of repair, as well as any seams and rivets that will be below the waterline. Patch should consist of a solid rivetted aluminum plate that extends beyond the area of damage and backbuttered with 3M5200. If it's just a pin hole, I'd drill it out and hammer in a 3/16" or larger solid rivet with 3M5200 to plug the hole.
 

87Starcraft

Petty Officer 2nd Class
Joined
Sep 15, 2021
Messages
108
Alright so, the pinholes that go thru I sprayed 50/50 vinegar water on them and was shocked to see a hole appear before my eyes. I thought I messed up big time. I feel like I’m going to have pinholes throughout the entire hull ifbi do this in all the places
 

Watermann

Starmada Splash of the Year 2014
Joined
Jan 12, 2013
Messages
13,753
I've only had to deal with corrosion on the transom skin, not any on the bottom, the boats I prefer are pre-pour in foam. We all have gathered our experience in certain areas so check out the thread by @classiccat . Although he doesn't like the title very much ;) 
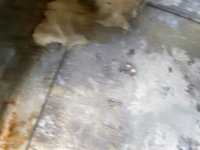
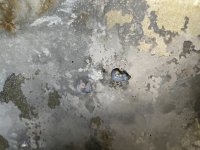
CC is the patch and corrosion specialist around here.
 

classiccat

"Captain" + Starmada Splash Of The Year 2020
Joined
Dec 20, 2010
Messages
3,405
Alright so, the pinholes that go thru I sprayed 50/50 vinegar water on them and was shocked to see a hole appear before my eyes. I thought I messed up big time. I feel like I’m going to have pinholes throughout the entire hull ifbi do this in all the places
Thanks @Watermann :ROFLMAO:

The dilute vinegar (Acetic acid) esp at that dilution is quite conservative & is simply dissolving the punky/corroded aluminum/aluminum-oxide; the pinholes were already there.

As @MNhunter1 recommends, After giving her a soap and water wash, I physically remove the aluminum oxide mechanically using an orange Nyalox cup brush, then dig out the stuff embedded in pinholes using a dremel, i'll chemically treat the aluminum if I'm going to backfill it &/or paint it.

I actually carefully (& w/ PPE) treated my problematic aluminum with more aggressive acids (phosphoric), follow it up with a chromate conversion and thoroughly rinse; surgical working in small areas and being careful not to allow the corrosive chemicals to get into a seam. West Systems has an aluminum etch kit (860) which has both PartA&B.

some pics of your worst areas would be helpful for us to recommend how to proceed.
 

matt167

Captain
Joined
Sep 27, 2012
Messages
3,690
I would have zero issue using something like alumiweld rods to fix the pin holes, or even one of the aluminum specific epoxies. And then gluevit and be done with it
 

BOYS & TOYS

Petty Officer 2nd Class
Joined
Mar 1, 2008
Messages
141
I found pin holes from corrosion in my 1968 Holiday too. Cleaned with nylon wheel then grinder with an aluminum bit. Holes were tig welded. Corroded aluminum is no fun to weld especially thin material.
 

87Starcraft

Petty Officer 2nd Class
Joined
Sep 15, 2021
Messages
108
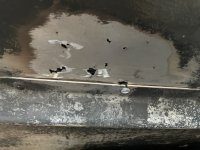
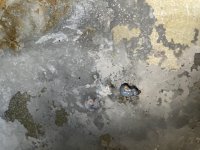
Here is holes from just running a nylon brush over corrosion
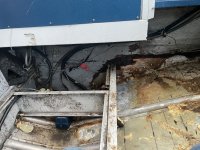
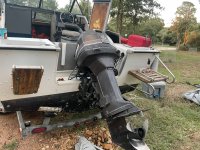
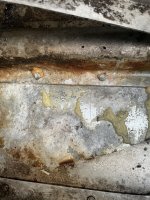
 

Attachments

  • B456718C-A716-4E54-BFAD-86FE86C039EB.jpeg
    B456718C-A716-4E54-BFAD-86FE86C039EB.jpeg
    3.5 MB · Views: 40
Status
Not open for further replies.
Top