


Reserector_
Chief Petty Officer" & 2021 Splash of the Year Win
- Joined
- Oct 15, 2019
- Messages
- 650
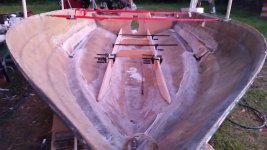
The places where you ground into the hull; were they all delaminated places?
On a different note, you might be able to put the shop vac in the tent while you grind, put the hose on the exhaust side, and run it out of the tent and under the garage door. A slight negative pressure will keep the dust from wandering out of the tent. It might also draw the tent toward you, but you get the idea.
On a different note, you might be able to put the shop vac in the tent while you grind, put the hose on the exhaust side, and run it out of the tent and under the garage door. A slight negative pressure will keep the dust from wandering out of the tent. It might also draw the tent toward you, but you get the idea.


 . That seems like a lot of cloth. Probably will have extra for a second rebuild ???


