1987 Power Play XLT-185 - floors, stringers, and upholstery

todhunter

Canoeist
Joined
Sep 15, 2020
Messages
1,243
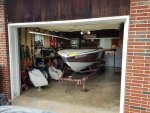
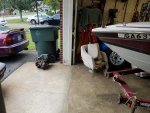
Well, here I am making my first post in a boat forum, and this post is in the resto/repair section, haha. Two weeks ago, my wife and I decided to start looking at boats with the hope of picking one up by next season. Naturally, I asked my brother (who is a boat guy) to be on the lookout for something that would fit what we were looking for. In less than 24 hours he had found me a boat that he wasn't going to let me walk away from, so I let him pick it up for me - a 1987 Power Play XLT-185 with a MerCruiser V8/260 and an Alpha One out drive, sitting on a Power Play trailer. The engine runs fine but it has a soft floor and the upholstery needs to be re-done. I got it for so cheap, I figure I can throw some money at the repairs and do them mostly myself and hopefully have a decent first boat on the water by next season, or if I dig into it and see that the repairs needed are too extensive, I can try to sell it again. I'm an engineer and love projects and learning new skills, but my wife is expecting to have a boat we can put on the water next season, so I am going to try to not let this drag on into eternity.

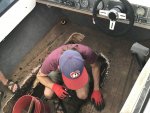
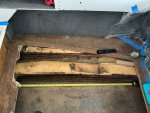
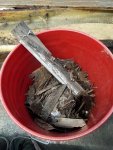
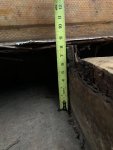
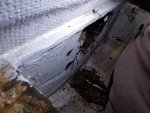
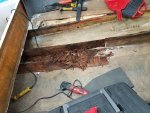
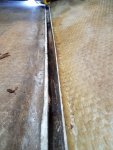
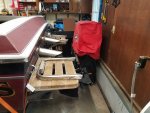
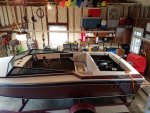
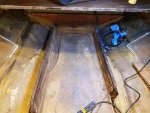
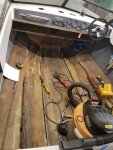
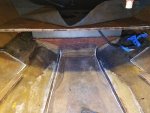
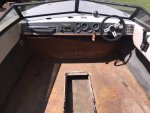
Last weekend I went down to my brother's house to lay eyes on what he spent my money on. The hull looks good but the floor was toast. The initial look at the transom and engine mounts look/feel/sound solid, but we haven't drilled into them yet. We cut most of the floor out and the stringers are also rotten surrounding the ski locker, but appear to become more solid under the dash. We have not looked at the stringers under/behind the bench seat yet to see where the rot stops. I was kind of surprised that the stringers were plywood with no fiberglass cap on them - the glass stops on the sides about 1" from the top of the stringer. The bottom of the floor/deck was also raw, un-fiberglassed wood.

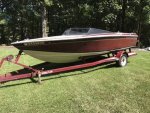
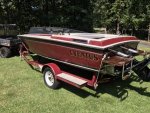
I'm going back down this weekend to do more deconstruction and hopefully get a full picture of the extent of the rot and make a game plan to fix it. I'm new to boats and fiberglass so hoping to learn from the folks in here. I've already been reading lots of good info here and elsewhere on the process. I attached some pictures of the boat from the CL ad.

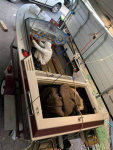
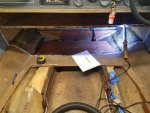
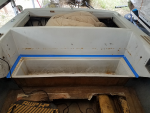
My hope was that we would be able to get away without pulling the cap if the rot is limited to the deck and only part of the stringers. After cutting out the floor, I looked back under the bench seat / cooler and the floor is not extremely rotten but not great there either. The bench seat / cooler is part of the cap, but my brother and I discussed potentially cutting out the lower portion consisting of just the cooler, and leaving the back-rest to not have to pull the cap. This could give us access to the rest of the deck and the portion of the stringers that are under there. Does anyone have any opinions on doing that vs. pulling the cap? I don't want to do a poor repair but I also want to see this thing on the water next summer.


UPDATE

The restored Power Play XLT was Launched on November 28, 2021. A video of the launch.


Attachments

  • photo339896.jpg
    photo339896.jpg
    34 KB · Views: 116
  • photo339897.jpg
    photo339897.jpg
    59 KB · Views: 112
  • photo339898.jpg
    photo339898.jpg
    58.2 KB · Views: 111
Last edited by a moderator:

todhunter

Canoeist
Joined
Sep 15, 2020
Messages
1,243
So this is the rear bench seat, with the cushion removed. It is part of the cap. The edge of the top of the "cooler" that forms the bottom of the bench seat has a 2" rim around the edge. In the picture attached, I've masked off halfway (1") inside this rim. My plan to avoid pulling the cap will be to cut out the cooler which will give me access to the decking/stringers/bulkhead that's underneath. By only cutting out the lower portion, I'm hoping this maintains enough structure in the cap to keep things in place. After repairing the structure underneath, I'd just glass the cooler back in. The seam would be visible only if you pulled up the lower cushion of the bench seat.

Has anyone done something similar? Am I crazy to cut this out instead of pulling the cap? I just think it would be so much less work to do it this way and would still give me access to everything I need. The only thing I think that may put me over the edge and make me want to pull the cap would be if the transom was rotten. We haven't drilled into it yet, but it feels very solid.
 

Attachments

  • photo339949.png
    photo339949.png
    769.8 KB · Views: 60

Baylinerchuck

Commander
Joined
Jul 29, 2016
Messages
2,726
I’m not a fan of pulling the cap for a few reasons, but I understand that it’s 100% necessary in some boats. Unless the boats been restored in the past, the transom core is most likely rotten as are the stringers and related structure. It is a 1987 after all.

If you can access everything you need to to make the proper repairs, I see no reason to pull the cap. If not, then there’s your answer.

Good luck getting started, keep us posted.
 

todhunter

Canoeist
Joined
Sep 15, 2020
Messages
1,243
Yep, I'm starting to be of the same mindset - not pull the cap unless absolutely necessary. I'll know more this weekend. My brother says it looks like the transom was replaced in the past, so maybe there's hope, but I'm going to drill a core sample this weekend to be sure.

I feel like I've gone through the phases pretty quickly - denial and now acceptance. I'm just ready to start making dust and huffing fumes (with proper PPE, of course).
 

Baylinerchuck

Commander
Joined
Jul 29, 2016
Messages
2,726
Yeh, I think everyone that’s posted a project in this section of the forum has gone through those same thoughts or emotions......the, “well maybe it’s not so bad”, to the “maybe I’ll only have to replace x”, to invariably, gut it all!!

It happens. But I agree, if you don’t have to pull the cap, don’t. Leaving the cap on will help ensure the hull doesn’t get deformed when putting in the structure or making repairs. If you do have to pull the cap, you’ll want to make a cradle to keep the hull’s original shape. Allowing the hull to flex will cause issues later when trying to line the cap back up.
 

todhunter

Canoeist
Joined
Sep 15, 2020
Messages
1,243
Got some more work done on the boat this weekend and was a little surprised at the construction. I fully expected the stringers to be one piece of wood all the way back to the transom, but to my surprise, the stringers (at least the inner two) stop at the bulkhead under the cooler that form the front of the bilge. This bulkhead appears to be a continuous piece of wood that spans the width of the boat. I would have thought it was the other way around.

Anyhow, we de-skinned the two inner stringers from under the captain's chairs all the way back to the bulkhead that forms the front of the bilge and the wood literally just crumbled out. The channel where the stringers sat is cleaned out and should make a nice place to bed the new stringers. It appears that water intrusion through the ski locker, and the fact that the stringers were not capped in fiberglass were the cause for this rot. The outer two stringers are still in relatively good shape. At this point, we are planning to leave those in place, inject epoxy in one small area, and cap them with fiberglass.

We also cut out a good portion of the bulkhead at the front of the bilge where it was rotten. The majority of this rot appears to be from the drain hole in the fiberglass cooler draining on the poorly protected end grain of the plywood that forms the bulkhead. Now we have a neat view of the bottom of the engine and bilge from in front of the cooler. :)

We discovered that in the bow, the deck and the stringer stop about 18 inches forward of what I'm calling the kick panel. The portion of the stringers up there looks good, but it would be a shame to only leave that much of the original stringer up there, so we started cutting out the kick panel to remove the rest of the deck and stringers in the front of the boat. Forward of where the stringers end is a bulkhead, and forward of that is the fuel tank. I've read that in these boats there is only foam under the fuel tank, so we're planning to leave that alone.

I bought an oscillating multi-tool last weekend to do the cutting. It works fantastic, but blade life is super short. Thinking it was just the cheap blade the came with the tool (Bauer / Harbor Freight), I paid $45 for three Bosch blades at Home Depot yesterday, but ended up smoking all those blades in less than a day. I didn't feel like the Bosch blades lasted any longer than the Bauer one. I ordered a 10-pack of blades on Amazon today for $15, so hopefully that will be a better deal, even if they don't last as long. All blades I've used so far are bi-metal, and not specifically wood blades.

After digging out the bulkhead at the front of the bilge, it looks like the side walls of the bilge (what I thought would be part of the stringer) have some rot, at least at the forward part of the bilge. We will investigate this further next weekend. We did pull the lag bolts for one of the engine mounts and it was dry. We stuck q-tips down in the holes and they came out dry. So that may be a good sign. I think we may be able to handle any rot in front of the engine mounts without pulling the engine, but my gut is telling me the engine is going to have to come out.

fetch

This is after we started pulling up the decking around the ski locker by hand.

fetch
Exposed stringers after we cut away more of the deck.

fetch
This shows how rotten the inner stringers are.

fetch
A bucket full of rotten deck and stringers.

fetch
Bulkhead at the front of the bilge / back of the cooler (view from the bilge side). You can see where the cooler drain started the rot.

fetch
The stringer's wood just crumbled after de-skinning.

fetch
The channel left behind after digging all the rotten wood out for the inner stringer.

fetch
Kind of hard to see what's going on here - this is one of the inner stringers where it ends against the bulkhead under the cooler (you can see the engine mount in the background).

fetch

Me starting to cut out the kick panel so we can get the remaining deck and stringers out of the bow.
 

Attachments

  • photo340157.jpg
    photo340157.jpg
    190.5 KB · Views: 625
  • photo340158.jpg
    photo340158.jpg
    191.5 KB · Views: 620
  • photo340159.jpg
    photo340159.jpg
    194 KB · Views: 610
  • photo340160.jpg
    photo340160.jpg
    195.8 KB · Views: 595
  • photo340161.jpg
    photo340161.jpg
    195 KB · Views: 616
  • photo340162.jpg
    photo340162.jpg
    192.4 KB · Views: 602
  • photo340163.jpg
    photo340163.jpg
    194.9 KB · Views: 600
  • photo340164.jpg
    photo340164.jpg
    189.2 KB · Views: 595
  • photo340166.png
    photo340166.png
    891.1 KB · Views: 606
Last edited:

todhunter

Canoeist
Joined
Sep 15, 2020
Messages
1,243
So I'm a complete newbie with boat construction. My boat is a 1987, and I noticed that most of the fiberglass in the boat (hull, transom, stringer tabbing, bulkhead tabbing, etc) looks like it's woven roving. In the videos I've been watching on YouTube for restoration, it looks like most folks are using 1708 for structural. Is 1708 a newer development, or is it just cheaper to use woven roving, or something else?
 

kcassells

Fleet Admiral
Joined
Oct 16, 2012
Messages
8,598
1708 will take you where you need to go. I suspect you are using poly so that's what you want to use.
Woven is heavy and sucks up way to much glue. 1708 has the strength also.
Hows the transom?
 

todhunter

Canoeist
Joined
Sep 15, 2020
Messages
1,243
Yes, I'm planning on using 1708...really I was just wondering why the original builders used roving instead - was it a cost thing or was it because 1708 wasn't around in 1987? And yes, I'm going to use polyester resin.

I haven't taken a core sample from the transom yet - may do that this weekend. We did pull the lag bolts out of one of the engine mounts and the wood in there looked good. The boat is currently 2 hours away from me at my brother's house...I'll be moving it to my place in the coming weeks.
 

Baylinerchuck

Commander
Joined
Jul 29, 2016
Messages
2,726
Yep, saw a bit of roving in my boat too. If you look though, there is chop sprayed throughout which is the binder that poly resins need for strength. The roving was usually hand laid on top of that. 1708 is pretty much our version of that same formula. CSM face down as the binder, with biaxial cloth for strength. Most of us backyard boat restorers and builders don’t have chop guns, and honestly that’s sloppy work. We prefer the much nicer easier to work with 1708.
 

todhunter

Canoeist
Joined
Sep 15, 2020
Messages
1,243
The boat is home and tucked safely in the climate controlled garage, which will let me continue fiberglass work through the cold months. It's a tight fit! Thankfully my trailer was built (modified?) to allow the tongue to be removed, or else it wouldn't fit. I ended up just replacing the entire hub on both sides of the trailer and took the best parts that were removed to make a spare. Before I get back on ripping the rest of the floor out, I've got to put up some more lighting in the garage and figure out some way to add plastic draping to minimize the spread of fiberglass dust to the washer/dryer area of the garage.

fetch

Boat in the garage.


fetch

Inches to spare between the swim deck and the welder.


fetch

About 12-18 inches between the bow and the garage door.


fetch

Another shot of it in the garage.


fetch

The tongue on my trailer unbolts, allowing me to get the rest of the trailer/boat in the garage with the door shut.
 

Attachments

  • photo340498.jpg
    photo340498.jpg
    166.8 KB · Views: 569
  • photo340499.jpg
    photo340499.jpg
    172.2 KB · Views: 564
  • photo340500.jpg
    photo340500.jpg
    169.5 KB · Views: 557
  • photo340501.jpg
    photo340501.jpg
    163.8 KB · Views: 555
  • photo340502.jpg
    photo340502.jpg
    168.4 KB · Views: 553

Baylinerchuck

Commander
Joined
Jul 29, 2016
Messages
2,726
That’s pretty neat, though 12 bolts to loosen or tighten. Might want to install a jack stand or blocking under the trailer frame opposite the jack. Looks like it could twist.
 

todhunter

Canoeist
Joined
Sep 15, 2020
Messages
1,243
That’s pretty neat, though 12 bolts to loosen or tighten. Might want to install a jack stand or blocking under the trailer frame opposite the jack. Looks like it could twist.
Good call - I did end up supporting the other side with a jack stand shortly after the picture was taken.
 

Baylinerchuck

Commander
Joined
Jul 29, 2016
Messages
2,726
Good call - I did end up supporting the other side with a jack stand shortly after the picture was taken.

:sneakiness: sweet, yeah the frame seemed be sagging slightly since the main beams weren’t tied together. I usually store mine with the weight on a jack stand instead of the trailer jack. Makes it much more sturdy when climbing in and out of the boat.
 

todhunter

Canoeist
Joined
Sep 15, 2020
Messages
1,243
I was hoping to do some actual work on the boat today, but I think I'm going to be consumed with a run to the hardware store and building some shelving in the gables of my garage to store interior pieces and other things.
 

kcassells

Fleet Admiral
Joined
Oct 16, 2012
Messages
8,598
Plan it out, get the goods and good to start when you have parts and stuff ready to go.
 

todhunter

Canoeist
Joined
Sep 15, 2020
Messages
1,243
More cutting tonight. I got the "kick board" out in one piece from under the dash, and pulled up the remaining front part of the rotten inner stringers and deck that was under the dash. I also dug out the foam that was under this area. The stringers and deck stop at the bulkhead that is just aft of the fuel tank. I'll start working toward the stern later this week.

fetch

The "kick board" from under the dash removed. Not sure why someone cut the access hole in the past. I'm going to try and re-use this piece.


fetch

The area where the kick board was. You can see the remainder of the deck in the front as well as the bulkhead that's just aft of the fuel tank.


fetch

Deck removed, stringers remain.


fetch

Stringers cut out.


fetch

Current status. This is as far forward as I plan on cutting.
 

Attachments

  • photo340614.jpg
    photo340614.jpg
    196.9 KB · Views: 605
  • photo340615.jpg
    photo340615.jpg
    196.1 KB · Views: 559
  • photo340616.jpg
    photo340616.jpg
    197 KB · Views: 549
  • photo340617.jpg
    photo340617.jpg
    197.3 KB · Views: 559
  • photo340618.jpg
    photo340618.jpg
    192.1 KB · Views: 553
Top