1987 Power Play XLT-185 - floors, stringers, and upholstery

todhunter

Canoeist
Joined
Sep 15, 2020
Messages
1,316
I've been measuring and sketching for the last several days and finally think I've got enough measured to at least know how much wood to buy. I'm going to buy AuracoPly plywood, as there is a supplier ~1.5 hours from me. I'm planning to buy 4 sheets of 3/4" and 4 sheets of 1/2". I should be able to fit everything on 3 sheets of each, with an extra sheet in each thickness in case I screw something up. I'm planning to replace 5 stringers, 1 bulkhead, ski locker floor, decking, engine mounts, and transom. I'm leaving the forward bulkhead and decking over the fuel tank in the bow, as there was no rot or water in that. As of right now, the plan is to start de-skinning the transom tomorrow evening.

Next up is taking a wag at how much resin and cloth I want to buy. I'm sure I'll be bouncing my thoughts off of yall regarding that in the coming days.

Just one of many sketches I've made over the last several days.
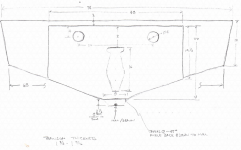
Clipboard01.png
 

Baylinerchuck

Commander
Joined
Jul 29, 2016
Messages
2,726
I used just under 20 gallons on my restoration of my 20’ Chaparral. But no restoration is the same.
 

PC on the Bayou

Petty Officer 1st Class
Joined
Apr 27, 2020
Messages
234
Nice progress so far. I am lucky to have a somewhat local source for the glass and resin. So I bought my estimated CSM, 1708, and 10 gallons of resin knowing if I need more I can get it quickly.
 

Baylinerchuck

Commander
Joined
Jul 29, 2016
Messages
2,726
Nice progress so far. I am lucky to have a somewhat local source for the glass and resin. So I bought my estimated CSM, 1708, and 10 gallons of resin knowing if I need more I can get it quickly.

That’s the best way to do it, getting a little at a time. The resin has a limited shelf life. It’s good you have a local source.
 

PC on the Bayou

Petty Officer 1st Class
Joined
Apr 27, 2020
Messages
234
That’s the best way to do it, getting a little at a time. The resin has a limited shelf life. It’s good you have a local source.
Yes it is good. Shipping with Hazmat fees is expensive. I was just telling my wife that I will be going back for more soon.

Another good thing is it doesn't hit the checkbook hard all at once. It makes it less noticable how much the project actually costs (which BTW is still cheaper than a new boat). I learned a long time ago not to try to keep up with project costs 😂🤣😂
 

todhunter

Canoeist
Joined
Sep 15, 2020
Messages
1,316
Thanks for the props on the progress. Thanks to the guys who posted their threads/videos/etc that have done this before and made it seem less daunting.

I've got a local source, but they only sell 1708 by the full roll - more than I'll need. And their 5 gallon bucket of resin is $170 each vs. $130 each from US Composites. Even with freight shipping the quote I got from US Composites comes out a little cheaper. If I get in a pinch though, I should be able to go grab resin locally. I think I'm just going to buy 10 gallons of resin from US Composites to start with and maybe buy any additional resin I need locally.
 

Reserector_

Chief Petty Officer" & 2021 Splash of the Year Win
Joined
Oct 15, 2019
Messages
609
Just in case nobody mentioned it, you want laminating (unwaxed) resin. No need to sand and acetone between applications because the surface stays sticky until you seal it so that the air can't get to it. Doesn't matter if it just cured, or if it's been weeks. Fresh resin reactivates the surface.
After your final coat, you can spray or brush some mold release on it to cure the surface. The mold release washes off with water.
 

todhunter

Canoeist
Joined
Sep 15, 2020
Messages
1,316
Just in case nobody mentioned it, you want laminating (unwaxed) resin. No need to sand and acetone between applications because the surface stays sticky until you seal it so that the air can't get to it. Doesn't matter if it just cured, or if it's been weeks. Fresh resin reactivates the surface.
After your final coat, you can spray or brush some mold release on it to cure the surface. The mold release washes off with water.
So you would recommend the mold release over the wax additive for the final coat of resin? I had planned on unwaxed resin and some kind of curing method (wax, waxed gelcoat like boatworkstoday uses, or PVA).

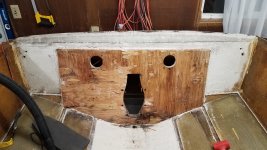
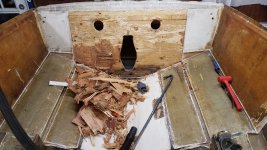
I started on the transom today and got further than I thought. I haven't de-skinned the entire width - I started with just the smaller piece. I was surprised to see less rot than I was expecting, but I wouldn't have been happy to replace all the rest of the wood and not the transom. I've actually made pretty good progress tonight in getting the majority of the smaller inner transom board off. Since the transom isn't totally gone, the wood is still pretty strong and tough to remove. I hope to keep making progress on digging out the transom through the rest of the week and weekend.

Fiberglass skin removed from the inside of the transom:
20201111_180852.jpg

Progress I've made tonight - most of the inner plywood is removed except for the lower left corner in this picture.
20201111_195819.jpg
 

Baylinerchuck

Commander
Joined
Jul 29, 2016
Messages
2,726
Most people top coat the resin with something, be it paint or gelcoat. If you apply wax to the resin, you’ll need to remove it prior to top coating. Use only unwaxed resin is my advice.
 

Reserector_

Chief Petty Officer" & 2021 Splash of the Year Win
Joined
Oct 15, 2019
Messages
609
I didn't want to dedicate a particular amount of resin to finish-coating only.
I finished most of mine with waxed gelcoat, but later learned that gelcoat needs a good bit more hardener to make it kick. Some of mine stayed sticky until I brushed some release on it.
 

PC on the Bayou

Petty Officer 1st Class
Joined
Apr 27, 2020
Messages
234
Not sure what you're using to remove the wood (I assume a wood chisel); but once you get down pretty close, a rotary sander / grinder with some 36 grit pads will make pretty quick work of the remaining wood.
 

todhunter

Canoeist
Joined
Sep 15, 2020
Messages
1,316
Not sure what you're using to remove the wood (I assume a wood chisel); but once you get down pretty close, a rotary sander / grinder with some 36 grit pads will make pretty quick work of the remaining wood.
Yes, I'm using pry bars and chisels right now. Once I start getting close to the outer layer of fiberglass on the hull I planned to switch to a grinder with 40 grit flap discs.
 

Reserector_

Chief Petty Officer" & 2021 Splash of the Year Win
Joined
Oct 15, 2019
Messages
609
I used a Harbor Freight Belt sander with 36 grit belts. Quick, flat, and MUCH less flying dust. Especially if you tape a length of vacuum cleaner hose to the port where the dust bag is supposed to go. It will blow the dust right through the hose. Toss the hose end out through the keyhole and get after it.
20191012_101345.jpg
 

todhunter

Canoeist
Joined
Sep 15, 2020
Messages
1,316
I used a Harbor Freight Belt sander with 36 grit belts. Quick, flat, and MUCH less flying dust. Especially if you tape a length of vacuum cleaner hose to the port where the dust bag is supposed to go. It will blow the dust right through the hose. Toss the hose end out through the keyhole and get after it.
View attachment 328890
I may try that. I've got a Ryobi belt sander. Thanks for the idea.
 

todhunter

Canoeist
Joined
Sep 15, 2020
Messages
1,316
Just in case nobody mentioned it, you want laminating (unwaxed) resin. No need to sand and acetone between applications because the surface stays sticky until you seal it so that the air can't get to it. Doesn't matter if it just cured, or if it's been weeks. Fresh resin reactivates the surface.
After your final coat, you can spray or brush some mold release on it to cure the surface. The mold release washes off with water.
Also - by "mold release", are you talking about PVA?
 

todhunter

Canoeist
Joined
Sep 15, 2020
Messages
1,316
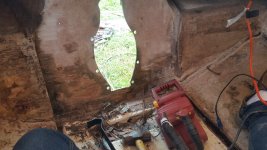
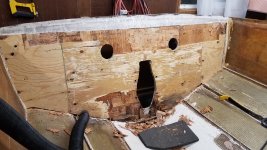
More transom progress today. I de-skinned the outer edges and started pulling the bigger layer of plywood off. I set my circular saw depth to ~0.670" (after a few test passes) and this gets me through all but the last ply of the wood. I've made a cut across the top and knocked the bulk of the wood out there, and started experimenting with chiseling the last ply of wood out between the thru-hull exhaust holes. I did dig into the glass a little at the top edge of the transom and at the bottom of the keyhole, but not too bad. I also dug out some of the rotten area at the bottom. I'll probably make a grid of cuts tomorrow evening. It's going to take some work, but I think I'll have the bulk of the wood removed in a week or less and then be ready for grinding/sanding.

20201112_195318.jpg
 

PC on the Bayou

Petty Officer 1st Class
Joined
Apr 27, 2020
Messages
234
Just curious. The ply on the ends was just deskinned? It looks pretty clean; so, I was wondering if the glass skin just wasn't laminated to the wood or what.
 

todhunter

Canoeist
Joined
Sep 15, 2020
Messages
1,316
Just curious. The ply on the ends was just deskinned? It looks pretty clean; so, I was wondering if the glass skin just wasn't laminated to the wood or what.
Correct - just de-skinned last night. I don't think they pre-saturated the wood with resin or something. After getting a pry bar behind it, it popped off pretty easy except the only tough part was along the top edge where the end grain of the plywood is.
 

todhunter

Canoeist
Joined
Sep 15, 2020
Messages
1,316
I'm trying to plan out how many yards of CSM and 1708 to buy. Any suggestions or changes I should make to my list below?

Transom
Back side - 3-4 layers of CSM (like Reserector did)
Front side - 1 layer CSM to cover entire face (does there need to be 1708 on the face?)
Tabbing - 6" of 1708 and 10" of 1708 all around

Stringers & Bulkheads
Tabbing - 6" of 1708 and 10" of 1708 all around
Capping - 1 layer of 1708
Bulkheads - if big enough, a layer of CSM to cover the center

Decking
Bottom side - 1 layer of CSM
Top side - 1 layer of CSM (should I add more CSM and/or some 1708?)
Tabbing - 6" of 1708 and 10" of 1708 all around
 
Top