1981 Sportcraft 270 repair underway - transom, stringers, & repower

Status
Not open for further replies.

kcassells

Fleet Admiral
Joined
Oct 16, 2012
Messages
8,715
Yup that is the construction of boats on a production line. These here fellers will keep you up to the best reconstruction options you will need. Take it all in and from that you can access your own approach for the final project.
Live and learn, ask , question, doubt, reform ideas to make your boat the best it will ever be. Beating a production line boat build is really not too hard to do. Your grandkids will be able to enjoy the ride along time.
 

WalleyeSniper

Petty Officer 2nd Class
Joined
May 15, 2018
Messages
108
Yup that is the construction of boats on a production line. These here fellers will keep you up to the best reconstruction options you will need. Take it all in and from that you can access your own approach for the final project.
Live and learn, ask , question, doubt, reform ideas to make your boat the best it will ever be. Beating a production line boat build is really not too hard to do. Your grandkids will be able to enjoy the ride along time.
Something that really confuses me, is layup schedule for the transom and stringer tabbing. Tell me what you think:

Transom Plan
- rear skin
- 3oz CSM
- 3/8 marine ply
- 3oz CSM
- 3/8ply
- 3oz CSM
- 3/8 ply
- layer of 1708
- tabbing out to 12"
- layer of 1708
- tabbing out to 9"
- tabbing out to 6"


Stringer Plan
- not sure what the best design schedule is, but I think I'm going to tab with 12", then 9", then 6". I'm just having trouble coming up with a good schedule for strength, plus capping in the riser sections for the deck support.

Somewhere I was reading that 3" tabbing increments are the best of both world's between strength and adhesion to the hull floor. But I can't remember where.

Anyone have any good suggestions or ideas, or that can correct or guide my line of thinking pin my tabbing plans thus far?
 

kcassells

Fleet Admiral
Joined
Oct 16, 2012
Messages
8,715
Something that really confuses me, is layup schedule for the transom and stringer tabbing. Tell me what you think:

Transom Plan
- rear skin
- 3oz CSM
- 3/8 marine ply
- 3oz CSM
- 3/8ply
- 3oz CSM
- 3/8 ply
- layer of 1708
- tabbing out to 12"
- layer of 1708
- tabbing out to 9"
- tabbing out to 6"


Stringer Plan
- not sure what the best design schedule is, but I think I'm going to tab with 12", then 9", then 6". I'm just having trouble coming up with a good schedule for strength, plus capping in the riser sections for the deck support.

Somewhere I was reading that 3" tabbing increments are the best of both world's between strength and adhesion to the hull floor. But I can't remember where.

Anyone have any good suggestions or ideas, or that can correct or guide my line of thinking pin my tabbing plans thus far?
3" and 6" for tabbing to hull is good. Wet out all wood and voids prior to glassing and let dry. Otherwise the wood sucks the resin out of the glass if you don't.
1708 is perfect. It already has a csm backing. Cut out moon on bottom of transom where your drain plug will go. After installed that area will be filled with hairy peanut butter and drilled out to fit you drain fixture, Gaboard plug.
Their is some info in the stickys above the forum.
 

todhunter

Canoeist
Joined
Sep 15, 2020
Messages
1,308
3 layers of tabbing seems excessive to me, but if you've got the time, materials, and desire, go for it. I did 2 layers. I also have a strong preference for doing as much wet-on-wet layup as possible. Wet-on-wet is doable with 2 layers of tabbing...with 3 layers things might start to get away from you with regards to having your layup start kicking.

I think regardless of how you do it, you should encapsulate the transom wood outside of the boat, attach it to the boat, then tab it in.

Regarding tabbing widths, if you're laying your widest tabbing down first, that's the only layer that's going to adhere to the hull - the other layers will just be adhering to the layer of tabbing beneath them. So the change in width per layer is probably less critical.

I think you're probably overthinking it. I did when I started mine. Once you actually start laying glass, you start to figure out what works and what doesn't, and some of your plans for layup schedules will likely change.
 

kcassells

Fleet Admiral
Joined
Oct 16, 2012
Messages
8,715
On your tabbing the 1st pc should come out @ 3" the next pc. overlaps so @6"
Wet on wet is the best chemical bond period. The next technique is called mechanical bonding. The glues and glass we use today were not the same as 10 yrs ago. It takes some time to get the feel for that. Their is no issues doing anothe layer the next day or so as long as you scuff it up and acetone wipe then apply the next glass.
Personally I like wet on wet and its a learning curve for timeing and bubbles etc.
Practice on some ply and also make up some hairy pb so you get use to it. Pb can be made to such a texture that it can be worked upside down. Don't fret it....it all comes together sooner than later.
Cheers!
 

WalleyeSniper

Petty Officer 2nd Class
Joined
May 15, 2018
Messages
108
3 layers of tabbing seems excessive to me, but if you've got the time, materials, and desire, go for it. I did 2 layers. I also have a strong preference for doing as much wet-on-wet layup as possible. Wet-on-wet is doable with 2 layers of tabbing...with 3 layers things might start to get away from you with regards to having your layup start kicking.

I think regardless of how you do it, you should encapsulate the transom wood outside of the boat, attach it to the boat, then tab it in.

Regarding tabbing widths, if you're laying your widest tabbing down first, that's the only layer that's going to adhere to the hull - the other layers will just be adhering to the layer of tabbing beneath them. So the change in width per layer is probably less critical.

I think you're probably overthinking it. I did when I started mine. Once you actually start laying glass, you start to figure out what works and what doesn't, and some of your plans for layup schedules will likely change.

Yeah, I think I'm just overthinking it and too worried about under-building on anything, so I go overboard with overbuilding it 😆.

I like the idea of encapsulating the wood and THEN attaching it at one shot and tabbing it. I was worried about 3 layers being too much and causing it to get too hot (which I've heard can cause weak spots in laminates) so looks like 6" and 3" tabs it is.
 

WalleyeSniper

Petty Officer 2nd Class
Joined
May 15, 2018
Messages
108
On your tabbing the 1st pc should come out @ 3" the next pc. overlaps so @6"
Wet on wet is the best chemical bond period. The next technique is called mechanical bonding. The glues and glass we use today were not the same as 10 yrs ago. It takes some time to get the feel for that. Their is no issues doing anothe layer the next day or so as long as you scuff it up and acetone wipe then apply the next glass.
Personally I like wet on wet and its a learning curve for timeing and bubbles etc.
Practice on some ply and also make up some hairy pb so you get use to it. Pb can be made to such a texture that it can be worked upside down. Don't fret it....it all comes together sooner than later.
Cheers!
Wet on wet seems to be what everyone suggests as the golden standard and the only way to go. So I'll be doing as much wet on wet as permitted. Thanks for the sticky thread, that had a lot of great info in it!

I finally found an awesome grinding disc for effortless grinding too! It's a 4.5" carbide "shaping disc" used for shaping stone and wood. It got rid of those hard areas in no time.

As for tabbing, I had a guy explain to me that tabbing small to large will actually cause problems when grinding down, because it leaves the tops of the bent laminate areas (that extend over one another) getting knocked down thin and that leaves the point of adhesion being pointless. I'll see if I can find the drawings and explanations he posted somewhere, to try and better illustrate what he was saying so you can see what your thoughts on it are.
 

WalleyeSniper

Petty Officer 2nd Class
Joined
May 15, 2018
Messages
108
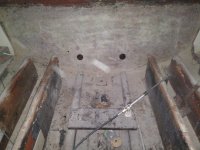
Well, got down to bare skin on my transom in no time, thanks to a little "carbide shaping disc" from Harbor Freight. Best $10 I've ever spent, it is really aggressive for those thick peanut better areas and skim layers of wood.

20210804_211303.jpg
Back transom down to glass. Some slightly low spots and some slightly higher now.

The amount of dust is absolutely INSANE! 😆

Can old fiberglass grinding dust be used for Peanut butter??? I have tons of cabosil, polyfiber II, and glass strand filler. But, just kinda had a random thought wondering if glass dust can be used for thickening.
 

WalleyeSniper

Petty Officer 2nd Class
Joined
May 15, 2018
Messages
108
On your tabbing the 1st pc should come out @ 3" the next pc. overlaps so @6"
Wet on wet is the best chemical bond period. The next technique is called mechanical bonding. The glues and glass we use today were not the same as 10 yrs ago. It takes some time to get the feel for that. Their is no issues doing anothe layer the next day or so as long as you scuff it up and acetone wipe then apply the next glass.
Personally I like wet on wet and its a learning curve for timeing and bubbles etc.
Practice on some ply and also make up some hairy pb so you get use to it. Pb can be made to such a texture that it can be worked upside down. Don't fret it....it all comes together sooner than later.
Cheers!

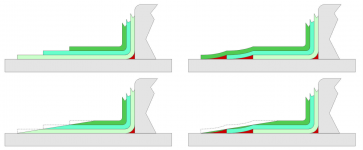
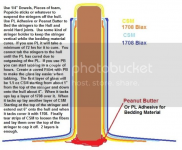
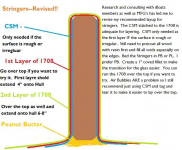
This the original thread and link to the conversation on tabbing that I was referring to from another site


I think the area pointed out that made me consider wider to smaller tabbing schedules, was the explanation about how the smaller to larger method becomes weaker if having to go back in and knock off edges or sand and etc - because it shaves off the bent corners of the overlapping layer on top, thus leaving only the bottom shortest layer for adhesion.

Then again, I'm not a professional boat builder so I'm not sure what the absolute best way is to go about it anyways, lol. Just sharing my thoughts and trying to see what others' opinions are.

Screenshot_20210804-235607~2.png
This was an illustration that caught my attention.
 

zool

Captain
Joined
Aug 19, 2012
Messages
3,432
Old glass dust usually contains contaminants, which can affect bonding, so its shied away from.
 

WalleyeSniper

Petty Officer 2nd Class
Joined
May 15, 2018
Messages
108
Old glass dust usually contains contaminants, which can affect bonding, so its shied away from.
Makes total sense. I had just had kind of a random thought while that stuff was flying through the air and thought "wow, this stuff floats like cabosil!". Then just kinda wondered if people used it like that.

Guess I'll be sticking to my cabosil and Polyfiber, lol.
 

WalleyeSniper

Petty Officer 2nd Class
Joined
May 15, 2018
Messages
108
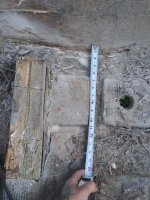
Does anyone know what these pads are for, next to either side of the rudder port? They come off of the engine stringers, but waayyyy aft of the inboard engine or trans, and are just kinda "there". I'm sure there's a reason, but I can't seem to figure out what they're for?

20210804_195647.jpg

20210804_195635.jpg
 

kcassells

Fleet Admiral
Joined
Oct 16, 2012
Messages
8,715
They can be used for thru hull fixtures like a seacock assembly or simply used to mount other things like bilge pumps, water pump. They are encapsulated pcs. of wood.
Typically cause you don't want to drill into the hull.
 

todhunter

Canoeist
Joined
Sep 15, 2020
Messages
1,308
This the original thread and link to the conversation on tabbing that I was referring to from another site


I think the area pointed out that made me consider wider to smaller tabbing schedules, was the explanation about how the smaller to larger method becomes weaker if having to go back in and knock off edges or sand and etc - because it shaves off the bent corners of the overlapping layer on top, thus leaving only the bottom shortest layer for adhesion.

Then again, I'm not a professional boat builder so I'm not sure what the absolute best way is to go about it anyways, lol. Just sharing my thoughts and trying to see what others' opinions are.

View attachment 347165
This was an illustration that caught my attention.
While that's probably true, who grinds/sands down the edges of their tabbing? I think there's arguments for both ways, but I just went with smallest first, as it made the most sense to me.
 

JASinIL2006

Vice Admiral
Joined
Feb 10, 2012
Messages
5,673
While that's probably true, who grinds/sands down the edges of their tabbing? I think there's arguments for both ways, but I just went with smallest first, as it made the most sense to me.

Same here, smallest first, then larger layers of tabbing. Two or three layers, probably doesn't matter much. Three certainly won't hurt.

For the transom, you can put fiberglass and resin between layers of plywood, but using an waterproof adhesive like Titebond III will be just as good; when dry, it will equal or exceed the glue tolerances used to make exterior or marine plywood. Then the whole piece can be encapsulated and installed.
 

WalleyeSniper

Petty Officer 2nd Class
Joined
May 15, 2018
Messages
108
They can be used for thru hull fixtures like a seacock assembly or simply used to mount other things like bilge pumps, water pump. They are encapsulated pcs. of wood.
Typically cause you don't want to drill into the hull.
Ahhh, ok, makes sense now. I guess that would be a great place for a bilge pump of raw water intake to go (instead of the thinner normal parts of the hull like they are now). You think I should relocate them? Or, just build plates/pads at their current places they were installed previously so I don't have to try and close up the hull/old holes? Lol
 

WalleyeSniper

Petty Officer 2nd Class
Joined
May 15, 2018
Messages
108
While that's probably true, who grinds/sands down the edges of their tabbing? I think there's arguments for both ways, but I just went with smallest first, as it made the most sense to me.
These were the explanations given to me below (these were all questions I had asked because I was really trying to get my head around both explanations and see where everyone was coming from because it's such a highly debated topic).

Q: when do you grind down tabbing anyways?
A: There are plenty of regions you need grind down tabbing, such as when prepping for bilge paint, epoxy to get rid of blushing, recoats of paint in the future, and others. We're talking extremely thin layers of cloth make up the tabbing, so even slight scuffings are taking material away from the overlapping tab bends where they're already having trouble (albeit small) and creating a weak point in the tabbing.

Q: But isn't it better to have more security by having more layers contact the original hull!?
A: Your mind would tell you that, but when the tabbing is overlaying itself at 90degree bends, you're creating small air pockets and resin rich areas that will be extremely brittle. Whereas with the biggest layer first, you have more square MM for square MM solid contact, while you're also avoiding resin rich lines at the end of each tab if running small to large. If you are worried about delaminations and expecting smaller subsequent sections of other layers to hold on, you're in for a bad time. If your prep work is solid and correct, delamination won't be an issue anyways. If you slip up and don't prep correctly, it doesn't matter what type of tabbing layup is on there, they'll all delaminate.

Q: But... wouldn't the forces translate better going from small to large, like, help with the attempted torsional twist or bending and popping of the stringer?
A: No. When using small to large, you're essentially cutting away the overall length of your tabbing strength, and relying on one layer at a time for each layer's end that sticks past one another because the force is wanting to pull up, not really torsional or torquing forces. The force of supporting the stringer will come from each layer above, sharing some force load from the layer below. If they're overlapped small to large, you're relying on only small strip taking the brunt of the load first, and transferring leftover energy directly above it, which the next layer is now relying only on the small section at its end trays only a couple inches longer to hang onto the hull, and so on. With larger tabs first, the length of the first layer has much larger complete and unbroken bond with the hull - because there's no weak, brittle, resin rich lines to contend with - and it transfers the upward pulling load progressively back into the bulk of the thickest part of the lamination at the base of the stringer and fillets. You also need to consider that manufacturers are moving like an assembly line and many are not hand laid jobs with the utmost of care. Some guy may be having a bad week and spray too much or too little resin. He may be careless on the application of the cloth, or may just overall trying to rush. This is another reason for large to small, because of the adhesion points I told you about earlier with more surface area being in contact with the hull. These guys are laying brand new glass on brand new hulls that haven't been battered, and tons of years of inconsistencies that may pop a tab from the hull's floor even if doing a crappy job.

Q: Well, when are each methods more preferred over one another then?
A: There's a reason that the largest prominent builders/companies use largest to smallest tabbing, and most of it is dictated by experience and countless dollars of engineering and testing. There are a lot of articles and results on this very issue in Boat Builder Magazine. But, and this is a big but, both methods are used in various situations and methods of laying glass. Remember though, these are brand new glass and materials being put onto brand new hulls that need zero prep and are virtually wet on wet or wet on tacky installs. So for stringers, it's almost exclusively largest to smallest tabbing, unless they're using a vacuum system to eliminate the resin rich lines and air pockets where subsequent larger layers overlap when going from small to big. Also, composite stringer versus wood stringer has a factor too. When using wider bulky composites, or relying solely on glass and knowing the internal stringer will not rot away or become weakened due to possible water entry, small to big is used almost exclusively in addition to the tabbing being much larger for the exact reasons you mentioned before - because the extra layers will grab as security layers, since not having to rely on solely the tabbing alone in the event the stringer rots away or is compromised by water intrusion like with wooden stringers. With the advances in tech, materials, and various resins across the board over the past decades, it's really less of a concern today as it would be in yesteryears as to which tabbing layup is used if done correctly either way. But for lumber stringers and planning for the long haul, that's why the largest company's including ours, tab from large to small. But it's really just a choice best made by the individual builder and what they feel is easier and most adequate for their build.

(---- End of questions ----)

So, what I seemed to gather from all of it, is that with today's superior resins, cloths, and manufacturing methods, it's really an apples to apples comparison. I don't think you can really go wrong in either direction when it comes to non-rushed hand laying like most of us are doing (unless building really skimpy on the verge of borderline underbuilding). So... until I'm building a lightweight racing hull for a trans-international racing company, I think I'll stick with small to large. Even if not just for the mental security since I overbuild everything anyways and I like the idea of subsequent layers grabbing the hull, lol.
 

WalleyeSniper

Petty Officer 2nd Class
Joined
May 15, 2018
Messages
108
Same here, smallest first, then larger layers of tabbing. Two or three layers, probably doesn't matter much. Three certainly won't hurt.

For the transom, you can put fiberglass and resin between layers of plywood, but using an waterproof adhesive like Titebond III will be just as good; when dry, it will equal or exceed the glue tolerances used to make exterior or marine plywood. Then the whole piece can be encapsulated and installed.
If using Titebond III, do you still put CSM between the layers of plywood like when they're going to be resin'd together? Or do you skip the CSM inbetween and just clamp with Titebond III in the middle like you're making a giant piece of plywood?
 

zool

Captain
Joined
Aug 19, 2012
Messages
3,432
I find that alot of pro repair shops, and oem builders will usually precut their cloth and wet it on a flat board, then lay full size equal length tabs for stringers and bulkheads, meaning a 12" high stringer will have 24" strips cut and wetted, then laid into place wet on wet. Then they will wet out the full size cap pieces and drape them over. That way, you get a full mill thickness throughout the lamination. Its even more common with epoxy users, given the longer working time. You can readjust the lam by lifting the edges to release and air pockets, especially on the capping. With foam or cardboard filled stringers, this is almost mandatory, given that the strength comes entirely from the glass and not the core.

I do this from time to time myself, but I mainly use epoxy.
 
Status
Not open for further replies.
Top