1981 Sportcraft 270 repair underway - transom, stringers, & repower

Status
Not open for further replies.

todhunter

Canoeist
Joined
Sep 15, 2020
Messages
1,316
I bought some PVA but ended up not liking it. It's difficult to see once applied and dried and then how do you know you've got it all off? I'm sure it has its place, but I much prefer just adding wax to the last layer of glass/gelcoat.

If you use laminating resin (no wax) and don't use PVA or something else to seal it off, it will still solidify rock hard...the surface will just be tacky (especially after an acetone wipe) and ready for the next layup. I do not recommend you add wax or coat in PVA until it's your absolute last layer, and I wouldn't do either if it's an area that will be hidden below the decks (like the stringers where you are going to fill the areas with foam).
 

WalleyeSniper

Petty Officer 2nd Class
Joined
May 15, 2018
Messages
108
I'm stenciling the transom right now using popsicle sticks and hot glue. Working pretty good so far. Then that hilarious picture got put up and stopped me in my tracks a good 10mins. Lol
 

WalleyeSniper

Petty Officer 2nd Class
Joined
May 15, 2018
Messages
108
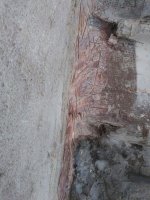
I accidentally cut a slit into the bottom of my hull while removing all this old resin chunks... How do I go about patching this? Or, is it so small, just filling with peanut butter. will be good enough because the transom is moving in right on top of it?20210809_194429.jpg

20210809_194435.jpg
 

zool

Captain
Joined
Aug 19, 2012
Messages
3,432
If it were me, I would tab in some cloth before I laminated the transom in, Its already grinded. Then I would fill in the bottom with an epoxy filler before I applied new bottom paint. Even tho its an inboard, potential stress cracks going forward would concern me below the water line. Pb alone lacks the strength for horizontal movement.
 

WalleyeSniper

Petty Officer 2nd Class
Joined
May 15, 2018
Messages
108
If it were me, I would tab in some cloth before I laminated the transom in, Its already grinded. Then I would fill in the bottom with an epoxy filler before I applied new bottom paint. Even tho its an inboard, potential stress cracks going forward would concern me below the water line. Pb alone lacks the strength for horizontal movement.
Ok, kinda what I was thinking. Should I grind it all even and tapered about 12" area around it, then laminate in 5 or 6 layers to give strength back to that area? Or, just add a couple patch tabs of 1708 over the top of it (inside the boat) and sand a little underneath (outside the boat) and fill it with thickened hairy epoxy from the underside?

I was hoping to get away with hairy thickened resin, but best not to chance it or slack on it of course.
 

zool

Captain
Joined
Aug 19, 2012
Messages
3,432
Ok, kinda what I was thinking. Should I grind it all even and tapered about 12" area around it, then laminate in 5 or 6 layers to give strength back to that area? Or, just add a couple patch tabs of 1708 over the top of it (inside the boat) and sand a little underneath (outside the boat) and fill it with thickened hairy epoxy from the underside?

I was hoping to get away with hairy thickened resin, but best not to chance it or slack on it of course.
dont have to go crazy, 2 layers of 1708, 6 inches on each side is fine.
 

Reserector_

Chief Petty Officer" & 2021 Splash of the Year Win
Joined
Oct 15, 2019
Messages
609
If you use laminating resin (no wax) and don't use PVA or something else to seal it off, it will still solidify rock hard...the surface will just be tacky (especially after an acetone wipe) and ready for the next layup. I do not recommend you add wax or coat in PVA until it's your absolute last layer, and I wouldn't do either if it's an area that will be hidden below the decks (like the stringers where you are going to fill the areas with foam).
He nailed it.
No need for sealing it off or adding wax until you lay your final layers, which are usually gelcoat.
"Laminating resin" (unwaxed resin) is designed to harden, but leave the surface tacky so that it will accept the next layer without sanding.
I have found that even after several weeks, a splash of acetone will clean and "wake up" the surface. It will be sticky and ready for the next layer. The next layer will actually liquify the tacky surface even more.
Each layer seals the previous layer from the air, allowing it to finish hardening.

If you seal it with PVA or add wax to harden the surface, you have to sand it to create a mechanical bond, which is likely not as strong, and MUCH more work.
 
Last edited:

zool

Captain
Joined
Aug 19, 2012
Messages
3,432
Ok, kinda what I was thinking. Should I grind it all even and tapered about 12" area around it, then laminate in 5 or 6 layers to give strength back to that area? Or, just add a couple patch tabs of 1708 over the top of it (inside the boat) and sand a little underneath (outside the boat) and fill it with thickened hairy epoxy from the underside?

I was hoping to get away with hairy thickened resin, but best not to chance it or slack on it of course.
If u put a strip of packing tape on the hull bottom prior to wetting and tabbing the inside, after it kicks, when you pull the tape, you will prevent resin from dripping out and off the bottom of the slit, then u will end up close to fair when you tackle the bottom paint.
 

kcassells

Fleet Admiral
Joined
Oct 16, 2012
Messages
8,732
Fill it with fiber reinforced PB, sand it put down 2 tabs/1708. Then set transom after tabs are dry. I don't understand the scotch tape theory yet.
 

zool

Captain
Joined
Aug 19, 2012
Messages
3,432
Fill it with fiber reinforced PB, sand it put down 2 tabs/1708. Then set transom after tabs are dry. I don't understand the scotch tape theory yet.
The packing tape is under the boat to keep the resin/pb from draining out and drying into hard drips that are a pain to sand when prepping for bottom paint. resin doesnt stick to it and it will peel off leaving a smooth bottom. It works, dont doubt me :]
 

kcassells

Fleet Admiral
Joined
Oct 16, 2012
Messages
8,732
The packing tape is under the boat to keep the resin/pb from draining out and drying into hard drips that are a pain to sand when prepping for bottom paint. resin doesnt stick to it and it will peel off leaving a smooth bottom. It works, dont doubt me :]
Ohhhhhhhhhhhhhhhh
unda da boat with the slices. I get now. Yup a def do. Keeps it in the boat with out weak icecles.
Wipe the area under with acetone and let dry. Then apply tape or tape where the cuts might be thru.
O that Zool! Always has on the money go to's.
 
Last edited:

kcassells

Fleet Admiral
Joined
Oct 16, 2012
Messages
8,732
Ohhhhhhhhhhhhhhhh
unda da boat with the slices. I get now. Yup a def do. Keeps it in the boat with out weak icecles.
Wipe the area under with acetone and let dry. Then apply tape or tape where the cuts might be thru.
O that Zool! Always has on the money go to's.
Whats the saying? If I remembered 1/2 of what he forgot.....I'd still be a genius.
 

WalleyeSniper

Petty Officer 2nd Class
Joined
May 15, 2018
Messages
108
Ok, got it.

Put tape on bottom of hull to create a backing.
Then make up some HPB and fill the little slit until level inside the hull.

Then, 2 layers of 1708 on top. First layer 3" around the cut, second layer 6" around the cut.

Then transom can go in and all the rest of HPB can go in around the edges to create the fillets. Then ultimately tab at the end.

Hopefully I don't find anymore surprise little cut-thrus from all the random PB I was cutting out wildly like a madman. Lol
 

WalleyeSniper

Petty Officer 2nd Class
Joined
May 15, 2018
Messages
108
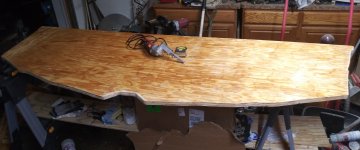
On a side note. I traced and cut out my transom core. Wetted out both sides, now just need to pre-wet the edges and then encapsulate it all. I'm going with 2 layers of CSM on back and around all edges, and one 1708 layer on the front, then all tabbed in of course.

20210810_011243.jpg
Transom core cut to shape, with moon'ish cutout taken out for the drain plug area.

20210811_001648.jpg
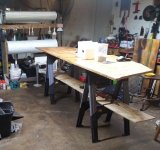
My chaotic little corner of the garage that's my work area. Yes, my garage always look like they got hit with a bomb. That's why I crop the images to try and hold onto a shred of my dignity, šŸ˜‚

I built a little stand to hold all my CSM and 1708. Bottom roll is 98yds of CSM, top roll is 30yds of 1708.

20210810_011232.jpg
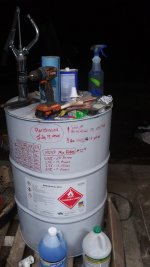
Hopefully we have enough resin for stringers, transom, floor, and cuddy rebuild... This barrel of unwaxed laminating resin, plus another 5 gallon bucket of ISO resin.
 

70marlin

Cadet
Joined
Aug 11, 2021
Messages
24
Came across an 81' Sportcraft 270 for $1500 and jumped on it. The hull is in great shape, so that's essentially what we were buying. Here on Lake Erie's central basin, we love these boats and I've have owned a few Sporties thus far.

We decided to do the stringers, transom, and repower her. Just started in on her and figured we'd share the progress and welcome and insight, tips, advice, or opinions anyone may have along the way on this. I have many questions as well, so figured this would be a good way to condense them into one thread instead of muddying up the forums with tons of posts. Here we go!

View attachment 343345
Starting Vessel (She's now on the trailer with cribbing built in 4 locations down her length for support during the build).

1981 Sportcraft 270
Engine/Power: Merc 225 (GM 305/5.0)
Drive/Trans: Velvet Drive 72C (10-18-006)
LOA: 27'
Beam: 10'

View attachment 343349
Cut the rear cap section off to expose the fuel tank and transom. I know I should remove the entire cap, pull out the tub insert, and etc. But, we don't have the resources nor desire to pull the cap. So, figured just cutting the rear section off is best and we'll reattach & strengthen it at the end.

View attachment 343350
Fuel tank exposed and ready to come out.

View attachment 343351
Fuel tank removed. This transom has seen better days for sure... There's only a single sheet of 3/4in plywood in there. Even though it's just an inboard and no real driving force is exerted on the transom, I feel like it's going to need to be at least double that thickness for a kicker motor install, no?

Next we'll be cutting the floor out, and then it's nothing but demo of all the old nasty wood and glass to get this to a near bare hull ready for new stringers, transom, and sole.

How thick do we need to go on this transom to add a 9.9hp kicker motor? It's currently only 3/4" thick ply in there. Should I double it and go 1.5" thick overall?

Thanks for looking! Any advice or guidance is welcomed and very much appreciated.
nice boat! looks like big redo good luck.
 
Status
Not open for further replies.
Top