1976 Tom Boy Boat, 1976 40 HP Johnson Outboard and who knows what Trailer

gm280

Supreme Mariner
Joined
Jun 26, 2011
Messages
14,605
Good stuff GM, I can't det the pics to show.

That is odd. I see all the pictures. I have zero ideas what is happening if you can't see any pictures. Maybe the "mods" can assist. :noidea:
 

Tnstratofam

Commander
Joined
Aug 18, 2013
Messages
2,679
It looks like you double posted and the second post's pictures aren't showing up.

Nice progress by the way. Hope you have some cooler temps coming your way. I know sanding in the heat is a bear.
 

gm280

Supreme Mariner
Joined
Jun 26, 2011
Messages
14,605
It looks like you double posted and the second post's pictures aren't showing up.

Nice progress by the way. Hope you have some cooler temps coming your way. I know sanding in the heat is a bear.

Okay I just went back and yes it does seem two posts. I have no idea how that happened other then I edited the initial post to correct some spelling issues. I honestly can't spell worth a darn. Never could. So if the mods can remove the second post, that would be okay with me. I don't think I can do anything with it now. :eek: :sorry: :eek:

Yes the temps are just a little bit cooler, yea 95 instead of 100 degrees. But seem we are getting a little break with the humidity. That makes a huge difference with me.
 

gm280

Supreme Mariner
Joined
Jun 26, 2011
Messages
14,605
Okay yet another progress report. Did I tell you how tiring sanding is. :facepalm:

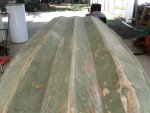
I finally pushed myself, not sure that was a great idea, to finish the bottom of the hull sanding. And I did finish the bottom and the only thing left to sand now is the outside of the transom. But some of that is already sanded as well.
Last bottom sanding (3).JPG
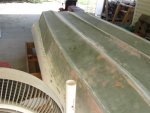
Yes the bottom is finished now. I did find some questionable issue in the left valley area that will take some fixing. But nothing serious.
Ha you can even see the old water heat sitting there too. I haven't taken it to the land fill yet.
Last bottom sanding (4).JPG
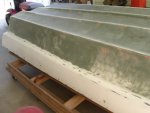
And the side too. You can see what looks like some water on the hull. That is just sweat.
Last bottom sanding (2).JPG
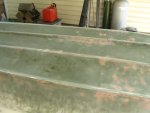
And another shot of the side.
Last bottom sanding (1).JPG
And the iffy section that will take some filler. But nothing major and I don't see any issues with it.

So pushing the effort this afternoon got the bottom finished sanded. The transom will be a bit easier and then I can start mixing the magic filler mixture and filling the imperfections. Then more sanding. But the initial 60 grit sanding on the hull bottom is finished. YEA!

I will say the hands and fingers vibrate for a while after stopping sanding. Probably not doing the hands and finger joints any good, but some times you just have to do what you have to do. That poor little DeWalt DA sander is taking a beating and still going strong.

Until next time, you all have a nice day... :thumb:
 

Woodonglass

Supreme Mariner
Joined
Dec 29, 2009
Messages
25,928
Are you blowing out the sander after each use? It helps longevity by getting all that abrasive FG dust out of the "Innards"!!!!

It's starting to look good!!!
 

gm280

Supreme Mariner
Joined
Jun 26, 2011
Messages
14,605
Are you blowing out the sander after each use? It helps longevity by getting all that abrasive FG dust out of the "Innards"!!!!

It's starting to look good!!!

Oh yes. I do blow out all the tools I use and with the pneumatic tools I even oil them too. I always blew out sanders and such power tools that collect dust. It keeps the tool clean and open for air to assist in cooling them when they are running. I blow the DA sander and a certain way I blow the different vent areas I get a very high pitched and loud squeal that actually throws me off balance for a second. So I have to be careful. I guess something to do with inter-ear issue. :noidea:

I am hoping today to mix up some magic formula and start filling areas and holes. But all in all, it is coming out nicely. :D
 

Woodonglass

Supreme Mariner
Joined
Dec 29, 2009
Messages
25,928
I've use sctochbrite pads and rubber bands to go over the vents in High Dust applications. they work well as filters!!!;)
 

gm280

Supreme Mariner
Joined
Jun 26, 2011
Messages
14,605
I've use sctochbrite pads and rubber bands to go over the vents in High Dust applications. they work well as filters!!!;)

That is a pretty good idea there WOG. Never thought about that. I do keep all my power tools in as good a shape as I can. In fact long sanding efforts works the hook and loop pad on the DeWalt DW421 sander. And after a long time the hook section gets flatted out and even melted in some areas. And when it stops holding the sanding disk on, I change it out. So I just bought two new replacement pads off EBay Pretty cheap too. Both for $15 dollars delivered. But for all the years I'd had and used that little sander, this is only the second pad I have on it. Thanks for the idea WOG! :thumb:
 

Patfromny

Lieutenant Junior Grade
Joined
Dec 2, 2012
Messages
1,197
I think the pads are about the same at lowes. Close enough anyway that it's worth buying them and not waiting for them. I think Depot sells them too but not for my machine. I have a four bolt pattern pad and Depot sells the three. I believe I have a Dewalt pad on mine now from lowes.
 

gm280

Supreme Mariner
Joined
Jun 26, 2011
Messages
14,605
I think the pads are about the same at lowes. Close enough anyway that it's worth buying them and not waiting for them. I think Depot sells them too but not for my machine. I have a four bolt pattern pad and Depot sells the three. I believe I have a Dewalt pad on mine now from lowes.

Okay, I honestly didn't know Lowes sell them. I thought I knew just about everything Lowes sells. Thank you for that info. If I already didn't have two new ones already, I would buy them there. Thanks again. :thumb:
 

gm280

Supreme Mariner
Joined
Jun 26, 2011
Messages
14,605
I wasn't up to mixing anything today. Was feeling a bit under the weather. But I hope to mix some tomorrow and start filling holes and imperfections. Here is the basic Magic Formula as I understand it;

Magic Formula:
250ml Polyester Resin,
60ml Cabosil,
250ml 3M Glass Bubbles,
2.5ml MEKP (Methyl Ethyl Ketone Peroxide)
15ml Acetone
3ml of Surfacing Wax.

Adding this mixture up it looks like about 580.5ml of filler. That seems like a bit much for a first try so I will cut it down proportionally and mix a smaller batch first. And I honestly don't have any idea of the cure time. I hope within at least 30 minutes. But if it takes longer, I can deal with it. :noidea:
 

Patfromny

Lieutenant Junior Grade
Joined
Dec 2, 2012
Messages
1,197
Okay, I honestly didn't know Lowes sell them. I thought I knew just about everything Lowes sells. Thank you for that info. If I already didn't have two new ones already, I would buy them there. Thanks again. :thumb:

No problem. I was just putting it out there for the future or for anyone else (everyone else) who melts their pads. Same price as you paid anyway so it's a wash. They hide them well but I just ask a guy in the tool corral and they usually know where they are. I'm on my third pad and counting. :grumpy:
 

gm280

Supreme Mariner
Joined
Jun 26, 2011
Messages
14,605
Okay My first "Magic Formula" filler mix. :happy:

I don't know how others mix up their poly filler mixture or the order they mix the different items in either, but I started with the polyester, then the surfacing wax and then the Cabosil. I mixed that together and then added in the Fiberglass Bubbles. Now that was interesting. Those bubbles don't really want to mix. And since they are miniature balls, they move around like water. But consistent mixing and they finally mixed. Next was the Acetone, that helped a little and once I had all that mixed well, I added in the MEKP last. I mixed that for about two minutes to make certain it all was mixed well.

Then came the actual application. :disillusionment:

Okay first lesson learned. My polyester was a bit old and it had some thick sections that came out the bucket. I should have stopped there and used the latest poly I bought recently. But no, I knew better. I could use that last bit of poly and just mix it really good. NO, that doesn't work that way. As I was applying that mixture, it had little clumps along with the smoother mixture and it was not a good application. But I used it anyways to see how it cures out. I haven't checked it yet, I am a little afraid to actual check it.

So my first "Magic Formula" filler mixture didn't go as well as I expected... :facepalm:

I only hope it sands easy if I have to remove it all. :eek:

I'll post the results if it worked out or not. :noidea:
 

sphelps

Supreme Mariner
Joined
Nov 16, 2011
Messages
11,468
Its not gunna sand as easy as some other fillers .... The more micro balloons the easier to sand but to much makes it a bit grainy ..
 

gm280

Supreme Mariner
Joined
Jun 26, 2011
Messages
14,605
Its not gunna sand as easy as some other fillers .... The more micro balloons the easier to sand but to much makes it a bit grainy ..

Sam I am spoiled using EverCoat Z-grip products for auto fillers and sanding. I get the feeling this "Magic Formula" isn't going to sand anywhere near as easy. However, It did harden up. I just haven't tried sanding it yet. But I will use new poly for the next mix. And I honestly don't know the curing time because once I struggled with the clumps in the mix, I applied what I could and closed up shop. I later walked out and it was hard, but I don't really know when it kicked off.

With EverCoat Z-grip filler, you mix it two parts and you better get it where you want it within about 5 to 10 minutes or it is hard. And it really isn't very bad sanding either. I would use that stuff but was told it has too much talc in it and that would draw moisture and not work for boats. So polyester home mixed Magic Formula it is.
 

gm280

Supreme Mariner
Joined
Jun 26, 2011
Messages
14,605
Okay, A little update.

Thank you, Thank you, Thank you WOG. That "Magic Formula" was great. Even the crappy mixing I did, it came out really nice. I have to say sanding (DA sander) was amazing. It not only sanded nicely, but contours great as well. And amazingly it doesn't plug the paper as I was thinking it would. So now I finished sanding the entire hull and even one quickie coat of Magic Formula in some places. And I know this is going to work out great. :D

It does fill great and contours as good as any other body filler I ever used. So now that everything has been sanded down with 60 grit, I can wash and wipe the hull down, mix up some more filler material, fill the gouges and holes and deep scratches and even contour places that were a little low. I like it. A little crazy mixture, but it works. :thumb:

One question I have for those that were faced with this situation. I have a new transom in place and it is rock solid. But the original transom top metal cap is...well...not in the best shape and I honestly don't know if it would even fit back on. So what has other used for the top cap? :noidea:
 

sphelps

Supreme Mariner
Joined
Nov 16, 2011
Messages
11,468
Don't really need a top cap if it's glassed over .... The motor will be bolted through the transom ...
 

gm280

Supreme Mariner
Joined
Jun 26, 2011
Messages
14,605
Don't really need a top cap if it's glassed over .... The motor will be bolted through the transom ...

Yea Sam I could go without a top metal cap. But I was thinking I could make something work to dress it off some and protect the possibility of water intrusion at the same time.I realize water shouldn't get in that way because of the fiber-glassing and poly, but I just want to be sure. I don't know what I will do yet. But I am leaning towards a metal cap.
 
Top