1976 22' SUS O/B "Hydration Break"

Watermann

Starmada Splash of the Year 2014
Joined
Jan 12, 2013
Messages
13,753
I know the feeling about the Al work, it's one of these toughest metals there are to work with but makes for a great boat!
 

classiccat

"Captain" + Starmada Splash Of The Year 2020
Joined
Dec 20, 2010
Messages
3,405
before laminating try to make sure the bow of each piece counteracts each other: () or )(.

Avoid (( or ))...if that makes any sense :LOL:
 

DWbaseball

Petty Officer 2nd Class
Joined
Aug 25, 2020
Messages
111
Thanks, I was planning on going )( for sure. I think my plan is going to be find to find my flattest looking piece of concrete and glueing them on that with a bunch of weights on top to flatten everything out. Glue will be Titebond lll (not TBll or l) since it needs to be waterproof.
 

DWbaseball

Petty Officer 2nd Class
Joined
Aug 25, 2020
Messages
111
Here we go got these glued up and a weekend of hot weather ahead of me.
I got advice from my BIL who is a carpenter and his recommendations were to go () and to clamp it once I started adding weight so there was no shifting. IMG_20220720_184720076_HDR.jpg
 

DWbaseball

Petty Officer 2nd Class
Joined
Aug 25, 2020
Messages
111
My latest project has been to cleanup my splashwell so it's ready to go back in. Should have done less stripping and more sanding but I needed to keep reapplying to get at some silicone that the PO had gooped on.

Confirmed that Citristrip much more effective than the Jasco stripper.

Finished pics soon.IMG_20220725_202324142_HDR.jpg
 

SHSU

Lieutenant Junior+Starmada Splash Of The Year 2019
Joined
Mar 8, 2017
Messages
1,668
Looking good. You going to paint the splashwell or leave it bare?

SHSU
 

DWbaseball

Petty Officer 2nd Class
Joined
Aug 25, 2020
Messages
111
Looking good. You going to paint the splashwell or leave it bare?

SHSU

I am planning to repaint the splashwell. I confirmed that the PO used Rusto Sail Blue when he was working on the boat and I am generally going to stick to his same color scheme.
 

DWbaseball

Petty Officer 2nd Class
Joined
Aug 25, 2020
Messages
111
Also note that although I had previously talked about wanting to raise the hight of the Transom vs. the waterline, I am going to rebuild this using the original transom shape. I just think this makes the most sense from a timeline and difficulty standpoint.
 

DWbaseball

Petty Officer 2nd Class
Joined
Aug 25, 2020
Messages
111
Been working on the captains console. Pics from the last two weeks. Unfortunately this is a busy weekend for me so no big boat projects going on. Need to get some of my epoxy work done this fall before the temps drop for the winter and nothing will set up outside in the cold.IMG_20220814_190511766_HDR.jpgIMG_20220815_195610909_HDR.jpg
Lastly I did a test fit of my transom wood where I used the old one as a template....we are going to have some trimming to do.IMG_20220814_190731059_HDR.jpg
 

SHSU

Lieutenant Junior+Starmada Splash Of The Year 2019
Joined
Mar 8, 2017
Messages
1,668
Make sure you predrill your holes so they will be straight. If you try after you install, you can get slightly angled holes that may cause issues down the road.

SHSU
 

DWbaseball

Petty Officer 2nd Class
Joined
Aug 25, 2020
Messages
111
Sharing some pics from the last few months of work.
IMG_20220918_162517069_HDR.jpg
IMG_20220918_162526105_HDR.jpg
Aluminum Brightener as prep work really cleaned up the hull.
IMG_20221121_091206838.jpg
IMG_20221121_091219929.jpg
IMG_20230107_160918823.jpg

Skim coat of jb weld on any detectable corrosion.
IMG_20230107_160854816.jpg
Cleaned up stringers
IMG_20221018_180221615.jpg
IMG_20221018_183231893.jpg
Console work
IMG_20221018_185834825.jpg
Need another coat
IMG_20221229_091949643_HDR.jpg
Cracked knee brace
IMG_20221110_202047838.jpg
 

Attachments

  • IMG_20221018_180249192.jpg
    IMG_20221018_180249192.jpg
    1.6 MB · Views: 0

DWbaseball

Petty Officer 2nd Class
Joined
Aug 25, 2020
Messages
111
Been working the last two days and these updates are from this weekend. The pieces are starting to come together!

IMG_20230115_155457401.jpg
IMG_20230115_160145152.jpg
Stringers also got Jb weld and they are riveted in. Using the Air compressor Pop Rivet gun was lots of fun and have these in solid.
IMG_20230115_160053923_HDR.jpgIMG_20230115_160032585_HDR.jpg
I riveted in some square Aluminum here to sure up the gunnels where they meet the front of the side trays. Both gunnels were collapsed at this spot and this made them much stiffer. Had to cut out some bad stuff on the one side. Still might rivet some square stock to the upright piece here to strengthen that part.

IMG_20230115_155540894.jpg
IMG_20230115_161636090.jpg
Had a welder work on my knee brace and he did an ok job I think. He did all the big work and I spent a few hours straightening up the rest of the old wings. There are now there StarCraft owners worth of Frankenstein knee brace represented here. Original, my PO's mod, and now I have strengthened from there. Still going to do aluminum brightener and a jb weld job on it.

IMG_20230115_155520433_HDR.jpgCant believe I didn't get any pics of the knee brace that I have temporarily pop riveted in and had the transom wood slid in for a test fit. Looks great, only minor trimming needed. Felt super solid.
IMG_20230115_191233031.jpgIMG_20230115_180618850.jpg
Also got the console dashboards cut today. Thinking I might do a light stain and spar on these for a bare wood look. Maybe do the sideboards that way too.
 

Attachments

  • IMG_20230110_203859263.jpg
    IMG_20230110_203859263.jpg
    1.1 MB · Views: 2

DWbaseball

Petty Officer 2nd Class
Joined
Aug 25, 2020
Messages
111
Also wow, these pics really show the nasty under the gunnels that I haven't cleaned up as good as I thought hahaha.

Let me know if anyone has questions about what I am doing.

I learned everything I think I need for this project from this forum and like the feedback. Thanks
 

BWR1953

Vice Admiral
Joined
Jan 23, 2009
Messages
5,898
Looks like good progress to me!

What's that dark gray stuff on the inside and outside of the hull?
 

DWbaseball

Petty Officer 2nd Class
Joined
Aug 25, 2020
Messages
111
Looks like good progress to me!

What's that dark gray stuff on the inside and outside of the hull?
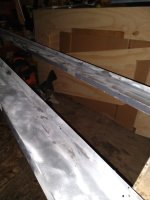
The grey stuff on the hull is regular jb weld with a tube or two of jb marineweld thrown in (white). I am using this to thinly skim/sand over any minor putting or corrosion that I found. The idea is that the aluminum brightener (acid) prep should kill any ongoing corrosion and then the jb weld fills in any pits so that if I have water in the bilge in the future, water can't pool in the pits and allow corrosion to restart.
 

DWbaseball

Petty Officer 2nd Class
Joined
Aug 25, 2020
Messages
111
More pics from today's work.
IMG_20230116_170911773.jpgIt was just warm enough that I felt like I could do some spray paint today, this splashwell looks better with a second coat of blue but will probably always show some spray lines. Maybe someday I will try to brush it out smoother but it's gonna get installed like this.
IMG_20230116_170116436.jpg
IMG_20230116_170436088.jpgIMG_20230116_170410260.jpg
Next I measured for the first three pieces of floor and got piece 1 cut. Fit was real good.
It was a really fulfilling weekend with lots of milestones for me so I am StarCraft hyped up!
 

SHSU

Lieutenant Junior+Starmada Splash Of The Year 2019
Joined
Mar 8, 2017
Messages
1,668
When putting the flooring back together, make sure to use wood joiners under the deck between the sheets. You can screw into them and it will help keep the floor even and prevent sheets from warping different ways compared to the partnered sheet.

Plus if you are doing post seating, this is the time to also add another sheet underneath to help strengthen the are the pedestal will be installed.

SHSU
 

DWbaseball

Petty Officer 2nd Class
Joined
Aug 25, 2020
Messages
111
When putting the flooring back together, make sure to use wood joiners under the deck between the sheets. You can screw into them and it will help keep the floor even and prevent sheets from warping different ways compared to the partnered sheet.

Plus if you are doing post seating, this is the time to also add another sheet underneath to help strengthen the are the pedestal will be installed.

SHSU

I have not yet decided if I should go with strips of aluminum like the OEM floor joiners or if I should go with wood as I have seen some others do. I was planning on using a combo of aluminum square stock and some L pieces to brace across the stringers so they maintain a fixed width and don't flex out, so maybe the aluminum strips aren't needed and wood joiners are the way to go? Thoughts?

Definitely planning on doubling up thickness for the captains pedastal witht nuts and then I'm thinking a set of back to back seats for port side.
 
Top