1976 22' Starcraft Islander Rebuild

fat fanny

Lieutenant Commander
Joined
Feb 9, 2006
Messages
1,935
Re: 1976 22' Starcraft Islander Rebuild

J for what it's worth I guess you could say he nailed it! ( sorry couldn't help it) Cherish it because now when their doing the wrong thing at the right time when their older (like mine) their never around and you just want their company! But so is life!!
 

jasoutside

Supreme Mariner
Joined
Dec 20, 2009
Messages
13,269
Re: 1976 22' Starcraft Islander Rebuild

Yah, I am with ya fanny. I love hanging with them, they are a riot!

________________________________________________________

OK, we finally got a little sun yesterday so I pulled the cover off and snapped a couple of photos for the boatguy (and anybody else who cares) of my sanded deck. I shoved my hand in the photo for scale...
P1050393.jpg


P1050394.jpg


The basic jest of how I did it was...

On the final coat of epoxy (4th) I sort of spread about a 2' x 2' section of epoxy then "salted" in the sand. I used the finer grade stuff that sits next to the bags on concrete mix at the lumber yard...
P1040663.jpg


Overall super easy and ridiculous cheap. I think I'd only give you two quick tips really. One, work efficiently as your epoxy has x minutes of pot life (best to mix small batches). It takes a little extra time to lay the sand down. Two, "salt" in more than you think you should. If the sand is too sparse it won't look/feel right.

I am pretty happy with how that turned out so far. The texture is quite subtle but still some excellent grip. My favorite part? SUPER CHEAP!

Disclaimer #1: I have no idea what is going to happen when I lay down paint. It may be so subtle that I might need to add more sand.

Disclaimer #2: I have no idea what the long term durability will be with this application. I am betting it will be great, but I could be completely wrong. I am NOT a pro and I have never done this. Honestly, I haven't personally seen anybody do this here on iboats either. Maybe this whole deal stinks and I'll have to throw my boat away.

Lifeguard not on duty, swim at your own risk, proceed with caution;):D

HAPPY EASTER EVERYBODY! OUR KING HAS RISEN!
 

boatguy94

Chief Petty Officer
Joined
Jul 29, 2009
Messages
520
Re: 1976 22' Starcraft Islander Rebuild

Lifeguard not on duty, swim at your own risk, proceed with caution;):D

I'm fine with that! :D
Thanks for putting up the pictures and showing how, I really like it! I wouldn't be too worried about the durability of it cause it could always be done again somehow if needed. Thanks again Jas! Happy Easter!
 

bilbo1usa

Seaman Apprentice
Joined
May 31, 2010
Messages
32
Re: 1976 22' Starcraft Islander Rebuild

Jas,
Been following the thread from the beginning.
Great thread, and great work man. You do a really good job, and have an amazing approach to life.
You can assume there are five guys that don't say a word reading these for each guy that posts.

I too have replaced my deck and have been inspired by your work and ideas.
I did the epoxy from USComposites, as did you, and I put the sand into my epoxy, but I used the anti-slip additive from Rustoleum rather than the sand (same difference from the look, just silica).

I loved the texture when it was just epoxy, however after 2 primer coats and three thin coats of Rustoleum Topside paint, I lost A LOT of the traction.
BattleshipGrey 003.jpg
You can see how it has taken an 'orange peel' texture now.

Not only is the Topside paint glossy when it hardens, but it really eats up the texture.
This isn't meant to criticize your work; you do a fantastic job, but you might want to do a test board on the side with ALL of the layers you plan to add to check the grip on the final product.

Thanks for your diligence both here and on the boat.
Bilbo
 

Wrongsyde

Petty Officer 3rd Class
Joined
Jun 24, 2010
Messages
77
Re: 22' Starcraft Islander Rebuild

Re: 22' Starcraft Islander Rebuild

!! So in 60 years when the next person gets to restore the big girl, he'll look at that foam and scratch his head and ask "Why in the world did they make foam with all these random little holes in it??!"
 

jasoutside

Supreme Mariner
Joined
Dec 20, 2009
Messages
13,269
Re: 22' Starcraft Islander Rebuild

Re: 22' Starcraft Islander Rebuild

I wouldn't be too worried about the durability of it cause it could always be done again somehow if needed. Thanks again Jas! Happy Easter!

Yah, having Rusto right at the lumber yard is sure a huge advantage vs. Durabak/KiwiGrip. Easy to lay down another coat whenever needed. Cool!

Jas,
Been following the thread from the beginning.
Great thread, and great work man. You do a really good job, and have an amazing approach to life.
You can assume there are five guys that don't say a word reading these for each guy that posts.

I too have replaced my deck and have been inspired by your work and ideas.
I did the epoxy from USComposites, as did you, and I put the sand into my epoxy, but I used the anti-slip additive from Rustoleum rather than the sand (same difference from the look, just silica).

I loved the texture when it was just epoxy, however after 2 primer coats and three thin coats of Rustoleum Topside paint, I lost A LOT of the traction.
View attachment 91140
You can see how it has taken an 'orange peel' texture now.

Not only is the Topside paint glossy when it hardens, but it really eats up the texture.
This isn't meant to criticize your work; you do a fantastic job, but you might want to do a test board on the side with ALL of the layers you plan to add to check the grip on the final product.

Thanks for your diligence both here and on the boat.
Bilbo

Wow Bilbo! Thanks for hanging with me and the kind words, much appreciated!

Yah, kinda my theory with tossing the sand into the epoxy was that it would be more durable. You may very well be right and my texture may be gone by the time I finish up the prime/paint. Once I lay down that first coat of primer I'll make a decision as to keep on going as is or salt in some more sand right into the primer.

I did run some tests back in the winter but that was just prime/paint, not in the epoxy. Here is how that came out...
P1040695.jpg


I was real happy with that. Either way, no biggie. I can always add sand and always lay down another coat of paint. Cheap and easy!

How nice boat. You deal with a good decision to have it. A little paint will surely make it wonderful. :D

Thanks man!

!! So in 60 years when the next person gets to restore the big girl, he'll look at that foam and scratch his head and ask "Why in the world did they make foam with all these random little holes in it??!"

Then he'll say...

"Oh, ya know what. He prolly had kids "helping" him":D


Hey, thanks for swinging through guys!


I did find my way into some progress today. I'll post up some photos in the a.m., I'm beat.
 

ezmobee

Supreme Mariner
Joined
Mar 26, 2007
Messages
23,767
Re: 22' Starcraft Islander Rebuild

Re: 22' Starcraft Islander Rebuild

I did find my way into some progress today. I'll post up some photos in the a.m., I'm beat.

Good thing. There was too much yacking not enough workin in this thread lately.
 

jasoutside

Supreme Mariner
Joined
Dec 20, 2009
Messages
13,269
Re: 22' Starcraft Islander Rebuild

Re: 22' Starcraft Islander Rebuild

OK, here ya go EZ...

First up, the weather gal has rain stacked as far as the eye can see in our forecast. I have been feeling like I have been playing the weather since I pulled it out and that was getting tiresom. So, I hauled the Islander back in the garage...
P1050446.jpg


She takes up the whole space sitting on the trailer, but it's all good.

I was really not very happy with the cutout for the vent line...
P1050450.jpg


So I carved it out, swiped a pair of grommets from the Jet Star splashwell and...
P1050451.jpg


That is a little better. All painted up it should look a little more finished.

Then I got to work on my side panels. Roughed them out and laminated two big ol chunks together with a backer plate of plywood...
P1050452.jpg


I'll trim a little detail into them and cut them to fit once the PL cures.

iboats sent me a package full of love...
P1050453.jpg


Here is what was in there...
P1050456.jpg


I had a set of guide on posts with my last boat, worth their weight in gold! Especially since I launch/load almost always by myself. At least till the boys get a little bigger.

I was originally going to fabricate a pair but by the time I bought all the materials, hardware and paint I figured I wouldn't be saving all that much. iboats had the best deal I could find, $60 on sale. Cool!
 

jasoutside

Supreme Mariner
Joined
Dec 20, 2009
Messages
13,269
Re: 22' Starcraft Islander Rebuild

Re: 22' Starcraft Islander Rebuild

Then I got to work on side panel flotation.

First piece...
P1050457.jpg


About mid way through...
P1050464.jpg


Done...
P1050470.jpg


P1050468.jpg


You can see how I had to step it back a little to follow the curve of the hull...
P1050467.jpg


All told, I believe I was able to fit just about three 1" sheets and two 3/4" sheets for those sides.

Not very pretty but I figure it's about like having two mid sized pontoons to help keep the rig afloat if tragedy strikes.

I also ordered up my marine vinyl, should be here in a few days. Kinda excited about that!

Rock on guys!:)
 

MichaelP

Lieutenant Junior Grade
Joined
Apr 26, 2010
Messages
1,190
Re: 22' Starcraft Islander Rebuild

Re: 22' Starcraft Islander Rebuild

Nice job filling in those sides. I'm very glad to see you resisted the temptation to use the unspeakable option. :facepalm:

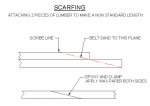
I plan to scarf my side panels if they end up being longer than 8'.
 

Attachments

  • SCARFING.jpg
    SCARFING.jpg
    29.3 KB · Views: 1

fshngho

Lieutenant
Joined
Apr 1, 2009
Messages
1,332
Re: 22' Starcraft Islander Rebuild

Re: 22' Starcraft Islander Rebuild

very nice job on the side panel floatation Jas. I did similar to the same but I am planning to cut out a couple places to have some storage. I will have to do it in the future as the boating bug has bitten me. Besides, I need a few projects to play with next winter. Keep it up Bro!
 

jasoutside

Supreme Mariner
Joined
Dec 20, 2009
Messages
13,269
Re: 22' Starcraft Islander Rebuild

Re: 22' Starcraft Islander Rebuild

Nice job filling in those sides. I'm very glad to see you resisted the temptation to use the unspeakable option. :facepalm:

Dude we could talk about it if you want to:D

Yah, I have a big chunk of backer plate to join the two pieces. She is solid and I'll sand the joint smooth.

very nice job on the side panel floatation Jas. I did similar to the same but I am planning to cut out a couple places to have some storage. I will have to do it in the future as the boating bug has bitten me. Besides, I need a few projects to play with next winter. Keep it up Bro!

Hey Dale! You should be over on your thread posting an update about now, eh! Let's see what ya got:)
 

ezmobee

Supreme Mariner
Joined
Mar 26, 2007
Messages
23,767
Re: 22' Starcraft Islander Rebuild

Re: 22' Starcraft Islander Rebuild

Looks good. I hadn't thought about putting flotation behind the side panels and now I wish I had. However, my panels are bolted to the side tray so it's not like it would be a huge deal to open them up a bit and stick some noodles back there.
 

Huron Angler

Admiral
Joined
Apr 7, 2009
Messages
6,025
Re: 22' Starcraft Islander Rebuild

Re: 22' Starcraft Islander Rebuild

Nice work on the side panel flotation, I'm planning on doing mine pretty much exactly like that.:)

Indoor work is a good idea, it will probably rain for the next 3-4 weeks straight. Great time for boat building:D
 

Deadwood

Chief Petty Officer
Joined
Jan 21, 2010
Messages
442
Re: 22' Starcraft Islander Rebuild

Re: 22' Starcraft Islander Rebuild

VERY nice Jas!;)

One of the pics looks like you picked up another tractor.:facepalm: A Deere maybe?:D
 

MichaelP

Lieutenant Junior Grade
Joined
Apr 26, 2010
Messages
1,190
Re: 22' Starcraft Islander Rebuild

Re: 22' Starcraft Islander Rebuild

Hey Jason....Before you button up those sides; Have you considered installing glove boxes in there? I'm hoping to add some and maybe speakers. My lil lady likes the tunes.:facepalm: On my SS I left some rectangular holes on the side panels up under the consoles. They're covered with carpeting now but I can cut it anytime and make some kind of drop in aluminum container. Kind of like the ash trays you'd see on a plane but much bigger and mounted vertical with a sloped bottom so stuff stays in. I think I just dated myself a bit.:(
 

jasoutside

Supreme Mariner
Joined
Dec 20, 2009
Messages
13,269
Re: 22' Starcraft Islander Rebuild

Re: 22' Starcraft Islander Rebuild

not like it would be a huge deal to open them up a bit and stick some noodles back there.

Well, I think you are prepping to do a bit of work on that SS, now would be as good a time as any, eh!

Indoor work is a good idea, it will probably rain for the next 3-4 weeks straight. Great time for boat building:D

I'd so much rather work outside but playing the weather game sure hampers my already molasses in Alaska progress.:rolleyes:

VERY nice Jas!;)

One of the pics looks like you picked up another tractor.:facepalm: A Deere maybe?:D

Thanks bro! Yah, never have too may tractors or Starcrafts on property my friend.

Nice work Jas !!

Thanks yoop, not bad for a troll eh!

Have you considered installing glove boxes in there?

Actually my panels will create a pair of 12' long shelves, plus I have the seat boxes, plus I have the hatches in the cabin, plus I have the cabin itself to throw stuff. I feel like I have enough space for everything. I am still debating if I want to build a glove box sort of deal at the port side helm seat, we'll see on that.

Yah, no stereo in my rig. Waves, wind, water, birds, tight lines, and the Merc V6, music to my ears:D

If life can't possibly go on unless we have tunes than I'll toss a small boom box in the cabin.

Cheers guys!
 

jasoutside

Supreme Mariner
Joined
Dec 20, 2009
Messages
13,269
Re: 22' Starcraft Islander Rebuild

Re: 22' Starcraft Islander Rebuild

Lil more progress today.

I shaped up and cut to length, and dry fit those side panels...
P1050471.jpg


P1050472.jpg


You can kinda see I mimicked the angle at the cockpit combing. Function with a just a little bit of form eh!

Man it's fun to see this boat start to take a little shape!

OK, if any of you fellas are bored and willing to take a look at my seat box specks I'd be much obliged. I feel like I have everything figured out but if you see anything weird or out of whack here, let me know. Always good to have another set of eyes checking on things.

Here is the port side, black squares are hatch openings. Fish box and batts will be housed here. You can see the fish box lid off to the upper left...
P1050475.jpg


Reference photo...
P1050474.jpg


Starboard side, all storage here...
P1050476.jpg


I also thought about putting a bigger hatch door on the side rather than the smaller on up on the other side. Like this...
P1050477.jpg


Thanks!
 

proshadetree

Lieutenant Commander
Joined
Jul 19, 2008
Messages
1,887
Re: 22' Starcraft Islander Rebuild

Re: 22' Starcraft Islander Rebuild

Looking good man. Can you smell the water? can you feel the sun on your face? Soon my man soon.
 
Top