1974 reinell cuddy restore

alldodge

Moderator
Staff member
Joined
Mar 8, 2009
Messages
40,746
Nice looking job, hope you don't have any issues with it. The strongest places of the tank are the edges, and while support looks good, it is only supported in the middle.

fetch


fetch


fetch
 

froggy1150

Master Chief Petty Officer
Joined
Nov 3, 2017
Messages
803
The 4 corners are supported by 8 inch strips about a inch in from the edge of the weld fore and aft. The 4 middle supports are about 18-20" long. before I wedged tank In on sides I could stand on corners and try to rock it and it would not budge
 

froggy1150

Master Chief Petty Officer
Joined
Nov 3, 2017
Messages
803
Just about got all my deck glassed on the underside and prepping to glue down. What's better, stronger, eaiser? Pb or 5200? Don't know the average strength of pb but I think I remember the 5200 having a pull strength of 3 tons per 4"square.
 

chevymaher

Commander
Joined
Mar 29, 2017
Messages
2,915
PB is pretty strong despite the rumors. My boat had no cloth in it from factory. It was a chop gun. It lasted 30 years. So it was basically made from PB.

1708 is 6X stronger than chopped stand. But the chopped strand is no punk. I use it for all kinds of structural things in auto bodywork.

I used PB as teenager to fix rust in a wheel well. Car got hit in the side. tore good metal away from the car. It was attached to the fiberglass. floating in mid air. It obviously has some stuctural rigidity. More than the surrounding metal had.

So take it for what it is worth. it is stronger than you will ever need it to be to do that.
 

kcassells

Fleet Admiral
Joined
Oct 16, 2012
Messages
8,599
Yup I laid my deck with hairy pb. I had no reservations in regards to strength.
 

froggy1150

Master Chief Petty Officer
Joined
Nov 3, 2017
Messages
803
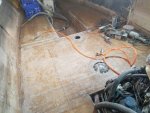
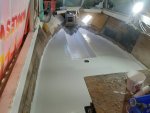
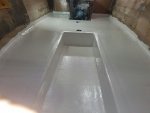
Where to put holes for foam? I have read/seen both ways. I understand each cavity will have multiple holes or vents. My specific question is to put hole down low, pour foam, and plug hole when it gets there and then let rise OR drill hole high, let foam solution flow downhill, hope it gets to lowest point of cavity and rise from there.
 

Attachments

  • photo321337.jpg
    photo321337.jpg
    791.7 KB · Views: 3

kcassells

Fleet Admiral
Joined
Oct 16, 2012
Messages
8,599
So boat is on a tilt. ea. cube has a low hole and then a high hole. Pour is in the high. Comes to the low then forces itself to the high hole. They vent off that way.
 

froggy1150

Master Chief Petty Officer
Joined
Nov 3, 2017
Messages
803
Here is the drain for the area where you step down into the cuddy. This was a point of failure from before. There was no place for water to escape from this area. There is a drain at the bow and this. When I put this part of the deck down I put a paper towel roll to keep area Clear while foaming. Afterwards I peeled the roll out and put 1708 in hole to seal foam. During final assembly I will also coat everything/fill cavity in 3m 4200 as a second barrier to keep foam dry
 

Attachments

  • photo322425.jpg
    photo322425.jpg
    1.4 MB · Views: 11
  • photo322426.jpg
    photo322426.jpg
    1.3 MB · Views: 11
  • photo322427.jpg
    photo322427.jpg
    1.4 MB · Views: 11

froggy1150

Master Chief Petty Officer
Joined
Nov 3, 2017
Messages
803
And I got foam.... not beer foam either! I used to camper jacks to tilt bow up. It's hard to tell but hitch is about 5 feet up in air. Couldn't go higher cuz rear pair of wheels were coming up and tail of trailer was dug into ground and it was getting side to side tippy. I left these little "vents" in the tabbing to allow air to escape and let foam get to edge of hull. Seemed to work well. Got good fill and almost no waste. 2 football size chunks and some little scraps. Used 3 2 gal kits and got it all in at about 75-82 degrees
 

Attachments

  • photo322428.jpg
    photo322428.jpg
    1.2 MB · Views: 14
  • photo322429.jpg
    photo322429.jpg
    1.2 MB · Views: 14
  • photo322430.jpg
    photo322430.jpg
    1.7 MB · Views: 14
  • photo322431.jpg
    photo322431.jpg
    1.5 MB · Views: 14

froggy1150

Master Chief Petty Officer
Joined
Nov 3, 2017
Messages
803
And when you are done sanding...... sand some more!
deck is sealed so now I can rest easy without worrying about wood getting wet. Only had one issue laying 1708. Doing by myself the big section over the tank. It was layed a little crooked and tried to fix it and made a wrinkle with a few bubbles. Easy fix. At least it's down before it got cold ( today it's about 60 but suppose to get colder over the holiday) now to gel coat.
 

Attachments

  • photo322882.jpg
    photo322882.jpg
    1.4 MB · Views: 5

froggy1150

Master Chief Petty Officer
Joined
Nov 3, 2017
Messages
803
Been awhile since I updated. Well the floor is white gelcoat! Was 45 deg out so I turned on the one heater by the bow and walked away to let the hull warm and came out to 107 deg.... oops. Didn't even fire up the propane one. It's a 1950's Era 240v 3 phase that I rewired single phase. Draws 32 amps o. A 200 ft so cord. Puts out about 700 deg f. Now that's toasty:flame:
 

Attachments

  • photo325068.jpg
    photo325068.jpg
    1.1 MB · Views: 13
  • photo325069.jpg
    photo325069.jpg
    1.1 MB · Views: 13
  • photo325070.jpg
    photo325070.jpg
    1.1 MB · Views: 13
  • photo325071.jpg
    photo325071.jpg
    993.1 KB · Views: 12

alldodge

Moderator
Staff member
Joined
Mar 8, 2009
Messages
40,746
Looks good and that's some heat. Might be a tad spike in the electric bill today
 

froggy1150

Master Chief Petty Officer
Joined
Nov 3, 2017
Messages
803
Used treehouse/"work platform" to gravity feed Lube down cable. Worked back and forth til oil came out clean. Smooth as silk!
 

Attachments

  • photo327366.jpg
    photo327366.jpg
    1.7 MB · Views: 8
  • photo327367.jpg
    photo327367.jpg
    1.7 MB · Views: 8

froggy1150

Master Chief Petty Officer
Joined
Nov 3, 2017
Messages
803
Cuddy prefit and now working on the cabin layout. 2x4s are so I don't have to screw into deck
 

Attachments

  • photo327368.jpg
    photo327368.jpg
    694.8 KB · Views: 11
  • photo327369.jpg
    photo327369.jpg
    976.6 KB · Views: 11
  • photo327370.jpg
    photo327370.jpg
    804.3 KB · Views: 11
  • photo327371.jpg
    photo327371.jpg
    1.3 MB · Views: 11
Top