1967 Starcraft Jet Rebuilding

catbones

Petty Officer 1st Class
Joined
Jul 15, 2012
Messages
319
Re: 1967 Starcraft Jet Rebuilding

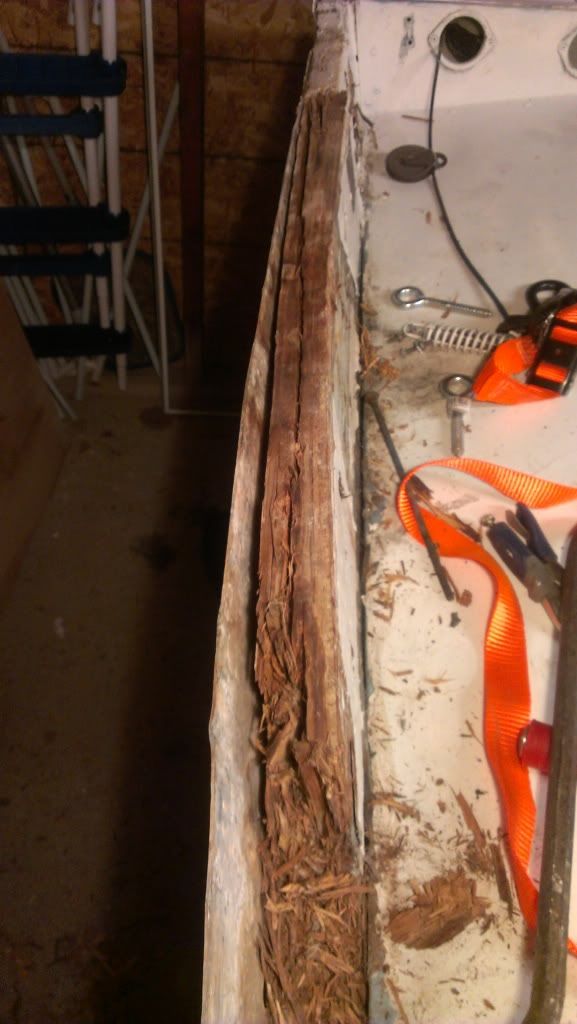
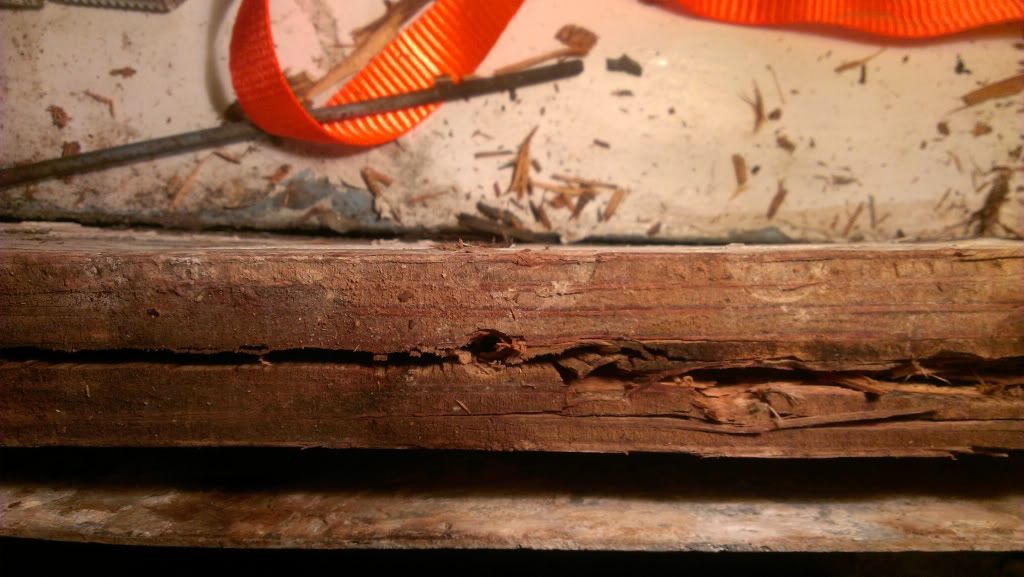
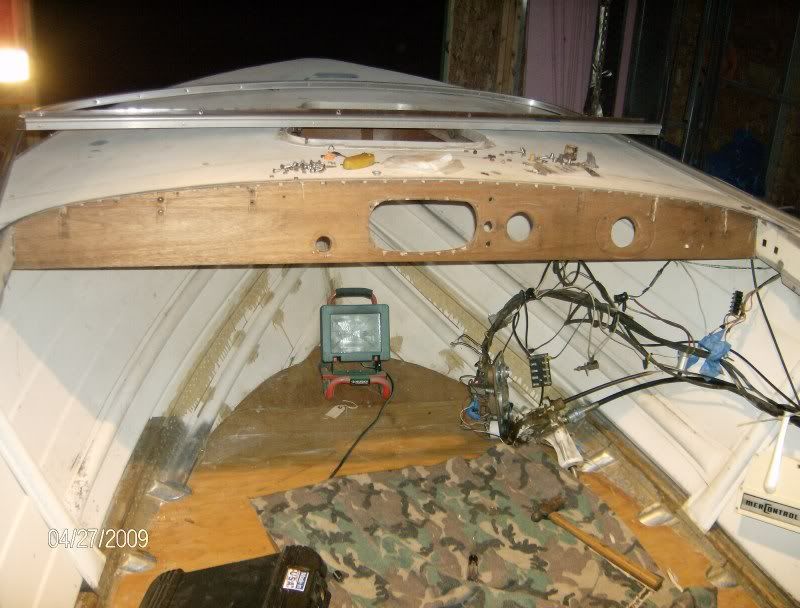
I'm currently having an awesome time trying to take out the transom wood out. Damn thing is in half and still won't budge at all. Had to take a hammer to it, nothing, hung it, jumped and kicked and damn nothing. Started to chip away the corner of it if she doesn't come out in one piece or even the 75% of it where she cut then she's coming in buckets of rubble.

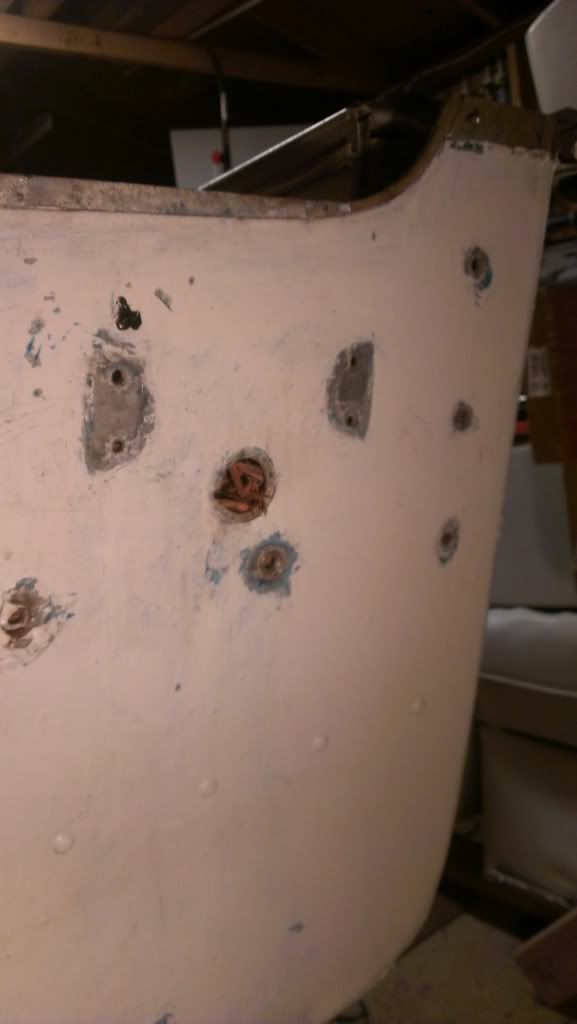
It ain't pretty but she gonna have to do. I don't see any other bolts or nothing else holding her in. Crowbar will have to do to a point I guess. Maybe I will get some leverage if I get the one corner completely out and then be able to lift her from one side or something. I know the other piece that someone else put in (25% piece) is done with what looks to be 5200 or similar. That is going to be even more fun.

The hooks I got from HD to lift the boat up and jump, well the wood so rotten on the edges that it just popped out after a few jumps in it and bangs at it.

Something tells me this is going to be a few days or weeks of hacking away this junk.

Any other suggestions always welcome. :)
 

catbones

Petty Officer 1st Class
Joined
Jul 15, 2012
Messages
319
Re: 1967 Starcraft Jet Rebuilding

So after about a day and a half, two days hacking at this thing. She won't leave the aluminum behind. I'm thinking something must be holding her down in the groove of the aluminum or something. Maybe they even glue it to the aluminum. I might have no choice but to take out part of my splash well and start bending and jacking the wack out of this board, with the splash well it's just not enough room for me to do nothing other then chip bits by bits from it from the top.

Ahhh the extra work :)
 

North Beach

Commander
Joined
Sep 29, 2008
Messages
2,022
Re: 1967 Starcraft Jet Rebuilding

Bud this is gonna be a difficult resto if you don't share pictures. I know we're always kidding about pictures but in all honesty, they really help us see what you have going on.

It sounds to me like you may be missing something in the transom. You have removed all the bolts or screws from the aluminum z channels at the bottom and the two going down the sides right?
 

lakelover

Rear Admiral
Joined
Mar 26, 2003
Messages
4,386
Re: 1967 Starcraft Jet Rebuilding

I think NB is right, you'd probably get a lot more replies & ideas from more members if you beefed up your picture content.

In addition to what he suggested checking, I wonder if the wood is swollen, or is it "glued" in with something? Frustrating, I know!
 

catbones

Petty Officer 1st Class
Joined
Jul 15, 2012
Messages
319
Re: 1967 Starcraft Jet Rebuilding

Hey guys,

My apology for not many pictures, let me go take a few. Picture uploading on this forum isn't really the greatest and easiest compare to other forums I've worked on :) I will however upload more.
 

jbcurt00

Moderator
Staff member
Joined
Oct 25, 2011
Messages
24,893
Re: 1967 Starcraft Jet Rebuilding

Are you using photobucket or the pix icon at the top of a post window?

Once they're in my photobucket acct, I find it fairly easy to post pix, much easier then all the other forums I post to..... The FeatherCraft.net site is a huge PITA...

I've got the add-on for PhotoBucket @my FireFox browser, so I can click any online pix & send it to my photobucket quick & easy too :D

I will admit getting my pix uploaded to photobucket is a challenge sometimes :redface:
 

catbones

Petty Officer 1st Class
Joined
Jul 15, 2012
Messages
319
Re: 1967 Starcraft Jet Rebuilding

Alright let's see if this works now and better. I'm also going to edit if I can and re-upload the previews pictures.

1. As you can see, I took a nice chunk, a big bite out of the transom wood since that side was totally rotted out;
IMAG0271_zps9a0c05e5.jpg


IMAG0272_zps5277c241.jpg


2. I think I've got all of the bolts out and screws and nails from everyone, anyone see any more ? :p Btw, the splash well was held to the transom or the transom to the aluminum by 12 screws, which normally is what, like 32?
IMAG0277_zps37bc7a52.jpg


IMAG0276_zps35744412.jpg


IMAG0275_zpsc7b15e05.jpg


3. Here is what happens with anything I do to it, just splits open. It is going to be long wrong;
IMAG0274_zpse8a5b6a6.jpg
 

lakelover

Rear Admiral
Joined
Mar 26, 2003
Messages
4,386
Re: 1967 Starcraft Jet Rebuilding

Hard to tell from looking at it, but is the wood real dry, damp etc. or what? It looks pretty dry but can't really tell. Is the curve holding it in? My bet is that it's a combination of that and moisture that has caused it to swell. It looks real tight on the ends.

I know I worked on trying to remove mine for at least two days, then winter came and I covered the boat with a tarp and it sat all winter having a chance to really dry out. I couldn't believe it in the spring when I thought I'd get at it again, whacked it with a hammer, and got it out in 10 minutes.

I've seen people on here grind the wood out of transoms with a chain saw, but I'm not necessarily recommending that! I know I'm not good enough with one for that method!:rolleyes:
 

jasoutside

Supreme Mariner
Joined
Dec 20, 2009
Messages
13,269
Re: 1967 Starcraft Jet Rebuilding

You'll get it out, just keep working at it.

Lot's of creative ways, prying, wedging, banging, burning, explosives....

Click on my Jet Star thread and you'll see several of those methods used in one transom removal;)
 

Phil L

Recruit
Joined
Sep 13, 2012
Messages
3
Re: 1967 Starcraft Jet Rebuilding

Alright let's see if this works now and better. I'm also going to edit if I can and re-upload the previews pictures.

1. As you can see, I took a nice chunk, a big bite out of the transom wood since that side was totally rotted out;
IMAG0271_zps9a0c05e5.jpg


IMAG0272_zps5277c241.jpg


2. I think I've got all of the bolts out and screws and nails from everyone, anyone see any more ? :p Btw, the splash well was held to the transom or the transom to the aluminum by 12 screws, which normally is what, like 32?
IMAG0277_zps37bc7a52.jpg


IMAG0276_zps35744412.jpg


IMAG0275_zpsc7b15e05.jpg


3. Here is what happens with anything I do to it, just splits open. It is going to be long wrong;
IMAG0274_zpse8a5b6a6.jpg


Most likely the wood is wet even if it doesnt look it and has swollen. The transom is a tight fit. Remove your splashwell. Its held in by rivets on two brackets and rivets on the undersides on each end. Once thats out, you can take a grinder with a cutting wheel or a circular saw and set the depth to cut the first 3/4" inside piece of ply. Cut out a foot piece from the inside and the transom will come out very easily and if you do it carefully you can use the outside piece as a template.

Thats how I removed my transom board...took about 20 min after I struggled with it for two days trying to pull the whole thing...

Phil L
 

catbones

Petty Officer 1st Class
Joined
Jul 15, 2012
Messages
319
Re: 1967 Starcraft Jet Rebuilding

Actually JB that's exactly how you do it. I covered all this in my resto thread. All you need to do is slice the dash anywhere from top to bottom and it will fall right out if you have all the bolts out. Then you just make the end cuts on the new one straight up and down in line with the bottom edge of the old one and it will fit back in. There is a peice of angle on each end that you bolt the new dash back into.

OK Catbones I just read thru the entire restore thread and need to add a few things. First Don't believe all those horror stories about the gluvit. That stuff is amazing! If you follow mixing instructions it will outlast you. I've used it on three boats. The liquid limo was done in 09 and the gluvit is just fine still.

On the hull of your boat where you are missing rivets you can drill out the hole to size and add these. Make sure the head is on the outside of the boat, it is set in a good glob of 5200 and put a small flat washer, a lock washer and nut on the inside of the boat. This is a two man operation. On the inside and outside wipe off all excess 5200. Then using a small dremel or grinder cut off the excess bolt on the inside of the boat. Make sure bolt, washer, and nut are stainless.
machine-screw-slotted-round.gif


On the dash- running all around the inside of your gunwale and accross the top of the dash is an inside trim peice (aluminum, with a rubber/vinyl center just like a rub rail). First you take a cotter key extractor, or a screwdriver at the end near the stern and remove all of the vinyl. save for re-use or you can buy new really cheap on ebay. Once you get the vinyl out you should see bolts like these. They have to come out before the dash will.
WW10.jpg


This is a quote from my resto thread with some additional pics.
We want to replace the old decrepid, full of holes dash with a new spankin peice of mahogany. Problem is, the danged edges are cut on an angle with the sides of the boat. Guess they were put in before the deck skin was installed and I don't want to detach all the deck stringers in the bow and remove the deck. So first I had to remove all the hardware, controls, and the gunwale rubrail receiver. This came up in the Starcraft forums a few months ago. After you remove the rubrail insert, the receiver is screwed to the dash and rivited along the gunwale. Also there's about 16 thru bolts into metal brackets that also tie into the deck stringers. Removing this dash is not a fun project!!!!
rroff.jpg

hodgepodge.jpg

Then you remove the tray attached to the bottom and peel the old canvas off so you can get to the bolt heads counter-sunk in the wood, There are also four bolts on each side up under the gunwale.
dashready.jpg

Now we've got it all ready to come out. Tomorrow evening, I'll saw it right up the middle and it should drop right out.

I forgot to mention there's a ton of stuff mounted to the back side of the dash-several fuse blocks, etc. and I also marked all the switches with masking tape so I wouldn't be trying to figure out which wires went to what when we re-wire.

Both of the fuse blocks had been totally bypassed by previous repairs except for one. But instead of a fuse, someone had installed a small spring, sort of like the ones you used to see in an old ball point pen???

It's gonna be nice to get all that cleaned up with this re-build.

If you have a bunch of bolts going into small aluminum angle braces tied into the front bow deck stringers (wood) you can install the angles with stainless screws from underneath. My new dash was 1" thick so I used 3/4" ss Screws from underneath. Starcraft used bolts because it's a little easier and they were gonna cover with vinyl.
I know your boat is a 16 footer and mine is a 22 but they were made one year apart and there are many similarities. Go thru my resto thread and look for pics and then the descriptions of things we did. It's provided to help folks out.

And I'm guessing your transom is bowed because your wood is in two peices. Once you replace it the bow should go away....

can I ask you a question since you took of trim rail? do you remember if the rail and its rivets held your splash well together to the gunwales? it seems that mine might be holding the sides of the splash well just thought since you took the rail off you might know before I rip it off.

thanks.
 

catbones

Petty Officer 1st Class
Joined
Jul 15, 2012
Messages
319
Re: 1967 Starcraft Jet Rebuilding

Hey, what do you guys think? should I use this compare to using 5200 ? I know this would be recommended on doing the hull rivets.

1.) http://www.homedepot.com/Loctite/h_...ord=epoxy+adhesive&storeId=10051#.UFtH12hWrEc

or

2.) http://www.homedepot.com/Loctite/h_...ord=epoxy+adhesive&storeId=10051#.UFtIb2hWrEc

*** #2 states marine *** is there a real difference? they are both water proof.

Here is what I'm thinking. I will use epoxy two-mix adhesive for all of the rivets and bolts, specially on the transom rivets, bolts and anything else. Plan is to use 3M 5200 on anything bigger then a small area, like the backing motor plate or in the transom between the aluminum and the new wood board placed in it. What you guys think?

Sorry for jumping between products and work jobs, just thought if I got it all in hand, I can move much quicker and when budget allows it. Wish HD sent me another HD Pro 25% off coupons :)
 

lakelover

Rear Admiral
Joined
Mar 26, 2003
Messages
4,386
Re: 1967 Starcraft Jet Rebuilding

In my mind, both of those Loctite products would be overkill on rivets (if you mean for sealing solid head rivets at time of installation?) and bolts going thru the transom. Maybe I'm not understanding...? The 5200 is sort of standard for those uses, and at my HD, the 5200 is only something like $6.50 for the 3 oz. tube. That amount goes a long way, I only went through less than 2 tubes on my whole project.
 

jasoutside

Supreme Mariner
Joined
Dec 20, 2009
Messages
13,269
Re: 1967 Starcraft Jet Rebuilding

Unlike my buddy lake there I go through 5200 like crazy, love the stuff! (Though I usually have a big pinch of it between my cheek and gum when I'm working on boats. Sometimes a big spoon full in my coffee too.)

Having said that I like the big cartridge size, only like 11 bux at my local HD.

I have no experience with that stuff you posted so I dunno, probably just fine.
 

Grandad

Lieutenant Commander
Joined
Jun 7, 2011
Messages
1,504
Re: 1967 Starcraft Jet Rebuilding

I will use epoxy two-mix adhesive for all of the rivets and bolts, specially on the transom rivets, bolts and anything else. Plan is to use 3M 5200 on anything bigger then a small area, like the backing motor plate or in the transom between the aluminum and the new wood board placed in it. What you guys think?
I generally don't like using 2 part epoxies for anything tedious or that may take time that exceeds the cure time. It's just an unnecessary aggravation when you have a time limit on getting something done just right. If you can see your way to using the 5200, you won't be disappointed in the results. It'll give you time to wipe off the excess and make a good looking job that you won't get if your expoxy starts to set before you're done. - Grandad
 

catbones

Petty Officer 1st Class
Joined
Jul 15, 2012
Messages
319
Re: 1967 Starcraft Jet Rebuilding

Unlike my buddy lake there I go through 5200 like crazy, love the stuff! (Though I usually have a big pinch of it between my cheek and gum when I'm working on boats. Sometimes a big spoon full in my coffee too.)

Having said that I like the big cartridge size, only like 11 bux at my local HD.

I have no experience with that stuff you posted so I dunno, probably just fine.

Jas, do you use the big guns of 5200 made by 3m or another brand from HD?
 

Phil L

Recruit
Joined
Sep 13, 2012
Messages
3
Re: 1967 Starcraft Jet Rebuilding

You can also use 4200 by 3M for underwater applications...same capabilities as 5200 but will come apart at a later date.

Phil L
 

North Beach

Commander
Joined
Sep 29, 2008
Messages
2,022
Re: 1967 Starcraft Jet Rebuilding

Catbones, what about the inside of the transom up and under the splashwell? Are you sure there's nothing in there? Sometimes there are screws, not thrubolts. And someone else answer, those three vertical mounted Rivets on each side didn't have to come out did they? My mariner had those metal to metal I thought and then screws screwed into the angle and into the wood from inside. And what about under the top flange of the splashwell? Just throwin stuff out here tryin to be helpful...... I'm gonna go back now and look at my mariner posts....
 
Top