1967 Starcraft Jet Rebuilding

lakelover

Rear Admiral
Joined
Mar 26, 2003
Messages
4,386
Re: 1967 Starcraft Jet Rebuilding

Know anything good for silicone removal?

..........What was your approach and idea removing your transom wood? With all the bolts and screws out does it just pop out or major force needed?


The only thing I've found that works for cured silicon is just scraping it off/out with whatever works, ie. razor blades on flat surfaces. As many say, and I agree, silicon has no place in a boat.

My transom came out in one piece so I could use it for a template, but it had to sit a full winter under cover to dry out and shrink enough to get out.

My transom removal saga is pretty well summarized in these two posts:

http://forums.iboats.com/showthread.php?t=524033&p=3547320&viewfull=1#post3547320

http://forums.iboats.com/showthread.php?t=524033&p=3547354&viewfull=1#post3547354

It was kind of frustrating, but since yours will probably come out in pieces, it might be easier, you can hack away to your heart's content!

One idea for making a template is to use the cardboard sides of a large box to fit & piece together the right shape & size, then keep tweaking it 'til it's perfect, then transfer to your plywood.
 

catbones

Petty Officer 1st Class
Joined
Jul 15, 2012
Messages
319
Re: 1967 Starcraft Jet Rebuilding

The only thing I've found that works for cured silicon is just scraping it off/out with whatever works, ie. razor blades on flat surfaces. As many say, and I agree, silicon has no place in a boat.

My transom came out in one piece so I could use it for a template, but it had to sit a full winter under cover to dry out and shrink enough to get out.

My transom removal saga is pretty well summarized in these two posts:

http://forums.iboats.com/showthread.php?t=524033&p=3547320&viewfull=1#post3547320

http://forums.iboats.com/showthread.php?t=524033&p=3547354&viewfull=1#post3547354

It was kind of frustrating, but since yours will probably come out in pieces, it might be easier, you can hack away to your heart's content!

One idea for making a template is to use the cardboard sides of a large box to fit & piece together the right shape & size, then keep tweaking it 'til it's perfect, then transfer to your plywood.

Thanks for the heads up, and direction I really appreciate it.

Hey, here is what I have looking from within the boat up the splash-well where its connected;

IMAG0214.jpg

IMAG0215.jpg

Is this what you had too? are these rivets looks weird. I always thought you would see the rivet head not the butt side :) Don't want to go wrong on this either.
 

lakelover

Rear Admiral
Joined
Mar 26, 2003
Messages
4,386
Re: 1967 Starcraft Jet Rebuilding

Is that where it's connected to the wood of the transom? If you can't see that they go all the way through, they may be nails. My transom cap was fastened on with lots of spiral nails. If so you can pry them out.
 

catbones

Petty Officer 1st Class
Joined
Jul 15, 2012
Messages
319
Re: 1967 Starcraft Jet Rebuilding

Is that where it's connected to the wood of the transom? If you can't see that they go all the way through, they may be nails. My transom cap was fastened on with lots of spiral nails. If so you can pry them out.

nope, alright so you know how you have the splashwell, how are the sides of the splashwell connected to the gunwales? do you know. i found that the rivets go all the way through but thats on the corners of the splashwell left and on right too but drilling those out would only take the bottom out and the sides would be left behind attached to the gunwales. cant seem to locate how they are attached. grrrr lol
 

lakelover

Rear Admiral
Joined
Mar 26, 2003
Messages
4,386
Re: 1967 Starcraft Jet Rebuilding

My splashwell is a fair amount smaller than yours (different year), see photo. The rivets are in addition to the 32 SS screws attaching it to the transom.

wtypeDSC_4809.jpg


The four in the sides aren't visible in this picture, they're behind the front of the splashwell, going thru a right angle fold in the aluminum.
 

catbones

Petty Officer 1st Class
Joined
Jul 15, 2012
Messages
319
Re: 1967 Starcraft Jet Rebuilding

My splashwell is a fair amount smaller than yours (different year), see photo. The rivets are in addition to the 32 SS screws attaching it to the transom.

wtypeDSC_4809.jpg


The four in the sides aren't visible in this picture, they're behind the front of the splashwell, going thru a right angle fold in the aluminum.

Lake, so all rivets are at the top and nothing in the gunwale? so the sides where the cables come out of the round opening, these dont come off right? they are not part of the splashwell.
 

lakelover

Rear Admiral
Joined
Mar 26, 2003
Messages
4,386
Re: 1967 Starcraft Jet Rebuilding

Look from undeneath and see if you see several rivets on each side fastening it to the gunwale.

wDSC_6824.jpg
 

catbones

Petty Officer 1st Class
Joined
Jul 15, 2012
Messages
319
Re: 1967 Starcraft Jet Rebuilding

Look from undeneath and see if you see several rivets on each side fastening it to the gunwale.

wDSC_6824.jpg

Lake thank you for trying to help. Did look at it tonight and well, totally different way this is in Jet star. Here is a picture of yours compare to where mine are. Sorry if this a bad job, but my wife's laptop only had MS Paint :) not photoshop.

wtypeDSC_4809.jpg

It says; 1.) I've got 6 rivets on each side of the splashwell, 2.) I've got two rivets on each side (all labeled with green) and then the while marked areas, do these come out at all with the splashwell or that is part of the gunwale?
 

lakelover

Rear Admiral
Joined
Mar 26, 2003
Messages
4,386
Re: 1967 Starcraft Jet Rebuilding

do these come out at all with the splashwell or that is part of the gunwale?

Good question, maybe you'll have to just start tearing things apart to figure it out. I've never seen one like that up close. Sorry I'm not much help on it! :eek:
 

emoney

Commander
Joined
Jul 19, 2010
Messages
2,551
Re: 1967 Starcraft Jet Rebuilding

BTW, that "hook" you posted a few days ago was put there by Johnson as a motor lift. Most of the older Jonnyrudes had it and it's very handy for pulling the engine. Looks like you used a strap, which obviously worked, but I wanted to point that out for when it's time to go back on. Doing great so keep it up!
 

catbones

Petty Officer 1st Class
Joined
Jul 15, 2012
Messages
319
Re: 1967 Starcraft Jet Rebuilding

BTW, that "hook" you posted a few days ago was put there by Johnson as a motor lift. Most of the older Jonnyrudes had it and it's very handy for pulling the engine. Looks like you used a strap, which obviously worked, but I wanted to point that out for when it's time to go back on. Doing great so keep it up!

Thank you for answering that. I thought but hey, not a outboard engine mechanic and couldn't find anything on it which is why I went with the straps. Thanks again thought.
 

catbones

Petty Officer 1st Class
Joined
Jul 15, 2012
Messages
319
Re: 1967 Starcraft Jet Rebuilding

Good question, maybe you'll have to just start tearing things apart to figure it out. I've never seen one like that up close. Sorry I'm not much help on it! :eek:

Hey, no sweat. I decided I will leave the splashwell in if the transom wood comes out nice and easy.
 

catbones

Petty Officer 1st Class
Joined
Jul 15, 2012
Messages
319
Re: 1967 Starcraft Jet Rebuilding

So, today I decided I will ignore my business and go on to getting something rolling on this rather then nursing it. I'm sure you guys are interested. :)

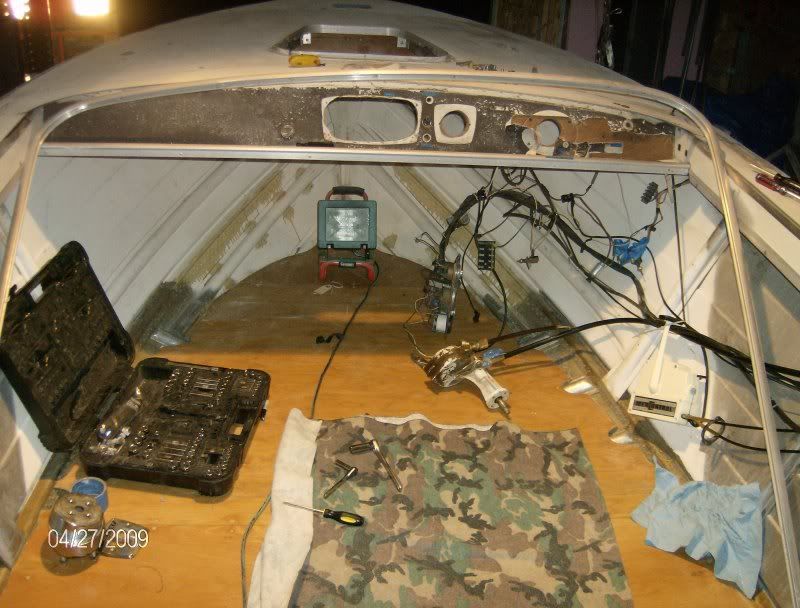
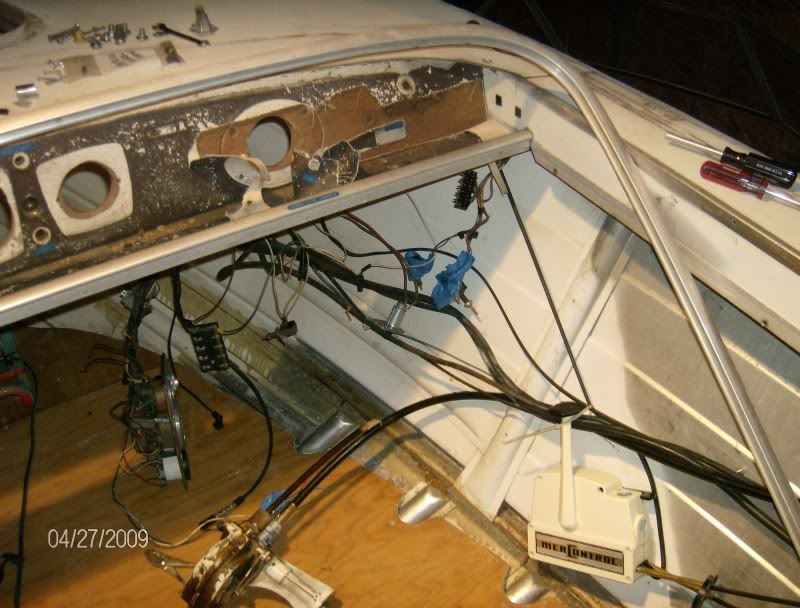
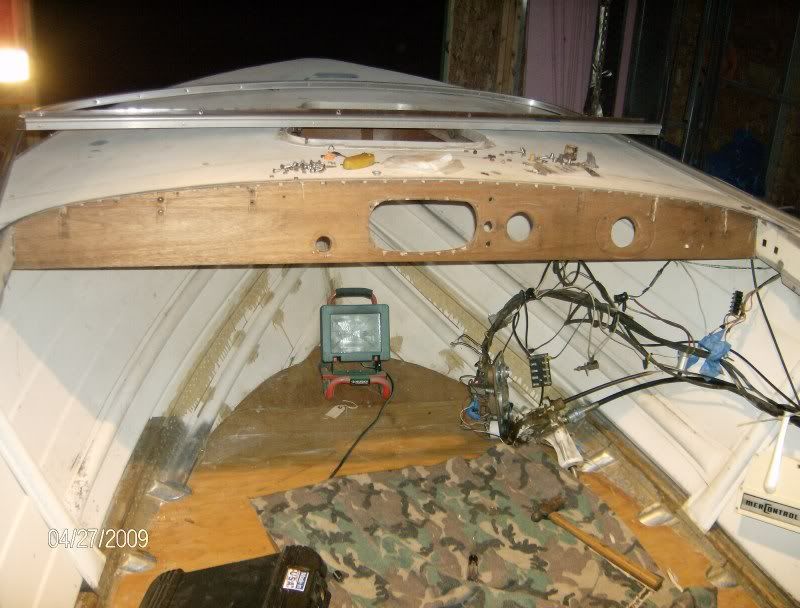
In any case, no pictures since my phone has been on charge and also the fact that well its quite the mess. Screws, bolts, trash here and trash there... it's a mess. Now I've got everything off, cable wise and all utilities wise or accessory wise. I wanted to do this before the floor goes.

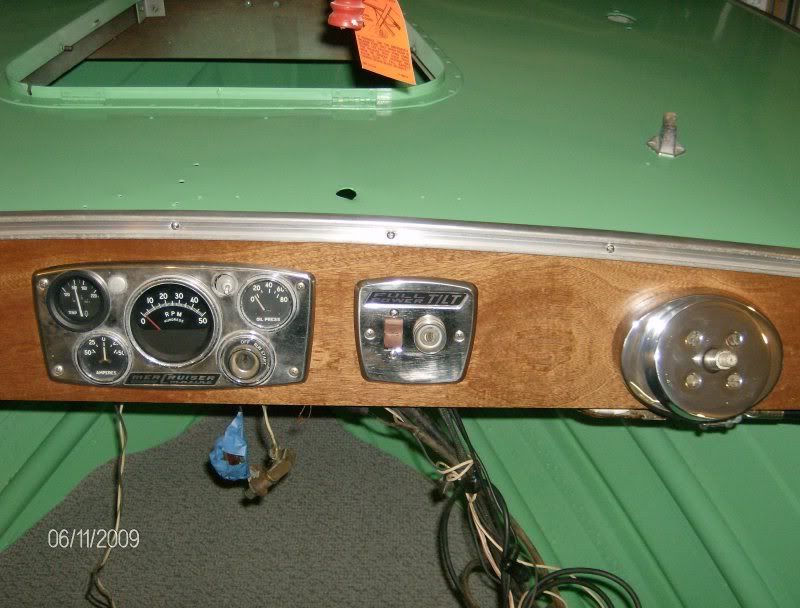
Now I ran into a little problem, besides the fact that no one uses aluminum screws on this whenever this thing has been fixed, stuff been added so half of them I had to drill through for things to let go and come out. But the major problem I am having is with the Dash wood. How, in the hell do you take that thing out? anyone??

I've got all the bolts out, all the little screws out, been banking at it for hours and not a mil letting it go. I could strip everything around it that has rivets and this still would be in.
 

catbones

Petty Officer 1st Class
Joined
Jul 15, 2012
Messages
319
Re: 1967 Starcraft Jet Rebuilding

Hi All,

So here are the updated taking her guts out pictures.

attachment.php


attachment.php


attachment.php


attachment.php

I think the rivet here the single one next to the two vertically, holds the dashboard in place even with the bolts out. GRR!

Now since, I think one of the rivets on the side of the dashboard is holding the sides of the dashboard, but I'm too afraid of taking a rivet of this caliber out I have another idea;

attachment.php


I will go and remove the center dashboard wood by cutting it level with the gunwales.

1.) Then mark and cut that template onto a new good piece. Paint it, seal it, etc...

2.) then put it in place and hopefully it's tight enough to just fit, maybe little hammer time.

3.) Drill all necessary holes needed for gauges, switches, steering wheel, etc..

4.) then on the back, put two metal plates. Run bolts and screws though it on each side. Bolts on the old wood (left and right) that will also be through the aluminum of the gunwale as it was originally (new bolts) then also bolts into the new wood as well with a flat head type bolts.

5.) Glue and attach it all, put 5200 on the bolts, etc...

6.) Last thing that will be left is to put a thin board wood on top, glue it and that is it. It will cover up the bolt heads on the new wood from being visible.

7.) Paint it all once again with enamel or something similar to have it shine and crisp looking.

What do you guys think?
 

Attachments

  • IMAG0223.jpg
    IMAG0223.jpg
    144.7 KB · Views: 0
  • IMAG0224.jpg
    IMAG0224.jpg
    146 KB · Views: 0
  • IMAG0226.jpg
    IMAG0226.jpg
    145.6 KB · Views: 0
  • IMAG0227.jpg
    IMAG0227.jpg
    146.6 KB · Views: 0
  • IMAG0225.jpg
    IMAG0225.jpg
    82.3 KB · Views: 0

lakelover

Rear Admiral
Joined
Mar 26, 2003
Messages
4,386
Re: 1967 Starcraft Jet Rebuilding

What do you guys think?

:) Well, I know what you mean about getting it out, so after lots of time used up on toughtful consideration, I decided to leave mine in. I ended up gluing a well-coated** & carefully fitted piece of 1/4" oak plywood to the existing dash wood while it was in place. In the end it saved a whole lot of headaches and time. I used Titebond III glue. Some on here have removed the wood in various ways however. I think my way was a lot easier.

**=2 coats of epoxy followed by 7 coats of spar urethane.

http://forums.iboats.com/showthread.php?t=309879&p=3334302&viewfull=1#post3334302
 

catbones

Petty Officer 1st Class
Joined
Jul 15, 2012
Messages
319
Re: 1967 Starcraft Jet Rebuilding

:) Well, I know what you mean about getting it out, so after lots of time used up on toughtful consideration, I decided to leave mine in. I ended up gluing a well-coated** & carefully fitted piece of 1/4" oak plywood to the existing dash wood while it was in place. In the end it saved a whole lot of headaches and time. I used Titebond III glue. Some on here have removed the wood in various ways however. I think my way was a lot easier.

**=2 coats of epoxy followed by 7 coats of spar urethane.

http://forums.iboats.com/showthread.php?t=309879&p=3334302&viewfull=1#post3334302

Hey thanks, right I seen your post on that. How come you used so many coats and of both spar urethane and epoxy, wasn't spar urethane just going to do a good job on it?

Also, I noticed in that same thread, how did you deal with the windshield buttons. Mine are basically stuck and the bolts on those screws were done. So I had to cut mine off, now I gotta figure out how to take the bolts off the windshield without damage.
 

lakelover

Rear Admiral
Joined
Mar 26, 2003
Messages
4,386
Re: 1967 Starcraft Jet Rebuilding

Yeah, the urethane probably would be good enough for a good long time, but I had left over epoxy, so really agve it the treatment, since it was interior plywood without waterproof glue holding the layers together.

I was able to unbolt my windshield brackets and reuse them.
 

catbones

Petty Officer 1st Class
Joined
Jul 15, 2012
Messages
319
Re: 1967 Starcraft Jet Rebuilding

Yeah, the urethane probably would be good enough for a good long time, but I had left over epoxy, so really agve it the treatment, since it was interior plywood without waterproof glue holding the layers together.

I was able to unbolt my windshield brackets and reuse them.

Very lucky on the windshield.

On the dashboard, I might just cut it per my picture and put a new piece in there. The current one in there, things are falling from it, so it is dry rot but since the damn sides won't let loose I got no choice.

The dashboard isn't held by the lip around the interior of the gunwales is it ?
 

jbcurt00

Moderator
Staff member
Joined
Oct 25, 2011
Messages
25,034
Re: 1967 Starcraft Jet Rebuilding

I think it's a shape & fit problem. The tapered ends of the dashboard wood indicate that it was dropped in from above, before the closed bow aluminum skin was added. The gunwales start to taper inward toward the front of the bow so you can't pull 1 end forward & let it drop out of place. The gunwales keep you from doing the same thing, you can't pull 1 side of the dash rearward and have it drop out of place either....

Having to dismantling a gunwale or the closed bow aluminum skin makes LL's overlay a very popular work around. Of course, the closed bow SC chop into an open bow is fairly popular too....

If you choose to cut out a 6" section of the middle of the dash wood, you can probably get the dash wood out. Then you might get lucky fabricating a new dash piece that is about the distance to the hull behind a gunwale shorter then the original. And have the dash piece running a few inches shorter on each end then the original, and be able to put it in behind the gunwale, and under the bow cover, w/out removing either. But that's a BIG may be!
 

North Beach

Commander
Joined
Sep 29, 2008
Messages
2,022
Re: 1967 Starcraft Jet Rebuilding

I think it's a shape & fit problem. The tapered ends of the dashboard wood indicate that it was dropped in from above, before the closed bow aluminum skin was added. The gunwales start to taper inward toward the front of the bow so you can't pull 1 end forward & let it drop out of place. The gunwales keep you from doing the same thing, you can't pull 1 side of the dash rearward and have it drop out of place either....

Having to dismantling a gunwale or the closed bow aluminum skin makes LL's overlay a very popular work around. Of course, the closed bow SC chop into an open bow is fairly popular too....

If you choose to cut out a 6" section of the middle of the dash wood, you can probably get the dash wood out. Then you might get lucky fabricating a new dash piece that is about the distance to the hull behind a gunwale shorter then the original. And have the dash piece running a few inches shorter on each end then the original, and be able to put it in behind the gunwale, and under the bow cover, w/out removing either. But that's a BIG may be!
Actually JB that's exactly how you do it. I covered all this in my resto thread. All you need to do is slice the dash anywhere from top to bottom and it will fall right out if you have all the bolts out. Then you just make the end cuts on the new one straight up and down in line with the bottom edge of the old one and it will fit back in. There is a peice of angle on each end that you bolt the new dash back into.

OK Catbones I just read thru the entire restore thread and need to add a few things. First Don't believe all those horror stories about the gluvit. That stuff is amazing! If you follow mixing instructions it will outlast you. I've used it on three boats. The liquid limo was done in 09 and the gluvit is just fine still.

On the hull of your boat where you are missing rivets you can drill out the hole to size and add these. Make sure the head is on the outside of the boat, it is set in a good glob of 5200 and put a small flat washer, a lock washer and nut on the inside of the boat. This is a two man operation. On the inside and outside wipe off all excess 5200. Then using a small dremel or grinder cut off the excess bolt on the inside of the boat. Make sure bolt, washer, and nut are stainless.
machine-screw-slotted-round.gif


On the dash- running all around the inside of your gunwale and accross the top of the dash is an inside trim peice (aluminum, with a rubber/vinyl center just like a rub rail). First you take a cotter key extractor, or a screwdriver at the end near the stern and remove all of the vinyl. save for re-use or you can buy new really cheap on ebay. Once you get the vinyl out you should see bolts like these. They have to come out before the dash will.
WW10.jpg


This is a quote from my resto thread with some additional pics.
We want to replace the old decrepid, full of holes dash with a new spankin peice of mahogany. Problem is, the danged edges are cut on an angle with the sides of the boat. Guess they were put in before the deck skin was installed and I don't want to detach all the deck stringers in the bow and remove the deck. So first I had to remove all the hardware, controls, and the gunwale rubrail receiver. This came up in the Starcraft forums a few months ago. After you remove the rubrail insert, the receiver is screwed to the dash and rivited along the gunwale. Also there's about 16 thru bolts into metal brackets that also tie into the deck stringers. Removing this dash is not a fun project!!!!
rroff.jpg

hodgepodge.jpg

Then you remove the tray attached to the bottom and peel the old canvas off so you can get to the bolt heads counter-sunk in the wood, There are also four bolts on each side up under the gunwale.
dashready.jpg

Now we've got it all ready to come out. Tomorrow evening, I'll saw it right up the middle and it should drop right out.

I forgot to mention there's a ton of stuff mounted to the back side of the dash-several fuse blocks, etc. and I also marked all the switches with masking tape so I wouldn't be trying to figure out which wires went to what when we re-wire.

Both of the fuse blocks had been totally bypassed by previous repairs except for one. But instead of a fuse, someone had installed a small spring, sort of like the ones you used to see in an old ball point pen???

It's gonna be nice to get all that cleaned up with this re-build.

If you have a bunch of bolts going into small aluminum angle braces tied into the front bow deck stringers (wood) you can install the angles with stainless screws from underneath. My new dash was 1" thick so I used 3/4" ss Screws from underneath. Starcraft used bolts because it's a little easier and they were gonna cover with vinyl.
I know your boat is a 16 footer and mine is a 22 but they were made one year apart and there are many similarities. Go thru my resto thread and look for pics and then the descriptions of things we did. It's provided to help folks out.

And I'm guessing your transom is bowed because your wood is in two peices. Once you replace it the bow should go away....
 
Top