1967 Starcraft Jet Rebuilding

catbones

Petty Officer 1st Class
Joined
Jul 15, 2012
Messages
319
Re: 1967 Starcraft Jet Rebuilding

Slotted machine bolt would be better if you don't want do go with a carriage bolt.

I was able to find time between clients and them getting back to me about project to work on the boat this afternoon. I promise to take pictures tonight and post them, did the following;


DONE TODAY:

1.) Got some good looking carriage bolts, nice washers and nylon lock nuts. Just a few to see if this thing will fit. BTW, they are at 1/4" x 1".

2.) Grinded few other items around where the accessories were on the gunwale. It look nasty so some grinding did the job.

3.) Took care of the rest of the rotted and rusty bolts out from inside of the hull. Took a wire brush to everything else a little to clean it up, sprayed some good grease remover :)

4.) Then, she got a nice bath and looking pretty. Nice weather too right now so she drying outside, going back inside the garage tonight to go to the next step.

NEXT STEP:
I think it will be to flip her upside down and get whatever is hanging from the bottom of the hull of the old bolts since they were all caulked up.

Then clean the holes with a wire brush and whatever else if residue is left, and put my new carriage bolts in dipped in 5200. Do some sanding of the entire boat bottom and sides just to get a better grip and give her a bath upside down, this lady is going to sign. :p

When done that, I've got plans to first fill her if not freezing temperatures yet and see if there are any other leaks. Believe it or not, taking all of the bolts, checking rivets, etc.. from the inside of the boat that is, I still haven't found that rubber hole and where that belongs to. Remember a few posts back I posted a picture of this weird hole in the bottom of the hull that seemed to either leak or fill with water and drip. Inside of it, its rubberish. Might have to JB weld it with a fill of 5200.

Anyways, pictures coming soon as an update to this post.

Cheers!
 

catbones

Petty Officer 1st Class
Joined
Jul 15, 2012
Messages
319
Re: 1967 Starcraft Jet Rebuilding

Here are the promised photo guys of how things look now;

1.) This is the best I could do on the transom, I tried all the tools I had available to get all the garbage out but still got specially in the grooves on the two sides and bottom piece left over crap on the walls of them. Might have to figure something else out but here it is;
IMAG0315_zpsb91b3bcc.jpg


2.) As mentioned above, I cleaned up also the gunwale a little from the junk that was hanging around there from moisture and well caulking as someone thought that everything on the boat was to be like that;
IMAG0316_zps1302d310.jpg


3.) Here she is a few more pictures of her after she got an inside bath. Looking better and cleaner then she was.
IMAG0317_zps523d43ea.jpg


4.) Now those ugly bolts are all out and I cleaned all the rivets in the ribs, cleaned the holes where the bolts were and rusty safari was happening;
IMAG0318_zpsbf625517.jpg

IMAG0319_zps88679940.jpg


Believe it, half of the back of the boat was bolted in the middle and randomly on the sides. A lot of holes to fill but she's gonna float better then she did. (HOPEFULLY!)
IMAG0320_zps5840bac1.jpg


Cheers!
 

lakelover

Rear Admiral
Joined
Mar 26, 2003
Messages
4,386
Re: 1967 Starcraft Jet Rebuilding

Lookin' good, real clean. My transom was about as pitted as yours from the PO's PT wood, maybe not quite that much, but about 75%. I didn't do anything about it. You have a good plan for the holes & I think you'll be glad you were so thorough when you're done!
 

North Beach

Commander
Joined
Sep 29, 2008
Messages
2,022
Re: 1967 Starcraft Jet Rebuilding

Correction, use 1/4", that square top will just smoosh into the alum. You might even be able to go smaller.

Not tryin to be argumentative here but I wouldn't use the carraige bolts with that square whatever its called in them. You don't have that much material in the existing hull and stringer and the square thing is going to prevent the head of the bolt from fitting flat on the bottom of the hull like a rivet would. If you're gonna go to all this trouble find the right bolts bud......
 

catbones

Petty Officer 1st Class
Joined
Jul 15, 2012
Messages
319
Re: 1967 Starcraft Jet Rebuilding

Not tryin to be argumentative here but I wouldn't use the carraige bolts with that square whatever its called in them. You don't have that much material in the existing hull and stringer and the square thing is going to prevent the head of the bolt from fitting flat on the bottom of the hull like a rivet would. If you're gonna go to all this trouble find the right bolts bud......

Haven't found anything yet and it seems like the square under the head of the bolt is the same size so it will sit within the hole but prevent it from turning. I'm also thinking I might do a bolt dipped in Jb weld as suggested compared to 5200.
 

catbones

Petty Officer 1st Class
Joined
Jul 15, 2012
Messages
319
Re: 1967 Starcraft Jet Rebuilding

hey guys, so I was at HD this morning to pickup something bigger then a 3/8 for that double hole. Got a few sizes. My idea is to drill the two into one big and put JB Weld on both sides, then run a bolt and tighten it. One big one is.

now while I was there I looked at foam too. they had this 1 1/2" thick while foam or something compare to the pink panther. is that at all good, anyone else seen this?
 

lakelover

Rear Admiral
Joined
Mar 26, 2003
Messages
4,386
Re: 1967 Starcraft Jet Rebuilding

Not sure exactly what it is, regular styrofoam? If it is that, it will absorb water a lot sooner than the pink of blue closed-cell stuff. I'll try to take a look next time I'm there.
 

Pmccraney

Lieutenant Commander
Joined
Jul 26, 2011
Messages
1,734
Re: 1967 Starcraft Jet Rebuilding

My HD and Lowe's had the exact same set-up... The largest size I could get in blue or pink closed cell foam was 3/4"... they had the "white sheets" with some sort of metallic covering/liner on one side... (is that what you are looking at?)... However, it looked like bubbled styrofoam of yesteryear so I just didn't risk it... You would probably be better laminating a couple of sheets of the pink/blue together than using that stuff....

Good work so far!
 

North Beach

Commander
Joined
Sep 29, 2008
Messages
2,022
Re: 1967 Starcraft Jet Rebuilding

JAS, not tryin to flame on you we're just having conversation here right? My line of thinking was with the flat slotted machine bolt as shown in the pic I posted earlier with the threaded shaft as close to the same size of the hole with 5200 would provide more sealing surface and less "slop" than drilling the hole bigger so the square thingy on the carraige bolt could "seat". If he has to go and buy something, why not get as close a fit as possible?

And Catbones-On the insulation, check another Lowes or Home Depot or any other building materials type place. What you want is Extruded Polystyrene without the foil. Either pink or blue. 3/4 is just fine bud. Actually it's way easier to cut than the 2" stuff and all you have to do is stack it. It will be held down by your floor and does not need to be stuck to itself. Remember, from the middle to the edges on the hull is tapered a little especially the closer you get to the bow so if you use the thinner stuff you can upside down stair step it to deal with the taper and still come out flat on the top.

Take a look at the flotation in my rebuild thread in my sig. It's the same just a bigger boat with more foam.

edit-Just like this
The Gluvit is all set up so I can’t really put this off any longer. Here’s a shot of how I started.
Beginfloatation.jpg


This is alternating between ?”, 1", and 2" Dow Foamular 250. Basically what HD stocks on the shelf. With the concave V hull, the angle was fairly steep so I needed a lot more of the 1” and ?” than the 2. So around 3:30 it was back to HD for more of the smaller stuff. When I arrived I realized I’d forgotton my wallet and the folks at the store weren’t having any of me coming back later to pay, So My wife, who thinks I’m off my knot for not buying a new boat had to drive to town with my credit cards. (more on what that will cost me later).

Here’s a shot of the finished product.
Finishedfloatation.jpg


Pretty much just building the stuff up to level at the top. Note should be made that the 1 and ? cuts really well with a razor knife. The 2 takes a keyhole saw resulting in a lot of pink beads everywhere. I did all the cutting outside and blew everything off with the hose reversed in my little shop vac. I also vacced out the boat about 50 times in an effort to keep the beads out of the bilge. The only down side to the operation was all the climbing in and out of the boat and cutting outside!
 

djpeters

Lieutenant Commander
Joined
Jun 9, 2010
Messages
1,824
Re: 1967 Starcraft Jet Rebuilding

Just skimmed the last few pages here, I'll re-read more later but for re-fastening those ribs to the hull I would only go with solid rivets or bolts. I wouldn't use a pop type rivet in anything structural. They are not near as strong. Good work so far!
 

catbones

Petty Officer 1st Class
Joined
Jul 15, 2012
Messages
319
Re: 1967 Starcraft Jet Rebuilding

Just skimmed the last few pages here, I'll re-read more later but for re-fastening those ribs to the hull I would only go with solid rivets or bolts. I wouldn't use a pop type rivet in anything structural. They are not near as strong. Good work so far!

Hey, thanks. I decided to pop a few bolts in place with JB Weld on them, then on the interior blob the ends with a good set of 5200. Just a preference of mine over dealing with solid rivets and no buddy in sight, specially since everyone lives in another country and enjoy their DUIs lol no border crossing.
 

North Beach

Commander
Joined
Sep 29, 2008
Messages
2,022
Re: 1967 Starcraft Jet Rebuilding

But you did make sure the 5200 is inside between the bolt head and the nut/washer? The best way to get what you're looking for here is to shoot the 5200 into the hole before placing the bolt in. It's a little messy but fills all the cavity and you can then wipe the hull for any excess.
 

catbones

Petty Officer 1st Class
Joined
Jul 15, 2012
Messages
319
Re: 1967 Starcraft Jet Rebuilding

But you did make sure the 5200 is inside between the bolt head and the nut/washer? The best way to get what you're looking for here is to shoot the 5200 into the hole before placing the bolt in. It's a little messy but fills all the cavity and you can then wipe the hull for any excess.

North, right. i was going to pop and smear 5200 inside the hole and inside between the washer and hull and washer and botton of the nylon lock nut since the top has the nylon on it, then smear a lot of JB weld on the bolt and put in, tighten and let it set.

ill do pictures or might get into videos doing some of thus stuff, but thats my plan. any objections? :)
 

catbones

Petty Officer 1st Class
Joined
Jul 15, 2012
Messages
319
Re: 1967 Starcraft Jet Rebuilding

Hi guys,

Sorry for the no updates to my project, have been glued into my work monitor for quite sometime with limited time to get away and with 3 kids having a ball in round trips getting sick you can image the shuffle.

In any case, I've had some time today since everyone is feeling better in the house and I've got pretty much everything at work wrapped up.

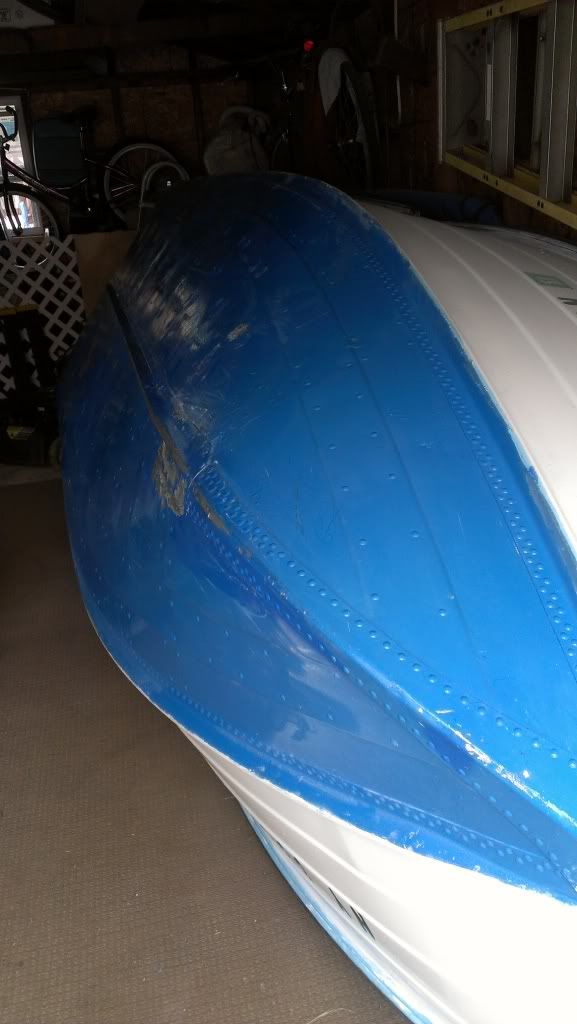
Few things have changed, one major would be the fact that this will become an open bow. I will be closely following Jas 15 footer rebuild sure with few changes in design or function I've got newly planned. So that is that.

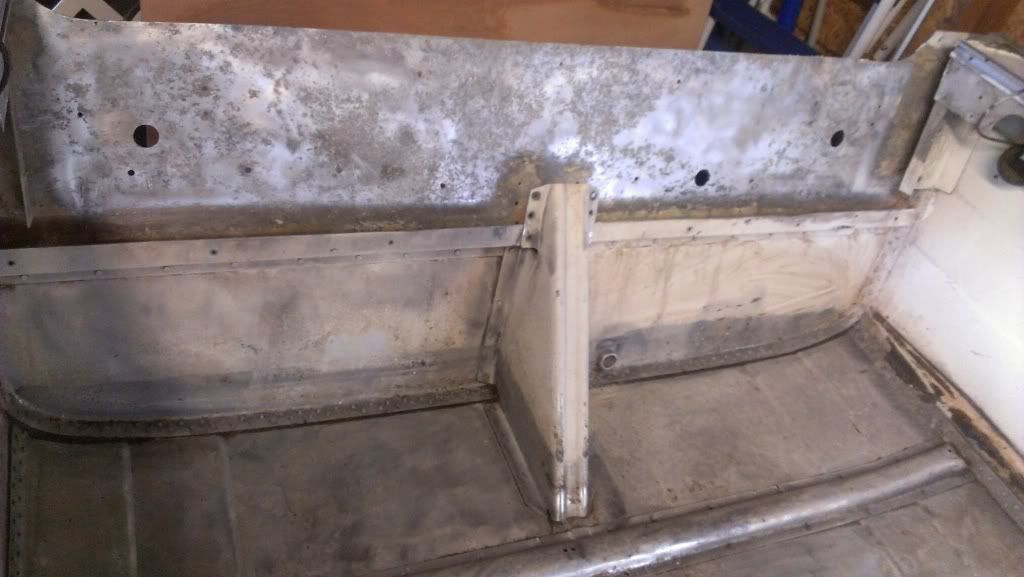
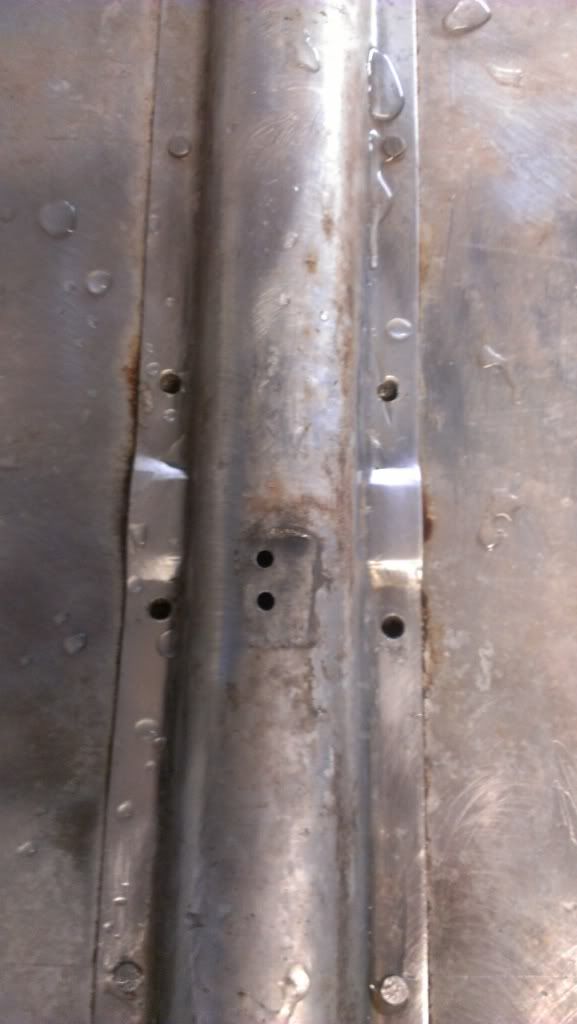
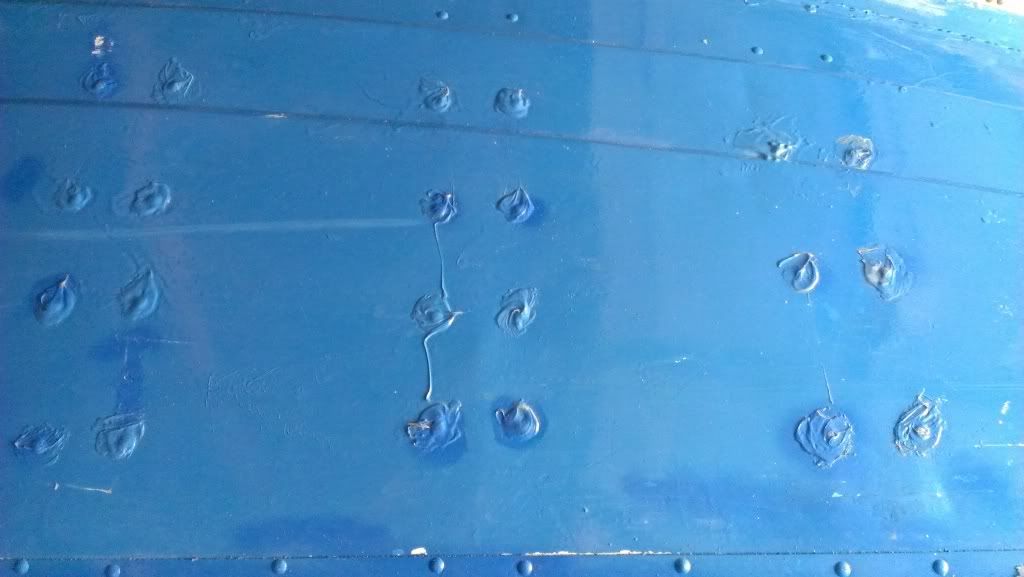
Today, I've worked a little bit for a few hours on flipping her to one side and taking a look on her hull since all rotten and rusty bolts been cut on the inside. Was I surprised and wished I never flipped her. Take a look for yourself;
IMAG0007_zpsb7aceb3e.jpg


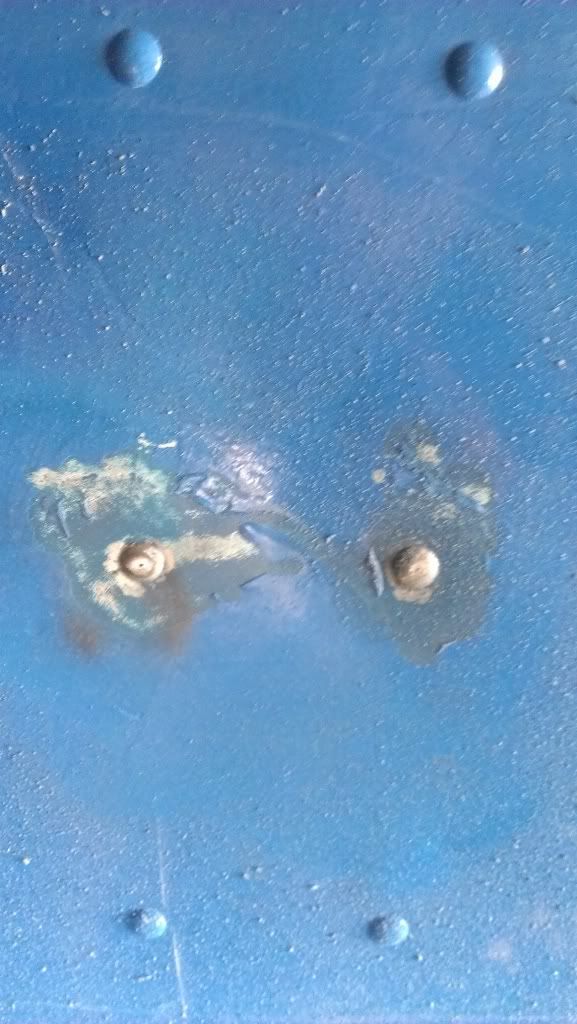
So back to my wire brush and grinder to clean nicely the holes after the bolts (I will do a better job on these, this was just a rush job) then I went through one side only of rivets that were caulked and painted over (as you can see in the photo above). Not the easiest to take this stuff off. Can't grind it off or you will damage the rivet and wire brush powered or hand, not so fast. I'm sure a little acetone would work much better.

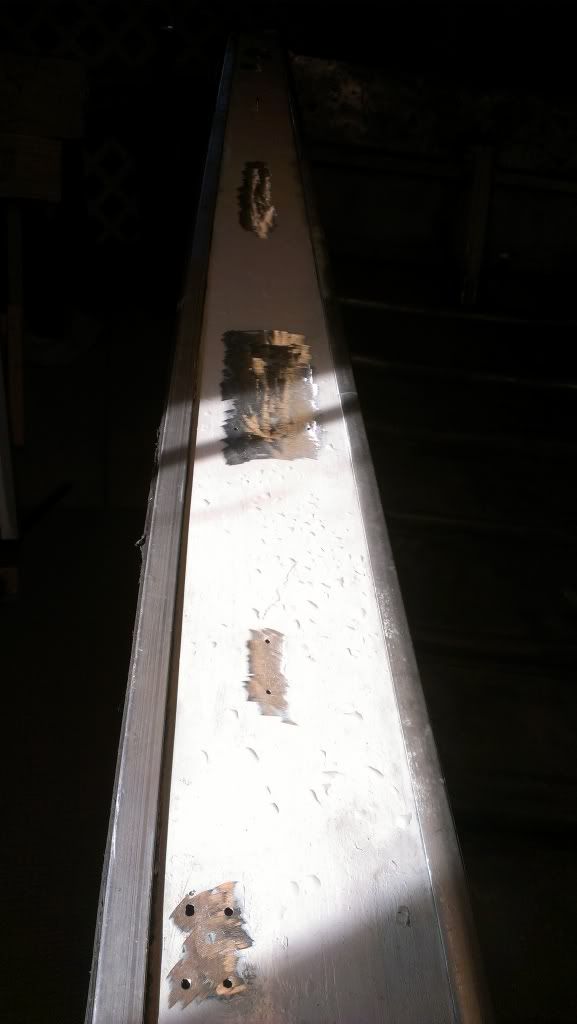
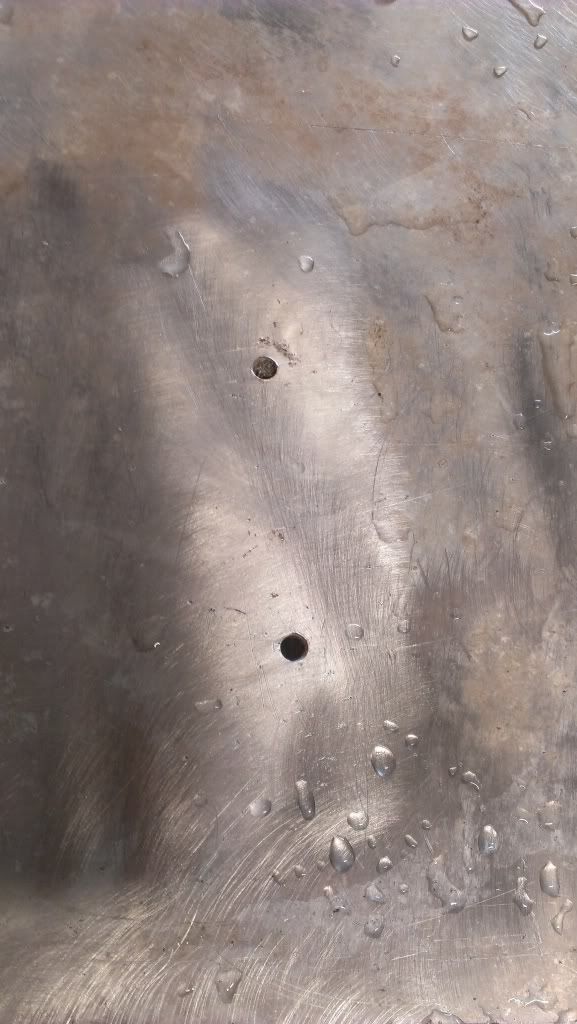
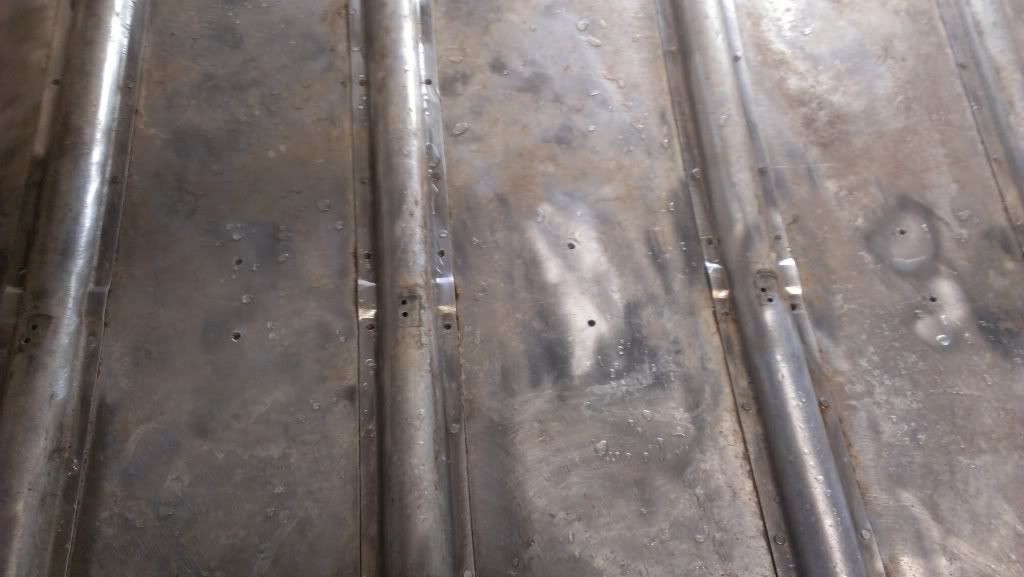
Here are some photos after the one side has been done;
IMAG0001_zps5ae6fa32.jpg

These will be cleaned much better so that its bare aluminum.

IMAG0002_zps2b321633.jpg

These are the holes that the bolts were in.

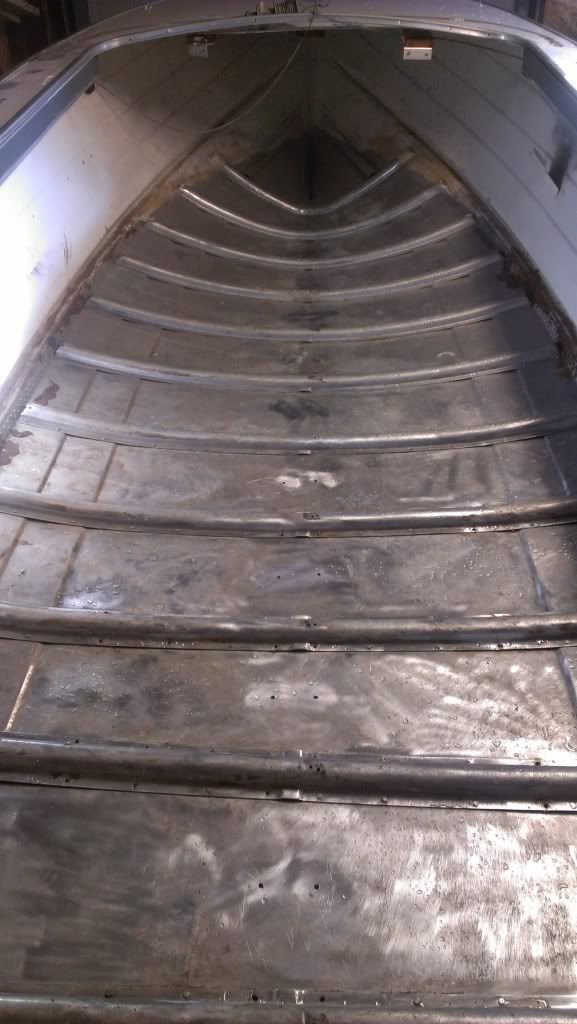
Here she is flipped onto one side before I go and flip her completely;
IMAG0006_zps2b792cc2.jpg

She's not that heavy just after all of it taken off, and piled up around in the garage I am running out of room LOL. Specially with all the toys and stuff being put away for winter.

Now here is the plan for the rest within the upcoming few weeks;
1.) I will be getting down to do the other side and clean it up off the rivets and holes.
2.) Each rivet and about inch all around will be cleaned to bare aluminum.
3.) Just for whatever reasoning I might have, I will be putting some nice JB Weld around the rivets or just Gluvit. Make sure we don't leak
4.) She will be washed and given a bath.
5.) Will flip her back on her belly and work on cutting the bow to open bow, manufacturing the gunwale and all the good stuff.

I believe I will have a good shaped Windshield and interior liner to give to anyone who needs for replacement. I will be however looking for a console of some sort. Side console to put in. I'm still in the tinkering area to see if I can fit one on the right hand side or two on both sides.
 

jbcurt00

Moderator
Staff member
Joined
Oct 25, 2011
Messages
24,891
Re: 1967 Starcraft Jet Rebuilding

Open bow will certainly give you & family more room & more seats.

Best of luck on the rivets w/ goop cleanup

PM your way :)
 

jasoutside

Supreme Mariner
Joined
Dec 20, 2009
Messages
13,269
Re: 1967 Starcraft Jet Rebuilding

Closed to open bow conversion is a tough go for sure. To make it solid, and functional, and look good is the crux. Any two out of those three items is pretty easy, but to put together all three, that is the real challenge.

All the best!:)
 

catbones

Petty Officer 1st Class
Joined
Jul 15, 2012
Messages
319
Re: 1967 Starcraft Jet Rebuilding

Jas,

thanks for the heads up. I wouldnt convert it but I have few folks telling me that I should if I really want to get into and enjoy fishing with em.

what's the thickness of ply you used for building up the front?

For everyone else, I'm also thinking of using very thin ply or something even thinner for building sides and making that be storage for poles or something. i will also be cutting down the splashwell like Jas did and adding a seating section with three seats, two that fold and you can pull Forward revealing the livewell and storage on the other side. Won't be easy but I hope it works. The middle seat , under it you would have access to the pumps, battery, etc... Now that middle seat you will be able to take off and pop one of those raised seats for fishing. So this all has to be strong. Might take way into the summer to finish it all. What you guys think on the ideas?
 

catbones

Petty Officer 1st Class
Joined
Jul 15, 2012
Messages
319
Re: 1967 Starcraft Jet Rebuilding

Here is sort of what I mean but of course, seats on top of that backboard so that you can accommodate 5 people seating.
2801513_2012-starcraft-marine-starfire-160-sc.jpg

attachment.php


Even the red trim on the outside gunwale works lol ... as my color will be black and red. :)
 
Top