1967 Starcraft Jet Rebuilding

catbones

Petty Officer 1st Class
Joined
Jul 15, 2012
Messages
319
Re: 1967 Starcraft Jet Rebuilding


No, I've seen those, just wanted something with a smooth head replacing what was there but if I have to LOL and can't find anything near.

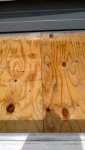
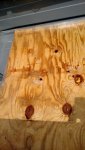
Just want to bolt her together and start working on the interior :) can't wait for next summer when she is finally done.

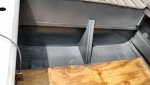
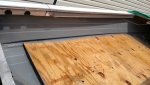
I did realize something though this weekend, spraying on paint vs roll and tip ... well roll and tip was much easier for me then spraying it. That's only because I'm limited on room and size, also the fact that I now see red every where :) with heavy cover all around even the floor still it all sneaked into here and there... so top coat and interior coat, going on with a roller and maybe a can of spray.
 

catbones

Petty Officer 1st Class
Joined
Jul 15, 2012
Messages
319
Re: 1967 Starcraft Jet Rebuilding

So I've been recently debating on removing the side rails from my Starcraft for cleaning, sanding it nicely to make it shiny and well also removing any paint that dripped down under the pain. However, putting it back together I'm either going with 5/16 half inch bolts SS or I was also looking at the Interlock Rivets... anyone used these interlock rivets before? they are stronger then normal ones but structural usage. I'm leaning more towards the SS bolts since more strength maybe.

Just out loud thinking, what do you guys think?

PS: Photos coming tonight of the paint being on her.
 

catbones

Petty Officer 1st Class
Joined
Jul 15, 2012
Messages
319
Re: 1967 Starcraft Jet Rebuilding

Woooohoooo! Hi all, hows everyone been doing through the winter??? Spring is finally shining down here and temperatures back to normal, some what.

I'll be back on restoring my boat once again or finishing her up this summer but first, when all of you jump on doing this in the spring I've got to put it off until mid summer since I and my wife decided to get a bigger property and that means moving first, boat later. GRRR! Another half cut year to get her wet.

I'll take a few photos of her when I gotta bring her out this week, she's looking beautiful in red and white.
 

Woodonglass

Supreme Mariner
Joined
Dec 29, 2009
Messages
25,924
Re: 1967 Starcraft Jet Rebuilding

Woooohoooo! Hi all, hows everyone been doing through the winter??? Spring is finally shining down here and temperatures back to normal, some what.

I'll be back on restoring my boat once again or finishing her up this summer but first, when all of you jump on doing this in the spring I've got to put it off until mid summer since I and my wife decided to get a bigger property and that means moving first, boat later. GRRR! Another half cut year to get her wet.

I'll take a few photos of her when I gotta bring her out this week, she's looking beautiful in red and white.

Don't forget to "PIN" your location on the New iBoaters map in the STICKY section at the top of the Forum. iBoaters Where Are You??
 

jbcurt00

Moderator
Staff member
Joined
Oct 25, 2011
Messages
24,893
Re: 1967 Starcraft Jet Rebuilding

Congrats on moving up to a larger place.
 

catbones

Petty Officer 1st Class
Joined
Jul 15, 2012
Messages
319
Ok so I'll slowly be getting on finishing my Starcraft but with a 2 month closing on the new house and moving I'm not sure how much ill do this year. Anyways, I'm up to where I lay the floor and stuff I'm just wondering if 3/4 thick plywood might be to heavy to run it for the floor. I noticed you guys used 1/4 to get the curve but I'm no buggy on that.
 

jbcurt00

Moderator
Staff member
Joined
Oct 25, 2011
Messages
24,893
A Jet can have 1 of 3 'floor' decks:

None

W/ a stringer down the center of the boat, a flat deck can be laid from about the height of the chine on 1 side of the boat across the top of the stringer to the other chine.

A 1/4" deck that is laid directly on the ribs, & 'rolls' up the end of the rib towards the chine.

If you want to get a more substantial feel from the deck, I'd recommend using 5/8" if you can find it in your choice of deck material. It's a bit heavier & less prone to deflection under foot then 1/2", not as heavy or expensive as 3/4". As a closed bow, you don't have to worry about the deck thickness effecting fit & finish of other components.

If you want to use 3/4", you can.
 

caswesm

Cadet
Joined
Aug 14, 2013
Messages
14
Has anyone thought of or has done Line-x their floor before installing it so, so it don't ever rot. Do you think it would add too much weight?
 

Woodonglass

Supreme Mariner
Joined
Dec 29, 2009
Messages
25,924
Been discussed a lot here on the forum and the general consensus is that it's not a good idea. Some have done it but most of the guys say NO!!! Mostly due to with adhesion/peeling issues, problems with future repairs etc... But Hey...It's your boat and you can do as you see fit.
 

catbones

Petty Officer 1st Class
Joined
Jul 15, 2012
Messages
319
Here's a quick question for anyone willing to pitch in their two cents. As you all know, I'm moving in about a month or so.. so the boat, its sort of on hold since I can't do anything other then upkeep the house at the condition the buyer purchased it. So no painting anywhere :)

Anyways, I've got storage all rented out near where I'm moving to move my boat parts, and what not over.... now since I won't have the time or space to put the motor temporarily on the boat, I'm thinking I should move it to the storage unit.

Here's the question however, can I tip the motor over to its side and lay it flat? will oil or anything else leak from it possibly?
 

jigngrub

Fleet Admiral
Joined
Mar 19, 2011
Messages
8,155
If your motor is a 2 stroke there's no problem laying it on it's side for a little while.

Applying the finish to the decking before installation is OEM for todays aluminum boats and is the best way to go (the only way to go in my book). It doesn't matter if it's Line-x or some other "paint on product", carpet, or vinyl. Apply the finish to the decking and then install the finished decking in the boat with exposed fasteners so you can easily remove the decking in the future without ruining your decking or the finish. Bed liners can be an attractive and durable finish when installed properly on aluminum boat decks (the plywood, not the hull).
 

lakelover

Rear Admiral
Joined
Mar 26, 2003
Messages
4,386
If you're putting in a curved floor, you'll never get 3/4" to bend. Even 1/4" was a bit of a challenge at one point toward the bow. 1/4" with foam insulation underneath will be plenty strong. Wood, the original curved floors were 1/4" on Jet Stars.
 
Last edited:

catbones

Petty Officer 1st Class
Joined
Jul 15, 2012
Messages
319
If you're putting in a curved floor, you'll never get 3/4" to bend. Even 1/4" was a bit of a challenge at one point toward the bow. 1/4" with foam insulation underneath will be plenty strong. Wood, the original curved floors were 1/4" on Jet Stars.
Thanks! Nope not putting in a curved floor wasn't so impressed when I laid the 1/4 down from left overs, so I decided 3/4 will be perfect to make things straight and even.
 

catbones

Petty Officer 1st Class
Joined
Jul 15, 2012
Messages
319
Overbuild!... I love it!!!:thumb:
Thanks! I'll take a photo where I'm at with her after I settle in at the new place. I'm thinking September. It will be actually nice for the first time to be able to work on my boat in a new, finished and heated two car garage that's attached to the house lol rather then have one car garage with tools, wood, paint and what not all around with a heater blowing that doesn't really cover it all and keep it warm. Can't wait fellas, can't wait. Actually I've been waiting what two years now so far for a splash and a year to actually move forward with this project. Not only was it too cold too long or too crowded lol but now I'll be able to actually finish it during winter times. Btw it feels so good too good being able to stand in her and I can just taste it already :) I hope it's not a bad thing already thinking and planning on selling and upgrading after I'm done. I'm dreaming 21' islander ;)
 

catbones

Petty Officer 1st Class
Joined
Jul 15, 2012
Messages
319
No Title

Ok... so the rebuilding continues this year after the move, settle, and with a broken arm/wrist when planned to work finally on the boat. Anyways, despite my doc saying to leave any labor work, I decided time to put in the floor and paint the insides. Here it is;

Not easy with one hand available but what I missed, carpet will cover. I'm thinking to also put down some ties on where the floor pieces connect from anything shifting.
 

Attachments

  • photo225988.jpg
    photo225988.jpg
    68.7 KB · Views: 0
  • photo225989.jpg
    photo225989.jpg
    61.3 KB · Views: 0
  • photo225990.jpg
    photo225990.jpg
    78.6 KB · Views: 0
  • photo225991.jpg
    photo225991.jpg
    75.4 KB · Views: 0
Top