ShoestringMariner
Lieutenant Commander
- Joined
- Apr 18, 2015
- Messages
- 1,605
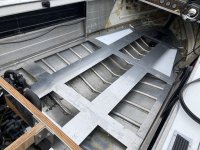
Looks like it’s taking shape. Is the foam going to support the aluminum sheet or will you be adding tubing, channel or angle?


")

Thats typically called Coroplast, sort of a plastic cardboard. The foam will go thru any nook and cranny, make sure its well sealed to keep the foam contained above the Coroplast.So I'm going to pour that on the sheet plastic and it can expand upward. If it comes up too high, it's ok to trim and cut it down. It's closed cell
Looks like it’s taking shape. Is the foam going to support the aluminum sheet or will you be adding tubing, channel or angle?
That corrugated plastic should do a great job keeping a nice cavity for drainage / airflow esp as it won’t compress downward!
Since you’ll be cutting the 2-part, look into ways to seal the cuts since you’re working in an open cavity; Epoxy might work here.
Pour-in is not the same as the foam board that we recommend (extruded polystyrene; XPS). They’re quite different actually.
XPS leaves no spaces between the cells…it’s these spaces that harbor the water. So it’s true that you will nick the outer monolayers of XPS cells when cutting (or melting with our hot wire cutters), there is literally nowhere for water to go beyond that monolayer of open cell.
I didn't know what it's called. It seems like it'll serve my purpose. When I pour the foam, I was thinking do around the edges first, and kind of build a barrier where I don' t want it to go. Maybe use duct tape if I need to keep it out of crevices. There's no pressure on it because I'm going to give it room to expand in other directions. It'll take the route of least resistance.Thats typically called Coroplast, sort of a plastic cardboard. The foam will go thru any nook and cranny, make sure its well sealed to keep the foam contained above the Coroplast.
Once you cut the over expanded pour in foam flush w the top of the stringers &/or backside of the deck(floor) ply, its not closed cell any more.
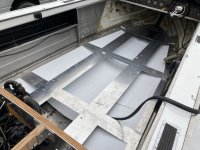
Thanks. She only had to do 3. It was cold, she hung in there though.Deck framing looks substantial, and well thought out
Congrats on having a interested Admiral, mine wouldt have been agreeable to solid rivets once the cacophony of riveting started.
Making nice progress.
Hope the metal shop agrees to fix their mistake.
XPS dissolves, which is why I covered much of mine at the stern with HDPE (gasoline proof) bags.One of the things I don't know about XPS, is how it reacts with gas, oil and chemicals that get into a bilge. I can't find anything about that. The pour advertises that it is unaffected by gas and oil.

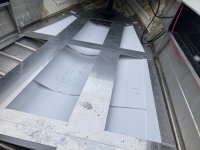
If I didn't know better, looks like someone trying the smuggle some stuff under the deck.....XPS dissolves, which is why I covered much of mine at the stern with HDPE (gasoline proof) bags.
View attachment 331646
If I didn't know better, looks like someone trying the smuggle some stuff under the deck.....
lol
Nice work!!!!
SHSU

I kind of regret that I'm not going to treat my rivets with Gluv-It... I replaced all the damaged and loose solid rivets that I could find. I wanted to treat it all with Gluv-It but I just don't have the conditions to clean it and prep it properly to apply the Gluv-It. I'm content with doing that next time I replace the decking If I do it at all.
After going through @classiccat 's build and seeing the corrosion he encountered, cause by epoxy, I'm not sure I want to use epoxy on my boat anymore. I'm definitely not going to apply it unless I feel good about the prep.
I’m not doing mine either. It’s 45 years old and might have the odd leaky rivet. But minor if at all.I kind of regret that I'm not going to treat my rivets with Gluv-It... I replaced all the damaged and loose solid rivets that I could find. I wanted to treat it all with Gluv-It but I just don't have the conditions to clean it and prep it properly to apply the Gluv-It. I'm content with doing that next time I replace the decking If I do it at all.
After going through @classiccat 's build and seeing the corrosion he encountered, cause by epoxy, I'm not sure I want to use epoxy on my boat anymore. I'm definitely not going to apply it unless I feel good about the prep.


I hear you, and it's not that I'm afraid of the work, but I don't have a shop. That stuff has to be applied under the right conditions and I can't affectively clean my boat and do the proper prep work in 10-30 degree weather. I'm not going to let it hold up my project. This is my only boat. I have a limited number of summers to enjoy it with my kids while they are little, and I'm going to do everything I can to have it ready to do that, this summer.I'd highly suggest taking the time to apply Gluvit or Coat-it. With the floor out and other work being done, seems like a no brainer to me. I don't recall it being that tedious of a process. Almost like skipping the primer under paint...not a step I'd want to personally bypass.
I’m not doing mine either. It’s 45 years old and might have the odd leaky rivet. But minor if at all.
Any substantial water in the bilge gets in there by rain and my crappy mooring covers anyway.
That is some nice floor bracing you have there! Gives you plenty of room to secure the flooring.
Starting to see what you meant on your idea to keep the pour in foam off the aluminum. How you going to secure the sheet together? Tape/glue?
SHSU