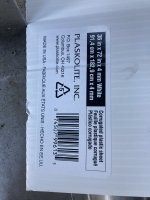
1966 Starcraft Holiday Interior Work

66Holiday924

Chief Petty Officer
Joined
Aug 21, 2017
Messages
578
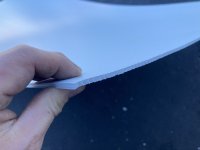
The boat has ribs running port to starboard. The stringers run across the top of the ribs elevating them about an inch or so. I'm running sheet plastic across the ribs also. That's going to create about a 1 inch cavity for water in the bilge to move. You pour the foam on top of the sheet plastic. It might press some areas of the plastic down, but the plastic is rigid enough that there is going to be a pretty effective in creating the cavity I want. Additionally the forward cowl is meant to naturally ventilate the bilge and engine compartment. I'm going to run the bilge duct hose below the sheet plastic so air can circulate through the bilge and engine compartment and escape through the aft cowl.
 

classiccat

"Captain" + Starmada Splash Of The Year 2020
Joined
Dec 20, 2010
Messages
3,412
if you're dead set on the pour-in, you can lay some XPS down between the ribs; the
Everything you're saying would be true for the Pink Panther foam... Every forum I've ever read, they sandwich the pink panther foam between the deck and the hull... If water could be trapped between my sheet plastic and the hull, the same would be true for the pink panther foam. Pick your poison... That's not going to happen though. The sheet plastic I'm using is rigid enough that it will create a pretty good cavity under there, and that is going to be naturally ventilated between the forward and aft cowls.
The way I put down the solid foam (as most do), I laid pieces flat (parallel with the hull skin) between the ribs; the rivet-tabs & rivets essentially serve as spacers and allow for drainage. My deck is glassed on both sides.

You may be able to do something similar with the pour-in...I don't have a feel for how much force the 2 part will impact on the foam; would it cause the rivets to push into the foam?
 

jbcurt00

Moderator
Staff member
Joined
Oct 25, 2011
Messages
25,034
I'm well aware of how your boat is built.
Had a Holiday 18ftr.

Your plastic sheet is more rigid then 3/4 plywood and/or the aluminum hull? Pour-in foam done poorly has been known to buckle plywood &/or aluminum when too much is used......

But to each his own....

Make sure every possible nook & cranny is well sealed along the edges of your plastic sheet. Pour-in will find them and push past/deform your sheet.....
 

66Holiday924

Chief Petty Officer
Joined
Aug 21, 2017
Messages
578
I don't know why this is so controversial... All I said is that I'm going to go with pour in foam. It is the same foam as the pink panther foam. They've been building boats with it for decades.

My concerns with using it is that the bilge needs to be able to breathe, natural ventilation must be able to occur. Any water that collects needs to be able to drain freely when you pull the plug.

The sheet plastic I'm going to put down mitigates all of that. It is going to create a void between the deck and the hull. coupled with the natural ventilation it should stay pretty dry down there. It's also going to prevent the foam from having extended contact with any water that collects in there, preventing water logged foam or damage.

I was originally considering using a very thin sheet of the pink panther to span the ribs, instead of the plastic sheeting. Then pour-in, on top of the pink panther, so it would be all foam, and have the cavity I want. I changed my mind because oil, gas and different chemicals end up in the bilge, and you don't know how they might slosh around with the water and break down foam they get on. The plastic will be more resilient to breaking down, and I don't care if it does breakdown... The main thing with this, is that it needs to be revisited every so often. IMHO that's part of the maintenance on an aluminum boat. Plywood deck will rot, rivets come loose, foam breaks down (eventually), etc. Every so often you have to pull it apart and re-do it. That's why I'm paying pretty good money to have the aluminum framing system built. It should make replacing the deck pretty easy in the future, something I see as regular maintenance on the boat.
 

SHSU

Lieutenant Junior+Starmada Splash Of The Year 2019
Joined
Mar 8, 2017
Messages
1,725
I don't know why this is so controversial... All I said is that I'm going to go with pour in foam. It is the same foam as the pink panther foam. They've been building boats with it for decades.

My concerns with using it is that the bilge needs to be able to breathe, natural ventilation must be able to occur. Any water that collects needs to be able to drain freely when you pull the plug.

The sheet plastic I'm going to put down mitigates all of that. It is going to create a void between the deck and the hull. coupled with the natural ventilation it should stay pretty dry down there. It's also going to prevent the foam from having extended contact with any water that collects in there, preventing water logged foam or damage.

I was originally considering using a very thin sheet of the pink panther to span the ribs, instead of the plastic sheeting. Then pour-in, on top of the pink panther, so it would be all foam, and have the cavity I want. I changed my mind because oil, gas and different chemicals end up in the bilge, and you don't know how they might slosh around with the water and break down foam they get on. The plastic will be more resilient to breaking down, and I don't care if it does breakdown... The main thing with this, is that it needs to be revisited every so often. IMHO that's part of the maintenance on an aluminum boat. Plywood deck will rot, rivets come loose, foam breaks down (eventually), etc. Every so often you have to pull it apart and re-do it. That's why I'm paying pretty good money to have the aluminum framing system built. It should make replacing the deck pretty easy in the future, something I see as regular maintenance on the boat.

My 2 cents for what its worth...

We are not trying to be controversial or tell you that what you are doing is wrong. There have been a lot of people that have had negative experience with pour in foam and the point of the forum is to educate and assist with issues as they come up. So as in this case, based off what others have seen and experienced we are expressing/passing that info on to you.

In this case, I can see you have done your research and due diligence so you are making an educated decision. In many cases others aren't aware of the potential issues that can occur.

All in all, its your boat and the final decision rests with you. If you are happy with it then by all means go forward. Would love to see the pictures showing the spacing you are building for the foam. Could be something for future renovators to take into consideration as well.

SHSU
 

jbcurt00

Moderator
Staff member
Joined
Oct 25, 2011
Messages
25,034
Yep ^^^ Nailed it

What type of sheet plastic would probably be helpful.

Q&A: whole point of a public forum, and not just those immediately involved, those that come later too....

If you want baseless flattery try other social media venues....

Esp those where pool noodles are still a widely accepted flotation foam substitute. Guess where that trend started, was well researched (and tested w written documentation) and then proved an unacceptable substitute that was then strongly discouraged:

The Iboats Starcraft forum

Same could be said for many (most? all?) of the methods posted here to eliminate/minimize the cons of pour in foam in an aluminum boat.

Perhaps your way will work, and work as you intend. Hope so, good luck.

Details Jim, we need details
[Insert StarTrek Dr McCoy meme]

@BWR1953 is the only recent (last 4 or 5 yrs) foam variation I've seen posted that was well thought out, well executed, very well documented and wildly successful. If you haven't paged thru his SOTY nominated King Fisher rebuild, take a look.
 

66Holiday924

Chief Petty Officer
Joined
Aug 21, 2017
Messages
578
If you want baseless flattery try other social media venues....

Esp those where pool noodles are still a widely accepted flotation foam substitute. Guess where that trend started, was well researched (and tested w written documentation) and then proved an unacceptable substitute that was then strongly discouraged:

That might be the rudest paragraph I've ever seen on iboats... In thousands of pages that I've read I've never seen anybody talk to another member like that. What is your problem with me?
 

66Holiday924

Chief Petty Officer
Joined
Aug 21, 2017
Messages
578
I got some pretty good news today. They're finished with my deck framing and they are going to let me use their shop to apply my expanding foam.

Reading about expanding foam, I can see why builders use it, and backyard builders don't. Apparently it is very sensitive to conditions. If the temperature and humidity isn't right, it will not expand properly and you will have a bad experience. Builders have large shops with controlled environments, so they can create the conditions to do it properly. It's not quite that easy to create those conditions for people who don't have a shop or a heated garage. Even on what might seem like a nice Spring or Summer day, the humidity might not be right and what I read is that it is very sensitive to both, heat and humidity. So getting the use of this shop is ideal for this and it eliminates my main concern.
 

SHSU

Lieutenant Junior+Starmada Splash Of The Year 2019
Joined
Mar 8, 2017
Messages
1,725
I got some pretty good news today. They're finished with my deck framing and they are going to let me use their shop to apply my expanding foam.
Nice!!! Don't forget the pictures!! lol

SHSU
 

66Holiday924

Chief Petty Officer
Joined
Aug 21, 2017
Messages
578
Nice!!! Don't forget the pictures!! lol

SHSU
Yeah, man, no pressure now. This could be the ultimate iBoats build up and failure... lol. I have no idea if, or how well this is going to work out. I'm hoping to get some work done this weekend and then either next weekend or the following I'm going to do the foam.

I am definitely an amateur. I can't come close to doing a lot of the work I see on iBoats. I don't have the skill set, resources, or the time. I'm just some dude that wants to get his boat straightened out before the summer. I come on here looking for help and advice. I like to share my project because I like looking at other people's work and I understand how the pictures alone are helpful to other people. I know it isn't very often you get to see somebody tear apart a 50 year old Starcraft Holiday, so I hope whatever I do, successes or mistakes, helps somebody. I am not here for baseless flattery though. I just enjoy the site.
 

ShoestringMariner

Lieutenant Commander
Joined
Apr 18, 2015
Messages
1,593
Yeah, man, no pressure now. This could be the ultimate iBoats build up and failure... lol. I have no idea if, or how well this is going to work out. I'm hoping to get some work done this weekend and then either next weekend or the following I'm going to do the foam.

I am definitely an amateur. I can't come close to doing a lot of the work I see on iBoats. I don't have the skill set, resources, or the time. I'm just some dude that wants to get his boat straightened out before the summer. I come on here looking for help and advice. I like to share my project because I like looking at other people's work and I understand how the pictures alone are helpful to other people. I know it isn't very often you get to see somebody tear apart a 50 year old Starcraft Holiday, so I hope whatever I do, successes or mistakes, helps somebody. I am not here for baseless flattery though. I just enjoy the site.

awesome point of view. We’re all amateurs at some things and pros or good at others. dive in, enjoy your build and be proud YOU did it. We’re all our worst critic but I’m sure this project will turn out very well: it won’t be a fail.
 

BWR1953

Admiral
Joined
Jan 23, 2009
Messages
6,178
Yeah, man, no pressure now. This could be the ultimate iBoats build up and failure... lol. I have no idea if, or how well this is going to work out. I'm hoping to get some work done this weekend and then either next weekend or the following I'm going to do the foam.

I am definitely an amateur. I can't come close to doing a lot of the work I see on iBoats. I don't have the skill set, resources, or the time. I'm just some dude that wants to get his boat straightened out before the summer. I come on here looking for help and advice. I like to share my project because I like looking at other people's work and I understand how the pictures alone are helpful to other people. I know it isn't very often you get to see somebody tear apart a 50 year old Starcraft Holiday, so I hope whatever I do, successes or mistakes, helps somebody. I am not here for baseless flattery though. I just enjoy the site.
That's exactly how I started, like so many of us. You're in good company! 👍😎
 

classiccat

"Captain" + Starmada Splash Of The Year 2020
Joined
Dec 20, 2010
Messages
3,412
You're thinking outside of the box; rather than paint-by-numbers you're contemplating the build soup-to-nuts and researching each build module.
I'm particularly excited to see this deck framing idea so please get plenty of pictures of construction and application!
 

66Holiday924

Chief Petty Officer
Joined
Aug 21, 2017
Messages
578
You're thinking outside of the box; rather than paint-by-numbers you're contemplating the build soup-to-nuts and researching each build module.
I'm particularly excited to see this deck framing idea so please get plenty of pictures of construction and application!
I am nervous about the deck plating. I think the idea is a winner but if they didn't cut it right, the pieces won't match up... That's going to suck if that turns out to be the case. I will be putting that in tomorrow and I can't wait to see if it's going to work. The boat is in storage and I haul it back and forth, to work on it over weekends, otherwise I would have checked that the second I brought it home yesterday.

My boat has two or three rivet holes in the tips of the ribs, so my idea was to have something else that the decking fastens to. I plan on keeping this boat for a long time, and I am under no illusion that no matter how good of a job I do, the decking will have to be replaced again and again. I can't just keep drilling holes in the ribs...
 

66Holiday924

Chief Petty Officer
Joined
Aug 21, 2017
Messages
578
The plating is inspired by @Watermann chief actually. I believe it was his build. He had to raise his decking so he put wood strips across the tips of his ribs, bridging them, and then fastened the decking to the wood and his stringers.
 

SHSU

Lieutenant Junior+Starmada Splash Of The Year 2019
Joined
Mar 8, 2017
Messages
1,725
I am nervous about the deck plating. I think the idea is a winner but if they didn't cut it right, the pieces won't match up... That's going to suck if that turns out to be the case. I will be putting that in tomorrow and I can't wait to see if it's going to work. The boat is in storage and I haul it back and forth, to work on it over weekends, otherwise I would have checked that the second I brought it home yesterday.

My boat has two or three rivet holes in the tips of the ribs, so my idea was to have something else that the decking fastens to. I plan on keeping this boat for a long time, and I am under no illusion that no matter how good of a job I do, the decking will have to be replaced again and again. I can't just keep drilling holes in the ribs...

I think all starcrafts being restored have the same multi hole rib tips. Might be a "feature" for weight reduction.... lol

SHSU
 

66Holiday924

Chief Petty Officer
Joined
Aug 21, 2017
Messages
578
Well... Bad news for me. They didn't cut my sheet plating right... The pieces are perfect except the part that is supposed to straddle the stringers is wrong. Thankfully, I can show them where it was their mistake, not mine. I guess we'll find out what's going to happen with this Monday.

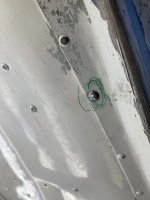
Otherwise, I had a pretty long productive day working on the boat. It was 10 degrees when I started. I had snow and a sheet of ice over my cover. I got that cleared, inspected the rivets, came up with the 3 that I knew about. The admiral and I replaced those. Hats off to my wife. She's a pulmonary doctor and works in COVID units all week long. I have her air hammering rivets on the weekend. She was a good sport about it. She ran the gun and I climbed in the boat and held the bucking bar. I really really really wanted to be the one on the gun but I thought that job would be easier for her.

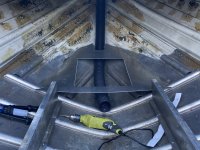
Then I installed my new natural ventilation tubing. The front cowl on my boat had bilge duct hose run from the cowl to the bilge. It takes air in, circulates the bilge, the engine compartment and escapes the aft cowl. That's how my boat was set-up. Bilge hose is kind of flimsy and I don't want it getting torn or crushed when I throw gear under the bow, so I used 3" corrugated, solid, drain tile instead. They bury that stuff in farm fields... It should do just fine on my boat, I'm thinking. It tucked in there really nicely.
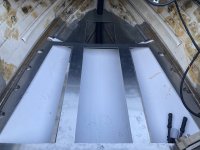
Then I riveted down the bow plate that they made, the only one that wasn't cut wrong.
 

Attachments

  • IMG_0274.JPG
    IMG_0274.JPG
    4.4 MB · Views: 30
  • IMG_0276.JPG
    IMG_0276.JPG
    2.7 MB · Views: 28
  • IMG_0277.JPG
    IMG_0277.JPG
    1.6 MB · Views: 30
  • IMG_0286.JPG
    IMG_0286.JPG
    3.5 MB · Views: 30

66Holiday924

Chief Petty Officer
Joined
Aug 21, 2017
Messages
578
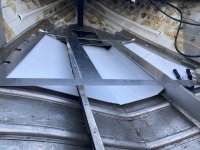
Here's a picture of what I'm trying to do. I want to lay the sheet plastic, install the aluminum plating, pour the foam, then install decking. The plastic bridges the ribs creating a cavity under the foam. The corrugated tile at the front of the boat gets tucked under the plastic for the natural ventilation.

From what I understand the pour in foam will expand and blow out anything trying to confine it, like freezing water in a pipe. It will also take the "path of least resistance" So I'm going to pour that on the sheet plastic and it can expand upward. If it comes up too high, it's ok to trim and cut it down. It's closed cell, just like the pink panther foam board that everybody cuts into pieces. The pour in can also be done in layers and that's what I'm going to do. take my time, layer it in there and try to reduce the amount that needs to be trimmed.

Attached is a visual. I threw the everything in there quick so I could post a picture on here. I thought the visual would help.

You can also see the plating is wrong and doesn't straddle the stringers...
 

Attachments

  • IMG_0283.JPG
    IMG_0283.JPG
    2.8 MB · Views: 33
  • IMG_0288.JPG
    IMG_0288.JPG
    4 MB · Views: 33
  • IMG_0289.JPG
    IMG_0289.JPG
    4.5 MB · Views: 33
  • IMG_0285.JPG
    IMG_0285.JPG
    1.3 MB · Views: 32
Last edited:
Top