1966 Starcraft Holiday Interior Work

66Holiday924

Chief Petty Officer
Joined
Aug 21, 2017
Messages
525
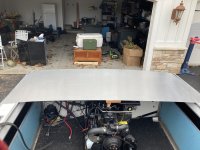
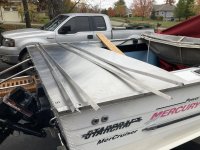
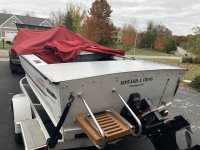
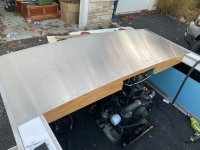
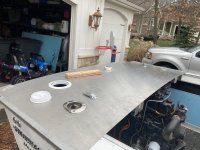
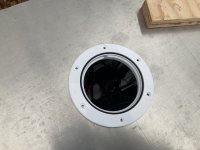
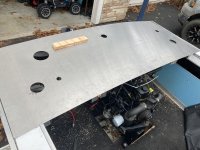
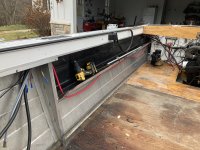
I got the new transom cap Friday. It fit perfect. I'm excited about having the clean slate. I have some support framing to build (waiting on hardware). Once that's done I can put it in place, mark where my holes are going to go for the rod holders, access porthole that I'm adding for the battery switch, fuel, etc. and then I'm going to have them punch the holes in it for me.

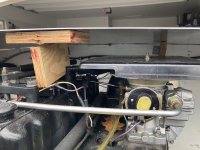
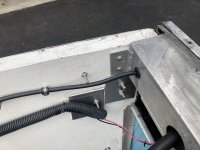
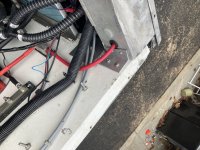
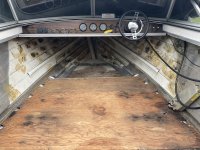
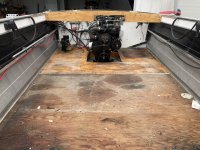
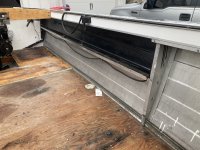
I added a couple of brackets to brace the corners where I had to trim away the Gunnells and that did the trick as far as taking the slop/wiggle out of the corners.
 

Attachments

  • IMG_0193.JPG
    IMG_0193.JPG
    4.3 MB · Views: 36
  • IMG_0200.JPG
    IMG_0200.JPG
    4 MB · Views: 36
  • IMG_0198.JPG
    IMG_0198.JPG
    4.3 MB · Views: 35
  • IMG_0196.JPG
    IMG_0196.JPG
    4.4 MB · Views: 33
  • IMG_0211.JPG
    IMG_0211.JPG
    4.6 MB · Views: 32
  • IMG_0201.JPG
    IMG_0201.JPG
    4 MB · Views: 33
  • IMG_0202.JPG
    IMG_0202.JPG
    2.2 MB · Views: 34

SHSU

Lieutenant Junior+Starmada Splash Of The Year 2019
Joined
Mar 8, 2017
Messages
1,665
Very pretty!!!! Nothing like a shiny piece of aluminum.

The bracket you showed, is that screwed in or through bottled? If just screwed, I would suggest through bolt with plenty of 5200.

Just my 2 cents....

SHSU
 

66Holiday924

Chief Petty Officer
Joined
Aug 21, 2017
Messages
525
The bracket you showed, is that screwed in or through bottled? If just screwed, I would suggest through bolt with plenty of 5200.


SHSU
I've got three rivets (I added another rivet to each after the pictures) to the gunnel aluminum and 2, 316 stainless, 3/4, ~1/4 dia., into the transom wood.
 

SHSU

Lieutenant Junior+Starmada Splash Of The Year 2019
Joined
Mar 8, 2017
Messages
1,665
Used 5200 to seal the wood where you screwed?
SHSU
 

66Holiday924

Chief Petty Officer
Joined
Aug 21, 2017
Messages
525
Used 5200 to seal the wood where you screwed?
SHSU
No, not this time. I think it's good under there. It stays dry. They're the only screws I'm putting in the transom for this project. I'm not buying a tube of 5200 for that.
 

SHSU

Lieutenant Junior+Starmada Splash Of The Year 2019
Joined
Mar 8, 2017
Messages
1,665
I guess I was a little over zealous with my use of 5200.

Mindset of "could it fail"??? "Maybe in a 1000 years... Ok 5200 the crap out of it and it will last 1001 years"!!!!

:D

SHSU
 

66Holiday924

Chief Petty Officer
Joined
Aug 21, 2017
Messages
525
I guess I was a little over zealous with my use of 5200.

Mindset of "could it fail"??? "Maybe in a 1000 years... Ok 5200 the crap out of it and it will last 1001 years"!!!!

:D

SHSU
I used 5200 on basically all of the other screws in it. I did a lot of work rebuilding that transom and didn't want water from the bilge splashing up and getting into it. I know exactly what you're saying. These screws are all the way at the top, and there are only a few of them, so I didn't worry about it with these. I know the mindset though!
 

66Holiday924

Chief Petty Officer
Joined
Aug 21, 2017
Messages
525
It's been slow, I've been mostly waiting on my sheet metal work. It didn't help that one of the measurements I gave them for a hole they stamped was a little small (the template was wrong), and I had to bring it back to have it stamped out even larger. They did an awesome job. I think it looks great! I'm happy with the addition of the access hatch. It's going to keep my switch easily accessible and safe from the elements.

I'm not very happy with the threaded inserts. I don't think so... They're just not aggressive enough to bite into the side of the Ply wood and hold the way I want them to. I'm going to have to say that is an idea that didn't work out very good. It's probably because I'm going into the side of the ply. Oh well, I guess we'll just screw it down(y). I need to fill in where I drilled out the wood for the inserts with something that has the strength to be screwed into, if I needed to. Any recommendations. I'm thinking gorilla glue epoxy.
 

Attachments

  • IMG_0234.JPG
    IMG_0234.JPG
    3 MB · Views: 26
  • IMG_0236.JPG
    IMG_0236.JPG
    4.3 MB · Views: 26
  • IMG_0238.JPG
    IMG_0238.JPG
    4.2 MB · Views: 26

SHSU

Lieutenant Junior+Starmada Splash Of The Year 2019
Joined
Mar 8, 2017
Messages
1,665
Metal work looks really clean!!

Have you done the final install or was that a test fit?

SHSU
 

66Holiday924

Chief Petty Officer
Joined
Aug 21, 2017
Messages
525
Metal work looks really clean!!

Have you done the final install or was that a test fit?

SHSU
Thanks! They did a great job punching the holes. It's nice and clean. It was just a test fit. I don't think I'm going to install it until the Spring. It's going to be wrapped in vinyl flooring, I don't have the weather conditions to do it right and I think I might have to be the one to do that.
 

SHSU

Lieutenant Junior+Starmada Splash Of The Year 2019
Joined
Mar 8, 2017
Messages
1,665
Bummer, but at least you have it there waiting for when you are ready. Any other work going to be done in the interim?

SHSU
 

66Holiday924

Chief Petty Officer
Joined
Aug 21, 2017
Messages
525
Bummer, but at least you have it there waiting for when you are ready. Any other work going to be done in the interim?

SHSU
Everything else is still going to move forward. A lot of it is going to be done at an upholstery shop though. I don't have cooperating weather, and I don't have a shop that I can create the right conditions in... So I'm going to finish up a few things that I can, and send it off to have the new floor put in (including foam), all of the panels rebuilt, jumpseats rebuilt, and engine cover modified. I'm going to have them go down the gunnels and across the dash with white Nautolex to clean that up, cover old screw hole, etc. and have a new bimini made.
 

ShoestringMariner

Lieutenant Commander
Joined
Apr 18, 2015
Messages
1,563
Interesting project, I love the Holidays. If I can ever find me a clean 22` for a good deal...

Why the longer transom deck? looks? function? both?

Looks great so far. subscribed
 

66Holiday924

Chief Petty Officer
Joined
Aug 21, 2017
Messages
525
It has been pretty slow moving due to the weather but I got lucky with a day in the 50's about a week ago and got some demolition done. I've done everything that I'm going to do until the Spring, as far as the transom cap is concerned.

I've removed the side panels, carpet, old decking, and re-riveted my stringers, to start the floor rebuilding phase. Next I'm going to inspect and replace solid rivets where needed (I've already identified 3). Treat them all with Gluv-It. Re-install my natural ventilation coming from the cowl on the front of the boat. Then, I have my sheet metal shop building me a framing system to install between the boat and my plywood decking. Basically, they have my plywood floor pieces and are going to build me a 1/8 sheet aluminum copy of each sheet, with windows cut out. When they're done, the pieces will each have a 5" border around the edges and down the stringers creating 3 windows per piece. The idea is to rivet the framing to the boat, and the wood to the framing. The idea is that It will stiffen up the floor and make future deck replacement easy. Some of my ribs already have three holes drilled in them where the deck was replace. This should put an end to that. Once the metal plate frame is in, I will rebuild the wood decking (weather permitting), then it goes to the shop to have, expanding foam installed below deck, re-carpeted, and the panels, engine cover, jump seats rebuilt. Nautolex to be installed over the transom cap, down the gunnels and across the dash.
 

Attachments

  • IMG_0254.JPG
    IMG_0254.JPG
    5.7 MB · Views: 24
  • IMG_0255.JPG
    IMG_0255.JPG
    6 MB · Views: 24
  • IMG_0256.JPG
    IMG_0256.JPG
    5.5 MB · Views: 23
  • IMG_0257.JPG
    IMG_0257.JPG
    5.3 MB · Views: 22
  • IMG_0259.JPG
    IMG_0259.JPG
    4.8 MB · Views: 23
  • IMG_0260.JPG
    IMG_0260.JPG
    5.8 MB · Views: 25

SHSU

Lieutenant Junior+Starmada Splash Of The Year 2019
Joined
Mar 8, 2017
Messages
1,665
Any day working on the boat is a good day... As long as it was planned. lol

I am sure others will chime in, but why the pour in foam? I know a lot of guys don't like them in tinnies.

SHSU
 

66Holiday924

Chief Petty Officer
Joined
Aug 21, 2017
Messages
525
I am sure others will chime in, but why the pour in foam? I know a lot of guys don't like them in tinnies.

SHSU

I know a lot of people use the pink panther foam. I don't think there's really that big of a difference as far as cost. It's not like there is some huge bilge under the deck of the boat. The pink foam seems like it would be a pain. For an extra $50 you can get a pour in kit... The other thing is how I've decided to run my natural ventilation. The natural ventilation comes in the cowl down the flex hose, through the bilge and ventilates through the aft cowl. I am going to partition of the bilge down the center with sheet plastic. So there will be a sheet of plastic that divides my bilge. I envision the plastic running between the bottom of the stringers, so down the middle, there will be decking, foam, a layer of plastic sheeting, and then my bilge, ventilated between the fore and aft cowls. I think the layer of foam will be easier to get in there with the expanding foam.
 

classiccat

"Captain" + Starmada Splash Of The Year 2020
Joined
Dec 20, 2010
Messages
3,405
I believe the trepidation comes from seeing other members experience the fun of literally digging out soaked pour-in foam only to be rewarded with corroded aluminum underneath. The modern formulations are reported to be better for water retention, thermal stability, etc.

If you keep the paths to the bilge open for drainage, put a barrier between the foam-to-hull (& foam-to-deck) and avoid extended exposure to water, I think it will be fine. I could be wrong here but cutting the foam after it has cured also seems to be counter productive since you're making the outer layer open-cell.

That said, I found putting in the foam board quite enjoyable...but I'm a little weird so take that with a grain of salt. šŸ¤£
 

66Holiday924

Chief Petty Officer
Joined
Aug 21, 2017
Messages
525
I believe the trepidation comes from seeing other members experience the fun of literally digging out soaked pour-in foam only to be rewarded with corroded aluminum underneath. The modern formulations are reported to be better for water retention, thermal stability, etc.

I wasn't aware that they were having problems with corrosion. I have read that the new pour in is different than the stuff they used decades ago and it doesn't retain water like the old stuff did or adhere to the aluminum. The stuff I saw reviewed said that it's adhesion is kind of like the gap filler stuff. It's sticky as hell until it cures, it's not sticky in the slightest bit.
If you keep the paths to the bilge open for drainage, put a barrier between the foam-to-hull (& foam-to-deck) and avoid extended exposure to water, I think it will be fine. I could be wrong here but cutting the foam after it has cured also seems to be counter productive since you're making the outer layer open-cell.

I am planning on creating a cavity with sheet plastic. The plastic would bridge the ribs, the foam gets poured over it and then the deck sandwiches it in. So there is some sort of cavity between the hull of the boat and the foam, so water can drain easier. Cutting the foam doesn't matter. It's just a bunch of tiny little bubble, "closed cells". If you cut it, yes you will cut the cells open along that layer but the rest of them remain closed, kind of like swiping a layer off of a bubble bath. It doesn't ruin the whole bath, just removes the top layer of bubbles. The pink panther sheets is the same stuff. It's closed cell and it doesn't affect it one bit if you cut it.
That said, I found putting in the foam board quite enjoyable...but I'm a little weird so take that with a grain of salt. šŸ¤£
It's 20-30 degrees here, with 6 inches of snow on the ground, with no sign of letting up... It's just not the weather to even begin to enjoy it. I want it done though. I want to use my boat in the summer.

I guess the other thing I'll say about this part of the project is that I don't plan on neglecting my boat like people do. They're digging foam out of boats, and that foam is 30, 40, 50 years old, and hasn't been replaced anytime the decking was. IMHO the decking and everything else made out of plywood will need to be revisited about every 10 years. and when the floor gets replaced, the foam should always be replaced too. Another hang-up I have about the pink foam is that I've read that the Coast Guard does not recognize it as floatation foam (even though it is the same stuff). IDK, you've given me pause. Luckily I have some time to think about it while my framing is being made.
 

jbcurt00

Moderator
Staff member
Joined
Oct 25, 2011
Messages
24,871
USCG rules dont apply, you arent a manufacturer. Flotation foam shouldnt be ignored or left out, its simply that there is no USCG requirement as a non-manufacturing backyard rebuilder

2lb pour in offers about the same flotation 'value' 60Lb/CuFt as the XPS foundation foam (pink, green or blue depending on maker. It too has 60Lb/CuFt...

I dont know how you intend to keep the plastic sheet from forming to the hull once you start pouring in expanding foam on top of it.

The corrosion comes from water being trapped between 2 surfaces and becoming caustic when its starved of oxygen. A sheet of plastic against the hull would trap water just like foam against the hull would..
 

66Holiday924

Chief Petty Officer
Joined
Aug 21, 2017
Messages
525
USCG rules dont apply, you arent a manufacturer. Flotation foam shouldnt be ignored or left out, its simply that there is no USCG requirement as a non-manufacturing backyard rebuilder

2lb pour in offers about the same flotation 'value' 60Lb/CuFt as the XPS foundation foam (pink, green or blue depending on maker. It too has 60Lb/CuFt...

I dont know how you intend to keep the plastic sheet from forming to the hull once you start pouring in expanding foam on top of it.

The corrosion comes from water being trapped between 2 surfaces and becoming caustic when its starved of oxygen. A sheet of plastic against the hull would trap water just like foam against the hull would..

Everything you're saying would be true for the Pink Panther foam... Every forum I've ever read, they sandwich the pink panther foam between the deck and the hull... If water could be trapped between my sheet plastic and the hull, the same would be true for the pink panther foam. Pick your poison... That's not going to happen though. The sheet plastic I'm using is rigid enough that it will create a pretty good cavity under there, and that is going to be naturally ventilated between the forward and aft cowls.
 
Top