1963 16' Star Dust I believe

jbcurt00

Moderator
Staff member
Joined
Oct 25, 2011
Messages
25,051
As Ron noted, there are options, some prefer 1 method over another. No need to debate the merits of them here.

Lets talk about the Stardust.

EDIT: I got those broken pix links taken care of.....
 
Last edited:

StarTed

Senior Chief Petty Officer
Joined
Jul 14, 2015
Messages
694
Thanks JB.

I got side tracked myself and did some requests for the better half this morning. I guess that's not really side tracking but rather off track for this topic but important work.

I'll try to take better care of my photo bucket account. My main computer where I store all the pictures is running XP and my wife and I both have lap tops that are running Windows 10. Moving copies to photo bucket is a multi stage process and sometimes I get duplicates. It's when I delete duplicates that I run into trouble.
 

StarTed

Senior Chief Petty Officer
Joined
Jul 14, 2015
Messages
694
Well, I'm back for a day. My father-in-law had his 91st b-day on Feb. 14th so we went down to Yuma AZ to help him celebrate it. While there we went on to Tucson to see the wife's sister for a few days and them up to Mesa to visit a friend before going up to Farmington NM to see a museum that I got an invite to see around 15 years ago. The museum is a must see in my opinion. Tommy Bolak called me about a meter museum I set up at Seattle City Light and invited me to see his museum in Farmington. He has over 1000 meters. His fish and wildlife museum is one of the best I've ever seen. His electromechanical one is still in progress but fills 3 large buildings and several acres outside. Did I mention they're free and no donations either.

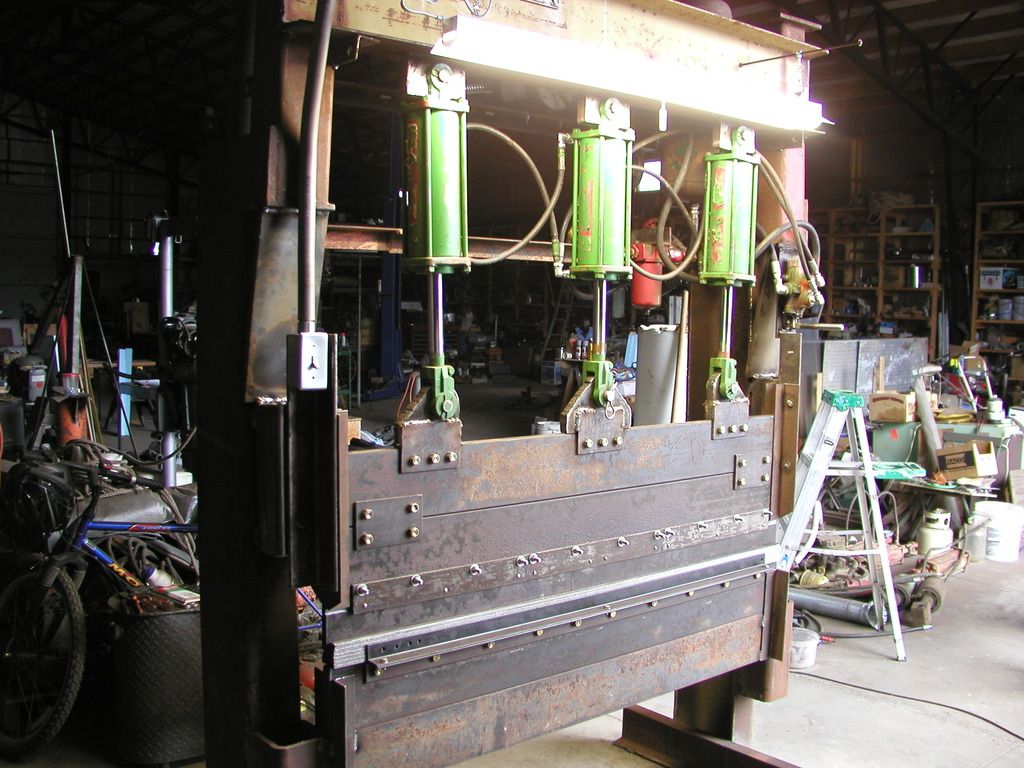
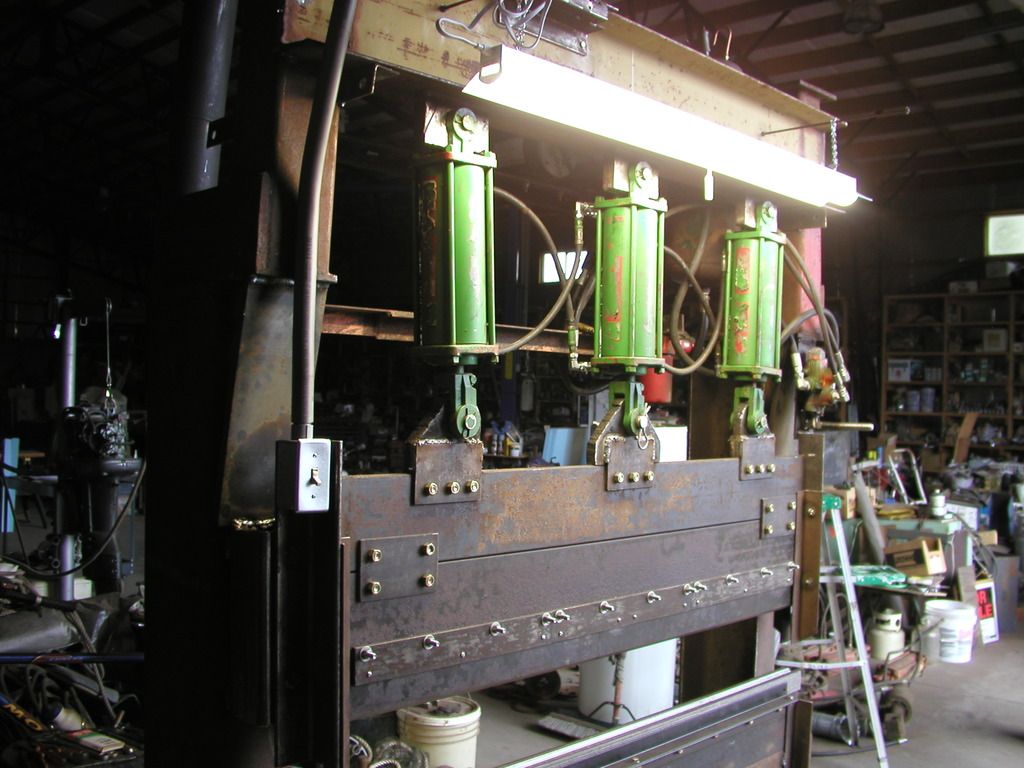
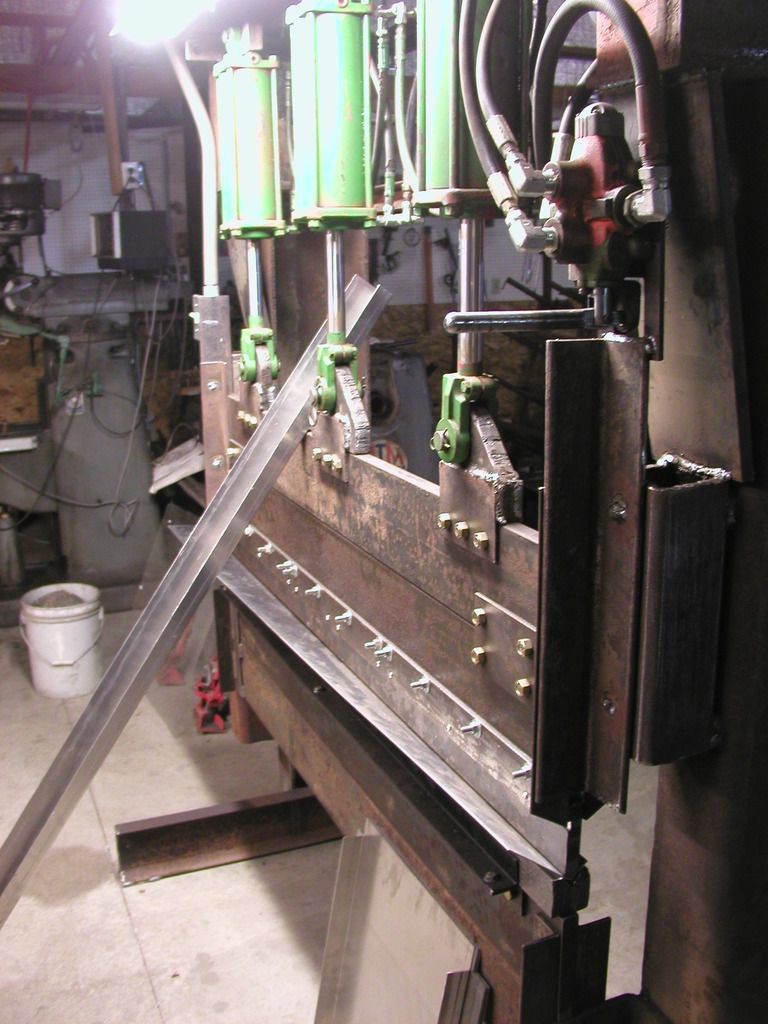
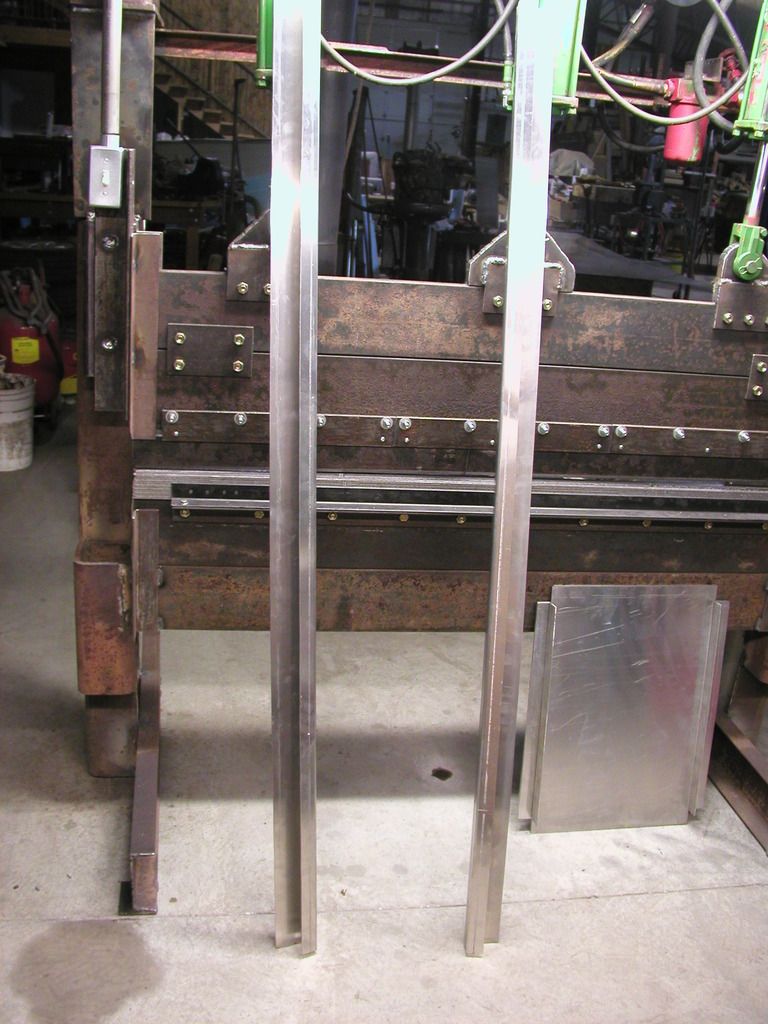
Between travelling and fishing for steelhead I managed to finish the brake. The 2hp electric motor is plenty adequate for the set up but the pump is very slow. I think that I've restricted the hydraulic flow too much but it works although rather slowly. I hear buzzing noise from the pump and control when moving the cylinders but I don't think it's too bad. At least I plan to use it as is since I fixed 2 small hydraulic leaks. Now I need to cut some aluminum strips 5' long and see how they bend.

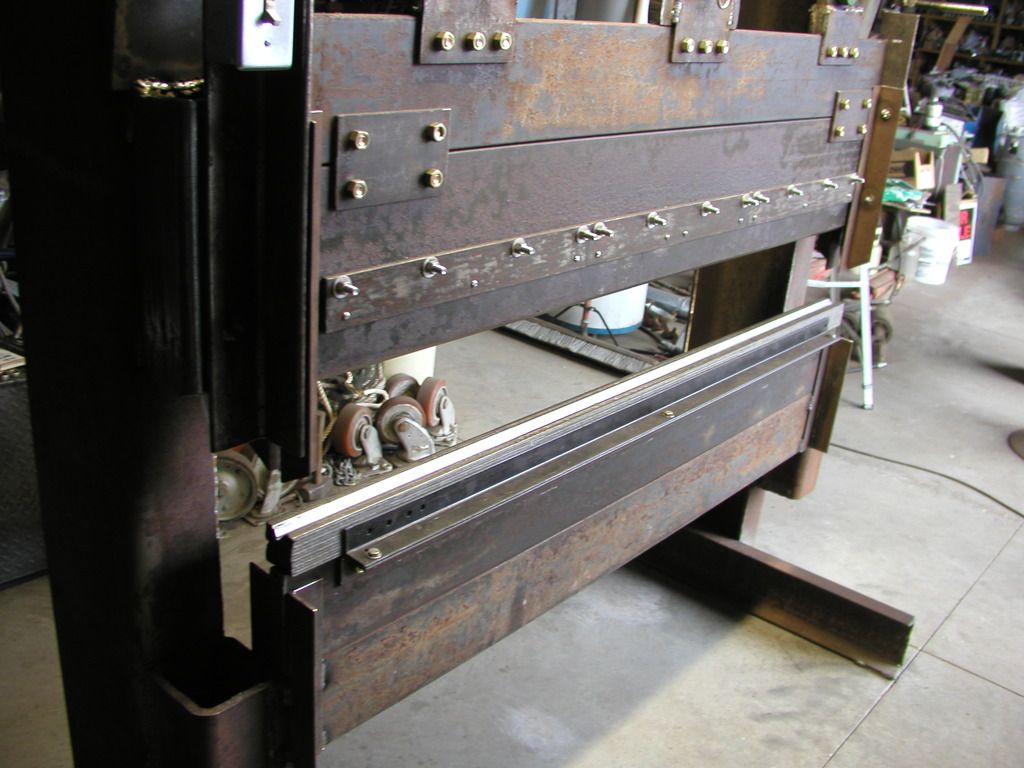
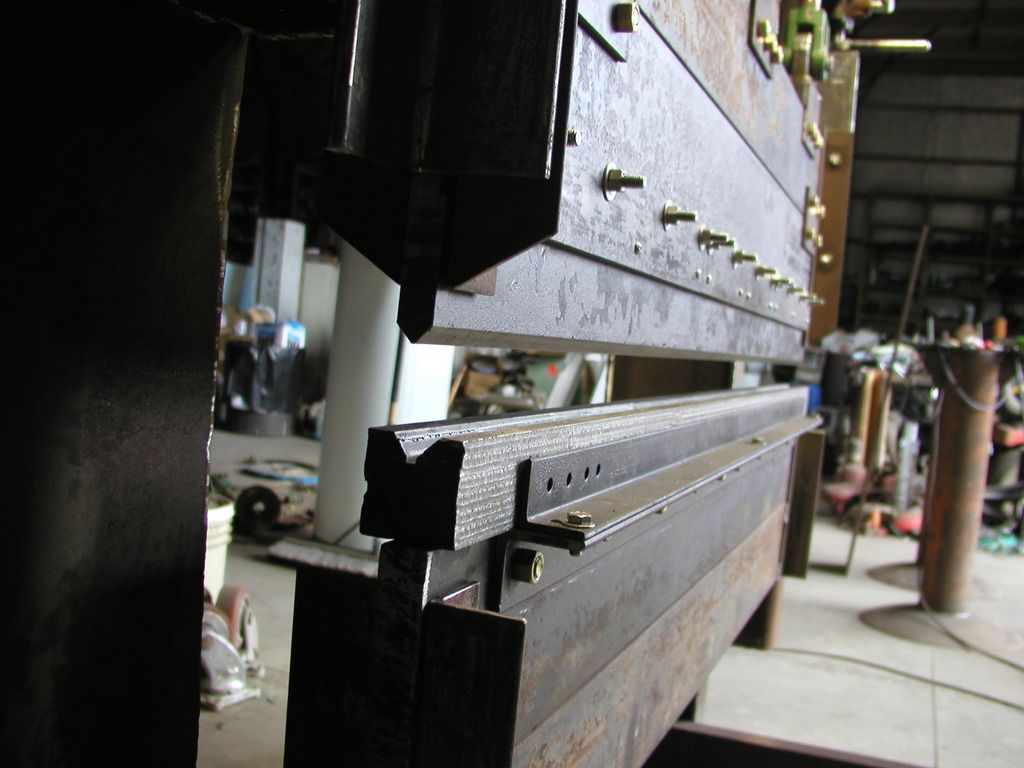
Here are some pics.


The brake with cylinders extended.


The brake with cylinders retracted


Brake wide open


View of braking mechanism.

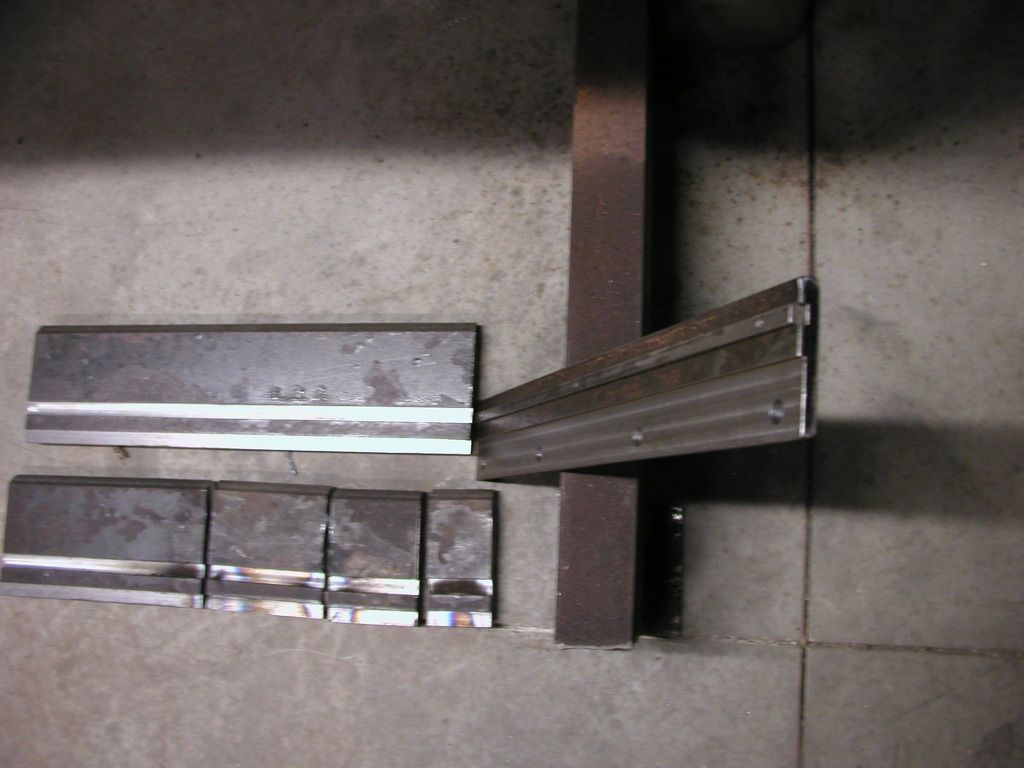
This is a finger brake without all the fingers cut yet. I still need to make 4 cuts to make fingers 2", 3", 4" and 8" One piece is 17" long to cut for the fingers. Another piece is 16" and the last piece is the remainder for a total of 60", The cuts will be out of the pieces cut leaving around 1/8" gaps.

Hopefully next week I'll get more time to work on the boat. Tomorrow another meeting in Seattle to plan the high lakes fish stocking for this summer and fall.

By the way, I caught 1 small bright steelhead keeper yesterday and a couple of larger non keepers on leap year day from the Snake.
 

Watermann

Starmada Splash of the Year 2014
Joined
Jan 12, 2013
Messages
13,796
Good Lord almighty, that sure is some brake :eek:

I love steelhead, grew up catching them all my life here on the upper Columbia.
 

StarTed

Senior Chief Petty Officer
Joined
Jul 14, 2015
Messages
694
I've been thinking about adding the aluminum channels with caulk between the sides and channels. Does anyone have any thoughts about using "Pro-Seal 34" ? I know it works well for roofers and stays flexible for years. It says that it can be used on aluminum. My sons have applied it in freezing weather and while storming and it seems to seal sooner or later. I like that it stays flexible. I'm trying to keep condensation from creeping down the sides and under the floor and also prevent chaffing between the aluminum sides and channels. I have some that is set up and is still very stretchy. What do you think?
 

jbcurt00

Moderator
Staff member
Joined
Oct 25, 2011
Messages
25,051
@Watermann
dozerII

Have both done more then 1 tin boat build, neither sealed the edge of the deck to the hull.

I can only think of 1 build that did, but I think it was to keep debris out more then water.

BWR or gone's, it escapes me which at the moment
 
Last edited:

BWR1953

Admiral
Joined
Jan 23, 2009
Messages
6,201
I've been thinking about adding the aluminum channels with caulk between the sides and channels. Does anyone have any thoughts about using "Pro-Seal 34" ? I know it works well for roofers and stays flexible for years. It says that it can be used on aluminum. My sons have applied it in freezing weather and while storming and it seems to seal sooner or later. I like that it stays flexible. I'm trying to keep condensation from creeping down the sides and under the floor and also prevent chaffing between the aluminum sides and channels. I have some that is set up and is still very stretchy. What do you think?
Can you post a pic of the area you're talking about sealing? I'm not visualizing very well. I might just need more coffee though. :ranger: :lol:

I sealed the deck of my Kingfisher to the sides of the hull with spray foam in order to prevent debris from getting below the deck.

Like so:

foamed.jpg

foam1.jpg

painted1.jpg
 

StarTed

Senior Chief Petty Officer
Joined
Jul 14, 2015
Messages
694
Thanks JB for the heads up.

BWR the post that shows what I'm referring to is #56.

How is the foam holding up? When I've cut into foam that looks like that it seems to be quite porous inside.

I'm also thinking of using gray porch and deck paint like yours. How does it wear and do you feel it's not too slick?
 

BWR1953

Admiral
Joined
Jan 23, 2009
Messages
6,201
Thanks JB for the heads up.

BWR the post that shows what I'm referring to is #56.

How is the foam holding up? When I've cut into foam that looks like that it seems to be quite porous inside.

I'm also thinking of using gray porch and deck paint like yours. How does it wear and do you feel it's not too slick?
Okay, I checked post #56 and understand what you're looking to do. I'm not sure but maybe 3M 4200 or 5200 might work. Some of the other guys with more experience are sure to chime in later.

The spray foam that I used was trimmed flush then primered and painted with gray porch paint. The foam and the paint are holding up well so far, although the boat hasn't seen a lot of use since that work was done. The deck is not slick at all.
 
Last edited:

StarTed

Senior Chief Petty Officer
Joined
Jul 14, 2015
Messages
694
Thanks BWR for your reply.

It looks like I'll be using porch paint for the floor.

I'm not sure 3M 4200 or 5200 are flexible enough for me. I'm leaning towards using Pro-Seal 34 after priming all the aluminum and maybe putting paint over the primer. That way I feel that it'll make for a longer life and also be removable should I need to remove the floor in the future should anything happen to the aluminum hull underneath that I'll need to fix.

I have some 14 gauge aluminum 55" long to cut and brake for the channels. I feel that my new brake will be up to the task. I bent some 14 gauge 21" long pieces today and they folded right over without a struggle.

Most of my channels will be 1 1/4" outside X 1 1/2" bottom X 2 1/4" inside from 5" wide strips. I'm still thinking about welding them together to make them better water tight.

My wife is trying to side track me into fixing up an old Craftsman table saw. The 1HP motor doesn't run and it was missing the start capacitor (that I stole for another motor years ago) so I put on another one on but I think it's the wrong value. Tomorrow I'll check out the windings to make sure the run winding isn't open. The motor struggled to spin but wouldn't spin up. I bought the saw new in 1970 and have kept it out of the weather so it's still solid but I guess it's getting old. We have a Delta industrial table saw that we primarily use but she uses the old Craftsman to do some dado work and keeps it set up just for that function. I had replaced the original motor with a 2 HP motor that I stole for the brake so now I need to get the old motor back on it if I can make it run.

Yes, my wife has taken over the wood shop but I got even, I took over the sewing machine. :)

We still share.
 

Watermann

Starmada Splash of the Year 2014
Joined
Jan 12, 2013
Messages
13,796
I have a question.

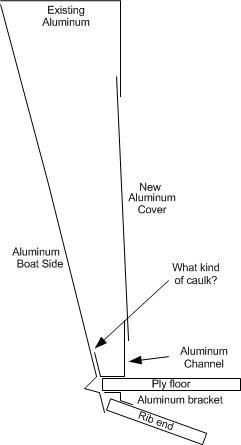
I plan to make some aluminum channels to secure to the floor and side covers. What is the best way to caulk them to the boat sides? I do not want to fasten them with rivets and would like to make them slightly flexible yet keep water from draining down behind.

See the below drawing.


Here is the post, figured I would bring it here so others can see what your talking about. Does your SC model like the others use the side panels as part of the boats structural integrity? If so they would need to have strong attachments to both the side of the gunnel and decking. This could be accomplished by riveting the channel down through the decking and into the base bracket first. then attach the side panel to the gunnel and channel with blind rivets.

For the seal between the decking and side panel, if it's a 90 degree joint why not use a piece of quarter round in either aluminum or solid PVC and use an adhesive sealant to secure it..
 

StarTed

Senior Chief Petty Officer
Joined
Jul 14, 2015
Messages
694
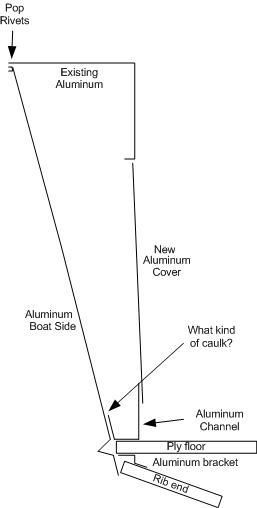
I upgraded the drawing some to better show how the existing top piece attaches. It was not originally connected to the side at the bottom. Once it's attached along the top at the outside edge the side becomes quite rigid.


The floor was originally 1/4" plywood attached to the ribs with pop rivets. Each sheet was 10' long and cut at the bottom center. That made the floor curved. The only thing that braced the sides a little were 2 seat boards from side to side. The new floor makes it much more rigid.
 

StarTed

Senior Chief Petty Officer
Joined
Jul 14, 2015
Messages
694
Today I cut some aluminum strips 6' long and bent them on the 5' brake. It took several presses sliding them back and forth to keep from warping them too much. The brake had no problem bending 5' of the 14 gauge aluminum.

Here is a picture of one piece done and another in the brake being bent.


Here are the 2 side peices bent to shape. I'll adjust the final bends by hand to align with the boat.


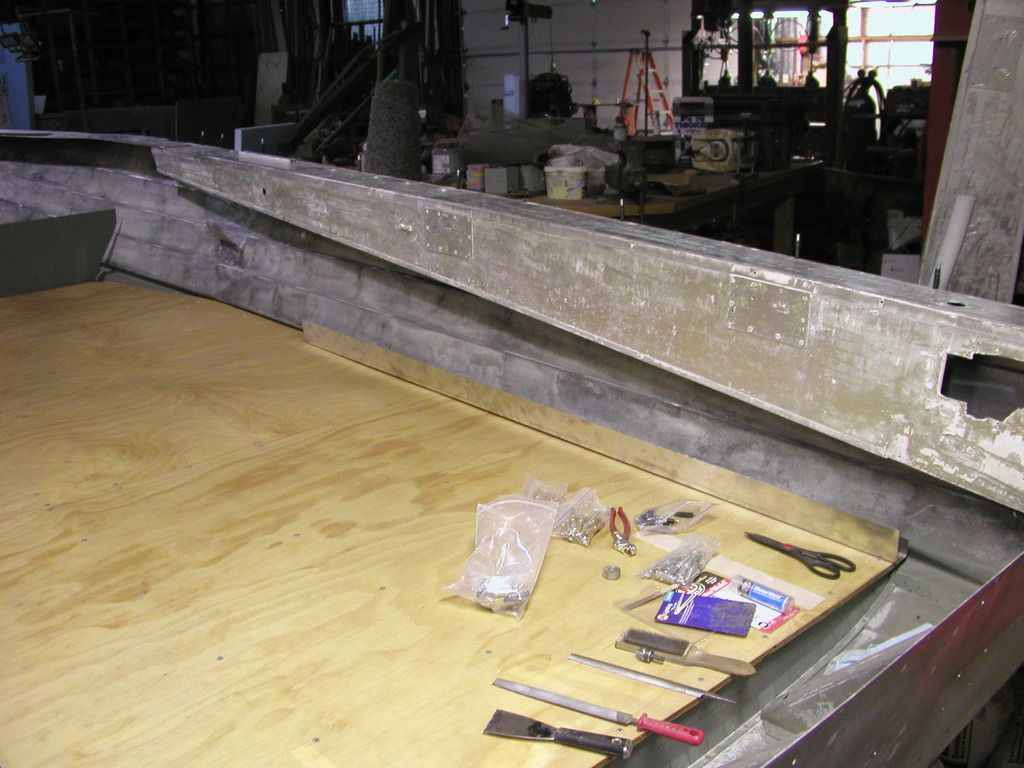
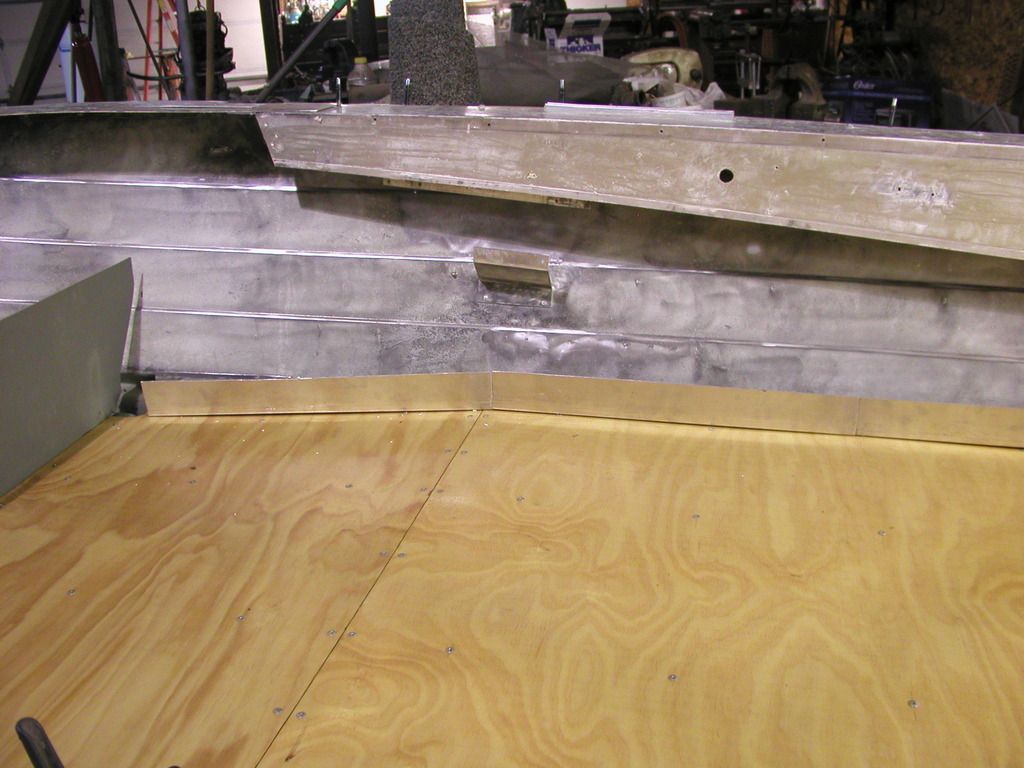
The next picture shows one of the bent pieces on the deck with the original side piece held in place with some clecos. It's not fastened yet because I plan to do more work to it.


Here is another picture showing additional pieces aligned along the side showing where they will eventually be fastened. I plan to screw them down with 3/4" SS screws into the deck.


I'm hoping to weld them together to form a continuous gutter down each side with the front end closed forcing the water to flow to the bilge in the stern. Then I plan to close the ends with either perforated aluminum or screen. No critters. The gap between the aluminum pieces on the side will be covered with an aluminum piece fastened at the top and bottom. I'm thinking of making some compartments in the side piece with doors for access. That way I'll have some storage and also it'll be easy to make access for wiring and control cables.

That's it for tonight.
 

StarTed

Senior Chief Petty Officer
Joined
Jul 14, 2015
Messages
694
Watermann,

I've been thinking over your idea and find it another option but I'm not sure it'll be any simpler. The gap is not consistent over the entire length and I want something to attach a side panel to so I'll also need an angle added for that connection. Now that I have the channels bent into the general shape I'm leaning towards using Pro-Seal 34 to keep out dirt, critters and moisture. I have a tube that was left with the end open and a gob sticking out of the nozzle. The gob is still soft and stretchy after being there for several years. It is definitely not something to use where you need a rigid finish however it is paintable.

I have to do something about the transom. I like the suggestion to add another sheet of aluminum on the outside sealed with 3M 5200 to cover up all the now filled holes in the original aluminum. The suggestion was to use 3/16" thick aluminum but I only have 13 gauge available. Does anyone see a problem adding 13 gauge over the existing aluminum? I'm hoping it should be thick enough and I won't have to spend any more money.
 

Watermann

Starmada Splash of the Year 2014
Joined
Jan 12, 2013
Messages
13,796
Yeah Ted you're going to have to see how the side panel hardware comes out to decide on how to seal it up. I'm into bedding stuff in sealants rather than beads for long term sealing.

For the transom is that to cover the motor pad area? Just to cover holes I don't know why .070 AL wouldn't work just fine.
 

StarTed

Senior Chief Petty Officer
Joined
Jul 14, 2015
Messages
694
Yeah Ted you're going to have to see how the side panel hardware comes out to decide on how to seal it up. I'm into bedding stuff in sealants rather than beads for long term sealing.

I'm planning to apply the sealant prior to assembly and feather the edge once installed. The aluminum channel will need to be bent slightly on the outside in order to follow the boat's side somewhat closely. That is why I made it come up 1 1/4" to have the channel overlap the side at least 1/4" mostly more.

For the transom is that to cover the motor pad area? Just to cover holes I don't know why .070 AL wouldn't work just fine.

The suggestion was to cover the whole transom with an additional skin set in 3M 5200. I believe it was to try to make the skin as whole again as possible. I suppose I'll have to screw them together with SS screws as well as clamp them to form a water tight seal.
 

oldhaven

Chief Petty Officer
Joined
Aug 30, 2015
Messages
576
I am just now fabricating this sort of outside transom cover from 1/8" 5052 AL. I will be using most all of a sheet that is 18" x 60". It will be cut and shaped on top to fit just below the transom cap and will extend to about 2" below the rivet line for the Z brace, which I have removed to clean up. In width it extends to just beyond the transom eyes on either side. If you do it this way, and with 5200, as you plan, the replaced Z brace rivets should seal the bottom pretty well and not interfere with the transom wood inside since they are below it. Additional clamping will be done by the knee brace and other through bolted hardware, and the splash well drains will also hold it. I plan to do as I have seen others do and after the transom is in, stainless steel screws around the perimeter of the plate and into the transom material but not through it, plus a fillet of 5200 will seal the deal. If you are using wood this does make for unsealed penetrations, but you could put sealant in the pre-drilled holes. I was tempted to leave the bottom of the cover open so things could drain, but I think I will try for total coverage of sealant instead. That's my plan, and I'll document it elsewhere, but I thought it might give you some options.

Ron

BTW, you have some awesome fabrication skills.
 
Last edited:

StarTed

Senior Chief Petty Officer
Joined
Jul 14, 2015
Messages
694
Thanks for the ideas and kind comments oldhaven.

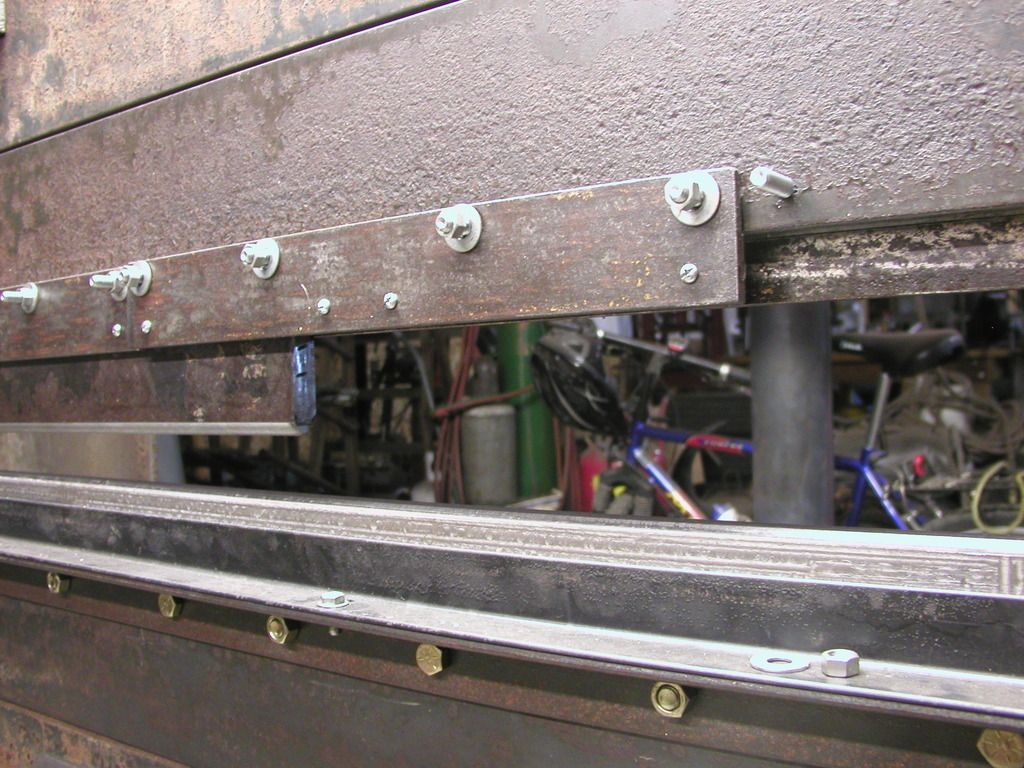
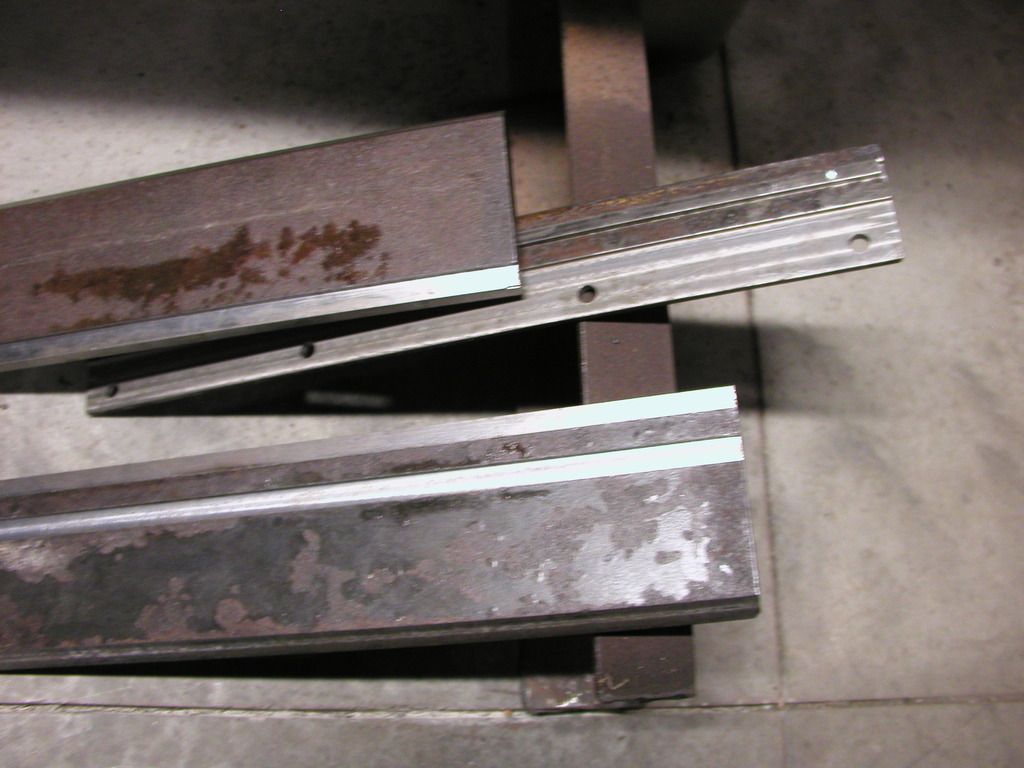
Today I decided to cut out the fingers in the brake. The 17" punch piece was cut into 2", 3", 4" and 8" pieces on the short side. This way I can make widths in 1" increments starting at 2". I took some pictures to hopefully show how the punch pieces are held in place. The main plates are 1" thick and the punches are 3/4" thick so I had to mill down some clamps to hold them in place and put in some key material held in place by small screws (#10). Hopefully you can see the detail in the following pictures. The cuts were too hot to handle so I'll grind off the burs tomorrow.


This picture shows the brake with some of the punches removed and the clamp loosened enough to drop the punches.


Here are 2 punches (16" and 17") with a clamping plate.


This picture shows the 17" punch cut into 4 pieces with a clamping plate on end showing the key held in by the #10 screws.

Tomorrow I'll assemble the brake back together for some more bending. So far the brake has met all my expectations.

These breaks from the boat allow me time to think about my next steps and digest the great advise I'm receiving. Just because I don't always agree or follow the advise doesn't mean I don't appreciate it and may apply the thoughts to future work. Much of my work is done applying stuff I find around my shop.

___________________________________________
(There's always a way, I just have to think about it)
 

StarTed

Senior Chief Petty Officer
Joined
Jul 14, 2015
Messages
694
Yesterday I cut out a new transom skin from the 13 gauge aluminum sheet. I used a piece 24" X 61" and cut out the transom piece about 1/8" smaller than the rear face. Now I have some more questions.

1. Should that size be OK to leave enough room for sealing the edges and prevent snagging anything in the water?

2. Should the patch be cleaned bare aluminum or primed before applying 5200?

3. Same for the existing transom skin. I suppose an acid etch should be sufficient.

4. Should the bottom edge through the aluminum only, be riveted or use ss screws and nuts to allow cinching them together? This is the area below the transom plywood.

5. How often should I fasten the bottom edge? Every 1", 2" or ?

Thanks for your thoughts on these.

Now to cast some sinkers.
 
Top