1958 14' Fleetform

Woodonglass

Supreme Mariner
Joined
Dec 29, 2009
Messages
25,924
Re: 1958 14' Fleetform

I think you need to listen to the video again. They are removing Paint not Gelcoat with that stripper.
 

jbcurt00

Moderator
Staff member
Joined
Oct 25, 2011
Messages
24,913
Re: 1958 14' Fleetform

I think you misunderstood whatever video you watched:
PRODUCT DESCRIPTION


Aqua-Strip is a technically advanced, safer marine stripper designed to remove up to 10 layers of thick marine anti-fouling, top-side and other paints and varnishes in one application. Aqua-Strip stays wet for extended periods of time to penetrate and lift bottom layers. Aqua-Strip will not damage the gel coat, fiberglass or other surfaces. It is environmentally safe, biodegradable, non-flammable, and contains no methylene chloride or caustic. Aqua-Strip is odor-free and can be easily cleaned up with water.


  • Begins working in 30 minutes
  • Contains no Methylene Chloride
  • Removes anti-fouling and other top side marine paints
  • Safe to use on gel coat and fiberglass
  • Environmentally safe, non-caustic
  • Subject to or will include a recycling fee in the following states: CA, OR
The product description of: will not damage gel coat, indicates that it WON'T even soften it... So it is unlikely to be able to strip gel coat.....

NO it isn't paint. That video you just posted from boat works, shows a boat that was painted black, at some point AFTER it left the factory and was applied on top of the gel coat. He refers to it as finish several times, but at about 4:45 he refers to the black that they are removing as PAINT. Then does it several more times, the black is paint.

As I also suggested you do earlier, the black paint was applied to poor condition gelcoat. After he stripped the paint off, they removed any areas of gel coat that were loose, repaired them. At about the 6:00 mark, he's got all those circled areas and talks about covering the entire boat w/ 2 layers of CSM.

If you have the PPE needed, and want to remove the damaged gel, you will have to replace it, as I've suggested in several previous replies.

Decker & Trooper have done what you want to do to the damaged white portions of your hull. READ their threads. You grind an area back to solid glass, and rebuild that area w/ CSM & 1708 as necessary to bring the repair to just flush w/ the surrounding areas. Once you sand it about smooth, you fair large areas to re-contour the shape of the hull.

Thanks for finding a great example of the work you have ahead of you. Sorry but it isn't an Aqua Strip gel coat stripper video.

As WoodOnGlass also stated....
 
Last edited:

Woodonglass

Supreme Mariner
Joined
Dec 29, 2009
Messages
25,924
Re: 1958 14' Fleetform

Ok, I read all of the posts in this thread and reviewed all of the pics. IMHO this boat will be an extreme challenge for a young man with no experience in fiberglass repair etc... I think your exuberance in wanting to do a boating project is honorable however I don't think this is a good candidate for you as a first project. Lot's of major repairs required here. Talking about upholstery, gelcoating etc at this stage is totally unrealistic. This hull has major issues and will require a total gut on the inside and a total grind off of the gelcoat on the outside and a lot of structural repairs too! A lot of time and money will be needed before you are anywhere near ready to flip her over and start on the top or inside. You Will need to remove the cap to effect the repairs on this boat. The design demands it.
 

cpenrose

Petty Officer 1st Class
Joined
Oct 26, 2012
Messages
261
Re: 1958 14' Fleetform

I meant they're using it on paint aren't they by the way.fleetform 233.jpg I have SOME experience with fiberglass, I know how to lay it and fair it. I know this is going to be hard and I think I should be able to do an acceptable job. I'm completely aware that It will be long and It will cost some good money ( that's what Christmas is for). I pick things up quicky(If I care about it) and focus on the subject. I would have had it gutted already if I could have gotten to a hardware store. I understand the gelcoat and those threads were helpful. NOW what I'm worrying about is the cap removal and the cradle. How am I supposed to get the cradle to fit perfectly, as in what am I using as a template? I am posting a pic of the cap/hull joint in a second.
 

jbcurt00

Moderator
Staff member
Joined
Oct 25, 2011
Messages
24,913
Re: 1958 14' Fleetform


I want to remove the gel coat because it falls off in spots if I even I power wash it. It's very chalky and cracked in a billion peices all over the white. I'm completely open to a way to save it. I got the idea of that stripper from a youtube video where they put that on and it just came off down to the glass with a chisel.


I meant they're using it on paint aren't they by the way. I have SOME experience with fiberglass, I know how to lay it and fair it. I know this is going to be hard and I think I should be able to do an acceptable job. I'm completely aware that It will be long and It will cost some good money ( that's what Christmas is for). I pick things up quicky(If I care about it) and focus on the subject. Iwould have had it gutted already if I could have gotten to a hardware store. I understand the gelcoat and those threads were helpful. NOW what I'm worrying about is the cap removal and the cradle. How am I supposed to get the cradle to fit perfectly, as in what am I using as a template? I am posting a pic of the cap/hull joint in a second.

It sure sounded like you were asking if Aqua Strip could be used as a gel coat stripper, and then posted the Boat Works video in support of that idea....... If that is not the case, well, it isn't I don't reckon......

If you would have finished gutting the boat w/out a cradle, why would you then need to know how to build a cradle now?

BTW: If you are now concerned w/ cap removal & a cradle, it should be a cradle 1st, then the cap. While you are working on fabrication of a cradle, you can be learning/reading/studying how to remove the cap. Once you finish the cradle & start working on removing the cap, you should be learning/reading/studying how to store the cap & work on it & the hull. The cap will likely require some attention & a safe/secure storage until you are ready to put it back on.

You DO NOT want to remove the cap until you have the hull supported. It will likely sag, in multiple areas, w/out the support of a cradle......

If you are comfortable using woodworking tools, and can approximate the shape of your hull, you can build a cradle. As most of these threads are dissimilar boats, 1 cradle style may or may not work for multiple hulls. You could start w/ a trailer & add support in areas that are not fully supported by the trailer bunks. If you need to be able to move your boat around while it's in the cradle, you'll want to add casters.

You are on steps 6 & 7, start here. Know how you want to proceed based on info available on iboats & the internet. There is much more info available then that which is posted & linked here in your thread. There will be times that you will see & read info that is similar or slightly different then how it is suggested here. Ultimately, you will need to sort thru available choices & decide for yourself how to proceed. That decision will be dependent on your abilities, budget, time frame & what tools/equipment/supplies you have access to.

The individual steps are not all straight forward & easy to assist you with remotely via limited text & pix on the internet.

You need to know how the rubrail trim is attached to the boat, some idea of how the cap & hull are joined before you consider a cap removal process as suggested by your latest pix that reads: Cut here?

BTW: The answer is likely NO, you do not cut there....... Else there will be no lip to re-join the cap & hull or to apply the new rubrail to.

Read Andgott's Lake & Sea resto: 1959 Lake N' Sea Restoration. His cradle, boat & resto will be similar to the shape & design of yours..
 

cpenrose

Petty Officer 1st Class
Joined
Oct 26, 2012
Messages
261
Re: 1958 14' Fleetform

Thats what I mean when I say I don't want to cut the cap off, It really looks like it has no seam, the trim is off and the only thing that isn't fiberglass left on the boat is the handle on the bow and the skier tow rings in the stern. There is also a putty type of material on the inside of the hull for about a foot along the joint at the stern. I hope that wasn't too confusing. Thank you for all the help by the way.
 

jbcurt00

Moderator
Staff member
Joined
Oct 25, 2011
Messages
24,913
Re: 1958 14' Fleetform

Did the rubrail attach like this:
Rubrail_zpsa99cf2af.jpg


Held on by friction? You carefully removed the rubrail, and saved it, correct? Some of them are extremely difficult to replicate & impossible to replace w/ new original styled rubrail. Particularly those from 1958, and those w/ out the vinyl insert...

W/out pix & details it is hard to understand what you're looking at & asking questions about. That's 1 of the reasons for the slow down, read A LOT comments..... The parts of your boat that will be redone similarly to how others are done, will become apparent when you have read more then you ever thought you'd want to read about rehabing old boats. When you get to that point & can't possibly stand to read or study anymore, read & study at least 50% more then you already have. This is where Don's how to thread gets you started. You then need to just start scanning threads in the resto section, dig in & start reading.

Ask lots of questions. But be patient, there are 150,000+ of us. And often your posts take some time for someone to reply...

If that lip behind the rubrail was like that pix I posted above, it should have rivets or staples holding the cap & hull lips together. Staples are very hard to remove w/out damaging the lip. Damage the lip & you lose both the holding the 2 parts together surface, but also the surface you attach the rubrail.

Pix pix pix

Get a photobucket acct, and post the pix IN your thread instead of the small attachment photos that make it difficult for me to reference when I'm reading your posts & trying to see the pix...

The putty you refer to is probably because of the droop (??) in the rubrail as it runs toward the transom. And is likely at or very near the water level when the boat is not underway. That putty is very similar to what you see referred to @here as PB, each maker had their own version or recipe & they vary quite a bit. Mine used fiberglass roving & resin to cover all the interior ends of the rubrail bolts...

Unless you cut thru the gunwale & remove the splashwell, you will have to remove the cap to replace the transom. Cut the finished/exposed gunwale &/or splashwell or remove the cap. Have to do 1 or the other...

Got an early & long day Wed. Have a good nite & start churning thru some threads..
 

jbcurt00

Moderator
Staff member
Joined
Oct 25, 2011
Messages
24,913
Re: 1958 14' Fleetform

BTW: I didn't own a boat until Nov 2011 :facepalm:

And am a long way from seeing that boat in the water & under way....

Keep after it & you'll likely splash this Fleetform before I splash the FireFlite, and it'll be in time for the 2013 season in NJ :)

Or at least before it ends next fall!
 

cpenrose

Petty Officer 1st Class
Joined
Oct 26, 2012
Messages
261
Re: 1958 14' Fleetform

It just nails right on to the joint, no overlap. Its flat not shaped like a c. Sadly, I didn't save it:facepalm: but since its not a precise fit to anything, I've already found somejavascript:void(0);
 

cpenrose

Petty Officer 1st Class
Joined
Oct 26, 2012
Messages
261
Re: 1958 14' Fleetform

caphulljoint002.jpg
caphulljoint001.jpg
The first one is of the joint on the inside which is what's confusing me. I finally was able to focus on the cap because I'm off of school for the rest of the week so I woke up and tried to clear things up with the grinder and what do you know, under a bit of what looks like bondo (which there is more of on the boat) there was a nice seam . I could slide a screwdriver under the seam but it looks like it's glassed on the inside so I still have to figure that out
 

Sleeper-6

Petty Officer 2nd Class
Joined
Oct 7, 2010
Messages
114
Re: 1958 14' Fleetform

That is one very thick looking seam. I think it needs some more exploring to really see what you've got there. I would power wash the snot out of the whole thing, even using the water pressure to blow away anything that it's loose enough for it to move. ( filler, paint, gel, whatever) If it flys away, it wasn't good enough to bond anything to anyway. Then use some hand tools and try to find the point exactly where and how the cap and hull meet in a small area.

As most of the others have said, cosmetics are last. You need to get it supported, separated, and get the transom and stringers structurally sound before anything gets pretty.

A strong ugly boat will get you home, new paint and windshield on a soft hull will leave you swimming eventually.
 

cpenrose

Petty Officer 1st Class
Joined
Oct 26, 2012
Messages
261
Re: 1958 14' Fleetform

Is the inside part just as confusing to everyone else as it is to me? I would love to talk to another owner about it...
 

cpenrose

Petty Officer 1st Class
Joined
Oct 26, 2012
Messages
261
Re: 1958 14' Fleetform

Oh and I'm TRYING to go for pretty AND strong : )
 

briangcc

Commander
Joined
Jul 10, 2012
Messages
2,189
Re: 1958 14' Fleetform

Climbing aboard for this one.

First off...my hat is off to you. 13 and wanting to restore a boat? Wow! I can only hope my son follows with your kind of ambition.

Next, I'm no expert and I don't play one on TV ;)

With that being said, there's been a lot of advice to slow down and develop a plan of attack. This is good advice from people who have been there before. So after that, the next step is to get that boat of yours supported correctly - as good as the cinder block is, it's not the correct way of going about things.


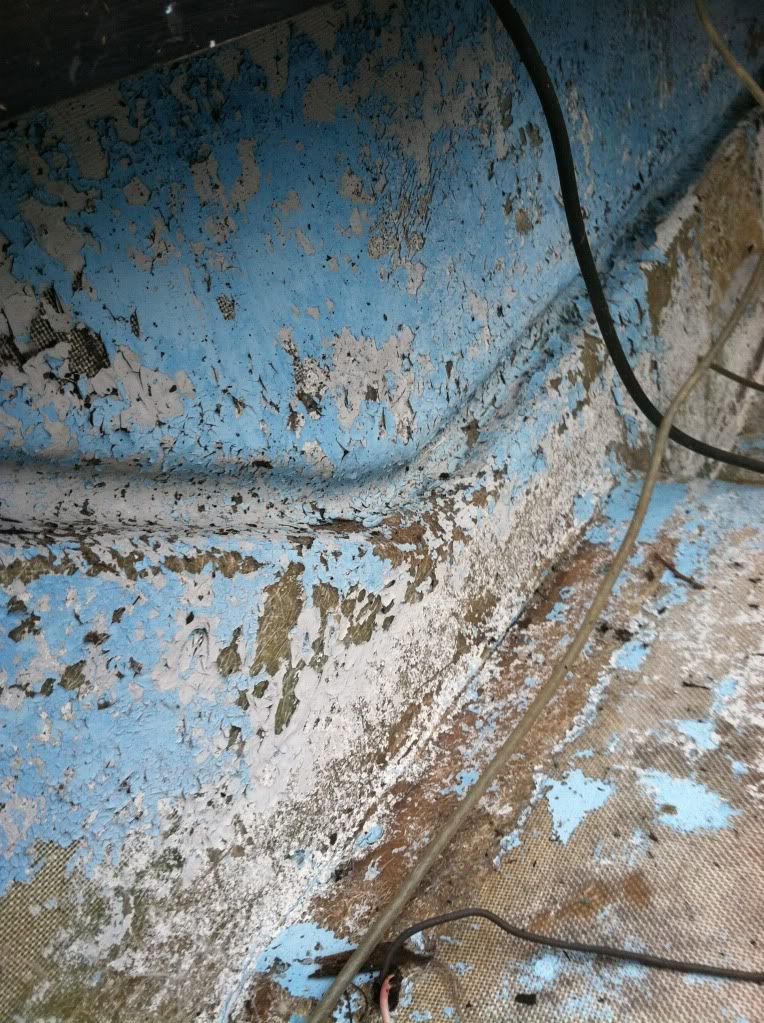
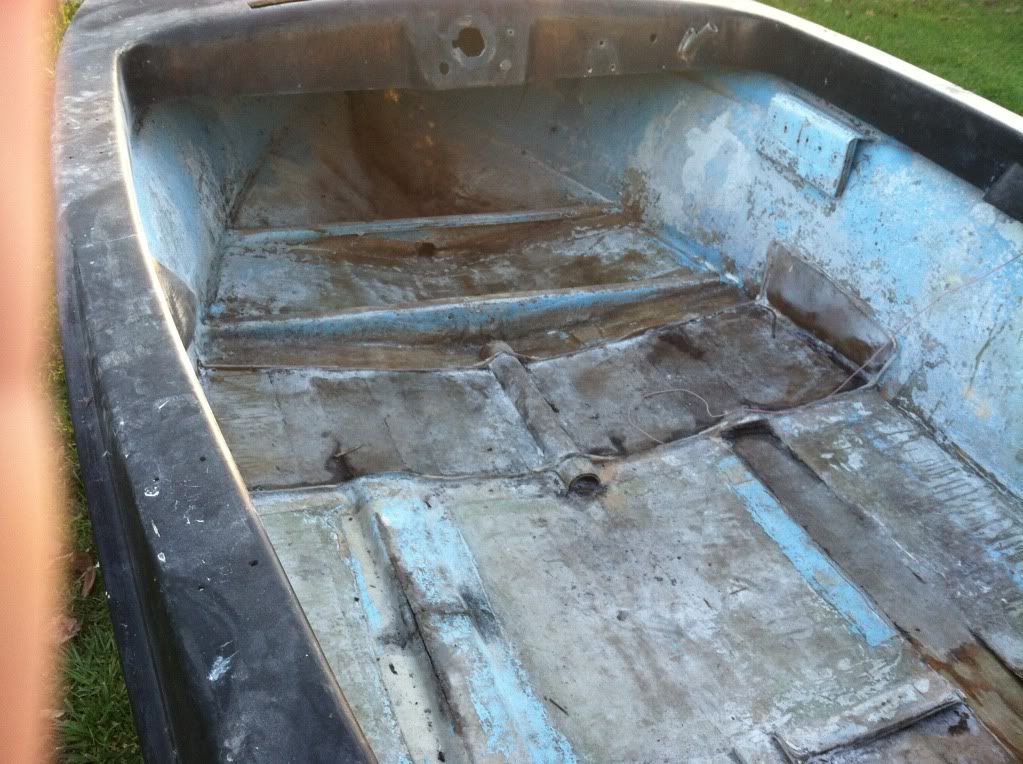
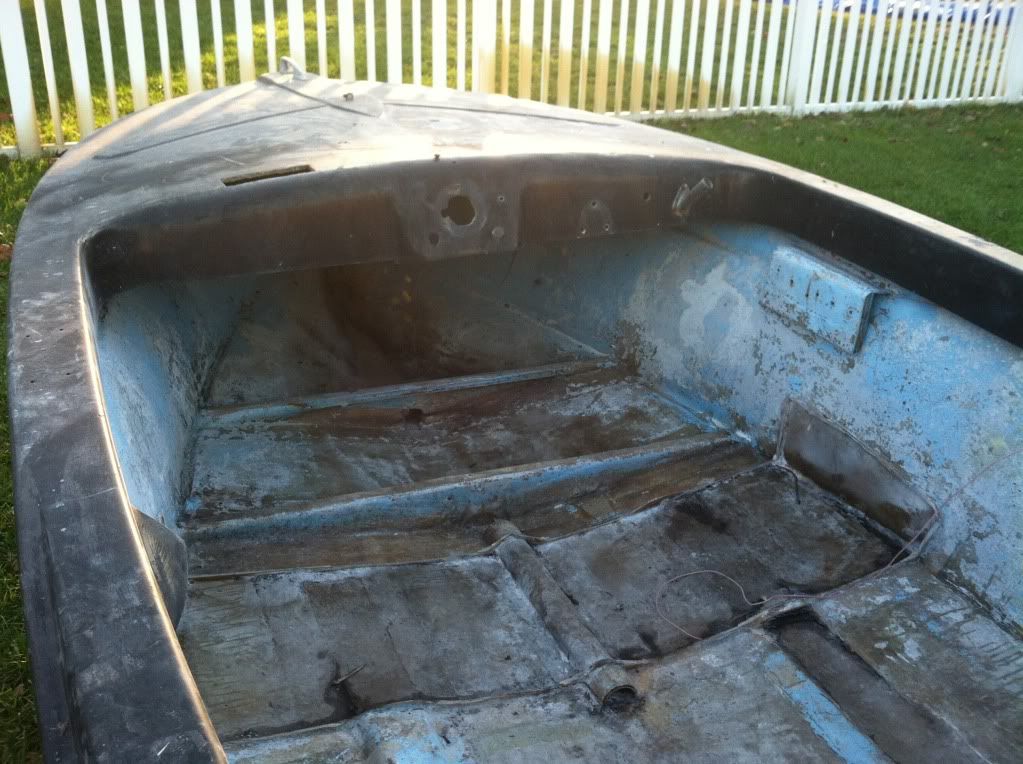
Now to answer your question about the interior, I don't own a boat just like yours but I did own a '56 MFG at one time. I think you have all the answers you need in this pic here:

caphulljoint002.jpg


If you look at it in layers, the closest one to you is the newest. That's definitely powder blue paint. That paint stripper can remove. However, when using paint stripper you need to know that any little trace that you leave behind will cause problems later on down the road. The better approach would be to sand that paint off as the residue can be vacuumed out with a shop vac and the remnants left behind can be picked up with a tack cloth and subsequent cleanings.

The next layer in is what appears to be either white paint or gelcoat. Usually gel coat is fairly thick. Going off your pic, it certainly looks like gelcoat which means its definitely time to break out the grinder.

That final layer underneath the white looks to be fibreglass cloth. I'm saying this as it has a grid like texture to it which, when you view other resto threads, is exactly like the cloth they're using.

Now, with all this sanding you are doing on fibreglass, its imperative you use the correct PPE (Personal Protection Equipment). Failure to do so will cause long term, long lasting health problems. So Tyvek suits and a respirator are in order. A $1 dust mask from your friendly hardware store will not cut it for this application. Please, please heed this advice. I didn't when I was younger and my hearing is suffering because of it - a summer job was cutting apart 55 gallon drums with an air chisel and NO hearing protection. I have ringing in my ears constantly. So learn from my mistake!


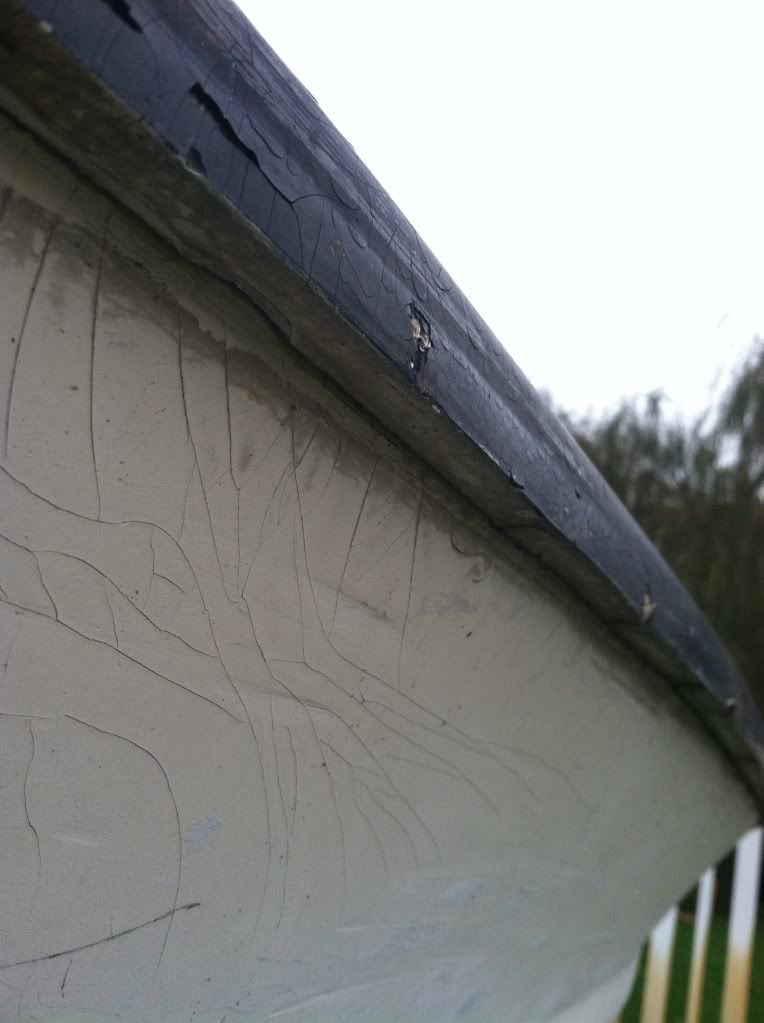
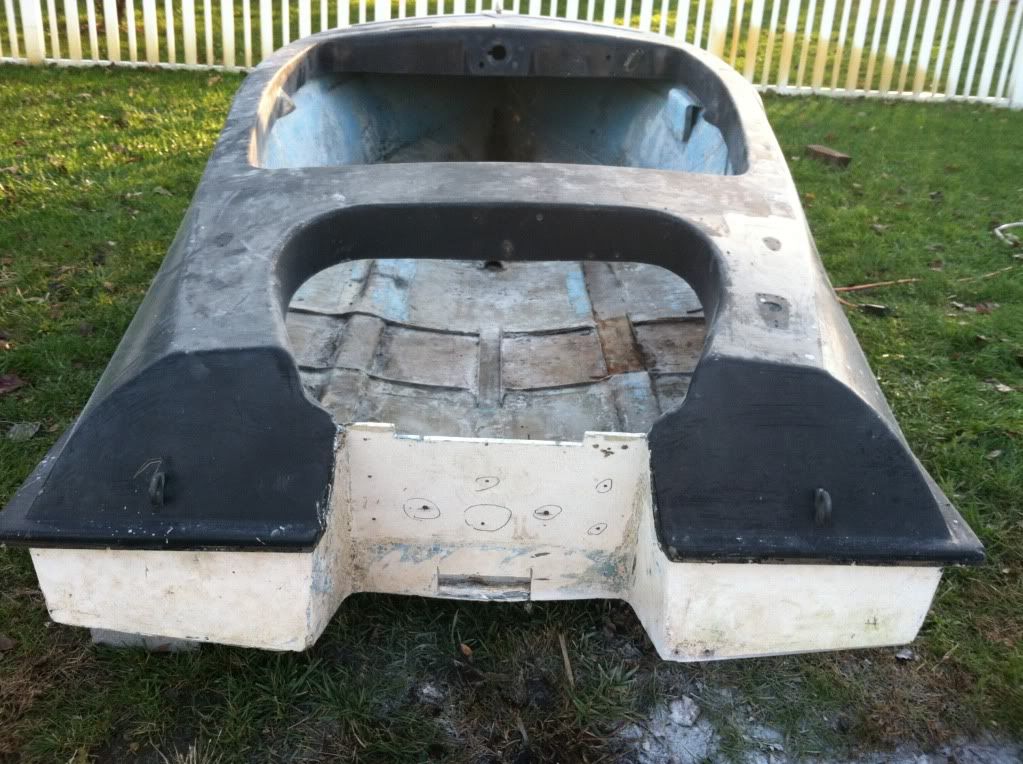
Now as for your cap, it looks like someone painted it dark blue.

caphulljoint001.jpg


I'm saying this as in one of the cracks it appears as if a lighter blue is under the darker blue. If that's indeed the case, then the upper layer of dark blue paint could be stripped off. If it were me, I'd be using a grinder again for the same reasons as not using paint stripper on the inside of your hull.


And one thing I have learned going through a number of these threads - take LOTS of measurements before you pull that cap off (and after the boat is properly supported). Keep them in a notebook so that you can refer to them later. Ratchet straps can help you reshape the boat if it springs out of shape once you pull that cap. You want the hull in the same shape as when the cap was on it otherwise you'll be expanding your vocabulary 10 fold when the cap doesn't fit right when you're ready to reattach everything.

Good luck and keep posting!
 

cpenrose

Petty Officer 1st Class
Joined
Oct 26, 2012
Messages
261
Re: 1958 14' Fleetform

All I have to do LUCKY FOR YOU GUYS is post for 3-4 days since I'm on my way to vacation and mainly on this ride I've been ready up on other threads. Most likely I'll be distracted and not post. Anyone else get this snow?! I was packing and I had to hurry and use my super human strength to flip it and place it on some cinder blocks quickly.
 

cpenrose

Petty Officer 1st Class
Joined
Oct 26, 2012
Messages
261
Re: 1958 14' Fleetform

Fleetformday1029.jpg
Fleetformday1030.jpg
So today I finally had ttime to work on the boat, I got the seats out, removed some of both stringers, and I know it doesn't look like it, but I DID clean it out. I know no one is going to agree with me but I don't think I'm taking the cap off. I couldn't get and any tool to fit where I need to cut the glass on the inside I also have access to the whole boat even with the cap on, so why would I need to? I'm still open to suggestions.
 

cpenrose

Petty Officer 1st Class
Joined
Oct 26, 2012
Messages
261
Re: 1958 14' Fleetform

Fleetformday1026.jpg
Oh and I'm not done yet I just need more cutting wheels
 
Top