180 SS New to the Forums.

DirtyHarry83

Petty Officer 1st Class
Joined
Jun 5, 2012
Messages
305
Re: 180 SS New to the Forums.

Finally

While we were waiting on the 2 halves to fuse with the epoxy and added thickener. Dad and I decided to attempt to bring back the old fiberglass VHF antenna.

We used a white epoxy paint. It's metal free to avoid radio reception/transmission issues.

EDr69NR.jpg


An old trash can many have some uses left.
That spider now has a permanent web....

ea9IMzd.jpg


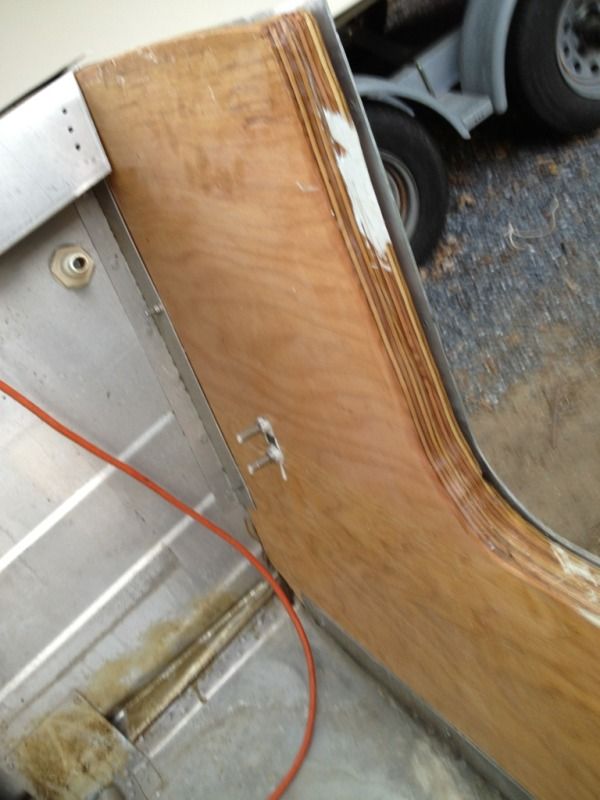
Hopefully I can start sealing the transom tomorrow and maybe get some coat it on the hull. This late summer rain is slowing me down.
 
Last edited:

DirtyHarry83

Petty Officer 1st Class
Joined
Jun 5, 2012
Messages
305
Re: 180 SS New to the Forums.

Transom work!

We did some test fits mixed with some sanding.

bVEDuzQ.jpg


There was a lot of test fitting. The work wasn't to difficult to do and it looks great to me.

DuMpODP.jpg


I didn't get a chance to post pictures of the sealing process. I had a storm roll through here and I was in a bit of a rush to put things away from the rain.

Take care folks.
 
Last edited:

barato2

Commander
Joined
Dec 7, 2010
Messages
2,956
Re: 180 SS New to the Forums.

nice progress, and good work documenting. if any of us were ever to go sell our boats, just think how helpful being able to show the prospective buyer everything done on the boat would be
 

DirtyHarry83

Petty Officer 1st Class
Joined
Jun 5, 2012
Messages
305
Re: 180 SS New to the Forums.

Thanks guys!

I am apprehensive today. I bought my seats. They seem nice although I smell modifications to these seats are in order. They seem to need added support for the larger side of people, even with the label claiming "big man boat seat". I predict some epoxy coated 3/4 inch plywood and then a little paint for added UV protection. This will mount on the underside for added support to my new folding pedestal seats. I went with Charcoal and grey. August 14th is the late arrival date. I predict sooner as I live closer to Philadelphia.

http://www.walmart.com/ip/WISE-Big-Man-High-Back-Folding-Boat-Seat/10913402
 

GA_Boater

Honorary Moderator Emeritus
Joined
May 24, 2011
Messages
49,038
Re: 180 SS New to the Forums.

Transom looks good. I put some Wise seats in mine, not the big man so not as wide as yours. I mounted the seats to swivels and then to my boxes. The plastic base of the seat flexes and I have nice circular scars on the top of the boxes from the screws that mount the hinges to the base. GRRR! I think your idea of reinforcing the seat base is good. I think the base is flimsy and big man seats are prolly worse being wider.
 

DirtyHarry83

Petty Officer 1st Class
Joined
Jun 5, 2012
Messages
305
Re: 180 SS New to the Forums.

A bit of a back story here as I've slacked a bit on the progress.

Here we are reinforcing the deck with extra plywood for our pedestal seats. It was bonded with thickened epoxied and screwed into place. Finished pictures later as I've been to busy lately.

HI1LOWR.jpg


Carb removal by flash light... For best results do during the day time. In my case do it when you can!
0c5ba99f.jpg


Hex wrenches make it interesting. It's a tight fit if you don't have a decent length to the keys...

XiDqs4V.jpg


Unfortunately my Carbs were so gummed when the throttle arm screw was being pulled it SNAPPED! ugh. So I'll have to deal with that repair later. I ordered another set of used carbs on Ebay for 60 bucks. :facepalm:
 
Last edited:

DirtyHarry83

Petty Officer 1st Class
Joined
Jun 5, 2012
Messages
305
Re: 180 SS New to the Forums.

Here is the finished Transom. I love the shine of it. Shame it'll be hidden, but I'll have that peace of mind no rot, and no insect damage.

ca28a800.jpg


Note: When using Stripper be careful not to forget that it can still have residue on there until washed with a hose. Wire wheel brush mounted to a power drill. The face it burns. ZEE GOGGLES ZHEY DO NOTHZING! Seriously though a clam walk to the garden hose and I was fine. :facepalm:

CoZW1Mj.jpg


I applied CoatIt on Friday night in anticipation for noodles. You'll see that below. I did cover all the rivets below the water line, I also covered the weld and seems near by to prevent any potential issues.

Noodles. Yeah Noodles. I cut them this way to let any water flow down to the limber holes. Great product to work with. Easy as hell to cut and very little mess. As you can see the grey spots are the Coat it.

TDvr3oN.jpg


Gas Tank mounting. 5200 pieces of trim plastic to prevent the tank from seeing consistent water contact. Plastic because it has a shelf life of longer than I'll live. This tank is solid.

nyyxJ89.jpg


Gas tank is now installed. Just need to add 2 lock down pieces of aluminum angle.

hM0Tehn.jpg
 
Last edited:

DirtyHarry83

Petty Officer 1st Class
Joined
Jun 5, 2012
Messages
305
Re: 180 SS New to the Forums.

Ordered this beauty on Thursday and it arrived on Friday. I ran it through some minor tests and I really like this product. It will help me save a ton of dash space. I went with gray scale because color sucks in direct sunlight. It only cost me 186 bucks.

eaZi9AI.jpg
 
Last edited:

rheagler

Senior Chief Petty Officer
Joined
Jul 14, 2007
Messages
662
Re: 180 SS New to the Forums.

Nice progress Harry. The project is looking good!
 

GA_Boater

Honorary Moderator Emeritus
Joined
May 24, 2011
Messages
49,038
Re: 180 SS New to the Forums.

Gettin' a lot done. Harry. And thinking ahead with the Lowrance. :D
 

astor

2018's Starmada Splash Of The Year.
Joined
Jul 31, 2011
Messages
425
Re: 180 SS New to the Forums.

DH,
Nice progress! Its looking great.

Now I see the main difference between the '87 and '88 SS180. the '87 has a single knee brace riveted to the hull. Where your's has two knee braces riveted to the stringers, hull, and splash well. I think the design of your boats structure is more robust than mine. Also your stringers are riveted to the boat hull, where mine are riveted to the tops of the ribs. It does give me some ideas on how to improve mine.

Thanks for posting such great pictures of your progress, its being a real help to my rebuild.

Ben
 

shadetree_fish

Petty Officer 2nd Class
Joined
Apr 24, 2010
Messages
130
Re: 180 SS New to the Forums.

Great job & progress DH!!!
I'm doing my SS180 by myself, SOOOOO of course work has gotten real busy. I was hoping to be where you are now... but I've fallen behind. BTW, if you notice my posting time, Yeah I just got home an hour ago!

I do have a question? are you putting anything for floatation behind your side walls & in your splash well area??? Mine had alot of styro crammed everywhere, but being a 79, none was able to be saved.

Keeps the detailed updtes & pics coming!!!
 

barato2

Commander
Joined
Dec 7, 2010
Messages
2,956
Re: 180 SS New to the Forums.

she's lookin good there! agree with shadetree, though, i'd add a lot more noodles or whatever, esp if you'll be goiing out in ocean. those tests where a noodle would only support about 3-4 lbs per foot really got my attention, esp coming on the heels of that story from Grt Lakes Angler blog....
 

DirtyHarry83

Petty Officer 1st Class
Joined
Jun 5, 2012
Messages
305
Re: 180 SS New to the Forums.

Thanks for all the complements guys. I appreciate it as it's been crazy busy while working on the boat.

She'll have more flotation. I'll stuff as much as I can in open spaces.

I'll place some under the side panels, and she still has foam under the gunnels to keep the balance. The bow has almost no room now thanks to noodles. The stern may get some vertical pieced in noodles, as well as some under the engine well. This will serve 2 purposes. One as a clean padded surface and the other more obvious as flotation around the OB.

In all she'll have over 88 noodles inside. The noodles were 5 feet long each. That's 20lb's a noodle and times that by 88 you've got 1760lbs in flotation. If you want to beat up that number that's fine but that boat only weighs roughly 1400lbs loaded (that's with me and the Admiral). It's also important to point out that plywood floats and this plywood has 2-3 coats of epoxy sealing it from water. This is another source for flotation. I don't have the math on them yet but it's a lot of surface area that's securely attached to the boat. My consoles also float since most of them will be made of epoxied plywood and I'll add a few surprises for later. She'll float like a damn foam bobber. Trust me she's no HMS Titanic. :cool:
 

barato2

Commander
Joined
Dec 7, 2010
Messages
2,956
Re: 180 SS New to the Forums.

all good. we like you and would like to keep you around. love the idea of sticking em in vertically under far sternmost area of gunwale and will probably steal it. not trying to beat up anything...your math looks great. altho i'd mostly consider the plywood a wash as far as flotation.....yes, it will float but i wouldn't count on it supporting any weight beyond its own. i usually just exclude it from my math.

keep crankin, you have lots of good ideas i want to steal!
 

cutbait76

Petty Officer 2nd Class
Joined
May 19, 2012
Messages
122
Re: 180 SS New to the Forums.

Just got into reading your resto DH..

It would appear you and I are in direct competition as to who is done first?

Though I have you beat by a mile on boat and trailer progress, the fact you have a motor {while not running} gives you an edge.

I like your decision on Coat it, half the price and works great. Gluv-it is just a brand name IMO... But not knocking the guys who like the security of past performances.

I suggest you not only glass mat the seams but also the notches where the rib cuts are. If nothing else it eliminates some issues when installing flooring


Great job on the tig welding, reading through the post I was like OH $H!t!!!! JB weld would of been a temporary patch IMO.. Good advise from the guys I have learned paying attention to is a wise decision.
 

DirtyHarry83

Petty Officer 1st Class
Joined
Jun 5, 2012
Messages
305
Re: 180 SS New to the Forums.

Some updates:
That OB that wasn't running. Yeah that's changed.

nKAWqsE.jpg


Did the first tests Saturday and Decarbed yesterday. Big puffs of white smoke enough said.
Tilt and trim rewire (damn mice) and refilled the reservoir. She still has some air in the pump but the overfill leaks out. It's going to take some use to get that air to release. I put that motor up and down with the T&T for 3 hours on Sunday. May be a rebuild on that in the future.

Key note. When building a reinforce piece for the deck always be sure to check twice. HAH! Stringer got in the way so we notched the block. It does not flex at all when I walk on it and feels solid as a rock. I did reseal any exposed wood with marine tx. It'll never see water anyway but just in case.

DE4lj9L.jpg


I did use tabs for each section for a more solid step. There are two pieces shown below. The ski locker section is below the gas tank hose and sending unit access ports.

t8nir1O.jpg


Air powered rivet guns are the bee's knees. Took me less than 2 hours to completely install the deck.
 
Last edited:

DirtyHarry83

Petty Officer 1st Class
Joined
Jun 5, 2012
Messages
305
Re: 180 SS New to the Forums.

Second coat of paint this morning with anti skid. I am going to replace with vinyl later but again I want to use the boat before the season ends and it's something that can be added later when $$ is available. Sorry for a lack of pictures but the seams were sealed with glass mesh and more epoxy. The flexing at the ends is now gone. It will become tighter once I rivet the side gussets to the deck.

NSmAgWd.jpg


These are the old fish finder and compass holes that the previous owner made. I took some JB Weld to close them up. I plan on a new dash setup.

xYSL9qh.jpg
 
Last edited:

dozerII

Admiral
Joined
Oct 25, 2009
Messages
6,527
Re: 180 SS New to the Forums.

Looks great DH, when is your planned splash?
 
Top