Where do I belong? Alum Goods 1687, SS16 Clone?

ShoestringMariner

Lieutenant Commander
Joined
Apr 18, 2015
Messages
1,600
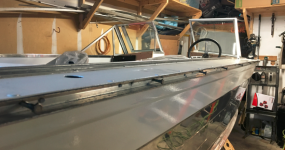
So, I bought one of those trim pieces to try out. Here's what the profile looks like up close. I quickly trimmed it to length, and will fit it permanently tomorrow. Those barbed tangs on the leg of the 'tee' are to embed in mortar when used in ceramic tile applications.
View attachment 355798
View attachment 355811
View attachment 355812

The deck piece with the pedestal is already riveted in place in the hull. My plan is to fit and bond that trim piece into place with 5200 and stainless screws into the edge of the deck panel. Then the aft panel will be slid up underneath, hopefully giving a nice finished and relatively water-tight edge.
Looks nice and clean! Are the flanges wide enough to cover the rivet heads? Did you use the wide flange rivets?
 

renns

Petty Officer 1st Class
Joined
Dec 20, 2017
Messages
316
I kept the first rivet back from the edge about 1-1/2". That 'tee' section is 7/8" wide, so no way to cover rivets. I ordered a bunch of 3/16" x 3/4" grip aluminum wide large flange rivets on eBay back in mid-January. The tracking showed the package bouncing around every USPS depot on the eastern seaboard before finally clearing customs into Canada just last week. I got tired of waiting and bought a small quantity of a few different sizes from SpaeNaur to try out, and have since used them all up. I should have just got them all there to begin with. I'm sure that was your earlier recommendation, and for whatever reason I didn't take the advice!
 

ShoestringMariner

Lieutenant Commander
Joined
Apr 18, 2015
Messages
1,600
No worries, I’ve had my run in with online orders too. Many, many weeks of delays on this project due to holdups.
 

renns

Petty Officer 1st Class
Joined
Dec 20, 2017
Messages
316
I've been getting moving again on this old boat project. All deck panels are in, side panels are done and mounted, with integral speakers. The transom was installed today with all new stainless fasteners. The new stainless U-bolts on the transom were mounted with 1/4" plate reinforcements on the inside to spread the load out a bit more. The aluminum splashwell drains fit and formed nicely with some careful raps with a ball-peen hammer. I still need to get up inside the splashwell and run in the series of stainless screws holding the splashwell and inner transom skin in place. Once that's done the transom cap can go back on.

In its original configuration the bilge pump emptied into the splashwell, and then drained out those splashwell drain holes. I think I'll retain that drain method for the 'backup' bilge pump. For the primary pump (the one wired to float switch), I've added a drain on the side of the hull in the second strake.

Upon reassembly of consoles and front seating, I found the consoles seemed to be sitting up higher than before. I did use 5/8 rather than 1/2 ply for deck material, but it seemed like more than a 1/8 difference. I ended up drilling out the rivets on the angle 'feet' at the bottoms of the consoles, and cutting them shorter by about 3/8" to get everything to fit properly.

Also at this time I'm trial-fitting the replacement windshield assembly I picked up last fall. It's from another boat, and is nearly identical in height and width, but is raked back at a more aggressive angle than the original.

The decision on what gets painted and what gets more Nautolex remains. Some voices are saying Nautolex along the tops of the gunnels will cover up all the various mounting holes, and give a good non-skid surface. Others think too much Nautolex converts the boat from 'pleasure boat' to 'fishing boat' category.... Both voices do agree that inside the side shelves can be Nautolex vinyl, so I guess I can proceed with that while the debate on other locations continues.

The work area is a bit 'chaotic' to put it nicely, so I'll commit to some clean-up, and get some updated pics in this thread as that seems to be required currency on these forums, and I'm overdue on that front.
 

ShoestringMariner

Lieutenant Commander
Joined
Apr 18, 2015
Messages
1,600
I've been getting moving again on this old boat project. All deck panels are in, side panels are done and mounted, with integral speakers. The transom was installed today with all new stainless fasteners. The new stainless U-bolts on the transom were mounted with 1/4" plate reinforcements on the inside to spread the load out a bit more. The aluminum splashwell drains fit and formed nicely with some careful raps with a ball-peen hammer. I still need to get up inside the splashwell and run in the series of stainless screws holding the splashwell and inner transom skin in place. Once that's done the transom cap can go back on.

In its original configuration the bilge pump emptied into the splashwell, and then drained out those splashwell drain holes. I think I'll retain that drain method for the 'backup' bilge pump. For the primary pump (the one wired to float switch), I've added a drain on the side of the hull in the second strake.

Upon reassembly of consoles and front seating, I found the consoles seemed to be sitting up higher than before. I did use 5/8 rather than 1/2 ply for deck material, but it seemed like more than a 1/8 difference. I ended up drilling out the rivets on the angle 'feet' at the bottoms of the consoles, and cutting them shorter by about 3/8" to get everything to fit properly.

Also at this time I'm trial-fitting the replacement windshield assembly I picked up last fall. It's from another boat, and is nearly identical in height and width, but is raked back at a more aggressive angle than the original.

The decision on what gets painted and what gets more Nautolex remains. Some voices are saying Nautolex along the tops of the gunnels will cover up all the various mounting holes, and give a good non-skid surface. Others think too much Nautolex converts the boat from 'pleasure boat' to 'fishing boat' category.... Both voices do agree that inside the side shelves can be Nautolex vinyl, so I guess I can proceed with that while the debate on other locations continues.

The work area is a bit 'chaotic' to put it nicely, so I'll commit to some clean-up, and get some updated pics in this thread as that seems to be required currency on these forums, and I'm overdue on that front.
Sounds like you are charging out of the gate like a greyhound after the rabbit. Can’t wait to see your pix, it was looking great before.

I am envious…I am so darn slow in getting anything done. I’m envious!
 

renns

Petty Officer 1st Class
Joined
Dec 20, 2017
Messages
316
Sounds like you are charging out of the gate like a greyhound after the rabbit. Can’t wait to see your pix, it was looking great before.

I am envious…I am so darn slow in getting anything done. I’m envious!
That's funny, I'm jealous right back at you. You've not only figured out the painting process, but actually laid paint on the hull! I still wake up with night sweats thinking about painting - my least favourite of tasks.
 

renns

Petty Officer 1st Class
Joined
Dec 20, 2017
Messages
316
OK, looks like I can't edit that old post to add pics, so here they are:

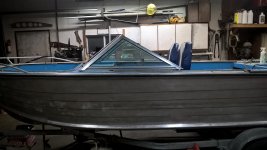
Windshield view from side. Is it too 'racey' looking at the higher sweep back angle?
1646009726130.jpeg
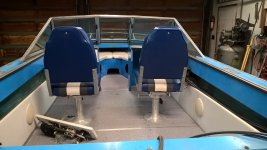
Windshield view from stern:
1646012905917.jpeg
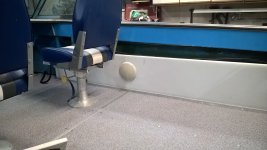
Side Panel: 1/2" ply wrapped in two layers of 1/8" closed cell foam underpadding, then wrapped in marine vinyl, overlapped at back to prevent water intrusion. Panel sits in angle that is screwed to the deck, and is fastened with 1/4-20 riv-nuts to the vertical supports fore and aft. Aluminum bushings were epoxied into the plywood panels at each fastener location to hopefully make for a more structurally sound attachment.
1646012730342.jpeg

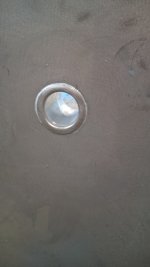
Aluminum splashwell drain tubes. These went in quite easily. I slid them in from the splashwell side after buttering both the transom hole and the tube OD. Then a big piece of flatbar was c-clamped in place, holding the tube flange tightly against the splashwell, and pushing the tube end out the other side. With a bit of work with a ball peen hammer it was easy to form the flange flat against the outside transom skin.
1646013193433.jpeg

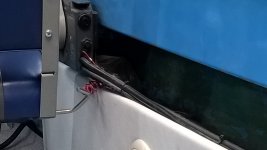
What do people do with control cables? On my boat the control cables and associated wiring harness just lay in the storage shelf, existing through a hole in the vertical support back at the splashwell. I was thinking of drill a hole, and threading these down below the shelf for a cleaner install. Any reason why that wouldn't be a good idea?
1646013317241.jpeg
 

ShoestringMariner

Lieutenant Commander
Joined
Apr 18, 2015
Messages
1,600
Man that looks killer!
Looks so clean and spacious! I like those trim angles you used on the floor seams. I’m going to look for those.

I also really like how clean your side panels are. The padding gave them a soft look. Have you got a pic of the hidden fasteners along the top of the board?

The windshield has a nice rake to it. Looks just right.

Control cables; mine were zip tied up under the gunnel. I had sleeper seats, so the exposed cables leading to the gunnels were sort of hidden. That looks pretty tidy what you’ve got there
 

classiccat

"Captain" + Starmada Splash Of The Year 2020
Joined
Dec 20, 2010
Messages
3,412
marching along!

I'm not sure about the windshield...when underway, that's less glass covering your face which is even a problem on stock starcraft setups. On the flip side, your mooring cover will probably fit a little better with the added rake...maybe?

most of us run those control cables in the gunnels. If I recall, yours are filled with 2-part foam so that could be tricky. I added hangers every few inches...secured through the rubrail trim (with rubber removed). If you have a bottom lip on the inner gunnel panel, you may be able to secure straps to that?

1646051138679.png

1646051206571.png
 

renns

Petty Officer 1st Class
Joined
Dec 20, 2017
Messages
316
@classiccat , thanks for the reply. My gunnels have foam blocks in them, and the area below the shelves is fully spray-foamed. I was thinking about popping a hole in the shelf, and cutting a groove in the foam to allow the cables to be routed below the shelf. Maybe that's really not the worth the effort though. Will look at the inner gunnel lip, and see what that looks like.

As for the windshield, the height of the top of the windshield is actually the same as for the original, just the rake angle changed. Mooring cover adjustments might be necessary due to the peak being further aft on the hull. I could go back to the original windshield, but all the glass needs replacing and the middle panel is missing.
 

renns

Petty Officer 1st Class
Joined
Dec 20, 2017
Messages
316
Man that looks killer!
Looks so clean and spacious! I like those trim angles you used on the floor seams. I’m going to look for those.
Thanks, I'm pleased with how they worked out. I used adhesive to bond them in place, along with rivets at the stringers and in the lateral members I mentioned earlier. They also extend under the aluminum angles that support the side panels, so they are locked in place pretty well. I didn't want to use something that was going to be flopping around in short order.

I also really like how clean your side panels are. The padding gave them a soft look. Have you got a pic of the hidden fasteners along the top of the board?

The fasteners along the top that hold the shelf in place are not yet installed. I was thinking they'd go in the back via 90-deg drive screwdriver. The current shelf has a leg that turns down, so I'd need to rivet a small strip of angle along the inside with leg up to accept those screws. Vinyl (Nautolex) is going in the shelf area, so that angle could be put overtop holding the vinyl from coming loose over time.

The windshield has a nice rake to it. Looks just right.

Thanks. I'm on the fence myself. The back-2-back seats that were in there were on boxes that raised them up so the seat surface uncompressed was around 16" off the floor. I cut these seat posts to give the same starting height, and they can be adjusted higher. I'm wondering if I should cut them down a bit more, to allow them to go shorter. The drawback is reduced adjustment range as those pedestal posts get reduced in height.

Control cables; mine were zip tied up under the gunnel. I had sleeper seats, so the exposed cables leading to the gunnels were sort of hidden. That looks pretty tidy what you’ve got there
 

ShoestringMariner

Lieutenant Commander
Joined
Apr 18, 2015
Messages
1,600
Thanks, I'm pleased with how they worked out. I used adhesive to bond them in place, along with rivets at the stringers and in the lateral members I mentioned earlier. They also extend under the aluminum angles that support the side panels, so they are locked in place pretty well. I didn't want to use something that was going to be flopping around in short order.


The fasteners along the top that hold the shelf in place are not yet installed. I was thinking they'd go in the back via 90-deg drive screwdriver. The current shelf has a leg that turns down, so I'd need to rivet a small strip of angle along the inside with leg up to accept those screws. Vinyl (Nautolex) is going in the shelf area, so that angle could be put overtop holding the vinyl from coming loose over time.


Thanks. I'm on the fence myself. The back-2-back seats that were in there were on boxes that raised them up so the seat surface uncompressed was around 16" off the floor. I cut these seat posts to give the same starting height, and they can be adjusted higher. I'm wondering if I should cut them down a bit more, to allow them to go shorter. The drawback is reduced adjustment range as those pedestal posts get reduced in height.

Control cables; mine were zip tied up under the gunnel. I had sleeper seats, so the exposed cables leading to the gunnels were sort of hidden. That looks pretty tidy what you’ve got there
Might I suggest you cut them down later if need be? I find that my stock windshield is too low. And that’s on sleeper seats. I find that I duck down a lot in cold wind/bad weather. Some on the water time might tell you where you need to have it?

Looks like you ordered the slide base for at least one of the seats? I pick one of those up also. I think that’s gonna be handy
 

renns

Petty Officer 1st Class
Joined
Dec 20, 2017
Messages
316
Wow, time for an update! We're back on the boat project again. Splashwell and sides are primed. The final choice is bare aluminum with sharkhide at strake 4 and below. Strakes 1, 2, and 3 are Rustoleum/Tremclad Medium Blue. After lots of hand-wringing and gnashing of teeth, here's the process:
1.) Spot fill bad scratches and any remaining pits with JB weld. (Next time will try thinning slightly with acetone - might flow into those little pits easier?)
2.) Sand, clean, degrease with MEK.
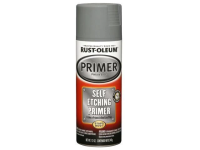
3.) Light prime coat using Rustoleum self-etching primer.
1648064748483.png
4.) Multiple coats of Rustoleum/Tremclad oil-based primer - roller applied.
1648064774897.png
5.) TBD coats of Tremclad Medium Blue. From looking at some of the unfaded original paint under the consoles, this appears to be a good match for the original.
1648064845896.png
I'm in the midst of steps 3 and 4 at the moment. Any thoughts on number of coats of primer? I have two on now, but haven't tried wet-sanding yet. I could roll another coat on, but every coat is another 24 hrs cure time if I'm reading things correctly.
Any words of encouragement, caution, or correction are welcome!
 

SHSU

Lieutenant Junior+Starmada Splash Of The Year 2019
Joined
Mar 8, 2017
Messages
1,741
Any thought on using Rusoleum Topside marine paint? Only ask as not familiar with Tremcald but guess its similar to Tractor Paint. I used the tractor paint on my build and also the Topside Marine paint. Can I tell the difference, no, but figured I would throw it out there.

SHSU
 

renns

Petty Officer 1st Class
Joined
Dec 20, 2017
Messages
316
Tremclad is the Rustoleum brand name in Canada, if I have the lineage correct. After reading all the reviews of the WoodonGlass method, I figured I'd give it a go. Plus the Tremclad has a std colour that is very close to original, so the admiral gets to keep the 'vintage' look she like so much!
 

Moserkr

Chief Officer + Starmada Splash Of The Year 2021
Joined
Nov 23, 2020
Messages
869
Man, not sure why my notifications on this thread were off since february! Keep up the good work, shes lookin nice. Cant wait to see the paint on her! Definitely the most nerve wracking part of my build.
 

renns

Petty Officer 1st Class
Joined
Dec 20, 2017
Messages
316
Thanks! This is a first for me. I'm not a fan of the whole painting business, but tried to follow all the steps correctly. Both primer and paint say 24 hrs between coats, which really slows down the whole process. And then there's the 5200 sealant used around the splashwell seams that's supposed to get 5-7 days to reach full cure before painting. I need a spreadsheet to track the timelines of all these steps!
Pics soon.
 

ShoestringMariner

Lieutenant Commander
Joined
Apr 18, 2015
Messages
1,600
Thanks! This is a first for me. I'm not a fan of the whole painting business, but tried to follow all the steps correctly. Both primer and paint say 24 hrs between coats, which really slows down the whole process. And then there's the 5200 sealant used around the splashwell seams that's supposed to get 5-7 days to reach full cure before painting. I need a spreadsheet to track the timelines of all these steps!
Pics soon.
Pay attention to temps in those dry times. Some paints and epoxies are temp fussy. Tremclad is likely one of the least fussy but dry times are slow. And Tremclad is funny stuff. It can stay tacky all day. You can check it at 15 minute intervals like 8-10 hours later and it’s tacky, tacky, tacky and then poof, all of a sudden it’s dry.

I bought a cheap temp gun online and it’s been handy.
 

Moserkr

Chief Officer + Starmada Splash Of The Year 2021
Joined
Nov 23, 2020
Messages
869
Yup lots of steps to remember. But once I started painting, it really wasnt that bad to do. Mine dried normal, but dry is not cured!! After its dry, Id wait a bit before moving it to the trailer too. After 3 days, mine wasnt cured and took a little damage getting back on the trailer which I had to touch up.
 

renns

Petty Officer 1st Class
Joined
Dec 20, 2017
Messages
316
I'll keep an eye out for cure rates. I've got the heat on in the shop, so it's 55 or so in there at a minimum. Moserkr, I'm only painting the top three strakes, so that can be done on the trailer. Below that I'm planning to use sanding/buffing for an even finish, and protect with Sharkhide.
 
Top