Wellcraft 170 Classic -89 full restoration

Jussi-T.

Petty Officer 2nd Class
Joined
Jan 5, 2013
Messages
151
Re: Wellcraft 170 Classic -89 full restoration

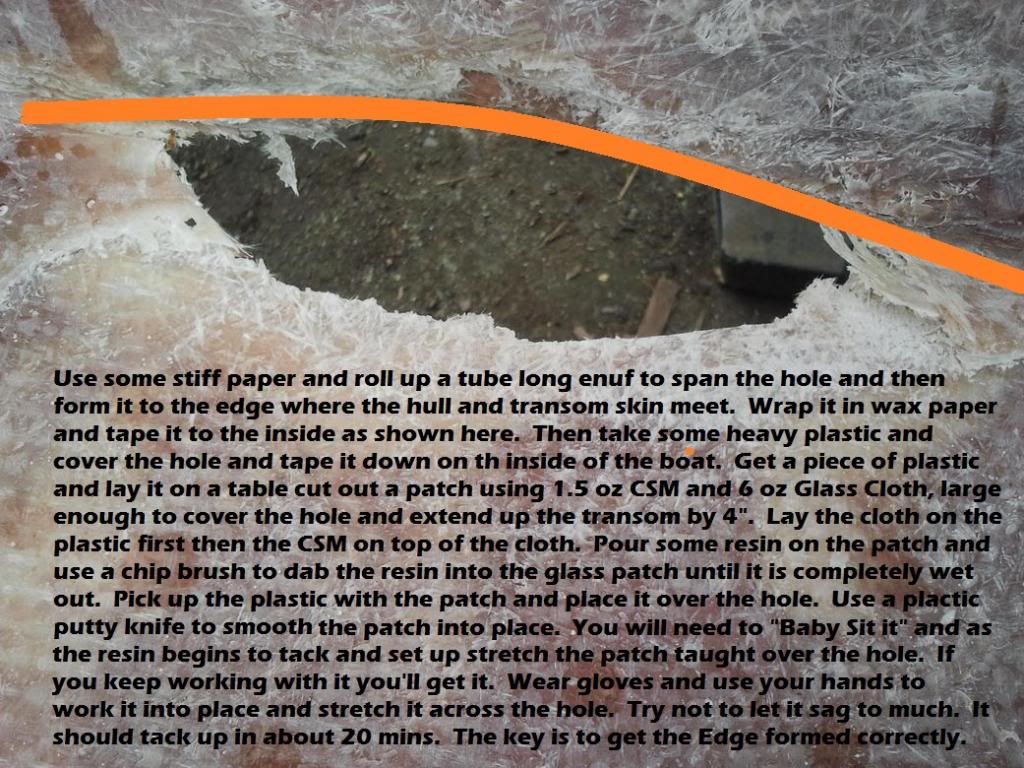
The hole was there when I bought the boat, I don' know what has happened... It had been patched but it was quite poorly done... So I opened it again.. I thought that now when the boat is completely bare it can be patched from the inside also.
 

Woodonglass

Supreme Mariner
Joined
Dec 29, 2009
Messages
25,924
Re: Wellcraft 170 Classic -89 full restoration

The location of this hole makes it bit more challenging to repair. You're going to have to create the edge of the bottom of the hull. You will need to make a thin patch on the outside first to conform to the shape of the hull. Prep the trans part and the hull part by sanding/grinding to fresh glass back 10-12 inches all around the area and taper towards the hole to a razors edge. Once prepped and washed down with acetone, I'd use some heavy paper rolled into a tube and wrapped in wax paper and then tape it to the inside of the edge of the hull spanning the hole. Then using a couple layers of CSM I'd patch over the hole on the ouside laying it up on the transom then down over the hole and onto the bottom of the hull. Use your fingers to conform it to the tube and make it a close to the edge of the hull as possible. I hope this makes sense. I'll try and post a drawing later. Once this thin patch sets up you can remove the tube (wax paper will let it release) and then effect the inside repair and then flip the hull and do the proper outside repair. It'll be strong and good as new when you're done.
 

Jussi-T.

Petty Officer 2nd Class
Joined
Jan 5, 2013
Messages
151
Re: Wellcraft 170 Classic -89 full restoration

Thank you for the great advice! A picture would be great! Can I flip the hull without the stringers in?
 

Woodonglass

Supreme Mariner
Joined
Dec 29, 2009
Messages
25,924
Re: Wellcraft 170 Classic -89 full restoration

Yes, but you will need to brace it. I'll send a pic for that too!
 

Jussi-T.

Petty Officer 2nd Class
Joined
Jan 5, 2013
Messages
151
Re: Wellcraft 170 Classic -89 full restoration

Ok, thanks!!

I have now purchased all the materials, plywood, resin,csm,etc... Next week I have a holiday from work, so I try to be very effective and get this project done as much as possible :)
 

Woodonglass

Supreme Mariner
Joined
Dec 29, 2009
Messages
25,924
Re: Wellcraft 170 Classic -89 full restoration

Ok Let's see if this will help.
HolePatch.jpg


I hope this picture and explanation makes sense. If not send me a PM and I'll try to explain more. Make sure on the outside to grind the gelcoat off down to fresh glass and make it at least 5-6" all the way around the hole and up the transom wall. This is just a temporary patch to aid in the permanent patch on the inside so it does not have to be perfect. Try to make it as flat as possible.

This is a drawing on how to do the patch on the inside.
TransomRepair.jpg

The bevel is an exageration but you get the idea. Bevel the grind towards the hole. Your layup should be CSM, 1708, CSM, 1708m CSM, 1708, CSM. Each layer 2" progressively larger than the first. First CSM patch should only be about 1" larger than the hole and should also extend up the side of the transom as should ALL the layers. As soon as you wet out the first layer lay the next until all layers are applied. A bubble roller will come in handy for this. Since the area is irregularly shaped you will need to conform the glass over the edges so use your hands to get the glass to lay down. Cut it with scissors if necessary.

Here's a drawing of how to brace the hull for flipping. Cut a 1x2 and screw it to the sides of the hull where the rub rail was attached then nail or screw some 1x4 cross bracing across the top of the hull to hold it's shape. you can then flip the hull. Patching the bottom will be basically the same as the inside. Brush on 3-4 thick coats of Gelcoat. Use wax or spray on some PVA on the final coat of Gelcoat.

HullBracingforflip.jpg
 

Woodonglass

Supreme Mariner
Joined
Dec 29, 2009
Messages
25,924
Re: Wellcraft 170 Classic -89 full restoration

Yup, I answered it!:joyous:
 

Jussi-T.

Petty Officer 2nd Class
Joined
Jan 5, 2013
Messages
151
Re: Wellcraft 170 Classic -89 full restoration

I think I GOT IT!! :D

You mean like this?
drawing.jpg

The circle describes the paper that is rolled in a tube, blue is CSM, red is cloth and black is the plastic mold at the outside.

So it goes like this ---> roll the paper in to a tube, put it inside and tape it good. Then do the outside mold from plastic, insert the cloth and then the CSM and add the resin, then press it on the hole from the outside of the hull. RIGHT? :D
 

Jussi-T.

Petty Officer 2nd Class
Joined
Jan 5, 2013
Messages
151
Re: Wellcraft 170 Classic -89 full restoration

HAHHAH ^^ :D

Thanks again! I'll post pics since I make some progress :)
 

Jussi-T.

Petty Officer 2nd Class
Joined
Jan 5, 2013
Messages
151
Re: Wellcraft 170 Classic -89 full restoration

Here is my outside mold. I didn't have proper plastic to do the mold, but I had 1mm tin sheet, which I placed to the outside of the hull and twisted to angle. It sits perfectly to the form. I thought this would do the same thing than the plastic mold? I just have to cover the sheet with wax paper so it wont get stuck to the hull.

2013-06-01 09.11.53.jpg2013-06-01 09.11.20.jpg
 

Woodonglass

Supreme Mariner
Joined
Dec 29, 2009
Messages
25,924
Re: Wellcraft 170 Classic -89 full restoration

That will work great. put the wax paper in the metal and lay the glass path piece on it too and apply the resin right on that piece of metal carry it to the boat and slap it in place and tape it off.45mins remove it Does not have to be perfect. It just gunna act as a backer for the inside patch. Once the hull is flipped you'll be grinding a lot of this patch back down anyway.
 

Jussi-T.

Petty Officer 2nd Class
Joined
Jan 5, 2013
Messages
151
Re: Wellcraft 170 Classic -89 full restoration

Today I got the outsdie patch done and it turned out great! I did as you told me Wood, except I didn't use the paper tube at the inside. Here's what I did:
First I wrapped the mold with waxpaper, then layed the cloth, then the CSM and added the resin. Then I slapped the whole thing in to place. Then I went inside of the boat and tabbed the mat with paintbrush. I had some leftover resin, and I decided to add one CSM to the inside also.
I waited about an hour and then removed the mold.

Some pictures:
008.jpg010.jpg013.jpg014.jpg015.jpg


Tomorrow I start adding CSM, cloth,CSM,cloth to the inside :) I think I am going to put the transom and stringers in and flip the hull after that. I know, it's heavier but I want to make SURE the hull wont sag.

Thanks for the advice so far Woodonglass!!!
 

Woodonglass

Supreme Mariner
Joined
Dec 29, 2009
Messages
25,924
Re: Wellcraft 170 Classic -89 full restoration

Looks good. Are those bubbles in that one pic. If so the need to be ground out and patched over. This really needs to be a solid one piece patch. Other than that it looks really good. I would grind the inside area a little larger and begin the glassing process on the inside.
 

Jussi-T.

Petty Officer 2nd Class
Joined
Jan 5, 2013
Messages
151
Re: Wellcraft 170 Classic -89 full restoration

Wood, I just did what you told me to do :D So thanks to you!!! It was HOT in here today, over 85 degrees and tomorrow should be even hotter.. The guy in the composite store told that optimal temperature to work with glass is 60 to 70 degrees. Well, have to work in shade :)

By the way, I heard from the news that there was a tornado in Oklahoma, was it near where you live?
 

Woodonglass

Supreme Mariner
Joined
Dec 29, 2009
Messages
25,924
Re: Wellcraft 170 Classic -89 full restoration

Here's a trick. Use an ice chest and keep the resin on "Ice" It fools it and makes its kick slower!!!!
Yep Lot of Tornado's but fortunately they missed us. 9 people got killed in Oklahoma City 90 miles west of me. Lots of Bad Weather in the past 2 weeks. Hopefully it will get better.
 

Jussi-T.

Petty Officer 2nd Class
Joined
Jan 5, 2013
Messages
151
Re: Wellcraft 170 Classic -89 full restoration

I'm glad they missed you. Yes those are bubbles, but they arent IN the laminate. They are at the outer surface of the laminate, for some reason there were bubbles formed between the mold and glass. Which I found when I removed the mold. I thought I'll fill them with PB before start the outside glassing process.
 

Jussi-T.

Petty Officer 2nd Class
Joined
Jan 5, 2013
Messages
151
Re: Wellcraft 170 Classic -89 full restoration

Got my inside glassing process done today, I'm pretty happy of how it came up.
001 (2).jpg002 (2).jpg003 (2).jpg004 (2).jpg

I also patched this hole, it's above the waterline, so this isn't as critical as the one at the transom/hull.Veneprojekti syksy-12-kevät-13 032 (2).jpg There's this one thing that is bothering me, I added 1% of hardener to the resin, and after two hours, the patch is still a little soft... It's not completely cured.. Yesterday and earlier today, when I did the transom patch I used 1% of hardener as well but the temperature was over 85 degrees. Now when I did this second patch the weather went suddenly pretty chilly, about 60 degrees.. I used a roller that was washed with acetone, I was thinking, could that cause this slow hardening...? I hope I don't have to tear it all open again... :facepalm:
 
Top