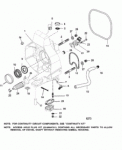
transom leak

rickasbury

Senior Chief Petty Officer
Joined
Jul 13, 2011
Messages
787
I'm a bravo III if it makes a difference, mine are all studs and I'm not sure I want to go through what it might take to get them out- I think they will be OK for a long time although I would like to replace. I will clean them up and find some anti rust something to put on them to slow the cancer. I will get some pictures up with I clean things up a bit and see what you all think. I have no clue for the most part!
 

Rick Stephens

Admiral
Joined
Aug 13, 2013
Messages
6,118
Yeah, your Bravo gimbal housing is a lot different.

My favorite bolt coating is VibraTite for not only stopping corrosion but also keeping my bolts tight. Note: there are a LOT of great solutions that others successfully use. I like VibraTite because it is not a glue, it is a super high viscosity coating. You see it on things like Chevy head and intake bolts all the time, an 'almost' dry red layer on the threads. It stays on the threads and can be applied to the entire stud. So far for me, it stops all the steel to aluminum galvanic corrosion that can be such a problem. Electrolysis is the biggest issue, keeping something on all the bolts that go into or through aluminum and isolates them electrically helps loads.
 

rickasbury

Senior Chief Petty Officer
Joined
Jul 13, 2011
Messages
787
Thanks Rick, I will look into that...here are some pictures around the gimbal that I'm working with. the main rust was at the bottom, two lower studs and a little up the right side. Also, around the water tube is a little corroded but other than that, really not anything to speak up. Shot there of the steering pin that I think I want to do but read horror stories getting that apart but this is the time to do it... transom 4-23-1.jpgtransom 4-23-3.jpgtransom 4-23-4.jpgtransom 4-23-5.jpg
 

Attachments

  • trasno 4-23-2.jpg
    trasno 4-23-2.jpg
    287.8 KB · Views: 0

alldodge

Moderator
Staff member
Joined
Mar 8, 2009
Messages
42,085
I don't remember but are you going to install the Bravoits fix while your working on it?

fetch
 

rickasbury

Senior Chief Petty Officer
Joined
Jul 13, 2011
Messages
787
Well, not sure what that is...I have a plastic part that makes that elbow connection..I thought I understood that used to me metal or somehow would get clogged up- is that the new part or the old part?? How does everything else look? I'd like to do that steering pin but I'm getting really tired of things that don't come apart unless I spend a week on them!
 

rickasbury

Senior Chief Petty Officer
Joined
Jul 13, 2011
Messages
787
this is what my connection looks like, is t hat the old or the new??

transo assy.gif
 

alldodge

Moderator
Staff member
Joined
Mar 8, 2009
Messages
42,085

rickasbury

Senior Chief Petty Officer
Joined
Jul 13, 2011
Messages
787
Huh....I wonder why it makes any difference? I will see what the kit costs as I have the new rubber tube from the bellows kit I bought....it's the same 90 degree turn except with a hard plastic tube in stead of the softer...the other parts look the same. I also have a thru hull pick up as well, am mostly fresh water and at some point, have to stop buying parts!
 

alldodge

Moderator
Staff member
Joined
Mar 8, 2009
Messages
42,085
Your in fresh water so should be fine, mine was after 20 sum years. Just thought I remembered something about yours being don, but probably got it mixed with another thread
 

rickasbury

Senior Chief Petty Officer
Joined
Jul 13, 2011
Messages
787
Thanks, may or may not...mine did not look so good when I took it apart....does it use the same hose cut off with the new plastic parts? Recall what the kit cost? My $$$ is getting to mount even doing this stuff myself!
 

alldodge

Moderator
Staff member
Joined
Mar 8, 2009
Messages
42,085
It doesn't use the same hose, in my post 267 it shows the kit contents. The part number is 32-8M0090859 and cost around 55. There is one on ebay for 45 but has no pic,
 

rickasbury

Senior Chief Petty Officer
Joined
Jul 13, 2011
Messages
787
Well, guess I'd probably better go ahead and do it.....thanks for the info!
 

rickasbury

Senior Chief Petty Officer
Joined
Jul 13, 2011
Messages
787
So, thinking ahead of myself a bit....when I pulled the motor, the bolts for the inner transom plate came out easily so that tells me the motor was aligned and level as they did not bind. So, going back in....the transom assembly bolts are obviously smaller than the holes for them in the transom. I don't know if those bolts are resting on the bottom of those holes or if they had a jig to center them? Point is, although not much "slop" for error, would seem impossible to have it exactly in the same position going back on than coming off. I'm more concerned with the left to right as I can adjust the up and down. How do they set this up when they install? Will I end up drilling new holes for the motor mounts as a result? I know the motor was out once and they used the same holes.....
 

alldodge

Moderator
Staff member
Joined
Mar 8, 2009
Messages
42,085
You will do no redrilling, and left/right is not adjustable

New motors are placed in, then rear bolts are installed and just snugged down. The front mounts are lagged bolted in place (new holes). The front mount top nut is loosened, then the motor is lifted by the thermostat housing lift ring slightly, and just enough to have a gap under the mounts.

The nuts under the mounts are brought up just flush with the bottom of the motor mounts. The motor is lowered back down, and then alignment is checked. If any adjustment is needed, it will be up/down only, and both sides will go up or down the exact same amount of turns. Once alignment is achieved, all bolts/nuts are tightened and lok tabs are bent in place.

Once your transom assembly is back in, the motor is set in place and rear bolts are installed. Lift the front and see if the mount holes line up, if not you need new holes, or could just fill yours in and make new ones from the start.

Check alignment. and if the motor needs adjusting, and do it as above
 

rickasbury

Senior Chief Petty Officer
Joined
Jul 13, 2011
Messages
787
so what I am visioning, when they set the motor back in, the inner transom plate is there and not adjustable left to right so once they pop those bolts for the rear motor mount to the inner transom plate, the front mount are going to go where the front mounts go- even if that means new holes...what am I missing? There is no left to right adjustment for the front mounts, correct? I am going to leave the ring around the out side of the transom so I can hopefully put it back in the same place!
 

alldodge

Moderator
Staff member
Joined
Mar 8, 2009
Messages
42,085
There is no left to right adjustment for the front mounts, correct?

Correct

I am going to leave the ring around the out side of the transom so I can hopefully put it back in the same place!

Give or take a couple hairs it won't really matter
 

Bondo

Moderator
Staff member
Joined
Apr 17, 2002
Messages
70,958
so what I am visioning, when they set the motor back in, the inner transom plate is there and not adjustable left to right so once they pop those bolts for the rear motor mount to the inner transom plate, the front mount are going to go where the front mounts go- even if that means new holes...

Ayuh,...... When yer hangin' a new motor that was never there before,.....

Ya hang the motor on a hoist, set it down on the rear motor mounts, with all the hardware, drop the bolts in, 'n Just snug 'em,.....
The nuts for those bolts, I tape into their captive slots, before movin' the motor in,.... 'bout any tape will do,....

Then ya slip the alignment bar into it, 'n align the motor, while hangin' on the hoist,.....
Properly hung, a few shakes, 'n wiggles will show ya the center for the rear mounts,....
Provided the rear mounts are in good shape of course,...

Measure up to the pre-assembled front motor mounts, pre-adjusted to 'bout centered, to see where the wooden mounts, if applicable, need to be built up too,....

As deep as yer diggin', I'd expect it to come in close, but I wouldn't count on it bein' aligned,.... ;)
 

rickasbury

Senior Chief Petty Officer
Joined
Jul 13, 2011
Messages
787
Thanks- I have read on other posts and I take it to be critical to the transom that when those back bolts go in, they should drop in and not bind- otherwise, the weight of the motor would be pulling on that transom at the top or the bottom with undesired strain rather than just supporting the vertical weight of the motor- probably not a big deal if it is a 3 o 4 l motor but this 800 lbs of motor. So- as I understand it, the transom plate is the controlling factor here- that's where the bearing sits and that's where the back of the motor mounts- My wood for the front mounts is obviously already there- I should probably just fill in those holes with sealant and if the holes match up, that's great, if they don't then way less important to have new holes vs. a motor that is not aligned to the transom assembly. So while it is still supported with the lift, I have the bar to align the bearing and the motor and then adjust the front mounts to the wood and we are done! Have not looked at the motor but I assume the tab for the mounts are slotted for some left to right adjustment if I can match to the old holes.
 
Top