Starcraft 1971'? 16' to Duck Boat Rebuild

SHSU

Lieutenant Junior+Starmada Splash Of The Year 2019
Joined
Mar 8, 2017
Messages
1,724
Depending on your access to water, if you can drive to a lake that is the easiest. Just need a couple buddies or couple hundred pounds to just hang out for a couple minutes next to the dock with a grease pencil. Then any leaks found, just circle.

The other option, while not recommended, is to fill the hull up with water and shift it around to get areas covered with water. Then you check from the exterior to see where it is coming from. As a side note, reason why people don't recommend this option is because your hull isn't designed to keep water in, so the pressure is different. That being said, I used this method as we are 1.5 hours from the closest place we can put in to test the hull.

SHSU
 

danimal045

Petty Officer 3rd Class
Joined
Feb 18, 2022
Messages
88
Depending on your access to water, if you can drive to a lake that is the easiest. Just need a couple buddies or couple hundred pounds to just hang out for a couple minutes next to the dock with a grease pencil. Then any leaks found, just circle.

The other option, while not recommended, is to fill the hull up with water and shift it around to get areas covered with water. Then you check from the exterior to see where it is coming from. As a side note, reason why people don't recommend this option is because your hull isn't designed to keep water in, so the pressure is different. That being said, I used this method as we are 1.5 hours from the closest place we can put in to test the hull.

SHSU
Thanks for the tip. Didn’t know about the grease pencil. Awesome idea. I am very close to multiple rivers and fairly close to some decent size lakes. I was thinking one of the river Ramos would be the best.

Any tips on how to flip this sucker. Honestly inthink me and one of my friends could lift it off the trailer onto the ground. Just don’t wanna mess it up rolling. I see some people say to flip it on the transom, but that seems trouble some.

I think the most appealing idea is to hook a rope in the eye on the bow, lift it a little, the lift the back and flip it there, rest it on a horse or something similar, move the trailer and let the front down. That’s the most appealing version for a flip I’ve found this far on the net, open to suggestions.

My buddy is dropping off the flotation/insulation within the next week.
 

g0nef1sshn

Lieutenant
Joined
Feb 24, 2015
Messages
1,291
Thanks for the tip. Didn’t know about the grease pencil. Awesome idea. I am very close to multiple rivers and fairly close to some decent size lakes. I was thinking one of the river Ramos would be the best.

Any tips on how to flip this sucker. Honestly inthink me and one of my friends could lift it off the trailer onto the ground. Just don’t wanna mess it up rolling. I see some people say to flip it on the transom, but that seems trouble some.

I think the most appealing idea is to hook a rope in the eye on the bow, lift it a little, the lift the back and flip it there, rest it on a horse or something similar, move the trailer and let the front down. That’s the most appealing version for a flip I’ve found this far on the net, open to suggestions.

My buddy is dropping off the flotation/insulation within the next week.
I rolled mine over once stripped fairly easy by myself. It won't hurt it.

As for leak test, once it's stripped I think best way is to add water inside the hull and let gravity do the work over a dry concrete/asphalt driveway. No leaks means no wet spots.

Put it in the water to test could mean not enough weight to make enough pressure to force water in it. Or not see it. That's my opinion anyway.
 

danimal045

Petty Officer 3rd Class
Joined
Feb 18, 2022
Messages
88
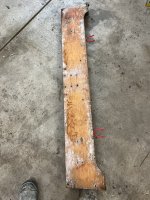
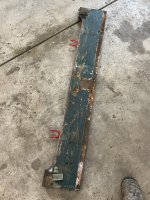
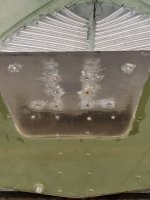
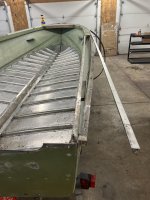
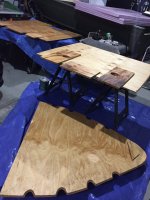
Got a little time in the garage last night and was able to get this transom out. I’m sure i missed something and did a bunch of unnecessary work, but it’s done now, and I’m happy i decided to do it, the bottom that was in the channel and far part of each side was a bit soggy, but after the gunwales were off, just a little prying with a large flathead and she was free. 1.5” thick. Have to start rebuilding it. The nice thing is i can use the old one as a template as it came out intact.
 

Attachments

  • D08C52F7-DBC6-4AB4-B21D-E0E73787EFF3.jpeg
    D08C52F7-DBC6-4AB4-B21D-E0E73787EFF3.jpeg
    2.7 MB · Views: 12
  • 0C29DEDA-4CA2-455A-ABE7-30C3099E16FB.jpeg
    0C29DEDA-4CA2-455A-ABE7-30C3099E16FB.jpeg
    2.7 MB · Views: 11
  • 53572E9D-5A5A-4330-A4B5-3208F22772D6.jpeg
    53572E9D-5A5A-4330-A4B5-3208F22772D6.jpeg
    1.4 MB · Views: 11
  • 0B35C9B8-A328-4916-9505-FD5393E5D227.jpeg
    0B35C9B8-A328-4916-9505-FD5393E5D227.jpeg
    1.1 MB · Views: 11
  • 6C619A34-5635-4D0C-B25A-017B44C84AA2.jpeg
    6C619A34-5635-4D0C-B25A-017B44C84AA2.jpeg
    1.2 MB · Views: 11
  • 82EA3BA4-2A67-43BE-9E4F-7B9172E85FAC.jpeg
    82EA3BA4-2A67-43BE-9E4F-7B9172E85FAC.jpeg
    1.9 MB · Views: 12

danimal045

Petty Officer 3rd Class
Joined
Feb 18, 2022
Messages
88
I’ve been looking for plywood for the Transom, as well as i think I’m going to do the floor and deck in that as well due to current cost. Even plywood is almost $80 a sheet. I saw not to use pressure treated and use exterior grade CDX or BCX, in my searches i am finding RTD, when googled it is saying it is:

“RTD and CDX plywood are essentially the same exposure 1 graded plywood, except for the superior manufacturing quality of the RTD plywood. This higher quality in the manufacturing process is what makes the RTD plywood a superior product to its CDX predecessor.”

Is this accurate? So I want RTD? Transom was 1.5”, so i would need 2x .75” or 3x .5”. I feel like on the Transom the less i can glue together the better, but i have no evolve ce to back that up.

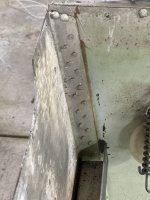
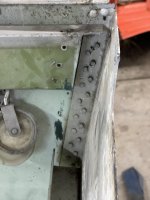
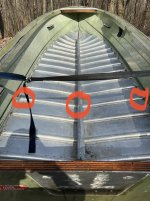
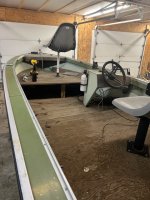
Also the factory decking was a half inch or, thinner, under a newer layer of marine ply, and was attached at the end of each ribs and to the middle support via rivets, circled in red. I was going to use 5/8ths, but if i have to get some 3/4” anyway may just do the whole floor with that, haven’t decided yet.

Should I reattach the same way, or add an additional support on each side? I can’t attest to the factory floors rigidity, as it was in bad shape.

Appreciate all the input fellas.
 

Attachments

  • BC2CEE42-4CBB-4735-BFA6-C44C55A66424.jpeg
    BC2CEE42-4CBB-4735-BFA6-C44C55A66424.jpeg
    1 MB · Views: 4

danimal045

Petty Officer 3rd Class
Joined
Feb 18, 2022
Messages
88
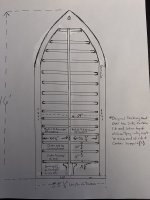
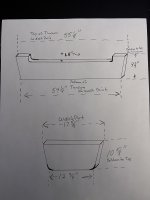
Some drawings i made showing various measurements that may help when making some suggestions. Ordered 8 yards of the Nautolex Natural Color vinyl Flooring today (it’s back ordered), figured that would leave me extra for the back seat/ box front deck, etc. now i need to decide on a glue, was leaning towards Rex Pro roll on glue.

Am leaving more towards 3/4” flooring now that i think i want to countersink the bases for flush mount seat bases as shown
 

Attachments

  • 77F19085-B5F4-40A3-B006-C6DBA569B502.jpeg
    77F19085-B5F4-40A3-B006-C6DBA569B502.jpeg
    1.6 MB · Views: 10
  • 0A67370C-1BB6-400C-A2B1-321CAC59E2C8.jpeg
    0A67370C-1BB6-400C-A2B1-321CAC59E2C8.jpeg
    1.5 MB · Views: 10

Moserkr

Chief Officer + Starmada Splash Of The Year 2021
Joined
Nov 23, 2020
Messages
869
Man Im glad I redid my boat before plywood doubled its already high price.

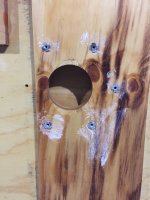
3/4” ply will do just fine for transoms and floor. Pretty sure mine was bcx, but PO installed it, I reused it. Whatever you do, put an aluminum backing plate on those bases under the floor, dont just screw or rivet them in. Bolting to a plate means they are never going anywhere. Could bolt to large washers too. The other option I had to use on a few seats are nuts with edges that grip into the wood. As you put the bolt in tight it draws them further into the wood. I put locktite on those bolts too so nothing moves.

I flush mounted my seat mount on my bow platform. I made some cross cuts with a cordless skill saw, then used a chisel to knock out the pieces. Put in some epoxy to seal the wood and level the seat mount.

Look up old timers formula, or use epoxy to seal up all the wood. If you go the epoxy route it does help to put glass cloth on with it for strength. I wouldnt worry about adding more than the factory mount for the transom. Even my 75hp 250lb motor just has the one support. A good transom and floor should handle the factory recommended motor. On the other hand, overkill is never bad imo lol.

Hope I got most those questions there. Boats looking good! Really interesting how the trim and transom comes together on yours to almost a point vs the larger models.
 

SHSU
Lieutenant Junior+Starmada Splash Of The Year 2019
Joined
Mar 8, 2017
Messages
1,724
“RTD and CDX plywood are essentially the same exposure 1 graded plywood, except for the superior manufacturing quality of the RTD plywood. This higher quality in the manufacturing process is what makes the RTD plywood a superior product to its CDX predecessor.”
No experience with RTD, but CDX or BCX should do just fine.

Is this accurate? So I want RTD? Transom was 1.5”, so i would need 2x .75” or 3x .5”. I feel like on the Transom the less i can glue together the better, but i have no evolve ce to back that up.
I would go with one sheet of 3/4 glued in half. That being said, technically plywood is just a bunch of sheets glued together so one glue or two is up to you.

Also the factory decking was a half inch or, thinner, under a newer layer of marine ply, and was attached at the end of each ribs and to the middle support via rivets, circled in red. I was going to use 5/8ths, but if i have to get some 3/4” anyway may just do the whole floor with that, haven’t decided yet.

Should I reattach the same way, or add an additional support on each side? I can’t attest to the factory floors rigidity, as it was in bad shape.

Floor should have been 1/2 from factory. I went with 3/4 as I am a bigger guy. Very happy I did so. As for attaching it, there are some who have added additional supports. Just not sure how you would connect to hull without just using the three spots the manufacture already used. Point being, don't think much rigidity added, if any, but that's just my two cents.

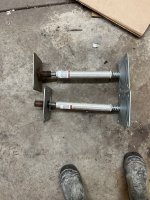
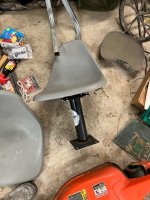
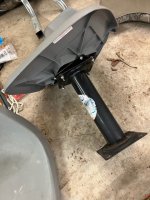
As for the seat mounts/pedestals, are those rated for movement or only stationary/under 5 mph?

SHSU
 

SHSU
Lieutenant Junior+Starmada Splash Of The Year 2019
Joined
Mar 8, 2017
Messages
1,724
Whatever you do, put an aluminum backing plate on those bases under the floor, dont just screw or rivet them in. Bolting to a plate means they are never going anywhere. Could bolt to large washers too. The other option I had to use on a few seats are nuts with edges that grip into the wood. As you put the bolt in tight it draws them further into the wood. I put locktite on those bolts too so nothing moves.
T- nut

Also, I had extra plywood so I created 1.5 inch flooring under the seat bases by using it as the backing. No complaints thus far.
 

MNhunter1

Lieutenant Junior Grade
Joined
May 12, 2014
Messages
1,053
Yep, I've always stuck with 1/2" decking, ACX or BCX plywood sealed with Helmsman's Spar, with 3/4" doublers added at the seams and seat supports. T-nuts for attaching the pedestal bases in areas that will not be accessible after the deck is secured down. It takes a little additional planning and consideration before the deck is placed, accounting for pedestal placement, allowing clearance for the stringers, etc. I've never felt like the new decking was not sufficient and it saves on both expense and weight, as well as eliminates any potential alignment issues with consoles, side panels, and other factory engineered dimensions.
121.jpg125.JPG
 

danimal045

Petty Officer 3rd Class
Joined
Feb 18, 2022
Messages
88
Man Im glad I redid my boat before plywood doubled its already high price.

3/4” ply will do just fine for transoms and floor. Pretty sure mine was bcx, but PO installed it, I reused it. Whatever you do, put an aluminum backing plate on those bases under the floor, dont just screw or rivet them in. Bolting to a plate means they are never going anywhere. Could bolt to large washers too. The other option I had to use on a few seats are nuts with edges that grip into the wood. As you put the bolt in tight it draws them further into the wood. I put locktite on those bolts too so nothing moves.

I flush mounted my seat mount on my bow platform. I made some cross cuts with a cordless skill saw, then used a chisel to knock out the pieces. Put in some epoxy to seal the wood and level the seat mount.

Look up old timers formula, or use epoxy to seal up all the wood. If you go the epoxy route it does help to put glass cloth on with it for strength. I wouldnt worry about adding more than the factory mount for the transom. Even my 75hp 250lb motor just has the one support. A good transom and floor should handle the factory recommended motor. On the other hand, overkill is never bad imo lol.

Hope I got most those questions there. Boats looking good! Really interesting how the trim and transom comes together on yours to almost a point vs the larger models.
Awesome. Thanks. I was going to countersink w a router. All good info. I’m taking notes lol.
 

Moserkr

Chief Officer + Starmada Splash Of The Year 2021
Joined
Nov 23, 2020
Messages
869
Router would be much better than my method if you can, but I didnt own one at the time. Just dont forget to seal that wood from every angle and hole. I put spar down every bolt hole. On my transom I oversized the holes, epoxied, then drilled through the epoxy so no wood was ever exposed where bolts pass through. That was highly recommended to me by some of the guys here.

I knew @SHSU told me about the t-nut, couldnt remember the name. He made a very good point about the speed rating of the pedestals too. @MNhunter1 ‘s pics show some good stuff as well. T-nuts, wood backing AND connecting plates (important for an even floor), and spar sealant. I put a coat of spar over my epoxy floors as added protection, and did spar on my consoles/side panels. Real test though is the Admiral’s wooden hammock stand which I refinished during the boat project. It sits outside 24/7 rain, sun, snow, etc. Looks the same as when I finished it over a year ago with 3 coats of spar.
With the cost of plywood now, and if mine didnt already come with new 3/4”, Id probably have gone with 1/2”. Im an average sized guy but Ive read 1/2” may have a little more flex when walking. 3/4” is beyond solid when put in properly. For the transom I believe I used titebond III wood glue and put 300lbs of weight on it til dry.
 

danimal045

Petty Officer 3rd Class
Joined
Feb 18, 2022
Messages
88
As for the seat mounts/pedestals, are those rated for movement or only stationary/under 5 mph?

SHSU
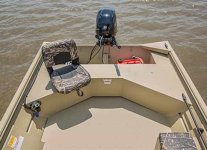
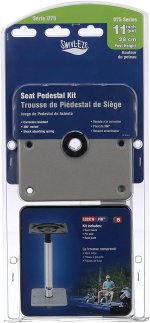
Im not sure on those pedestal ratings, really the plan is they will be stowed or unoccupied until we hunt or fish. They are this same model i believe.

I also have this seat Base I can paint and reuse with a more appropriate seat.

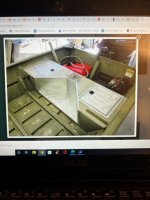
My buddys dad is an aluminum welder and i used to work for him back in the day when i was in college , he came out and checked the project out on sunday and is going to weld me up a rear transom box/storage bench/ seat/ elevated pedestal base for fishing. we are using these 2 pics as a reference right now. This would also double as i seating are for 2 passengers getting to the spot.

I want to put the console back roughly where it is, have a raised deck, lower than what i removed from front of console to bow with a latch for storage. have a removable pedestal on front deck, middlish of boat close to transom box, and one on top in middle of transom box. So i would have 3 bases w removable seats, seating for 2 on the transom box, and i would be able to drive/hunt from my chair
 

Attachments

  • 81ZgdSrARzL._AC_SL1500_.jpg
    81ZgdSrARzL._AC_SL1500_.jpg
    128.9 KB · Views: 12
  • b1.jpg
    b1.jpg
    74.5 KB · Views: 10
  • bs 1.jpg
    bs 1.jpg
    87.9 KB · Views: 9
  • bs2.jpg
    bs2.jpg
    81.7 KB · Views: 12
  • transom box 1.jpg
    transom box 1.jpg
    61.3 KB · Views: 12
  • transom box 2.jpg
    transom box 2.jpg
    39.9 KB · Views: 13

danimal045

Petty Officer 3rd Class
Joined
Feb 18, 2022
Messages
88
Appreciate all of your replies and insight w real world experience, keep em coming! you guys might make people think I actually know what i'm doing when she's done.

Tons of great ideas I will definitely use.

If you boys think im annoying now, wait till I start redoing the trailer!

As far as rivets, besides a leak test, is there any giveaway they are bad, besides, missing, loose, etc?

Also order of operations question: Should I A.) redo any rivets interior and exterior I think/know are bad then take it to the river for the leak test then fix any leaks then reapply marine caulking on the major seems inside and Gluvit on the rivet lines, or B.) do all of that, then water test it?

I was leaning towards A, as that should expose any obvious leaks i missed vs essentially putting a band aid on it and maybe the issue goes undiagnosed?
 

BWR1953

Admiral
Joined
Jan 23, 2009
Messages
6,178
I used t-nuts under the deck on my Kingfisher but ran into a problem. I didn't put a backing plate over the t-nuts to fully keep them in place, just glued them down.

When I installed the seats, long after the deck was fully installed, I knocked a couple of the t-nuts loose and they went down into the foam under the deck. A major pain. :cautious:

After much research and time, plus some more expense, I found a solution that took care of the problem. Had I simply installed a backing plate, the issue wouldn't have arisen. :rolleyes:
 

danimal045

Petty Officer 3rd Class
Joined
Feb 18, 2022
Messages
88
take solace that your pain was not in vain. You could have just saved me a similar nightmare
 

danimal045

Petty Officer 3rd Class
Joined
Feb 18, 2022
Messages
88
Hopefully this will work, bc for the price of gas to my buddies warehouse, this is what’s going in the bottom lol
 

Attachments

  • 62B6C37A-5E04-42BA-AA76-128C38A85874.jpeg
    62B6C37A-5E04-42BA-AA76-128C38A85874.jpeg
    2.4 MB · Views: 12

Moserkr

Chief Officer + Starmada Splash Of The Year 2021
Joined
Nov 23, 2020
Messages
869
Foam looks good! For leak testing, I fixed rivets first, then tested, then fixed remaining, then coat-it (gluvit). Opt A as you stated.

Rivets you should replace are ones that are loose, missing (obviously), corroded, or tails are missing or low. Some can be re-bucked.

Those splashwell designs look great! Cant wait to see what you end up putting in.
 

danimal045

Petty Officer 3rd Class
Joined
Feb 18, 2022
Messages
88
Foam looks good! For leak testing, I fixed rivets first, then tested, then fixed remaining, then coat-it (gluvit). Opt A as you stated.

Rivets you should replace are ones that are loose, missing (obviously), corroded, or tails are missing or low. Some can be re-bucked.

Those splashwell designs look great! Cant wait to see what you end up putting in.
Okay, what you said regarding rivets is what i gleaned but i wanted to be sure. I like option A as well, just can work as far ahead before i have to get it water for the initial test. But i got alot of other things i can work on before i get it wet, like this transom, cutting/fitting/epoxying deck pieces, and malting out the flush seat mount and installing backer board.

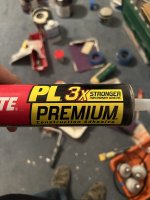
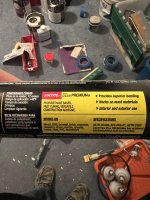
Speaking of transom…. I have some of this left over from building up a subfloor before laying hardwood (remodeling a house we just moved into in nov), it is poly i believe. Would this work for laminating the 2x-3x stacked transom? Doing some searches it appears people have used similar products including gorilla glue w success. Not adverse to getting anything else, just makes it easier if i have it or i can get it from Home Depot. I’m there so often they think I’m a contractor lol.
 

Attachments

  • 440A2FA9-FC9C-4B02-AFD1-AADDEEACB5BB.jpeg
    440A2FA9-FC9C-4B02-AFD1-AADDEEACB5BB.jpeg
    1.4 MB · Views: 3
  • E39621D3-C04D-4838-837F-42178081168E.jpeg
    E39621D3-C04D-4838-837F-42178081168E.jpeg
    1.4 MB · Views: 3
Top