Starcraft 1971'? 16' to Duck Boat Rebuild

SHSU

Lieutenant Junior+Starmada Splash Of The Year 2019
Joined
Mar 8, 2017
Messages
1,665
Got any pics?

Usually they can sit on the dash or the top of the console. Pretty much any flat surface.

SHSU
 

danimal045

Petty Officer 3rd Class
Joined
Feb 18, 2022
Messages
88
I got pics of the side console, I’ve since taken it apart and am redoing the wood, and also a pic of the control that came with the motor. Sorry if some of my questions are dumb, this is the first boat i ever had.

The dimensions on the control are roughly 4”x6”x7.25”, so that mounting bracket i sent won’t work, but i can prob bend something myself that would have 5” on top for this to sit in
 

Attachments

  • B713B333-BA4D-4B22-AFD8-678804EE4626.jpeg
    B713B333-BA4D-4B22-AFD8-678804EE4626.jpeg
    2.3 MB · Views: 2
  • 632AD6CF-DE27-40B2-A59F-B955408CEEE4.jpeg
    632AD6CF-DE27-40B2-A59F-B955408CEEE4.jpeg
    1.6 MB · Views: 2
  • 0768B663-1C7E-4FC9-9BD2-744E8ADBD729.jpeg
    0768B663-1C7E-4FC9-9BD2-744E8ADBD729.jpeg
    2.1 MB · Views: 2
  • D7B8FE52-ACAB-40B6-BCF1-367CA958779E.png
    D7B8FE52-ACAB-40B6-BCF1-367CA958779E.png
    6.3 MB · Views: 2

SHSU

Lieutenant Junior+Starmada Splash Of The Year 2019
Joined
Mar 8, 2017
Messages
1,665
Only dumb question is a question not asked.

As for the controller, it can be mounted on a flat surface. Generally seen on top or the console next to steering wheel.

SHSU
 

danimal045

Petty Officer 3rd Class
Joined
Feb 18, 2022
Messages
88
So i got her float tested, no water anywhere besides a small hole in the bow we’re the keel is that had an old worn out patch, ground it down, patched it with some marine epoxy patch, sanded it uniform (don’t have that pic), as well as some holes from old transducers. Then i stripped the bottoms paint off for applying Gator Glide. I need to prep rest of boat, but painting the hull and bottom should be done within next week. Im doing the hull with duralux duckboat drab and a Wagner PowerPainter before the camp stencils. That’s what seems to be recommended for this paint. Slowly but surely.
 

Attachments

  • C4750417-290D-4AB6-963B-3C94F2DB0555.jpeg
    C4750417-290D-4AB6-963B-3C94F2DB0555.jpeg
    2.3 MB · Views: 13
  • 6DFAC9D4-CFCC-4A6B-AE8A-7DD985940D03.jpeg
    6DFAC9D4-CFCC-4A6B-AE8A-7DD985940D03.jpeg
    1.8 MB · Views: 13
  • A66C058A-25C2-472A-B263-9520A80C9057.jpeg
    A66C058A-25C2-472A-B263-9520A80C9057.jpeg
    1.7 MB · Views: 14
  • 990C6A6C-6CE7-459C-9E7C-285D4CD369D8.jpeg
    990C6A6C-6CE7-459C-9E7C-285D4CD369D8.jpeg
    3.2 MB · Views: 16
  • DD47C57A-2BA1-4AF5-9F47-4E4A467769D8.jpeg
    DD47C57A-2BA1-4AF5-9F47-4E4A467769D8.jpeg
    3 MB · Views: 12

danimal045

Petty Officer 3rd Class
Joined
Feb 18, 2022
Messages
88
Here was the hole that the patch was worn out and how it turned out after i repatched and sanded it down. Not too bad. Also sanded down the patches were there were a few screws for transducer mounts. I got the final bit of paint off the bottom. Should be prepping and painting the hull by the weekend. Trailer is going off for a sandblasting for $250, and the shop will do an epoxy primer base coat for another $250, would have the trailer back by next week, think I’m gonna do it….
 

Attachments

  • 1EE23774-A6F2-43FB-87C9-69648B626F66.jpeg
    1EE23774-A6F2-43FB-87C9-69648B626F66.jpeg
    2.3 MB · Views: 11
  • AB4D84C3-00D5-4F5A-A9FC-A23AE3A31D0C.jpeg
    AB4D84C3-00D5-4F5A-A9FC-A23AE3A31D0C.jpeg
    1.8 MB · Views: 12
  • 6C99EF84-A2CE-458F-97D9-4689F37BB21E.jpeg
    6C99EF84-A2CE-458F-97D9-4689F37BB21E.jpeg
    1.6 MB · Views: 12
  • 14CF5E58-6D38-4809-A499-A1DBEC402AE1.jpeg
    14CF5E58-6D38-4809-A499-A1DBEC402AE1.jpeg
    375.4 KB · Views: 12

danimal045

Petty Officer 3rd Class
Joined
Feb 18, 2022
Messages
88
Of course, didn’t get as much accomplished as i wanted, but i Disney my “paint booth constructed, and one side and the transom cleaned with acetone, scuffed with green scotchbrite pad, and cleaned with acetone again. Gonna try and get a coat on today
 

Attachments

  • 640A1F49-C5FD-4576-9677-1D23E7357BCA.jpeg
    640A1F49-C5FD-4576-9677-1D23E7357BCA.jpeg
    2.1 MB · Views: 5

danimal045

Petty Officer 3rd Class
Joined
Feb 18, 2022
Messages
88
So got my first coat down. Went with Duralux Duckboat Drab. The consensus on the fkrums was to roll and tip, or use a basic Wagner power painter, as the paint needed thinned to much for an air compressor gun. So i got. Wagner power painter off eBay new in box for $50, and it worked like a champ! The base is duckboat drab, need a second coat, let it cure fully, then I’ll be using dead grass green and black for the stencil. Thinking of a matte clear coat. Then it’s time for gator glide on the bottom. It’s starting to look like I’m making progress!

Finished up my reloading bench thinweekms well. The other pic is what I’m hoping the camo pattern comes out like


Attachments

  • 6B5F2BD2-AFB3-42E8-BC3A-AEEAC57C0F70.jpeg
    6B5F2BD2-AFB3-42E8-BC3A-AEEAC57C0F70.jpeg
    2.2 MB · Views: 10
  • 67BD7047-B6EE-44F1-AED7-BDDBF32952ED.jpeg
    67BD7047-B6EE-44F1-AED7-BDDBF32952ED.jpeg
    1.9 MB · Views: 10
  • BF1818AC-0E71-449E-89E3-A0523996F343.jpeg
    BF1818AC-0E71-449E-89E3-A0523996F343.jpeg
    2.3 MB · Views: 10
  • 8AD74B53-3BB4-495A-88BF-B7949C2D4B4F.jpeg
    8AD74B53-3BB4-495A-88BF-B7949C2D4B4F.jpeg
    2.5 MB · Views: 10
  • 0686ECB7-B019-49A0-8B3A-332376417C1A.png
    0686ECB7-B019-49A0-8B3A-332376417C1A.png
    5.9 MB · Views: 9
  • D82D64C8-DC3D-4096-A746-E7B9E2F5CA65.jpeg
    D82D64C8-DC3D-4096-A746-E7B9E2F5CA65.jpeg
    1.3 MB · Views: 9
Last edited:

Moserkr

Chief Officer + Starmada Splash Of The Year 2021
Joined
Nov 23, 2020
Messages
834
Looks great! Love the color, perfect for a marsh full of ducks!!
 

danimal045

Petty Officer 3rd Class
Joined
Feb 18, 2022
Messages
88
Thanks, i certainly hope!
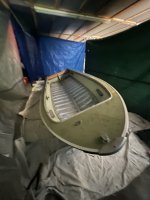
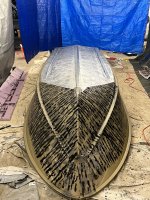
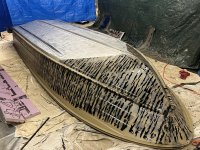
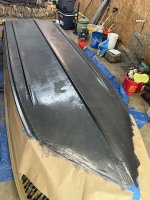
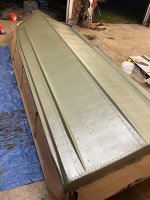
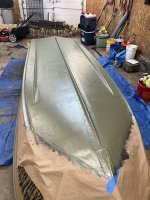
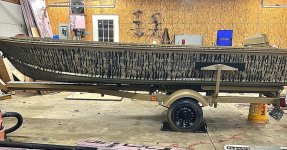
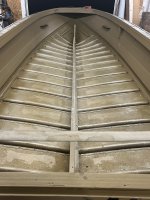
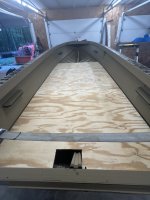
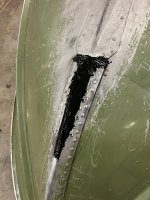
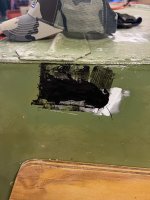
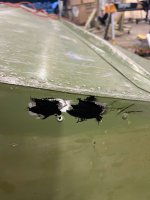
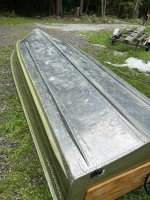
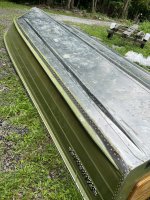
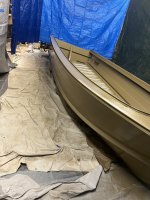
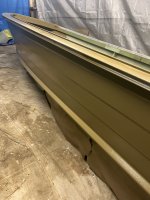
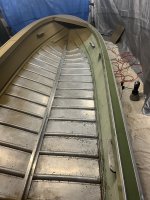
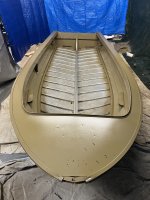
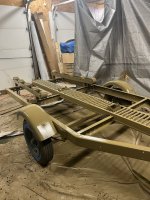
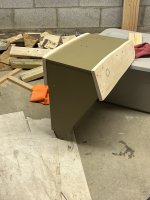
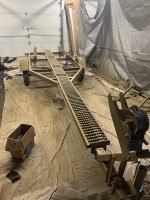
Besides a few paint touch ups, it came out pretty good. If i stencil a boat again, definitely getting the kind you stick on, painte, then peal off. Some overspray, a few runs, but as a whole i think it came out pretty good from my first attempt at painting a boat. I’m prepped and ready to start the gator base tomorrow or friday, then gator glide 3 days later, then the boat can go back on the trailer which i wil Be painting while the gator glide is curing. Then it is layout time.

I got 2 batteries, cranking and deep cell with plenty of cca’s i believe per charts i read and a blue sea add a battery and fuse block with negative bus, going to an 8 switch rocker panel. Never done this before either. Very confusing. Blue sea has some basic wiring diagrams that may be helpful.

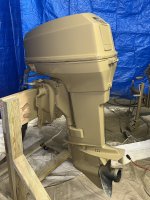
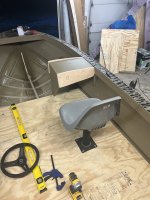
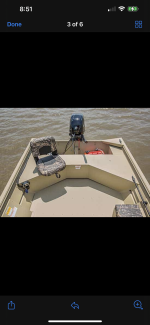
I plan to have a light bar in front, 2 pod lights in the stern, and 2 pod lights in the middle, bilge pump, trolling motor, running lights in bow and stern, fish finder/GPS, and under gunwale lights for seeing things on the floor or when the blind is up. Probably add a radio and 2 speakers at some point. I have ample 12awg wire for most applications, i know i will have to get some big stuff for the batteries. Batteries will be in front near bow, motor and gas in front of transom.

Anyone have a place you can create or that provides some wiring diagrams for beginners? Gotta start mapping it all out. Appreciate any input.
 

Attachments

  • 72F2CA5C-C5F7-4A34-BF38-000453D6C2D0.jpeg
    72F2CA5C-C5F7-4A34-BF38-000453D6C2D0.jpeg
    2.5 MB · Views: 7
  • 516A687F-FDD8-4150-BC9D-129C366919E6.jpeg
    516A687F-FDD8-4150-BC9D-129C366919E6.jpeg
    4.4 MB · Views: 7

danimal045

Petty Officer 3rd Class
Joined
Feb 18, 2022
Messages
88
Got the base coat done on the trailer, used the same base color that i did on the boat. Now i built the front console back out with new wood to the same specs it was, it I’m prob gonna have to change something up if i want the 8 Gang switch panel on the console. Trying to figure out what I’m gonna do for a rear seating/storage. Think i wanna do a bench seat with two removable seats and a pedestal mount in the middle. I found some good inspiration pics, now i have to figure out how to execute. Think the one with the camo seat would be best for my application and runnin a kicker if needed
 

Attachments

  • D8675FEC-4F0A-4FCC-84C5-496699DC73B3.jpeg
    D8675FEC-4F0A-4FCC-84C5-496699DC73B3.jpeg
    2.3 MB · Views: 7
  • 7D46DCFE-A9A8-4B56-B56C-F81038ED556F.jpeg
    7D46DCFE-A9A8-4B56-B56C-F81038ED556F.jpeg
    1.5 MB · Views: 8
  • 3ACE49BE-3E71-45AB-8CDA-A8D81DF09C56.jpeg
    3ACE49BE-3E71-45AB-8CDA-A8D81DF09C56.jpeg
    2.4 MB · Views: 8
  • EEA91D8F-369E-452C-97C3-383BD848D6C7.jpeg
    EEA91D8F-369E-452C-97C3-383BD848D6C7.jpeg
    1.9 MB · Views: 7
  • DF8F540A-6B00-42FB-8BA5-7A96730F8A55.png
    DF8F540A-6B00-42FB-8BA5-7A96730F8A55.png
    4.3 MB · Views: 5
  • CF136761-5BB7-4466-AC7A-1D57C5D0AA7D.png
    CF136761-5BB7-4466-AC7A-1D57C5D0AA7D.png
    4.4 MB · Views: 5
  • C973E2EE-0A89-4F2B-9B28-0714A16AE89C.jpeg
    C973E2EE-0A89-4F2B-9B28-0714A16AE89C.jpeg
    2.6 MB · Views: 6

danimal045

Petty Officer 3rd Class
Joined
Feb 18, 2022
Messages
88
Got the Gator Base on Saturday, and i no longer have a big white Johnson, but a big tan Johnson. Gotta wait 3D says for it to cure before i can but the top coat gator glide on
 

Attachments

  • 6E018A67-86ED-425B-AE56-F16B713FD062.jpeg
    6E018A67-86ED-425B-AE56-F16B713FD062.jpeg
    2.6 MB · Views: 7
  • 5E86A001-F3D8-46B9-8500-2302C8ACA600.jpeg
    5E86A001-F3D8-46B9-8500-2302C8ACA600.jpeg
    1.9 MB · Views: 7

danimal045

Petty Officer 3rd Class
Joined
Feb 18, 2022
Messages
88
Top coat of GG done, now another 3 days until i can flip it and actually put this thing back together, hopefully functional!! Going to carefully remove tape tomorrow
 

Attachments

  • 73F4A280-3DD0-4396-819C-2C013C672099.jpeg
    73F4A280-3DD0-4396-819C-2C013C672099.jpeg
    2.6 MB · Views: 5
  • 0C70CD6F-EDAE-483F-B1D3-A7AF59F81B9F.jpeg
    0C70CD6F-EDAE-483F-B1D3-A7AF59F81B9F.jpeg
    2.6 MB · Views: 5

danimal045

Petty Officer 3rd Class
Joined
Feb 18, 2022
Messages
88
Gator glide finished, boat motor painted, interior rivers seale, trailer finished, and started laying the floor back out. It’s the final push to get ready for the season…
 

Attachments

  • 499BABAD-1570-4110-8719-937D5D23CA93.jpeg
    499BABAD-1570-4110-8719-937D5D23CA93.jpeg
    565.5 KB · Views: 8
  • BF210E80-BD29-4C9A-850D-7B3BDD8561E9.jpeg
    BF210E80-BD29-4C9A-850D-7B3BDD8561E9.jpeg
    2.2 MB · Views: 8

danimal045

Petty Officer 3rd Class
Joined
Feb 18, 2022
Messages
88
Nice work. Moving right along!!!

SHSU
Thank you! Got the plywood cut for the entire floor and fitted, marked where they line up on each other. It was 5 pieces total. (2) 48” long, (1) 23” long, then getting into the bow (1) 38” piece, and (1) 15.5” piece up to the bow. Mocked up were the console is going to go and the captain chair and ordered a 14’ Vevor Rotary steering system. Pulled it all out and lined up on the floor and cut steel strips so the whole floor will attach together. I’m hoping to glue the vinyl on out of the boat and wrap it around the bottom and hit it with some staples, that way i only have 2 fully wrapped pieces to put in the boat then fasten down. I got enough flexible conduit to run on each side from bow to stern, T into the battery compartment up in the bow, and also T out below the console for the accessory wires to the switches. I then started laying out the foam for beneath the floor. Feels like I’m gettin there. I’ll be working before i know it. Hopefully. Lol. I’m not using that seat
 

Attachments

  • 5805D435-E5AB-4DED-AFD4-895FD2F08624.jpeg
    5805D435-E5AB-4DED-AFD4-895FD2F08624.jpeg
    1.7 MB · Views: 11
  • E66169C7-7161-49D4-9597-87C2139D9529.jpeg
    E66169C7-7161-49D4-9597-87C2139D9529.jpeg
    2.1 MB · Views: 11

danimal045

Petty Officer 3rd Class
Joined
Feb 18, 2022
Messages
88
It’s how the original was. i just got thicker scrap pieces to redo. Original in pic. there were metal strips on each of the 3 original pieces of flooring were riveted to, connecting them. I had to do 5 pieces on the rebuild, so I’d like to attach the first 3 pieces together outside the boat, do the vinyl, drop it in and secure it and do the same w the 2 pieces in the bow, if that makes sense.
 

Attachments

  • EDFC29BB-82C4-4F3B-88F2-891805C45ECA.jpeg
    EDFC29BB-82C4-4F3B-88F2-891805C45ECA.jpeg
    905.9 KB · Views: 6

BWR1953

Vice Admiral
Joined
Jan 23, 2009
Messages
5,847
It’s how the original was. i just got thicker scrap pieces to redo. Original in pic. there were metal strips on each of the 3 original pieces of flooring were riveted to, connecting them. I had to do 5 pieces on the rebuild, so I’d like to attach the first 3 pieces together outside the boat, do the vinyl, drop it in and secure it and do the same w the 2 pieces in the bow, if that makes sense.
That's what I thought. I strongly urge you to use aluminum for your underdeck reinforcement joiners. The last thing you want is steel rusting under your deck, rotting things out. :)

This is how I did my underdeck aluminum joiners. ☺️

1.jpg

2.jpg
 
Top