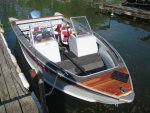
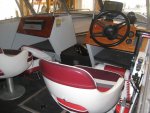
Sea Nymph GLS 195 restoration

Status
Not open for further replies.

Watermann

Starmada Splash of the Year 2014
Joined
Jan 12, 2013
Messages
13,798
Ok, now that I look again, I think I can see the gluvit in the keel seam and where you drug the brush out to load up the seam.

IMG_20170602_101331509_zpsdwgiuq9s.jpg
 

someone11

Petty Officer 1st Class
Joined
May 2, 2009
Messages
296
Oops, my previous post was the wrong picture lol this was the one I meant to post


fishin98

Chief Petty Officer
Joined
Nov 28, 2009
Messages
521
You are doing a great job!!! When I redid my Alumacraft, I filled that area with 3M5200 Slow Cure, Which flows into every nook and cranny.
 

someone11

Petty Officer 1st Class
Joined
May 2, 2009
Messages
296
You are doing a great job!!! When I redid my Alumacraft, I filled that area with 3M5200 Slow Cure, Which flows into every nook and cranny.

Thanks! Yeah if it still leaks there after the gluv it I may use 5200 there.

I wasn't planning on going this in depth but once I started tearing it apart and noticed the issues I knew what needed to be done. Im gonna be down longer than I had planned but it'll be worth it in the end. But I must say, its KILLING me not being able to fish right now. ALL of my time off is spent on this boat right now.
 

fishin98

Chief Petty Officer
Joined
Nov 28, 2009
Messages
521
I felt the same way when I did my Alumacraft rebuild, the extra time spent on little issues resulted in a quality rebuild project.
 

someone11

Petty Officer 1st Class
Joined
May 2, 2009
Messages
296
I felt the same way when I did my Alumacraft rebuild, the extra time spent on little issues resulted in a quality rebuild project.

Exactly, it's also a safety issue too not fixing it right. Last thing I want is something catastrophic happening 15 miles out on lake Superior. That's what I felt like before I started working on the boat. Now I'll feel safer when going out.
 

Watermann

Starmada Splash of the Year 2014
Joined
Jan 12, 2013
Messages
13,798
Nice work, after seeing the keel pic I don't think you'll have any issues there with water coming in. :thumb:
 

appleo

Petty Officer 1st Class
Joined
Jul 19, 2012
Messages
388
No Title

Ask if you have any questions Mine is a 1988..New floor, dash, carpet, minnkota . electronics foam was dry hull no leaks
 

Attachments

  • photo267185.jpg
    photo267185.jpg
    124.1 KB · Views: 3
Last edited by a moderator:

jbcurt00

Moderator
Staff member
Joined
Oct 25, 2011
Messages
25,059
appleo the whole point of a forum is tobpost questions and solutions in an open forum so it benefits those that follow us.

So please dont request emails or PMs to discuss rebuilds.
 

someone11

Petty Officer 1st Class
Joined
May 2, 2009
Messages
296
Will post a couple pics tomorrow, dont feel like doing it tonight, but I test fit the transom, cut it down a bit to fit and laid the first layer of epoxy down today. Also got the inner transom skin primed. Have to pick some more primer and paint up tomorrow. Hopefully have transom installed within a week (so by next friday). I have all my thru hull fittings/aerator and hoses except for one, company sent me the wrong size hose for the livewell drain. Good customer service though, they told me to keep the wrong one they sent me and they are sending the right hose out. I also have the SW drains and the flange tool (yes I bought the tool because for me it'll probably work better/easier than the one i make). So as soon as the transom is done with epoxy I should be able to make some headway. Kinda stuck until payday with getting more materials, I do need to pick up a sheet of 1 1/2" foam for going between the ribs under the livewell and gas tank tub.
 

someone11

Petty Officer 1st Class
Joined
May 2, 2009
Messages
296
Ask if you have any questions Mine is a 1988..New floor, dash, carpet, minnkota . electronics foam was dry hull no leaks


I like that dash, I was thinking of doing something similar with mine, not sure if I just want to leave it sealed wood or paint it. This boat wont be for show lol Hopefully will be putting lots of fish on board.
 

appleo

Petty Officer 1st Class
Joined
Jul 19, 2012
Messages
388
someone11;n10413387 said:
I like that dash, I was thinking of doing something similar with mine, not sure if I just want to leave it sealed wood or paint it. This boat wont be for show lol Hopefully will be putting lots of fish on board.

Made from a piece of mahogany table top found on craigslist
 

someone11

Petty Officer 1st Class
Joined
May 2, 2009
Messages
296
Sorry I havent posted much. Its been a hurry up and watch epoxy dry game lately lol But I got the transom set in the boat today after drilling the holes. Since tomorrow is payday im gonna get the hardware to install the transom- FINALLY! Should make some significant headway soon. Thru hull fitting is installed as well as the aerator.


someone11

Petty Officer 1st Class
Joined
May 2, 2009
Messages
296
I forgot to mention, shortly after I got the old transom out and all the foam out, I had carpenter ants in the house :mad: Ive been battling them ever since. Ive got them down pretty good now but man they were bad right after I got it out.
 

someone11

Petty Officer 1st Class
Joined
May 2, 2009
Messages
296
What do you guys recommend to replace the transom cap nails with? Will small stainless screw work?
 

someone11

Petty Officer 1st Class
Joined
May 2, 2009
Messages
296
Yeah screws, those little nails were a bad idea to begin with.


Yeah I thought so haha. I was searching through the forums and came across a post where you had commented in. Someone ran the screws through the top of the cap instead of the side (or lip) any reason to do one or the other? I think someone mentioned that its hard to get the holes to line back up.
 

Watermann

Starmada Splash of the Year 2014
Joined
Jan 12, 2013
Messages
13,798
Either way sides or top I don't see a difference but if you pierce the sealer on the transom with screws the holes need to be sealed against water intrusion.
 

someone11

Petty Officer 1st Class
Joined
May 2, 2009
Messages
296
Either way sides or top I don't see a difference but if you pierce the sealer on the transom with screws the holes need to be sealed against water intrusion.


Yeah I was thinking about that. Would have to drill a real small pilot hole or screw them in and then out, fill with sealer and then re-screw.
 
Status
Not open for further replies.
Top