New project - '63? Aero Craft

Driven1

Petty Officer 2nd Class
Joined
Jul 13, 2008
Messages
157
Re: Possible new project - '63? Aero Craft

Re: Possible new project - '63? Aero Craft

On the question of the motor pictured in the AeroCraft brochure pic, after more research, it is a '63 Evinrude Lark which had electric "Push-button" shifting, choke, and start. It was rated at 40hp. I believe the motor cowl may have been repainted for the AeroCraft pic because the factory engine paint didn't come that way. The pic of the motor and cowl on the AeroCraft match the Evinrude Engine Brochure for that year.

Still gotta work out exactly what year my AeroCraft is.
 

CATransplant

Admiral
Joined
Feb 26, 2005
Messages
6,319
Re: Possible new project - '63? Aero Craft

Re: Possible new project - '63? Aero Craft

Take a pass on the electric shift Big Twins. You may have to go back to 61 or 62 to find a lark for your boat, but don't buy the electric shift. The 40hp versions will definitely be a great match for that boat.

I see 35 and 40hp Big Twins here in the Twin Cities Craigs List all the time. They go for cheap. I've seen several, in good cosmetic and running condition for $250-400. They're reliable, torquey, and easy to maintain. They do suck a little more fuel than more modern ones, but...
 

Driven1

Petty Officer 2nd Class
Joined
Jul 13, 2008
Messages
157
Re: Possible new project - '63? Aero Craft

Re: Possible new project - '63? Aero Craft

Thanks for the info on the Evinrude Larks. I've got a long way to go before I get to the motor. Just curious. What kind of problems occurred with the electric shift. Burnt solenoids? Jams?
 

baylinerbuff

Cadet
Joined
Jun 8, 2008
Messages
12
Re: Possible new project - '63? Aero Craft

Re: Possible new project - '63? Aero Craft

This looks like a fun project, my dad had one of those when I was a kid.

Good luck and have fun restoring it if you get it.
 

baylinerbuff

Cadet
Joined
Jun 8, 2008
Messages
12
Re: Possible new project - '63? Aero Craft

Re: Possible new project - '63? Aero Craft

Yeah, it's pretty hilarious. When the guy said "Make me an offer." I'm thinking to myself, well hell, he wouldn't give it away, it does need a lot of work, 100? 200? Then he chimes in with "How about 35?." I swear I almost sh_t myself. Good thing I wasn't drinking anything!

As it turns out the dumbass gave it away anyhow! And is going to deliver it! Go figure.

Well its a good start, 35 bucks delivered, this boat will look awesome when restored, just looking at the colors on this boat gives it that classic look.

Have fun.
 

Driven1

Petty Officer 2nd Class
Joined
Jul 13, 2008
Messages
157
Re: Possible new project - '63? Aero Craft

Re: Possible new project - '63? Aero Craft

Well folks,

I went and paid the outrageous amount of 35 bucks for the AeroCraft today. Bill of sale in hand! I expect to have the boat here in a few days. I'll have a better idea of what's going to need to be done after that.

I believe I'm going to have some serious work to do on the transom. I noticed along the bottom outside edge that it looks like it cracked out and a half fast job of repairing it was done. There's also a giant metal plate hung on the back. Not a good sign. Luckily, I was wrong about the floor. It's fiberglass. There was never a wooden floor in it.

Really looking forward to this one!
 

Driven1

Petty Officer 2nd Class
Joined
Jul 13, 2008
Messages
157
Re: Possible new project - '63? Aero Craft

Re: Possible new project - '63? Aero Craft

Well guys, got the old girl home today finally. I gave up on waiting for the guy I bought it from to deliver it. I talked a neighbor into giving me a hand getting it. The boat was heavy as hell. Snapped my winch line twice trying to load it on the trailer. Got it home and started tearing into it. Took out all of the seats and hosed out the inside. On the bottom of the transom outside I noticed a very small hex head plug in the center bottom. I unscrewed it and yup, you guessed it, full of water. I guess that would explain why the thing was so damn heavy. :D

As it turns out, what appeared to be a solid fiberglass floor, isn't. It's glass coated marine ply. The back 3rd of the floor to the transom is shot. Surprisingly, ahead of it seems solid as a rock. Gonna replace the whole floor anyway. Removed the fabricated aluminum plate off the back of the transom. The wood there's also totally shot. Of course, some very poor repair attempts were made previously.

There's one part of the whole transom thing that I think is going to be particularly troublesome. It looks to me like the transom and hull below the floor were full of water and allowed to freeze, cracking the transom outer skin from the bottom of the hull. Someone had done a poor patching job with some mat, then maybe someone else with what looks to be JB Weld, and then perhaps someone else with some RTV Silicone. I'll know more when I get the rear portion of the floor out.

It looks like the original finish might be saveable (except where the hull was repaired at the transom. Not sure what I'm gonna do there yet) Gonna get some "Orange" paint stripper to see if I can get the enamel that was brush painted off of it, assess the gelcoat and go from there. Gonna follow Mark's method as outlined here

Looks like it's gonna be a long haul but I think it's worth it. I really like the classic lines of this boat. The MGF I've been working on continues to be my main focus and I'll be working on the AeroCraft when I'm not working on the MGF for whatever reason. I've been called back to work so I'll have more money to do the work that I won't have time to. Don't know which is worse!

As I've been doing with the MFG, I'll be updating with progress pics and I'm sure I'll have questions related to fixing that transom/hull separation problem.

Wish me luck!
 

Shizzy

Ensign
Joined
Aug 5, 2007
Messages
984
Re: New project - '63? Aero Craft

awsome score.

you have the same tone I had when I dragged home an old (late 60's - early 70-'s) fiberglass canoe. the more I looked at it the more I found wrong with it. But as soon as I got working on it the more I found myself talking to it and telling myself im getting this thing out on the water.

good luck with it.
 

Driven1

Petty Officer 2nd Class
Joined
Jul 13, 2008
Messages
157
Re: New project - '63? Aero Craft

Thanks Shizzy! She's definately going in the water. (either for fun or burial) So far I think it's looking more and more like for fun.

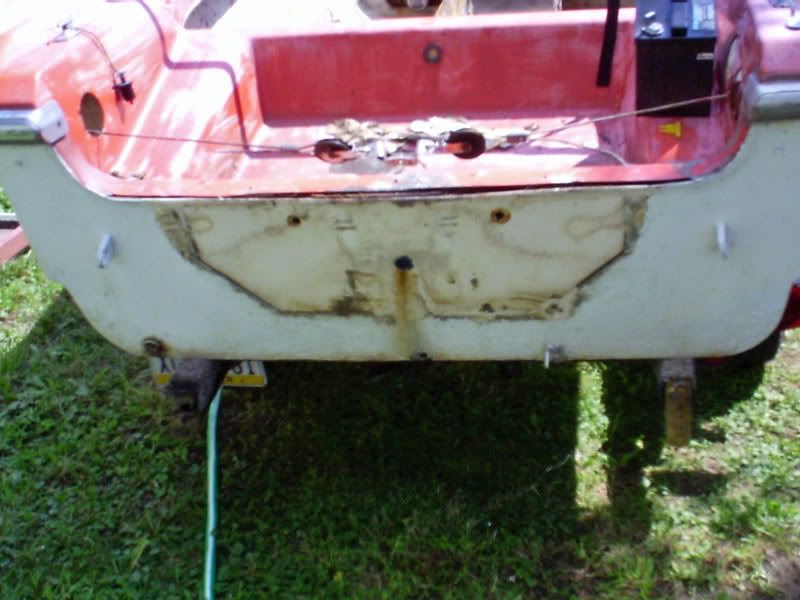
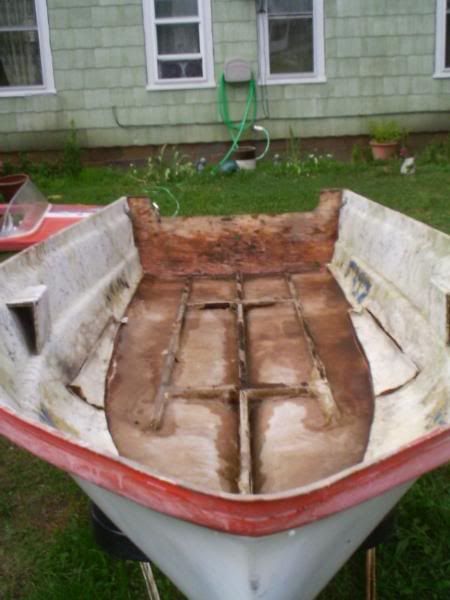
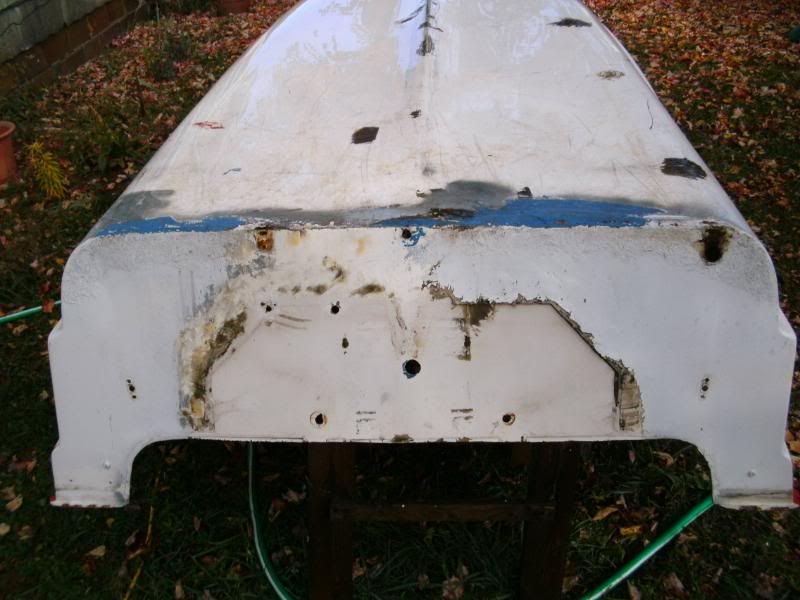
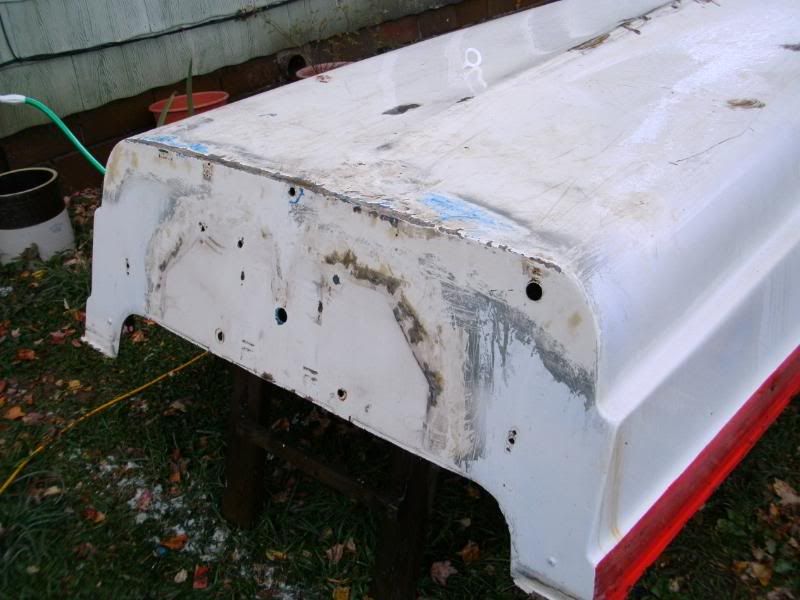
Tore into it today after work to see what I was up against. I don't think that it's as bad as I thought originally. I opened a part of the floor up and got a pretty good look at where the Transom skin cracked. It should be pretty easy to rebuild strength back into it from the inside and then do some cosmetic work on the outside to get it to look good again. Whoever put the Aluminum plate on the back to "strengthen" the totally rotted transom actually tried to glass it to the back of the boat and the splashwell. Luckily, whoever it was, had no clue and most of the fiberglass didn't stick to the gelcoat. The stringers appear to be totally glassed in and still solid (Bonus!) I'll know more when I have the entire floor out. This thing seems to be built a lot better than my MFG was!

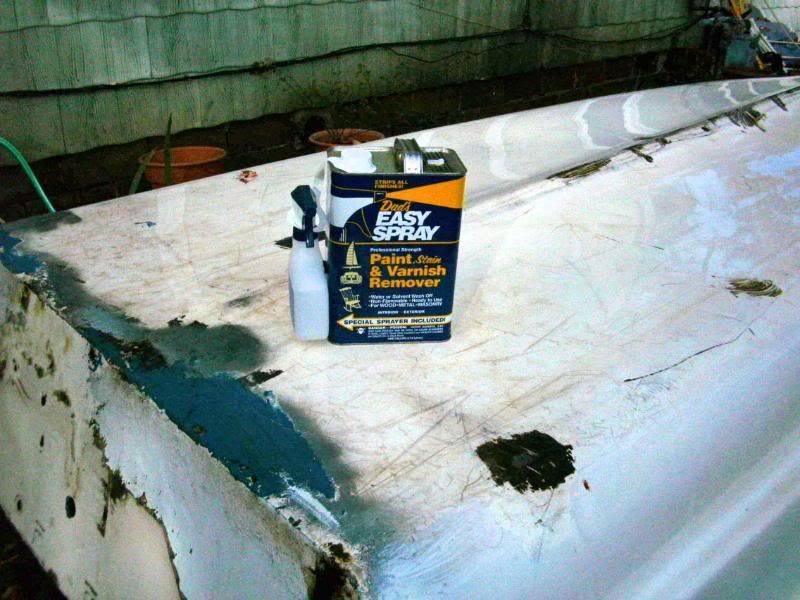
Speaking of gelcoat, the top half of the boat's gelcoat is really thick about 3/16 of an inch or so. That gives me a lot of room to get the original finish shining again. I'm gonna strip the damn rutoleum off it and then buff the hell out of it. There are a few chips and I think I'm just gonna leave 'em.

The bottom half should be the same color as the top but it's been painted over white. I thought about trying to get the color back (would be awesome) but because of some really poor repair work done on the hull, it's going to be impossible. So, I think what I'm gonna try to do, is see if I can get a paint match to the top half and spray or roll it (probably spray). There's no way I'd be able to match it with a gelcoat patch kit or Marine Tex. I hate when people do dumb stuff.

In general, I think the boat's gonna be pretty easy to do. The cap is held on by pop-rivets. I'll just drill 'em out, take the cap off, then flip the hull over to take care of the spots that need it and paint. Then flip it back over, cut out the floor and the inner transom skin, replace the wood, make new seats, glass it all in, and then button her back up with new rivets and give 'er a shine.

So, for those interested, and as an example of how NOT to fix a boat, here's past Stupidity on Parade...

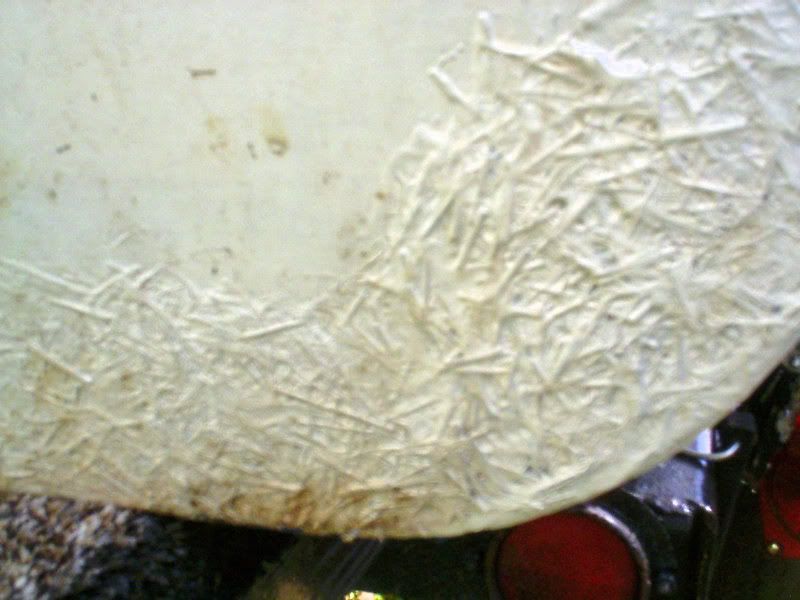
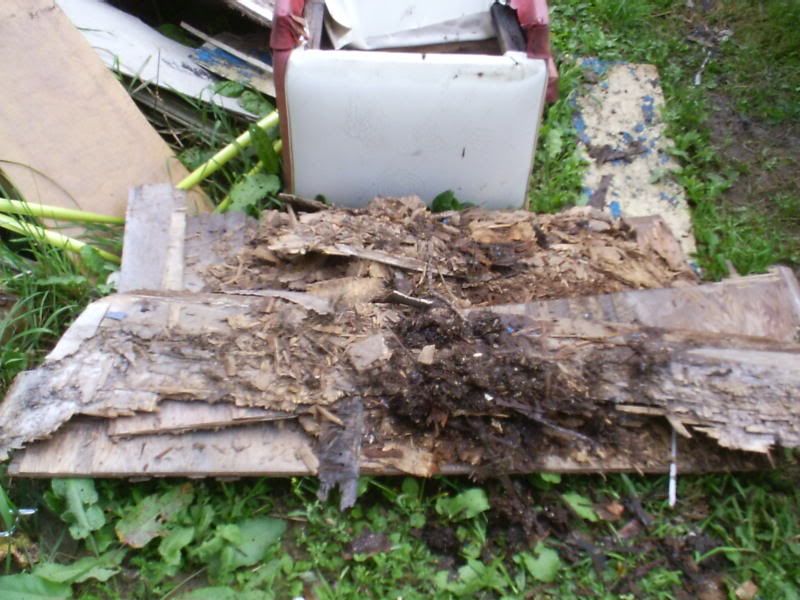
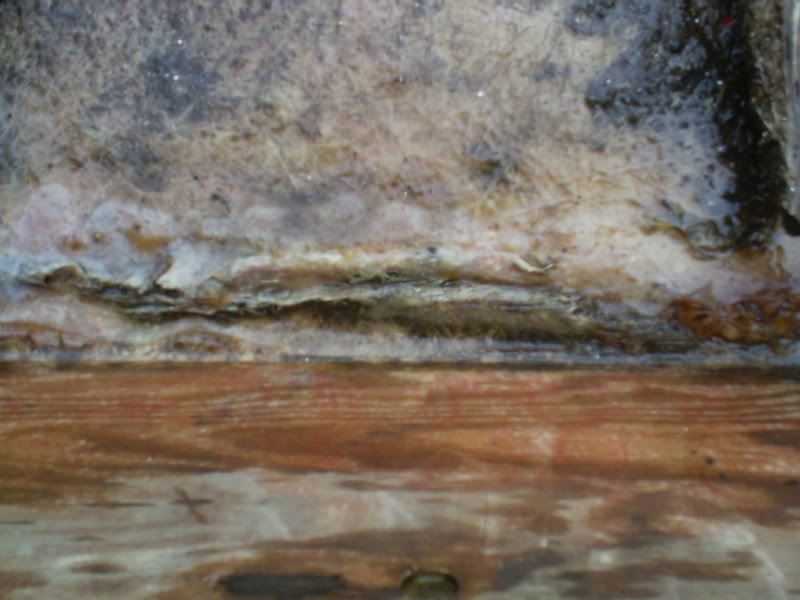
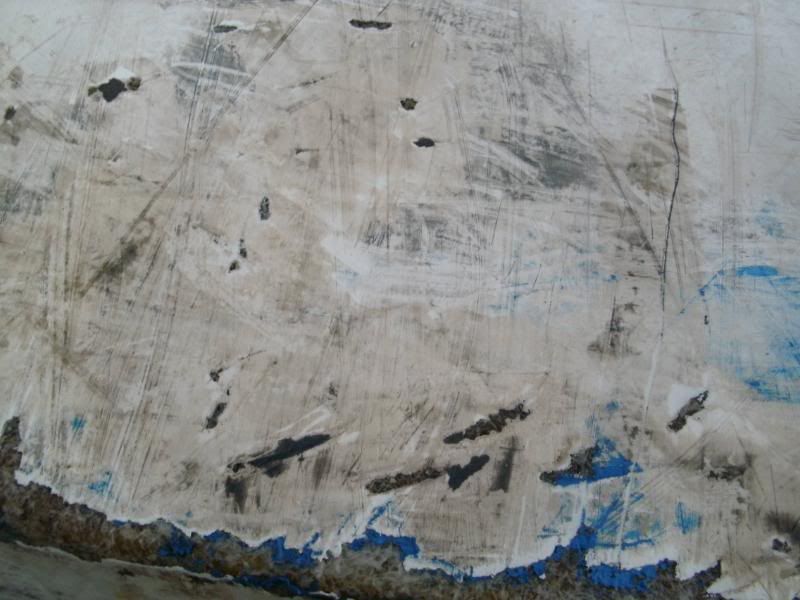
The line around where the aluminum plate was is fiberglass mat. Ummm metal doesn't glass well...

00000025_edited.jpg


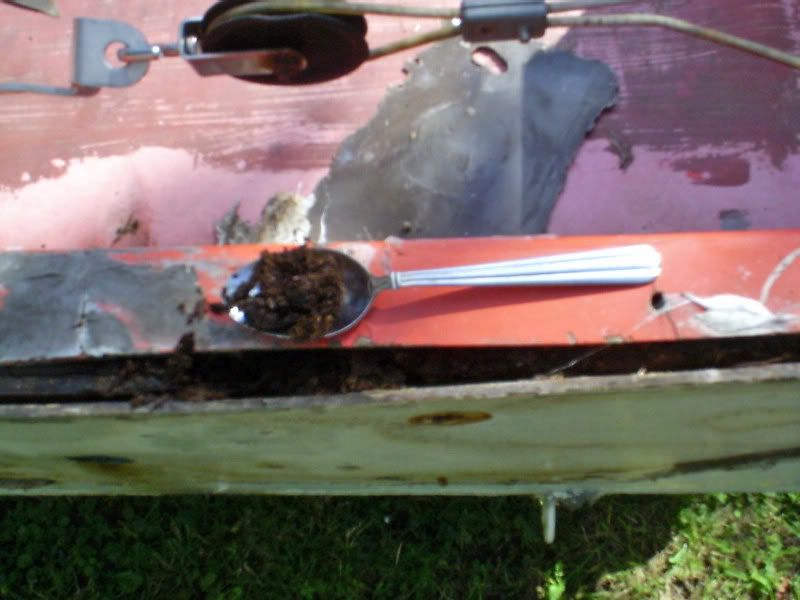
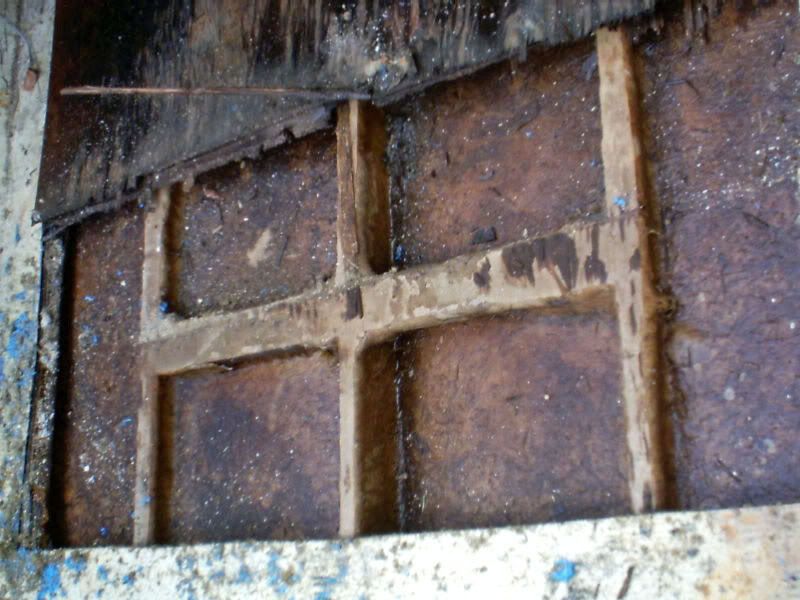
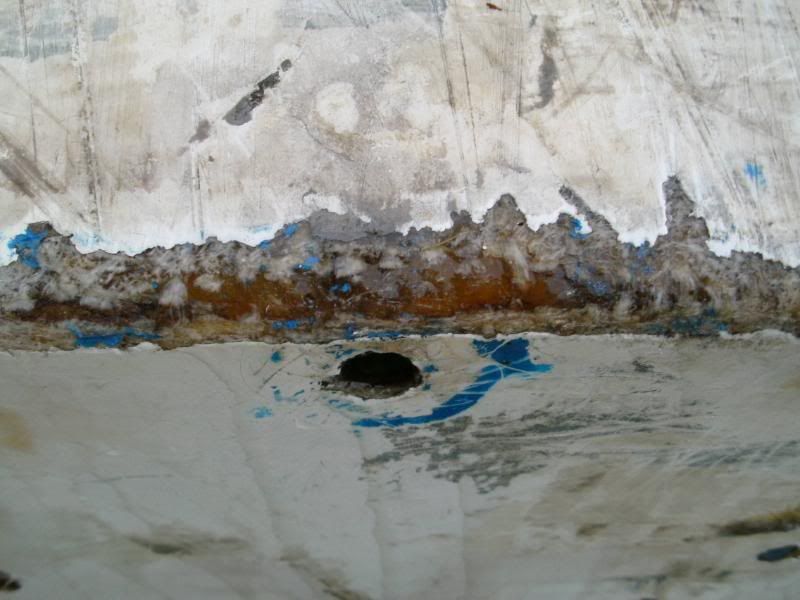
The Transom is so yummy, you could eat it with a spoon...

00000028_edited.jpg


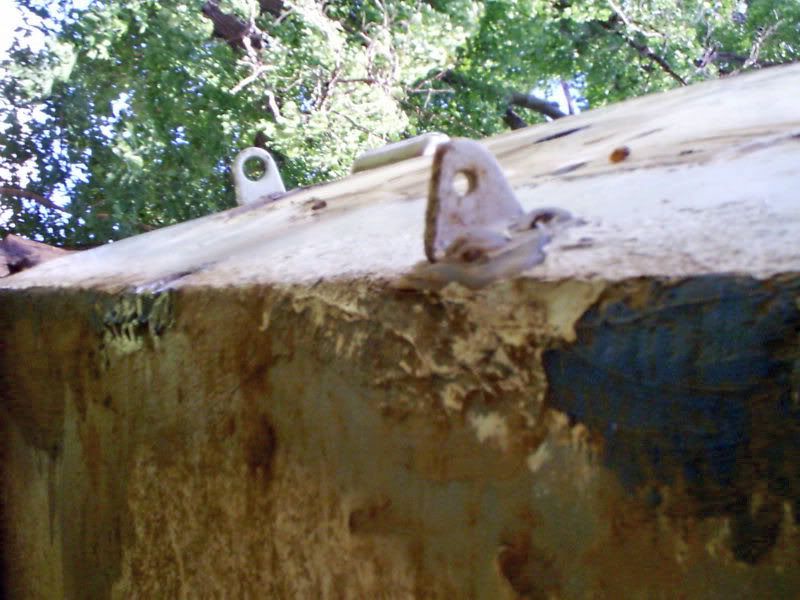
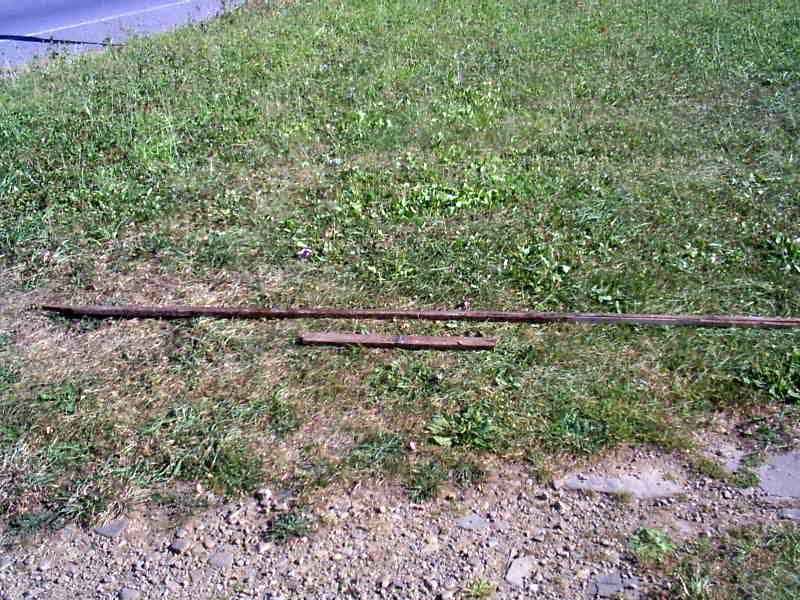
Hey, I got me a good idear, why don' we jest slap whatever we got laying aroun' on thu bottom here to keep it from sinking.

00000026_edited.jpg


An' hey, while we's at it why don' we just slather som-uh chis-a-here stuff on thu kerner...

00000027_edited.jpg


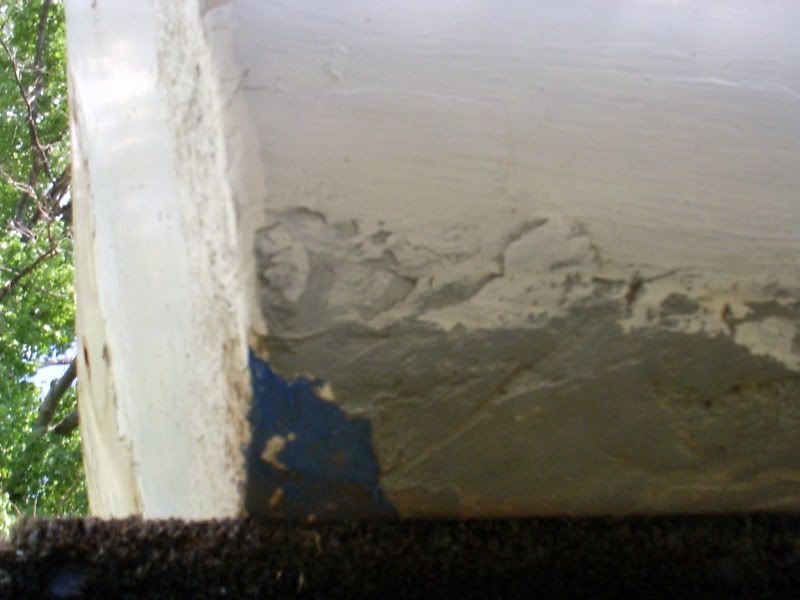
Who-eee, lookie there! Jes' like new!

00000034_edited.jpg


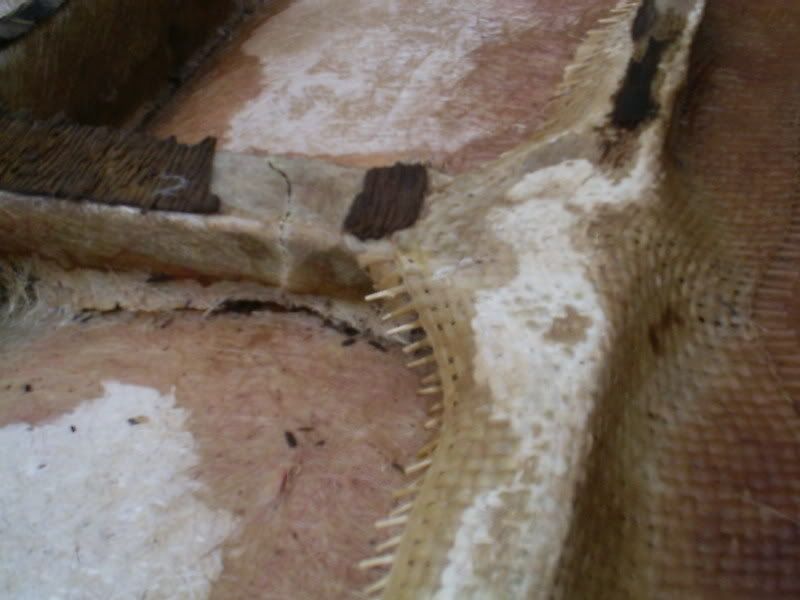
Hey, lookie unner here! I dun missed a spot. Gimme sum-a-that-there brown goo...

00000031_edited.jpg


Alrighty, git thu poles an' the bait. We's a-goin' fishin'!
 

Driven1

Petty Officer 2nd Class
Joined
Jul 13, 2008
Messages
157
Re: New project - '63? Aero Craft

Didn't have room in the previous post for this pic. Wanted to show how well done this was at manufacture under the deck. Wish MFG had taken the time to do it this way!

00000035_edited.jpg


The stringers and bulkheads (if you can call them that) are totally glassed in and still nice and solid. After I get the floor totally out, I'll be drilling some test holes in the stringers just to be sure they aren't rotted and seal them back up if they're ok. The floor will be real easy to replace because it's totally flat.
 

tcindie

Petty Officer 3rd Class
Joined
Jul 31, 2008
Messages
76
Re: New project - '63? Aero Craft

I'd be surprised if they're not rotted, or at least saturated with water... Mine were all glassed in, but they were drenched inside the glass casing...
 

Driven1

Petty Officer 2nd Class
Joined
Jul 13, 2008
Messages
157
Re: New project - '63? Aero Craft

Good news everyone! I've got a new best friend. It's called Dad's Easy-Spray Finish Remover. I personally like to call it "Stupid" Remover.

I was stripping a chair near a pile of scrap poly resined glass 3 or 4 weeks ago with it and got some of the stuff on the scrap glass. A while later after letting the stripper work I went to hose it off. I noticed that where some of it got on the poly fiberglass that it dissintegrated it! So today I performed a little test on the bottom outside of the transom where someone had made a mess of it. If it tore up the original glass who cares. I was gonna tear it up anyway. As expected it worked on the "repaired" area. It DID NOT tear up the gelcoat below!

Did another test in an inconspicuous spot where the top finish had been brush painted with Rustoleum. Same thing. Tore up the old paint but not the gelcoat. Awesome! Gonna make this job A LOT easier. I can get all of the "stupid" off this boat real easy. No grinding or sanding necessary!

It appears that the stuff either doesn't attack epoxy resins or works much, much more slowly on them.

I will tell you that this is some brutal stuff though. Safety is a must. Wear goggles and a long sleeved shirt. This stuff WILL burn you in just a few seconds. And, obviously, keep it away from any poly based resins.
 

Driven1

Petty Officer 2nd Class
Joined
Jul 13, 2008
Messages
157
Re: New project - '63? Aero Craft

Well, tried to see what I could do with the old gelcoat. I stripped the paint from half of the bow, cleaned it with comet and a scratchpad, went over it with rubbing compound and then polishing compound.

No luck! :mad: The paint apparently did something to the gelcoat and caused whitish splotchy areas in the gelcoat. I tried buffung them out. No good. Tried sanding them out. Better luck but some areas of the old gelcoat were thin and ended up sanding down to the fiberglass. No good either. Went ahead and tried rubbing compound, polishing compound again, and then cleaning wax using a buffer for all of it. Still not what I wanted to see.

There is a huge difference though...

00000002_edited-1.jpg


So it looks like I'll be painting it. I was really hoping to restore the original finish. I'm gonna do some calling around to local body shops to see if I can find out who does the best job of matching colors around here and see if they can match from a gel chip from the boat. Dern it!!!
 

Driven1

Petty Officer 2nd Class
Joined
Jul 13, 2008
Messages
157
Re: New project - '63? Aero Craft

Y'all probably thought I've been sitting on me arse. Nope. Still going at it.

I've got the top popped and the floor out. Getting the top off was pretty easy. Just had to drill out all the 1/8" pop-rivets. There was a little something I didn't expect though. STAPLES. Yup, staples. They were about twice the diameter of a standard paper staple but about the same length as one. They held the cap to the hull on a flat flange that fit into the rubrail. I would have like to seen that stapler! I happened to have one of those MXZ Saws and cut through them at the seam with that. Once I got the staples cut my wife and I lifted the top off.

Next, of course, was pulling the rest of the floor out. I tell ya, these folks loved their fiberglass. The glass skin around the edges is anywhere from a 1/4 to 3/8 of an inch thick in spots. I learned something too. If you're gonna tear the floor out of one of these, don't follow what appears to be the space between the hull and the plywood. The manufacturer made a really tight fit of the floor using a fairing mixture. The "dip" around the edge is actually fairing glass. I ended up slicing through the hull in one small spot because I just thought I wasn't through the floor coat yet! Damn! One more thing I gotta fix now. Oh well.

SO, if you happen to need to tear the floor out of an AeroCraft Lark, stay about a half inch away from where you think the edge of the plywood is!

I was hoping that I could get away with doing a partial stringer replacement. No luck. Gotta replace 'em all.

I'm also going to have to do some glass repair at the bottom of the hull where it meets the transom. As I suspected, it got cracked out by freezing at some point. Someone tried fixing it by stuffing resined glass through the crack and then glassing over with a single strip of mat from the outside.

Next I'll be flipping the hull over to get a look at the spots that I showed with the "Brown Goo" in earlier pics to see what kind of a mess I've got there. I don't think it's going to be too bad because there's no indication of any through holes in the hull from the inside.

I've got my work cut out for me on this one. I'm still bound and determined to get 'er looking new again though. :D

The pics...

An example of how thick the glass over the floor was. It's hard to see the 1/2" plywood but you can definately see the glass above it!

00000010.jpg


In this pic you can see where some damage was done to the glass over the stringers at some time.

00000012.jpg


Here's a shot from the bow with the floor and what was left of the transom out.

00000009-1.jpg


Here's what's left of the transom!

00000013.jpg


And last, where the glass was stuffed through the crack at the bottom of the transom and hull.

00000014.jpg
 

Driven1

Petty Officer 2nd Class
Joined
Jul 13, 2008
Messages
157
Here's something different...

Here's something different...

I started pulling the stringers out of the AeroCraft and found something really odd. They aren't much in the way of stringers. Simply 3/4 x 1 1/4 by 8' chunks of wood...

00000003_edited-1.jpg


Here's the wierd part...

00000005_edited-1.jpg


They're all pieced together like this...

00000010_edited.jpg


Was this company so hard up for cash at some point that it had to piece together scrap wood to make parts? Seems to me it would have been cheaper to use ply and cut what you needed in one shot rather than pay somone to piece together scrap wood!

Wierd. :confused:
 

jcsercsa

Captain
Joined
May 21, 2007
Messages
3,401
Re: New project - '63? Aero Craft

OHHH MAN and I thought mine was made cheap !! Did they have it all glass in ?? Mine sure wasnt !! John
 

Driven1

Petty Officer 2nd Class
Joined
Jul 13, 2008
Messages
157
Re: New project - '63? Aero Craft

Yeah, they were glassed in. I was hoping because of that, that I wouldn't have to mess with 'em. No luck. Still the craziest thing I've ever seen. Just one stringer was made from no less than 8 pieces of wood, joined and stapled together. I guess because they (obviously) weren't too concerned with strength they figured this method was ok for getting use out of every scrap of wood they had. Like I said earlier, I think it was the more expensive way to go. Just crazy! :eek:
 

Driven1

Petty Officer 2nd Class
Joined
Jul 13, 2008
Messages
157
Re: New project - '63? Aero Craft

Got a little more work done on this one. Laminated the transom together and got the center stringer out. Again, it was crazy. It was made from about 10 different pieces of wood all finger jointed together! I used the center stringer as a template and cut a new one. Little did I know there was still a piece of the finger jointed wood at the bottom of the hull near the bow :(. I thought it was just dirt. Nope. Wood. Ticked me off. Guess what. That piece of wood's staying where it is! It's not really rotted. Just wet. I'm going to treat it with ethylene glycol (Anti-freeze) let it dry and then go ahead and install the new stringer when I'm ready. The other two stringers are going to be real easy. If I was smart, I'd be trying to button this boat up instead of my MFG. Which, I just may do! I'm running out of weather. Lots more to do on the MFG than this one.
 

Driven1

Petty Officer 2nd Class
Joined
Jul 13, 2008
Messages
157
Re: New project - '63? Aero Craft

Well, I'm boned. Too cold now to do any glass work. But, not too cold to get things ready for winter and use a little "stupid remover" while I was at it.

I flipped the hull and set it up on Sawhorses, then gave the hull a quick cleaning...

BILD0074.jpg


Here's a shot of the area that I'm most concerned about...

BILD0075.jpg


There's Blue RTV, Automotive Bondo, perhaps some JB Weld, and Glass Mat with poly resin covering God knows what.

Time to break out the "Stupid Remover."

BILD0084_edited.jpg


Bought a whole gallon of the stuff. It's about 35 bucks a gallon but worth every penny. Dad's Easy Spray comes with a small spray bottle. I used one spray bottle's worth of product to do the following in about a half hour...

BILD0086.jpg


I know I would've gone through at least 2 quarts of another Heavy Duty Stripper product to do the same thing and it would have taken a lot longer.

The reason I used Dad's Easy Spray was to remove the "stupid" to see what it was covering up without just starting to grind. As it turns out, I'm glad I did. Things weren't quite as bad as I imagined they would be. Most of it is stuff like this...

BILD0089.jpg


The worst of it is right round the edge where the transom skin ties to the hull...

BILD0090.jpg


Not that I'll be doing it this winter unless I find a garage to use, but I'm not sure of the best way to repair that edge. I figure I can use MarineTex on the small, chips and cracks. I don't know if it would be the product to use on that edge though. Any suggestions?
 
Top