My tri-hull transom replacement w/ pics

Status
Not open for further replies.

drewpster

Commander
Joined
Oct 17, 2006
Messages
2,059
Re: My tri-hull transom replacement w/ pics

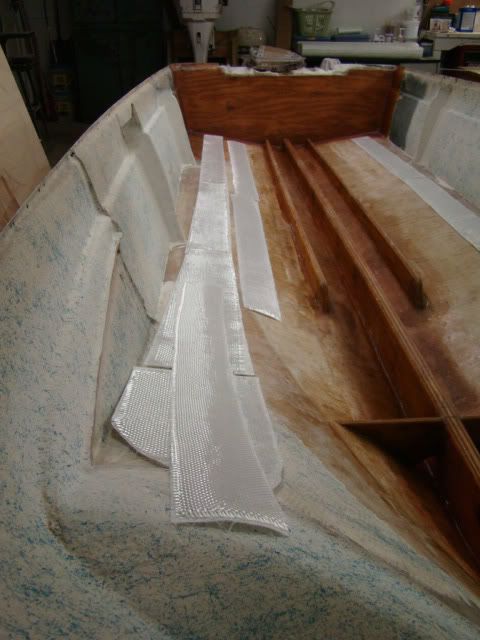
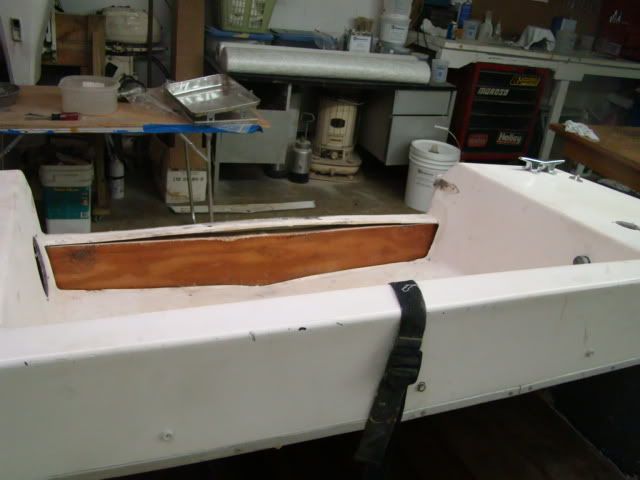
I tried to cover the outer stringers with 18 oz woven roving. I had allot of problems getting the roving to lay down at the top edge of the stringer. This also caused problems with voids down the sides. I pulled the stuff off and now have a work of art in the form of a wad of hardened roving. That was not my intent.
At first I thought I would try vacumm bagging the stringers. But that will cost money. (pump, hose ect.) So I came up with another bright idea.
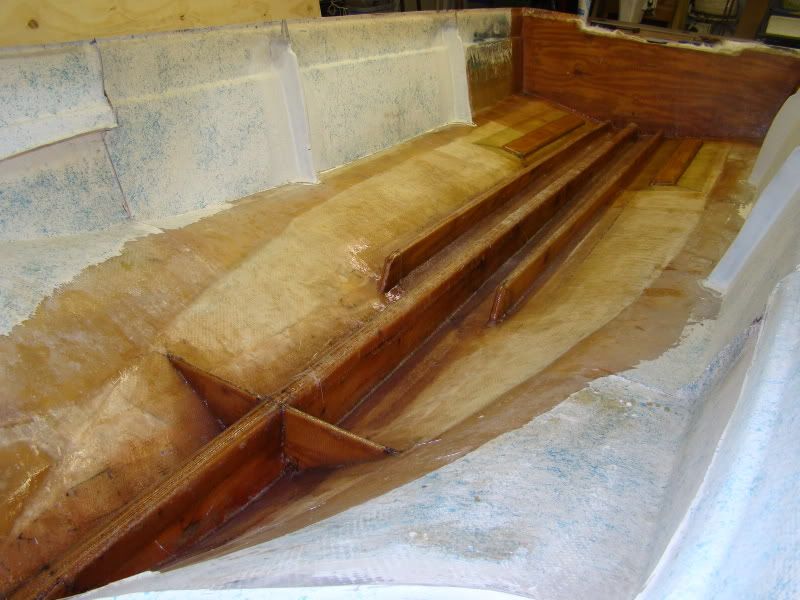
Since the roving seems to lay down well at the sides of the stringers, I should do this in two parts. First, sand down the extra resin left from my failed attempt. Then do the sides of the stringers first followed by a cap on top of the stringer. Now here is my idea.
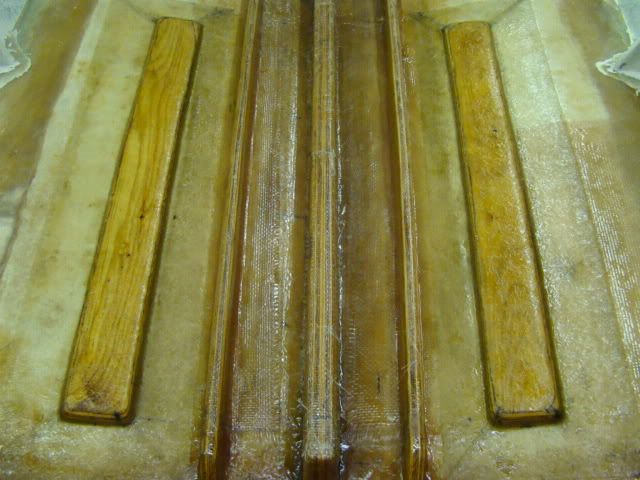
It will take some plastic sheeting, like plastic drop cloth or the like and two metal rods. (bar stock, maybe 1/2") I will lay the "caps" as normal. While the resin is still wet I will drape the plastic over the top of the stringer while the resin is wet. Here is where the rods come in. I will roll up the bar stock so that they hang on either side of the stringer. (like an inverted hammock on top of the stringer) The weight of the rods will pull down on the glass just enough to keep it adheared until the resin hardens. After curing remove the plastic and wallah! (right?:confused:) I know this is hard to picture from my lack of writing skill. I will post pictures of the process and we will see if it works.
 

redfury

Commander
Joined
Jul 16, 2006
Messages
2,655
Re: My tri-hull transom replacement w/ pics

Hopefully there will be enough weight to pull the roving tight against it. I think oops went through the same thing with his. I'm using 1708 in 8 inch wide strips up from the hull to the sides of the stringers and then am going to just cap them with cloth unless I find something better to work with.
 

Mr.Swee

Cadet
Joined
Jul 16, 2009
Messages
17
Re: My tri-hull transom replacement w/ pics

Wow!!! Very impressive!! You would not want to come buy my house and help me, do you?:D
 

drewpster

Commander
Joined
Oct 17, 2006
Messages
2,059
Re: My tri-hull transom replacement w/ pics

I may not have the time to actually come by Mr. Swee. But I will offer any advice I can to make things as complicated as possible. :p We are all learning as we go. Thanks for the compliment.
 

escapade

Petty Officer 1st Class
Joined
Jul 30, 2007
Messages
205
Re: My tri-hull transom replacement w/ pics

things are really moving along for you, everytime I see progress like this made it makes me get more work done on mine, however progress has been slow due to all the rain we have been getting
 

showcase

Cadet
Joined
Jul 26, 2009
Messages
6
Re: My tri-hull transom replacement w/ pics

Drew...Nice work so far. I just joined the forum today after recently inhereting a 1979 Sea Star 17ft tri hull. Was looking for tips on how to restore it and this was great. Cant wait to get started. By the way still wiping away the tears from seeing your shop. Keep up the great work and really appreciate the advice.
 

drewpster

Commander
Joined
Oct 17, 2006
Messages
2,059
Re: My tri-hull transom replacement w/ pics

Well I have moved along a little this week. I managed to cover the stringers with a second layer of CSM. I followed that with a layer of roving. Originally I intended to use 18 oz. roving to cover and give strength to the stringers. That did not really work out. No matter what I tried, short of vacuum bagging the whole she-bang, the roving would not laydown.
What I ended up doing is using a little lighter roving. I also pre-cut and wet out both the CSM layer and roving layers together. I used 1.5 CSM directly followed with 16 oz. roving. The 16 oz. worked in to the curves much better than the 18 oz.
I started by pre-cutting all the fiberglass I intended to use for the session.

DSC04697.jpg


I pre-cut the underlying CSM and all the roving pieces prior to starting any wet out of the cloth.
I then guesstimated the amount of resin that would be needed to to wet out each section. This was a pure guess. I have been working with pint sized batches of kicked resin at a given time. I knew the CSM would soak a huge amount of resin so I started by mixing a quart. I then pored three more pots of resin in to pint sized containers without MEKP. As I moved along, I mixed up batches a pint at a time of kicked resin and wet out the layer of csm in a given section.
(in other words i mixed just enough resin to get started. i then mixed in MEKP to each pint container as is it was needed to wet out each section)
I found that the CSM soaked up allot more resin than the layers of roving. So it was better to completely wet out the CSM in a section, then lay the roving on top of the wet CSM, then roll the dry roving in to the CSM as I worked along.
This worked great! The wet CSM held the roving in place with a minimum of voids. The bottom line is that you need to wet out your CSM, then lay the roving in place and roll it in to the csm.

DSC04727.jpg


I was able to make the roving cover and lay in place over tight bends and in corners with no problems using this method.

I also re-installed the hull stiffeners in the aft section of the hull. I was not sure if they would be needed given the changes I have made. I put them back in place anyway. I figure the factory already worked out the reasons why they were there.

DSC04728.jpg


I plan to cover all of this with an additional layer of CSM to make water tight. I have ordered another 5 gallon pale of resin along with a gallon of gelcoat. (hmmm. wonder what that's for)

While I was at it I pre-cut and fitted the aft section of deck. To get the forward section I will need a big piece of cardboard to cut a template.
Deck to follow. I am pleased that I have come this far. Man this is hard work. Allot of bending! I will be glad when the deck is down. I plan to re-fit the cap before glassing the deck down. I want to make sure I have no warping in the hull before the deck gets glassed in.
 

redfury

Commander
Joined
Jul 16, 2006
Messages
2,655
Re: My tri-hull transom replacement w/ pics

The nice thing about how your stringers don't attach to the transom is the fact that any water that drains to the back of the hull has a place to go.

It looks like it's coming along nicely. I'm getting ready to glass 2 of my stringers in the morning. Still wish I had a garage or a temporary shelter to work under, I could get more work done...but it is what it is. I'll get there eventually.
 

drewpster

Commander
Joined
Oct 17, 2006
Messages
2,059
Re: My tri-hull transom replacement w/ pics

Red, if you plan to cover your CSM with roving, do it in one session. I am telling you, the roving stays in place allot better with wet CSM under it! Just pre-cut all your glass first, then wet out everything in place. It makes a huge difference how the roving lays down.
 

chrishayes

Senior Chief Petty Officer
Joined
Apr 9, 2009
Messages
691
Re: My tri-hull transom replacement w/ pics

Hopefully there will be enough weight to pull the roving tight against it. I think oops went through the same thing with his. I'm using 1708 in 8 inch wide strips up from the hull to the sides of the stringers and then am going to just cap them with cloth unless I find something better to work with.

1708 is a bit easier than roving due to the linear nature of it compared to the checkerboard pattern of the roving. If you lay it with the grain going parallel with the string it isnt too bad. You have to babysit the hell out of it though. Be prepared to be there for hours or till your resin kicks basically. Just keep squishin in back down till it finally give up.

I also agree with Drew, do it all in one shot. much easier not to mention you only have to be in that F'ed up position once instead of letting it cure then sand then do it all over again...screw that! boat building hurts:mad:
 

drewpster

Commander
Joined
Oct 17, 2006
Messages
2,059
Re: My tri-hull transom replacement w/ pics

I had a good bit more progress this past weekend. I finally finished glassing the stringers in. I glassed in a final layer of CSM using waxed resin so it will cure completely. So glad these are done!

DSC04732.jpg


With a little help from my son we temporarily replaced the cap to prevent warping when the deck goes down. The upper edge of the hull where it meets the cap was full of holes where the original rivets held the two together. I epoxied a thin strip of aluminum around the perimeter of the upper edge to give the new fasteners (screws or rivets, undecided) something to bite in to. After a little "fitting" I used a few temporary screws to hold the cap to the hull. The 2x2 across the dash boxes are there to hold them up.

DSC04731.jpg


In order to fit the cap, and accommodate the thicker transom, I had to cutout part of the splash well. After the final fitment, this will get glassed back in place.

DSC04734.jpg


In this pic you can get a better idea of why I glassed those little wings in at the bow end of the hull. The receiver for the casting seat will be supported by them under the deck. There are two large limber holes where the wings intersect the bottom of the center stringer to allow for drainage. They where a real pain to get glassed and sealed! (sore knees:eek:) Btw- if you do this in shorts, plan on having bare hairless knees!:p

DSC04733.jpg


Hopefully time allowing, the deck will get glassed down this weekend. The the cap will have to be removed again so that the seat boxes can get re-installed. Really seeing progress now.
 

tlovelandka

Petty Officer 3rd Class
Joined
Jul 5, 2009
Messages
82
Re: My tri-hull transom replacement w/ pics

Impressive Drewpster!

I'm about to follow in your footsteps with my tri-hull. Lots of good info here! Keep it up, I'll be following your build.

Oh, and I've got one word to describe how I feel about your shop...JEALOUS!!!:D
 

drewpster

Commander
Joined
Oct 17, 2006
Messages
2,059
Re: My tri-hull transom replacement w/ pics

My last shop was a gravel driveway. I thank God every day for having it. I have done this kind of stuff all my life and having it is a real blessing. I have countless memories of working in, and often in spite of, the weather. Trust me I appreciate my shop.
 

scrawnyronny

Seaman Apprentice
Joined
Jul 19, 2009
Messages
47
Re: My tri-hull transom replacement w/ pics

Drewpster, do you have to rough and scuff then acetone the contact points on the top of your stringers for placing the deck? or am i not quite understanding how this connection is made? (did this make any sense?)
 

jowrag

Recruit
Joined
Aug 16, 2009
Messages
1
Re: My tri-hull transom replacement w/ pics

Drewpster, This is a great thread and I will be following it closely. I just acquired a 74' Thundercraft tri-hull with Evinrude 33 and aim to get her rock solid. I am totally new at boat ownership and looking forward to getting my (understanding) wife and 3 kids on the water. Thanks again for the good thread. Can't wait to see your finished product!
 

allpoints360

Petty Officer 1st Class
Joined
Jul 23, 2009
Messages
342
Re: My tri-hull transom replacement w/ pics

Strong work, Drewpster. A couple of questions from the "how'd he do that" section: Did you work from inside the hull or over the sides? What is the best method for wetting out large sheets of roven? Did you use a brush, roller, pour and roll, sprayer? How much resin did you use, so far?

Man, what a shop!
 

drewpster

Commander
Joined
Oct 17, 2006
Messages
2,059
Re: My tri-hull transom replacement w/ pics

Drewpster, do you have to rough and scuff then acetone the contact points on the top of your stringers for placing the deck? or am i not quite understanding how this connection is made? (did this make any sense?)

Yes I have to do a little sanding on top of the stringers when the deck goes down. The final layer of glass and resin on the stringers has surfacing wax in it so the resin will fully cure. The wax rises to the top sealing the resin surface from air allowing it to fully harden. I will use adhesive to bond the underside of the deck to the tops of the stringers as well as at the edges where it contacts the deadrise in the hull. Since no adhesive I know of will bond to wax, the wax layer will have to be removed and cleaned. (sanded/ wiped with acetone) For adhesive I will use thickened poly resin, construction adhesive, (PL premium), or thickened epoxy. I have not decided which to use yet. I will also use stainless screws down the center stringer. These will be sealed and covered by the top layers of glass on top of the deck.
 

scrawnyronny

Seaman Apprentice
Joined
Jul 19, 2009
Messages
47
Re: My tri-hull transom replacement w/ pics

is that last coat with wax a required step or just personal preference? btw niiiice.
 

drewpster

Commander
Joined
Oct 17, 2006
Messages
2,059
Re: My tri-hull transom replacement w/ pics

Strong work, Drewpster. A couple of questions from the "how'd he do that" section: Did you work from inside the hull or over the sides? What is the best method for wetting out large sheets of roven? How much resin did you use, so far?

Man, what a shop!


I worked inside the hull. Over the sides when I could reach. Its a real backache so I took plenty of breaks.
I have used about eleven gallons of resin so far. That includes finished transom and stringers and some other small repairs. I am hoping the 5 gallon I have left will be enough to finish, totaling 15 gallons.

[/QUOTE]Did you use a brush, roller, pour and roll, sprayer?[/QUOTE]

Yes to all, except the sprayer. The best way to do it is to roll resin on to the surface until it is wet then wet out the glass on a separate table. After the cloth is translucent and fully wet lay it in place and roll it down.

Since I do not have a large wet out table I used a paint roller to wet the surface first, then lay the cloth down and wet it out in place using the roller. You will get allot of bubbles and bridged areas. The best tool I have found to roll these out is a grooved roller. It is a must have in my opinion! The trick is judging how much resin you need to kick to do a piece. I recommend starting with small amounts. (pt.-qt.) Have other mixing cups with resin in them ready to be catylized. If you need more, quickly mix it and keep rolling. I also recommend having all the CSM and roving for your session pre-cut and ready to go. It is better to wet out each layer as you go. That way all the layers cure together. I stop at one layer of CSM and one layer of roving on larger pieces. (like a transom, or a stringer) The work time of the resin will dictate how many layers for what size piece you are glassing. Start out small until you get a feel for it.
Another point is to avoid using too much resin in the layup. Resin rich layers are not as strong. I roll on enough resin to the surface until it looks as though it is just about to run. (let it pool in the corners) I then lay the glass in place and roll with a semi wet roller until the glass goes clear. If the glass has trouble soaking it up, wet the paint roller a bit more. The glass will continue to soak after a little time. Again, you have to get a feel for it.

get one of these! they make smaller diameters for tighter corners. Gotta have it.
DSC04737.jpg


Below is a picture of all my fiberglassing tools.

DSC04738.jpg


The chip brush and the shears are also must haves in my opinion. A good cheap chip brush can be used to dot or tap in areas where the grooved roller will not reach. Bubbles are our enemy. I did not buy high dollar fiberglass shears. But I did buy a higher quality pair. They will last longer. Stay away from cheap plastic handle scissors.
Doing larger pieces take a little pre planning. The time you have before the resin starts to gel is limited. The time gets shorter in hotter weather so use less MEKP (hardener) in hot temps for a longer work time.
 
Status
Not open for further replies.
Top