My tri-hull transom replacement w/ pics

Status
Not open for further replies.

drewpster

Commander
Joined
Oct 17, 2006
Messages
2,059
Re: My tri-hull transom replacement w/ pics

My boat did not have any foam under the deck and I did not put any under it. I read somewhere that the Coast Guard started requiring manufacturers to use a certain amount of floatation foam in production boat hulls. I do not know what year this requirement kicked in but it must have been later than the late seventies because my boat did not have any. Since the boat did not have foam originally we can assume it is not needed for structure.
I did not add any foam. I saw no real benefit of doing so.
Foam can have its advantages, like sound reduction, and obviously, added floatation. However foam soaks water and has been the cause of allot of rot in wooden core boats. Generally speaking, I would never use foam unless the original design had it for structural reasons. There is no practical reason for it in my boat.
 

showcase

Cadet
Joined
Jul 26, 2009
Messages
6
Re: My tri-hull transom replacement w/ pics

Thanks a lot for the advice on the foam. I will for-go the foam in my restore. I just got the cap off this weekend and took a good look at my transom. Much like yours did it looks solid at the top but rotted at the bottom especally near the drain hole. I will take your advice on the tools you used to remove your transom. Is it safe for me to assume the transom tear out is pretty much a cut and chip away process? No chance this thing will come out whole? the glass on the outside is delaminated and came off by hand. but other side of the transom is pretty well ahered to the hull. any advice or cautions on tearing the transom from the hull? My goal is to have the transom out over the labor day weekend. Sorry for all the questions...this tread is just very inspiring and has really help along my progress.
 

drewpster

Commander
Joined
Oct 17, 2006
Messages
2,059
Re: My tri-hull transom replacement w/ pics

Remove and discard the inside fiberglass skin covering the transom. If you can, peel the old plywood out in layers as you go. There will be areas that come out easy and others you will have to work on. In the harder areas it helps to cut grooves in the wood so that you are removing pieces rather than whole sheets. If you are using a burr bit like mine be very careful not to cut the outside skin, it cuts very quickly. Keep cutting grooves and removing layers until you reach the inside of the outside skin. I had mine out in a couple of hours, its not a terrible job just time consuming.
The terrible part comes when you start grinding.:D
 

showcase

Cadet
Joined
Jul 26, 2009
Messages
6
Re: My tri-hull transom replacement w/ pics

Sounds pretty straight forward. I messed around last night and got all the front fiberglass skin off. Gonna wait till the weekend to tear into the plywood layers. Thanks again for the great advice. B.T.W nice job on your deck.
 

drewpster

Commander
Joined
Oct 17, 2006
Messages
2,059
Re: My tri-hull transom replacement w/ pics

The fun continues.
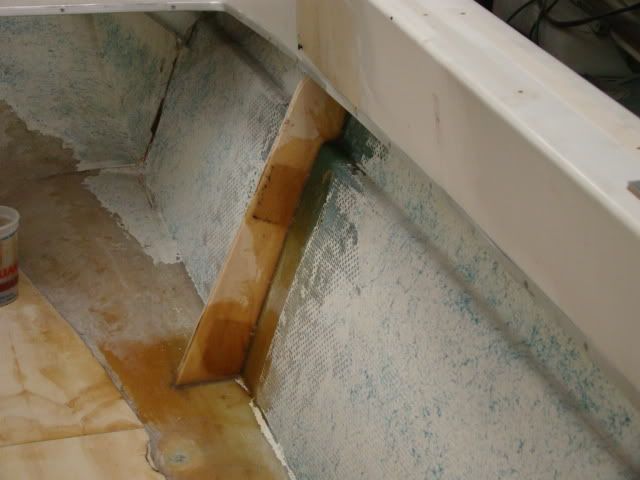
Inside the hull on each side there are stiffeners that keep the hull sides ridged. They were built using shaped pieces of plywood covered in fiberglass. I started doing some grinding to prep them for a covering of new glass. I did not intend to replace them but Murphy had other plans. I found that they had rotted from the bottom up. Brown stuff that used to be wood shot all over the place when I accidentally penetrated the fiberglass while grinding. They had to go. I took several hours cutting them out and grinding away the old glass that fastened them to the hull. Setbacks like this are such a joy.:mad:

I spent allot of time meticulously fitting the first template then quickly found that it would only work on the first support. I had to fit separate pieces for each support! Needless to say this took forever.
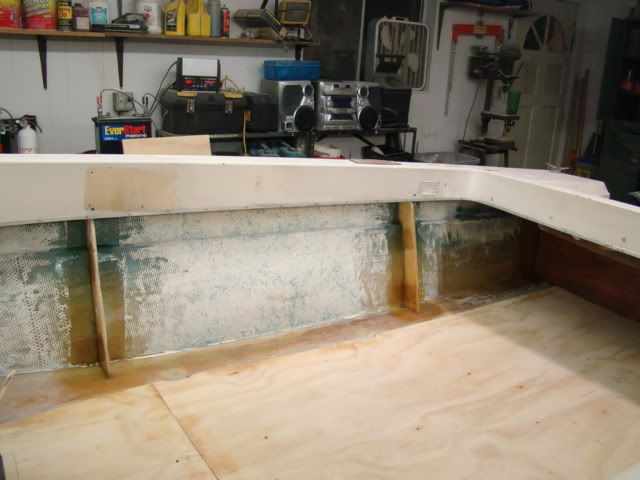
Below is the finished result. The supports are one piece, mold to the shape of the hull side and support the gunnels.
DSC04886.jpg


One forward and one aft on each side support the hull sides and keep them from flexing. I worked well in to the night to get them in place and ready for glassing. I used thickened resin to bed them to the side of the hull. And tabbed them in place using strips of CSM. It was early morning before I quit. I was determined to make up for lost time getting them fixed. Next I will cover them in fiberglass for strength and waterproofing.

DSC04885.jpg


Its just this type of setback I have gotten used to in this project. Did I mention this whole thing started as a transom job? The picture below makes it obvious what I have been doing with my spare time.

We have been buying our veggies this year!
DSC04883.jpg
 

tlovelandka

Petty Officer 3rd Class
Joined
Jul 5, 2009
Messages
82
Re: My tri-hull transom replacement w/ pics

Hey Drewp,

Haven't checked your thread in a while,and boy it's looking real nice! You're moving right along... :D

-TLove
 

Josh P

Petty Officer 1st Class
Joined
Aug 26, 2009
Messages
328
Re: My tri-hull transom replacement w/ pics

drewpster when you took the top off the hull was it glued or just riveted? was doing a transom repair found soaked foam and a weak deck time to do more investigation. btw your project is looking great thanks for all the info and tips
 

showcase

Cadet
Joined
Jul 26, 2009
Messages
6
Re: My tri-hull transom replacement w/ pics

Josh the cap on my tri hull was riveted and glassed in at the seams on the inside. lot of fun tearing that out but seemed like a very good idea. I will probably do the same when I put my cap back on.

Drew I got the transom out this weekend, thanks to your advice on the tools. What grade of plywood did you use on your new transom?

thanks.
 

Josh P

Petty Officer 1st Class
Joined
Aug 26, 2009
Messages
328
Re: My tri-hull transom replacement w/ pics

i dont have a tri hull i just a v hull bow rider nothing special, thought it was a good deal. 500 dollars with running 120 force outboard, on a trailer. Hey it just needs a transom....... right. well i don't think mine is glassed, have drilled out rivets yet but can feel some movement when putting upward pressure on the cap. when i reassemble should i caulk it any before i put the rub rail on? oh on the stringer wood treated or not or what to get. they look like 1x8s i was thinking 2x8 its a 73 sea ray 190 only has 2 stringers in it.... so far gotta rip the other half of the deck up.
 

drewpster

Commander
Joined
Oct 17, 2006
Messages
2,059
Re: My tri-hull transom replacement w/ pics

The transom and stringers are marine plywood. The deck and side supports are ACX plywood. The topic of what kind of wood to use is a huge debate in the forums. Do a search on it if you want all the details.
If I had to do over again I would forget the marine ply and go with ACX for all of it. The added expense of marine ply is really not necessary in my opinion as a fiberglass core. One local boat shop owner in my area made my mind up for me. He has been in business here for 25 years +. his words "If marine ply were necessary the factory would have used it, they did'nt. How long did yours last?" (33 years) "Just get good grade AC plywood and do good glass work"
Of course at that point I had already purchased 2 4x8 sheets of marine grade at $100 bucks each! So I used them for the transom and stringers. Next time I'll save my money and use all ACX. Some guys like to use treated plywood for their boats. The problem I had with that is I did not want to wait for the wood to dry out before I used it. I am also not completely convinced that the resin would properly bond to treated wood, even after drying.
I may regret my decision..........when I'm 74 years old. I will let you know.;)
 

Josh P

Petty Officer 1st Class
Joined
Aug 26, 2009
Messages
328
Re: My tri-hull transom replacement w/ pics

so on the stringers you laminated the ply together to form a thicker piece? i got some 7 ply 3/4 thick exterior ply that was 80 bucks a sheet. got 2 sheets for free gonna use that for the transom.
 

maxum247

Lieutenant
Joined
Sep 18, 2007
Messages
1,363
Re: My tri-hull transom replacement w/ pics

Just finished reading through your project beginning to end this morning!
The stringers and transom look outstanding! :)
There's a guy not far from where I live that has an older model Wellcraft tri hull I'd like to have, catches my eye every time I ride by.

max!
 

boatflipper

Chief Petty Officer
Joined
Jun 16, 2009
Messages
500
Re: My tri-hull transom replacement w/ pics

This is probably the 10th time I have read your post and everytime I learn something new! I am about to do a transom on my 18 ft. Mark Twain (You may have seen the post. It's on here somewhere!) I was just wondering, how many sheetes of plywood did you use on the transom and what was the final thickness of it? Also, how big or a motor do you think it could hold assuming I do mine half as good as you:D
 

drewpster

Commander
Joined
Oct 17, 2006
Messages
2,059
Re: My tri-hull transom replacement w/ pics

The transom was built using two sheets of 3/4" ply bonded together. If I had it to do over I would not go that thick. The factory thickness was only 3/4" alone and they used a doubler at the top of the transom. I do not like that idea either. I recommend you use a 3/4" sheet and a 1/2" or even 3/4" and 3/8". I think 1 1/2" is a bit of overkill in total thickness. Bare in mind that I am no engineer, but 3/4 seems to thin and 1 1/2 seems too thick. Split the difference and save the weight.
My boat came with a 70hp outboard. I am going back with the 70 temporarily until I can get a 90hp. A word of caution here- I do not recommend going over the rated h.p. of the hull you are working on. Again, I am no engineer. A bigger engine means more weight. At some point the weight of the engine will negate the added ponies. I think I can safely go with 90 horse power so that is what I am shooting for. When I get closer to that decision I will get some recommendations from the motor guys in the engines section of the forums.
I did some more glass work tonight on the deck, I'll have some pics tomorrow.

sleepy time.
drewp (whata ya expect, i gotta three year old in the house):redface:
 

boatflipper

Chief Petty Officer
Joined
Jun 16, 2009
Messages
500
Re: My tri-hull transom replacement w/ pics

drewpster,
Thanks for your advice, that really got me going in the right track....hopefully one of these days between broken down lawn mowers and sick goats I can get my darned cap off and start tearing out that transom...I am sure I will have many questions along the way...
thanks
 

drewpster

Commander
Joined
Oct 17, 2006
Messages
2,059
Re: My tri-hull transom replacement w/ pics

Unfortunately my wife has the camera on a business trip...to Tampa! So I have no pictures, but I do have some progress to report. I completed the install of the hull side supports. I first tabbed everything in with CSM in the corners and the lower edge. I covered that with a layer of woven roving to add strength. After getting the bottoms of the supports tabbed to the deck I added a layer of CSM down each edge of the deck.
Then the comedy began. :p
I intended to cover the deck with a layer of CSM, then roving in the first session. I like to lay the roving in to wet csm making a better bond and generally keep the job going. The problem I had with that is that once the wet csm was in place, I had no where to stand to lay down the roving. But I did try. This was not a good idea. I ended up stepping my bare, but clean foot right in to the wet csm. I finally got the roving down but it was terribly out of shape and bubbled up every where. Needless to say I pulled the roving up. And finished with the csm layer. I now have a very nice roving covered folding table. :mad:
I let the csm cure and used plastic to cover it while I set up to do the roving layer. I now have the forward section covered with csm and roving. The aft section will have to come later. I am still sticking to the kitchen floor. Everything went well after I found out that the impossible was indeed so. Next I will finish the roving on the aft section of the deck and remove the cap again to start on the forward seat boxes. Wheew! pics coming after my wife gets back from vacation...I mean work.:mad:
 

HopeSheFloats

Lieutenant Commander
Joined
Jun 12, 2009
Messages
1,674
Re: My tri-hull transom replacement w/ pics

LOL, I've found out by letting the resin harden on your feet, I don't need sandles anymore ;)....coming along nicely, set backs or not...looking good!
 

drewpster

Commander
Joined
Oct 17, 2006
Messages
2,059
Re: My tri-hull transom replacement w/ pics

Wifey is home along with the camera so here are the pics of the latest progress over the last couple of weekends.
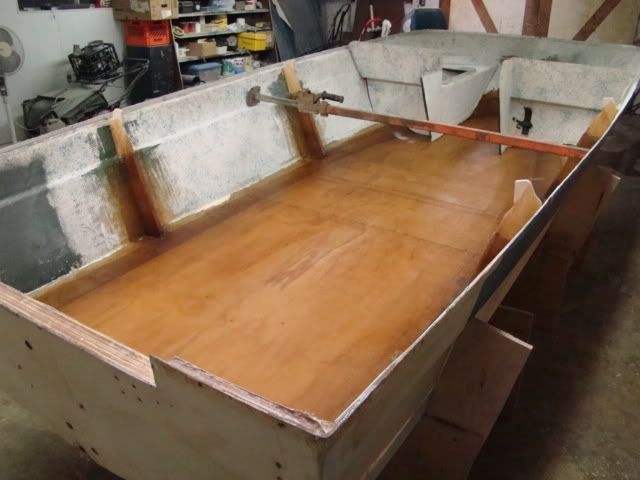
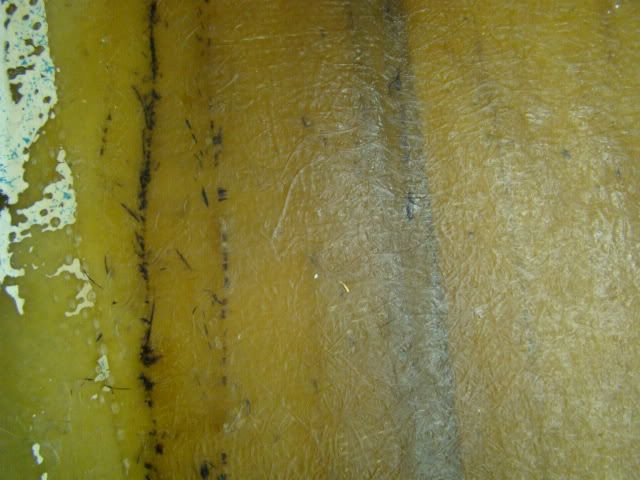
Since all the structural fiberglass layup is finished on the deck my son and I removed the cap. All of the deck glass is down including the lower portions of the gunnel/ side supports. Here is what two layers of CSM, a layer of 18 oz. woven roving followed by a top layer of CSM looks like.

DSC05059.jpg


The black lines in the laminate pic below are the cut lines on the edges of the fiberglass layers. I used a black sharpy pen to lay them out. You can see how each layer is progressively wider so that they bond well at the edges. The only layer cut exactly to the size of the previous one was the woven roving. I sandwiched it between the CSM to provide the best bond and to give a finish-able top layer for gelcoat and paint. I can sand the CSM layer smooth without compromising the strength of the surface layer. All of the resin in this final layer contained wax to provide a hard cure in prep for sanding and fairing.

DSC05062.jpg


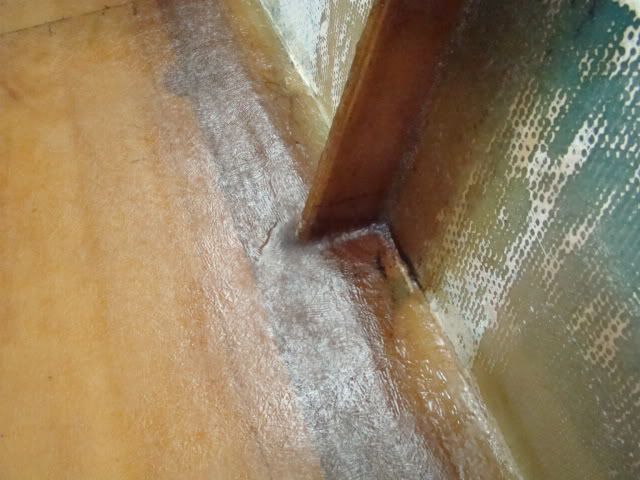
Where the bottom of the support meets the deck I filleted the corners and covered it so that the glass turned out at the bottom where it is sandwiched between the layers in the deck glass. I wanted this joint to be extra strong. These had broken loose and were cracked at this spot when I bought the boat. These joints probably get allot of stress.

DSC05056.jpg


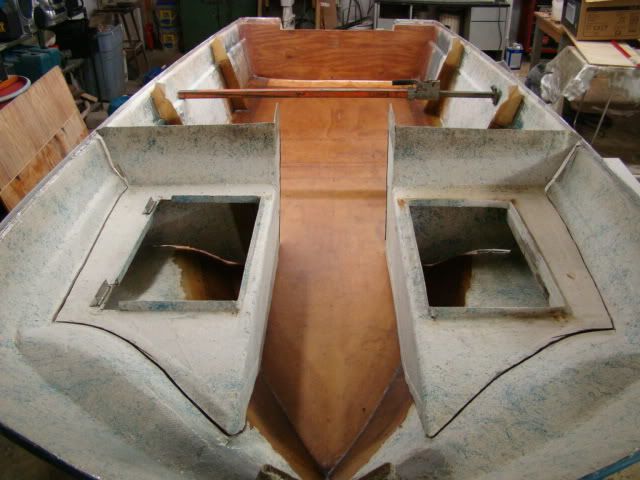
I temporarily replaced the seat boxes in the bow to show there placement. I will grind all the edges of these and all the areas where they will get tabbed back in place. I was happy to see they fit almost perfectly. I was a little surprised given all the new glass work. I hope to have them back in this week end.

DSC05063.jpg


After the seat boxes get glassed back in the cap will go back on permanently. I was worried all this time that I was adding a ton of weight to the boat through all of this. Just after I took these pics I tried to lift the back of the boat by hand. It is surprisingly still very light. I was able to lift it a few inches all by myself! And I worked 12 hours today. I am not all that strong so the weight must be pretty good.

DSC05059.jpg
 
Last edited:

ezmobee

Supreme Mariner
Joined
Mar 26, 2007
Messages
23,767
Re: My tri-hull transom replacement w/ pics

Looks amazing. Great work!
 
Status
Not open for further replies.
Top