My First StarCraft; 1975 18' SuperSport

classiccat

"Captain" + Starmada Splash Of The Year 2020
Joined
Dec 20, 2010
Messages
3,409
Re: My First StarCraft; 1975 18' SuperSport

Screw ups? WE don't screw up! We just learn by doing, and re-doing, and re-doing until we either get it right or say its good enough.:facepalm:

Today's "lesson" was one in patience...after the 2nd re-do fail, I went upstairs to see if Sig posted those pictures yet...and he had so I was happy again :lol: :p


HEY I got the pics up.

You are doing really great thorough work as usual.


Thanks to all my friends in the Starmada especially you, I was really smart with my money this time.

Pour in Foam NO
Pressure treated lumber NO.
Cracks holes, and pitting NO.

Hopefully thanks to you the hardest job I am going to have is removing the old hull numbers and stickers.

Glad I (and my boat's PO) could give my buddies an education of what to avoid! Knowing what I know now, I would've still bought the boat...but only @ 1/2 of what I paid. Knowledge is leverage at the negotiating table (or truck hood)!

Yeah man, you're going to get that old tin lookin' sharp! I'm guessin' you'll layout your plan of attack in the resto thread. Can't wait! Oh, and did I mention that I really like that shade of green :D

Nice job on the repair for the holes from the P/O's, it's unreal how may transducers and pito tubes can go on one boat.
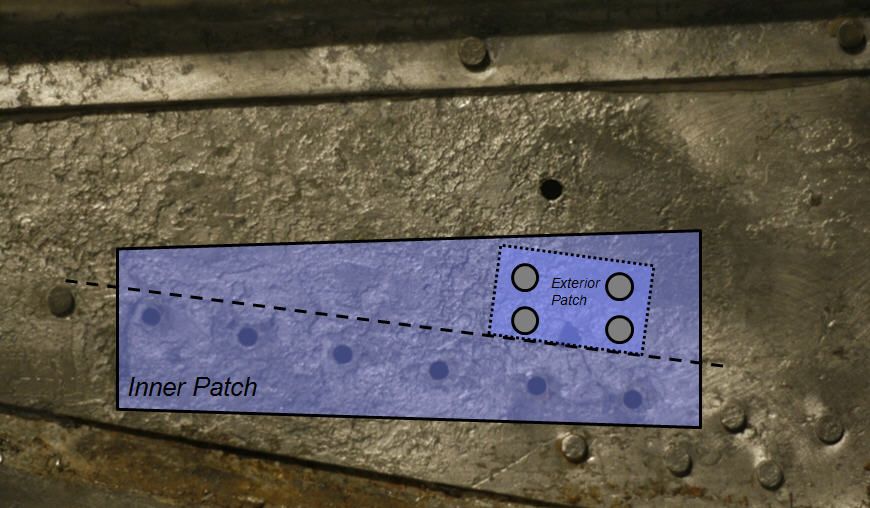
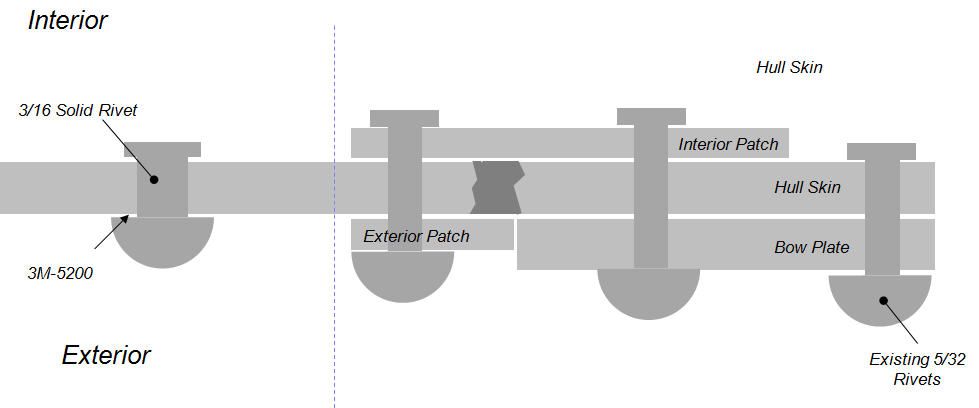
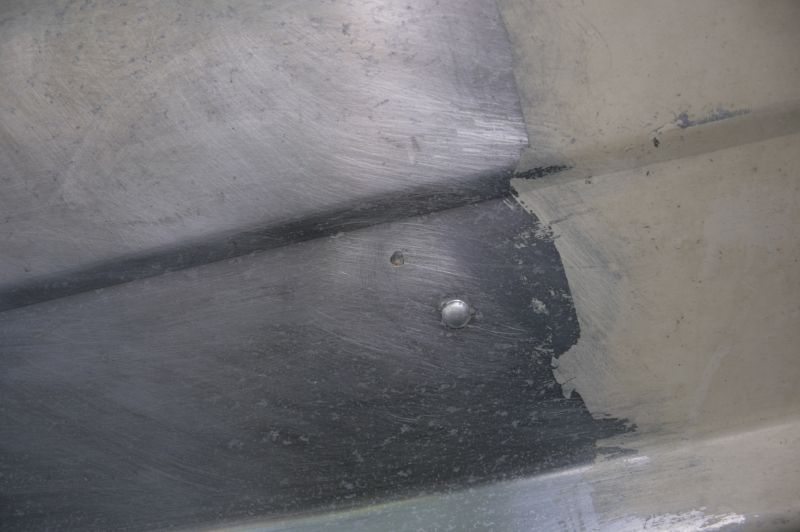
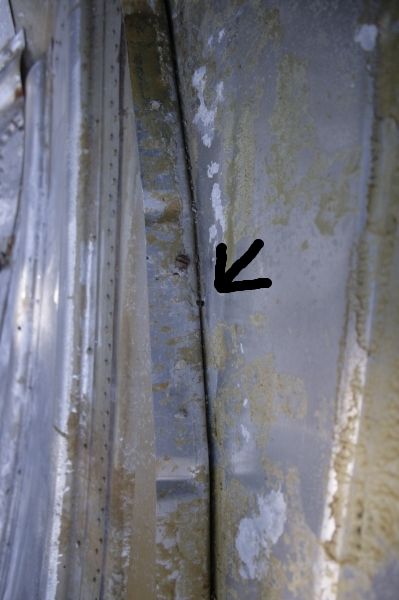
Thanks Glen! This wasn't too bad...some of these holes are for the transom z-bracket. Where it gets bad is when they think squirting some silicone caulk into the unoccupied holes is adequate for stopping water :rolleyes: good stuff!
 

Watermann

Starmada Splash of the Year 2014
Joined
Jan 12, 2013
Messages
13,753
Re: My First StarCraft; 1975 18' SuperSport

Hey I'm with ya on the ducer hole reducer.

I have an idea for 90 degree bending of thick stock aluminum. You'll need a non ferrous saw blade for your table saw. After marking out where your bends are, run the material over the retracted saw blade removing just a small amount of material on the bend line.

The problem isn't doing the 90 but the extra 5 degree past 90 so the bounce back doesn't leave you at an 85 degree bend.

IMG_0700+%2528Large%2529.JPG


IMG_0706+%2528Large%2529.JPG


IMG_0720+%2528Large%2529.JPG
 

Attachments

  • IMG_0720+%u00252528Large%2529.JPG
    IMG_0720+%u00252528Large%2529.JPG
    131.7 KB · Views: 1

jbcurt00

Moderator
Staff member
Joined
Oct 25, 2011
Messages
24,893
Re: My First StarCraft; 1975 18' SuperSport

Great idea, but if you blow that pix up full size, it looks to have a stress crack forming on the down side of the bend opposite the edge of the kerf:
IMG_0720+%2528Large%2529.JPG


But perhaps not
 

InMotion

Commander
Joined
Nov 3, 2011
Messages
2,080
Re: My First StarCraft; 1975 18' SuperSport

Cool man... JB has better eyes then I, but it looks cool to me! :)

How strong is after removing the material and bending it? Will it hold together or snap? Just curious...


J.
 

Watermann

Starmada Splash of the Year 2014
Joined
Jan 12, 2013
Messages
13,753
Re: My First StarCraft; 1975 18' SuperSport

That bend is in 1/8" thick alum. A couple things that could be done to add structural strength and keep it from cracking is to fill the seam with epoxy and rivet in some lighter gauge "L" brackets near the ends. This will be the method I use to fabricate up a dash panel for my Chief with a sheet of 1/8" alum I have.
 

barato2

Commander
Joined
Dec 7, 2010
Messages
2,956
Re: My First StarCraft; 1975 18' SuperSport

i'm watching to see how your ducerbracket comes out. i was going to do the same on mine but have only got the rough idea and the scrap hunk of Starboard
 

astor

2018's Starmada Splash Of The Year.
Joined
Jul 31, 2011
Messages
425
Re: My First StarCraft; 1975 18' SuperSport

I still think that the best way is to increase the bend radius. Also it will help if you watch the grain direction, and ensure the rolling marks are perpendicular to the bend not parallel to the bend if at all possible.

my last resort would be to try to anneal the material as mentioned earlier in the video. Keep in mind that you will anneal the whole piece not just the area being bent.

ScreenShot2014-02-10at71414PM.png


Edit: For our Canadian Master Starcraft Tin Knockers- them numbers are in English units.
 
Last edited:

classiccat

"Captain" + Starmada Splash Of The Year 2020
Joined
Dec 20, 2010
Messages
3,409
Re: My First StarCraft; 1975 18' SuperSport

Nice! I step away from my thread for a few hours and it turns into a tin-fab rump session! :thumb:

I think astor is right...different grades of aluminum have a recommended bend radius...I knew this but got lazy :facepalm: It was a mother to bend such a small tab...and as soon as it neared 90-degrees, I felt it pop.

Interesting technique WM! Those sharp 90-degree angles are acting like scribes on glass. maybe optimize the depth (or make the kerf using a router)? :noidea: That's a sweet setup though...having my table saw setup for aluminum cutting would've saved me a ton of time.
 

classiccat

"Captain" + Starmada Splash Of The Year 2020
Joined
Dec 20, 2010
Messages
3,409
Re: My First StarCraft; 1975 18' SuperSport

well guys, after a rough monday at work, some tin-therapy was needed.

My wrong-way 'ducer bracket didn't go to waste! It's holding my "hillbilly airplane-building tools" :D


This patch was a little tricky due to all of the distortion in the hull skin from being dropped.


Inside before:


With the patch (pencil marks the outside of the patch):


I hope everyone has a great week...thanks for stoppin' by! :yo:
 

Watermann

Starmada Splash of the Year 2014
Joined
Jan 12, 2013
Messages
13,753
Re: My First StarCraft; 1975 18' SuperSport

Yeah, there ya go with the white MT which in pics I can't tell if it's 5200... :confused:

Looks like we're in the same stage or filling, patching and goop slathering. Good times! :happy: Can't wait to have all of this work in the rear view mirror. The riveting although is more fun now with the hillbilly tool. :D
 

dozerII

Admiral
Joined
Oct 25, 2009
Messages
6,527
Re: My First StarCraft; 1975 18' SuperSport

I'm going to have to order me some of them Hillbilly tools.
 

classiccat

"Captain" + Starmada Splash Of The Year 2020
Joined
Dec 20, 2010
Messages
3,409
Re: My First StarCraft; 1975 18' SuperSport

That fits them tools nicely.

...and the 6061 piece from fail#1 makes a nice lid :D

Yeah, there ya go with the white MT which in pics I can't tell if it's 5200... :confused:

Looks like we're in the same stage or filling, patching and goop slathering. Good times! :happy: Can't wait to have all of this work in the rear view mirror. The riveting although is more fun now with the hillbilly tool. :D

No 5200 yet agua. Just 2 more little patches for the bow and I'll be ready to for more rivet action!

I'm going to have to order me some of them Hillbilly tools.
they'd come-in handy when fabricating / repairing your still as well :D
 

classiccat

"Captain" + Starmada Splash Of The Year 2020
Joined
Dec 20, 2010
Messages
3,409
Re: My First StarCraft; 1975 18' SuperSport

Evenin' fellas!

I chipped away at some of the little jobs that I've been putting off.

You may recall the bow corrosion:
BowCorrosionInsideB20131230_zps89cc703f.jpg


and the plan:
BowCorrosionCartoon20131230D_zps16fa829f.jpg


Here are the patches that will make this area whole agan:


and from the outside:


continued...
 

classiccat

"Captain" + Starmada Splash Of The Year 2020
Joined
Dec 20, 2010
Messages
3,409
Re: My First StarCraft; 1975 18' SuperSport

Then there's another hole from a PO's wondering drill-bit. It's in a tricky spot because you can't simply rivet the hole.
StarcraftSBStrip20130625_MG_1212_zps1e302bdf.jpg


the PO plugged-it up using some "silly-cone":
StarcraftSBStrip20130625_MG_1211_zpsff1c9a50.jpg


I drilled-out a few rivets to release the angle, and ground-off some metal to accommodate band-aid rivet's bucktail:


continued...
 

classiccat

"Captain" + Starmada Splash Of The Year 2020
Joined
Dec 20, 2010
Messages
3,409
Re: My First StarCraft; 1975 18' SuperSport

Lastly, I removed all of the SB rib-end rivets...they were toast due to corrosion and flex.

I noticed a tiny stress crack that was under a rivet head.


Rather than go full-montey with external patches, I went Grandad-style with an internal patch that will be buttered w/ 5200:


Once I get an extra set of hands to pound-in some rivets, the short list of stuff to fix before I start reassembling this beast:
  1. external spray-rail patch (ground away by a carriage-bolt used to secure a side guide-bunk)
    StarcraftSSDemo20130421_MG_0844_zpsd67a69af.jpg

    =
    StarcraftSSDemo20130421_MG_0792_zpsdf5ffab8.jpg

  2. keel patch (keel was ground away by the steel-roller shafts)
    StarcraftSSDemo20130421_MG_0843_zps1184b0d9.jpg


Have a great weekend and thanks for stoppin' by! :yo:
 

GA_Boater

Honorary Moderator Emeritus
Joined
May 24, 2011
Messages
49,038
Re: My First StarCraft; 1975 18' SuperSport

Hey BF - Have you figured out how much extra weight you're adding with the added rivets? Of course the alternative is glub, glub. Mayday, Mayday.
 

Watermann

Starmada Splash of the Year 2014
Joined
Jan 12, 2013
Messages
13,753
Re: My First StarCraft; 1975 18' SuperSport

Amazing thought and solutions to some serious issues. :encouragement:

I can't imagine being so dim witted as your boats PO as to not notice they were grinding off all that material in those areas.
 

jasoutside

Supreme Mariner
Joined
Dec 20, 2009
Messages
13,269
Re: My First StarCraft; 1975 18' SuperSport

Amazing thought and solutions to some serious issues. :encouragement:

Agreed! You are doing some awesome work here bringing this chewed hull back to life, really well done:thumb:
 

dozerII

Admiral
Joined
Oct 25, 2009
Messages
6,527
Re: My First StarCraft; 1975 18' SuperSport

Please tell me you are finished finding holes and areas of aluminum that needs your crafty repairs. I'm pretty sure it must of taken quite a few useless PO's to in inflict all that damage.
 
Top