My First StarCraft; 1975 18' SuperSport

classiccat

"Captain" + Starmada Splash Of The Year 2020
Joined
Dec 20, 2010
Messages
3,409
Re: My First StarCraft; 1975 18' SuperSport

Design Ideas

I lost count of the number of design ideas that I've up to this point. :indecisiveness: However considering the condition of the hull ...as well as my limited abilities (paint and I don't get along very well), a design seems to be taking shape...

Bottom:
  • This hull is used/abused. It fell from the top of a very large ugly tree and hit every branch on the way down.
  • I have alot of repairs to make and I'd feel more comfortable if I can monitor them...so
  • Bare/Brushed. I'll try for a dull polish however the PO used heavy sandpaper for removing the original bottom paint...i bet 40-grit. To remove those scratches, I'll need to remove a ton of aluminum..and that's tinny abuse

Sides:
  • Bare aluminum; polished.
  • I think this is possible. I did very little damage to the aluminum while stripping. There was alot of small pits in the paint which resulted in alot of light surface corrosion. If I can get this out with little/no abrasion, she should polish well.
  • For this to pop, I'll need to polish the top/side rubrail aluminum. The top rubrail aluminum still has its anodization and has very little damage so it would be great if I could polish without removing the anodization.
  • the side rubrail has alot of corrosion and is going to need sanding/polishing

Upper sides:
  • White...following the 1975 paint accent pattern.
  • Starcraft S decal in Gold to match the outboard. :cool:

Bow Plate:
  • Bare; polished
  • Bow eye & Cap will be polished as well.

Gunwale cap:
  • Entire gunwale cap: White
  • All of my hardware (lights/cleats, etc.) were severely pitted. So i've been slowly collecting replacement pieces; granted they're not year/model accurate but they sure are sexy (see below!)
  • The windshield is from a larger SFM therefore it will extend onto the gunwale cap. I'll have to truncate the inner gunwale trim and keep the consoles level with the cap (Like the '79 V5's).

Splashwell:
  • White to match the gunwale cap. Dirtiest part of the boat but I like when the SW matches the gw gap

Transom:
  • I'll try to polish but mine is pretty buggered-up esp where I took the cupped wire brush to it. likely white.
  • I'll be replacing the motor-mount wood with aluminum plate (alot of pitting to cover).

Interior:
  • largely undecided but it will likely be a mix of greys, white, bare metal and black accents.
  • I would like the floor sections to be somewhat removable due to the quantity of hull repairs that I need to make. The deck will be double-sided, glassed 1/2" PLY (minimize weight) with the top-side covered with either with vinyl or traction paint. The visible edges will probably be trimmed with thin angle.
  • I'm far from being settled on the seating plan.
  • I'll probably be opening my wallet for a custom convertible top rather than a bimini.

...and to keep the mob happy, these came-in today...a little more than bottom-feeder prices but WAAAY cheaper than I expected. :madgrin:


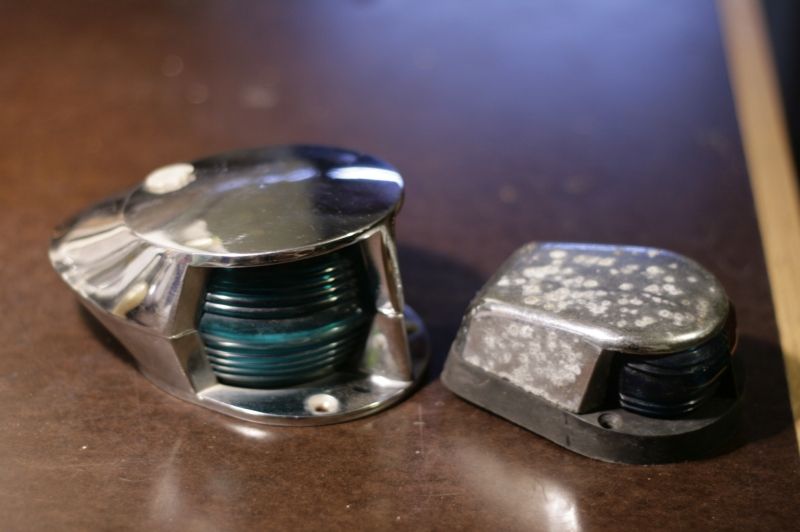
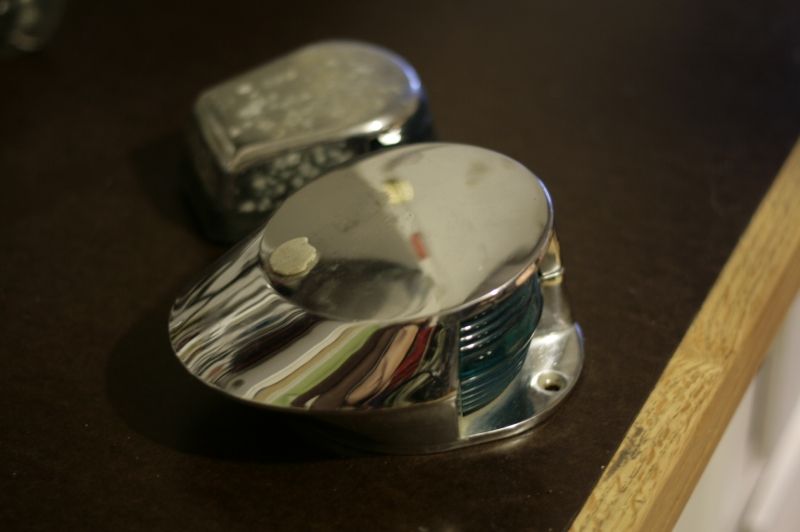
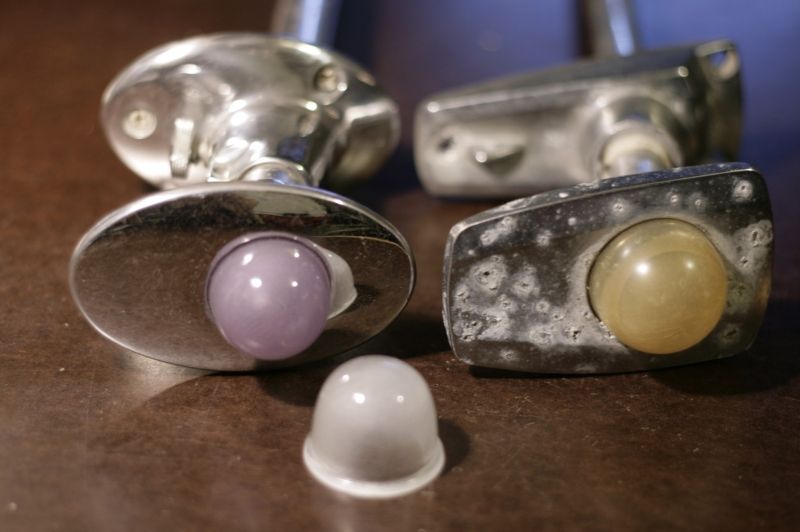
The purple lens will only come-out for special occasions...I found a replacement lens when planning to restore the original stern light.
 
Last edited:

jbcurt00

Moderator
Staff member
Joined
Oct 25, 2011
Messages
24,894
Re: My First StarCraft; 1975 18' SuperSport

Good looking list!

Lights look good. There was an SC light on CL in Ohio last week, looked re-chromed, but original. Missed it by 30min.
 

ctswf

Chief Petty Officer
Joined
Aug 7, 2012
Messages
424
Re: My First StarCraft; 1975 18' SuperSport

"I'll probably be opening my wallet for a custom convertible top rather than a bimini."

oh man, ill be waiting for this.

do you have a massive splashwell like my offshore did? mine was 36" deep
 

classiccat

"Captain" + Starmada Splash Of The Year 2020
Joined
Dec 20, 2010
Messages
3,409
Re: My First StarCraft; 1975 18' SuperSport

"I'll probably be opening my wallet for a custom convertible top rather than a bimini."

oh man, ill be waiting for this.

do you have a massive splashwell like my offshore did? mine was 36" deep

I'm sure you've seen the convertible tops before...these are the ones that attach to the windshield and have a zipper opening at the walk-through portion of the windshield.

I'm guessing that my splashwell is the same size as yours...that is, before you shortened it :)
 

classiccat

"Captain" + Starmada Splash Of The Year 2020
Joined
Dec 20, 2010
Messages
3,409
Re: My First StarCraft; 1975 18' SuperSport

Good looking list!

Lights look good. There was an SC light on CL in Ohio last week, looked re-chromed, but original. Missed it by 30min.

Thanks JB! It feels good to finally have a vision going forward.

Bummer on the missed light! They pop-up on fleabay quite a bit but they're usually 2-2.5x what I paid for mine.
 

GA_Boater

Honorary Moderator Emeritus
Joined
May 24, 2011
Messages
49,038
Re: My First StarCraft; 1975 18' SuperSport

You found some nice looking lights, BF. Wrap the Purple Haze in bubble wrap when you aren't using it and be very careful changing it in/out. The glass gets fragile as it ages. Your old stern light looks like a Jetson, only a newer or older version as it's more angular. And full of Moon craters. :watermelon:
 

barato2

Commander
Joined
Dec 7, 2010
Messages
2,956
Re: My First StarCraft; 1975 18' SuperSport

i've heard rumors that there are jars with the right size thread to screw into a Jetson light.....;)

i think you're on the right track with your paint plans. gonna also have to paint my transom cap white, to cover the spots where i'm using JBWeld to fill the remaining Issues from when it bowed out along with the former transom. i also think it will be more pleasant to lay a hand on when i'm landing fish or climbing aboard from diving
 

cpdchap

Petty Officer 2nd Class
Joined
Mar 2, 2013
Messages
162
Re: My First StarCraft; 1975 18' SuperSport

BlueFin,......On the bottom polishing, even with 40 grit marks the right wheel will polish it right up, you will just see shiny 40 grit marks. When I polished the bottom of mine there were some pretty big scratches that I knew would have to stay and it still looks fine IMO.
Glad you got plan going always good when you can start picturing it in your head.
 

classiccat

"Captain" + Starmada Splash Of The Year 2020
Joined
Dec 20, 2010
Messages
3,409
Re: My First StarCraft; 1975 18' SuperSport

You found some nice looking lights, BF. Wrap the Purple Haze in bubble wrap when you aren't using it and be very careful changing it in/out. The glass gets fragile as it ages. Your old stern light looks like a Jetson, only a newer or older version as it's more angular. And full of Moon craters. :watermelon:
Thanks GaB! Done...the new-old Jetson is fully disassembled and stored in a safe/secure location!

The original post apocalyptic Jetson light...time will tell... i may try to fix it up and put it on the BF!


i've heard rumors that there are jars with the right size thread to screw into a Jetson light.....;)

i think you're on the right track with your paint plans. gonna also have to paint my transom cap white, to cover the spots where i'm using JBWeld to fill the remaining Issues from when it bowed out along with the former transom. i also think it will be more pleasant to lay a hand on when i'm landing fish or climbing aboard from diving
Thanks B2! My transom cap is one of the few things that are salvageable for me! Maybe you can give it some contrast with transom skin by using one of the rusto shiny-metal paints?

BlueFin,......On the bottom polishing, even with 40 grit marks the right wheel will polish it right up, you will just see shiny 40 grit marks. When I polished the bottom of mine there were some pretty big scratches that I knew would have to stay and it still looks fine IMO.
Glad you got plan going always good when you can start picturing it in your head.

Thanks for the tip cpchap!! I'll probably be studying your thread when I get to that point. I'm eyeballin' a variable speed polisher at HF (50% off has me drooling)
 

classiccat

"Captain" + Starmada Splash Of The Year 2020
Joined
Dec 20, 2010
Messages
3,409
Re: My First StarCraft; 1975 18' SuperSport

Weekly Membership Dues:

Starting with the hull, I learned that permatex hand soap and a 3M pad does an excellent job at removing the corrosion on/around rivets...that resulted from water trapped by the epoxy:


and after only 30s of karate kid:


The rest of the week was spent on outboard painting/prepping.

I went from being a very sucky spray-bomb painter (Tip-n-roll is more my speed) to a slightly sucky spray-bomb painter who's inability was compensated by good OEM paint! So we ended on a high-note!

My 1st mistake was selecting a rusto-pro primer with a high-output tip...and holding it too far from the work piece. (16" instead of 8"). It resulted in a sandy finish in some spots. Lots of wet sanding to correct.

My 2nd mistake was with the Rusto automotive primer ...but holding it too close to the work piece (8" instead of 12-16"). This resulted in heavy coated regions that cracked, especially in corners...and ALOT more wet sanding to correct. I really like this stuff...dries very fast and you can wetsand or top-coat as soon as it's dry.


Lesson learned: the paint can instructions are kind-of important.

The swivel bracket required extra prep so starting from scratch, I was able to wash, ZC, prime (automotive) and finish coat (OEM) in 1 day. I'm pretty jazzed about these results (2 light coats).


Lastly, I decided to ditch the old stripe decal; i was getting ghost patterns and the decal was faded...and either buy a new one or leave it be...I'll prime the exhaust housing (blend the texture) one-more-time then on to LU+exhaust housing top coats.


Once painted, I'm almost out of excuses from running this bad boy!!
 

GA_Boater

Honorary Moderator Emeritus
Joined
May 24, 2011
Messages
49,038
Re: My First StarCraft; 1975 18' SuperSport

Well you still have to put it back together, Unless you have Carp Fairies that visit during the night and assemble motors. :faint2::eek::lol: :D

Motor paint - :thumb:
 
Last edited:

classiccat

"Captain" + Starmada Splash Of The Year 2020
Joined
Dec 20, 2010
Messages
3,409
Re: My First StarCraft; 1975 18' SuperSport

Well you still have to put it back together, Unless you have Carp Fairies that visit during the night and assemble motors. :faint2::lol: :D

Motor paint - :thumb:

I'm saving them for the tough jobs...they're masters at BFH-ing :cool: :lol:
 

SigSaurP229

Commander
Joined
Oct 1, 2008
Messages
2,123
Re: My First StarCraft; 1975 18' SuperSport

Well you are a million times more patient than me. I found a busted shift linkage, and a broken throttle linkage. I changed the water pump cleaned the carbs, changed the plugs reworked the entire electrical, and ran it. She isn't lake ready though. I basically begged my uncle to weld the shift linkage. Nice having family with access to million dollar metal working machinery. I ordered a new throttle linkage off of flea bay, and get to drop the lower unit again to find out why my water pump isn't pumping.
 

classiccat

"Captain" + Starmada Splash Of The Year 2020
Joined
Dec 20, 2010
Messages
3,409
Re: My First StarCraft; 1975 18' SuperSport

Well you are a million times more patient than me. I found a busted shift linkage, and a broken throttle linkage. I changed the water pump cleaned the carbs, changed the plugs reworked the entire electrical, and ran it. She isn't lake ready though. I basically begged my uncle to weld the shift linkage. Nice having family with access to million dollar metal working machinery. I ordered a new throttle linkage off of flea bay, and get to drop the lower unit again to find out why my water pump isn't pumping.

Patience is definitely something that I've been blessed with...now only if I would've tapped into that quality before priming :facepalm:

Welder in the family...you've got a goldmine right there! GL with your linkage and cooling issues!
 

SigSaurP229

Commander
Joined
Oct 1, 2008
Messages
2,123
Re: My First StarCraft; 1975 18' SuperSport

Check out what is going underneath that new steering wheel.

No more cheesy plastic steering bezel. Its been replaced with aluminum, all my plastic windshield mounts are being replaced with Stainless steel as well. My switch plates are going to be made of stainless steel too.


classiccat

"Captain" + Starmada Splash Of The Year 2020
Joined
Dec 20, 2010
Messages
3,409
Re: My First StarCraft; 1975 18' SuperSport

Check out what is going underneath that new steering wheel.

No more cheesy plastic steering bezel. Its been replaced with aluminum, all my plastic windshield mounts are being replaced with Stainless steel as well. My switch plates are going to be made of stainless steel too.

bling...and more bling! I assume your uncle will have quite a few free fishin' trips in his future!

I'm considering one of these plastic rusto paints for my steering bezel...if that doesn't work, does wrapping in aluminum foil count? :lol:
 

SigSaurP229

Commander
Joined
Oct 1, 2008
Messages
2,123
Re: My First StarCraft; 1975 18' SuperSport

Might see if he has an extra piece of aluminum laying around
 

GA_Boater

Honorary Moderator Emeritus
Joined
May 24, 2011
Messages
49,038
Re: My First StarCraft; 1975 18' SuperSport

bling...and more bling! I assume your uncle will have quite a few free fishin' trips in his future!

I'm considering one of these plastic rusto paints for my steering bezel...if that doesn't work, does wrapping in aluminum foil count? :lol:

Only if you make a hat too. :laugh:
 

SigSaurP229

Commander
Joined
Oct 1, 2008
Messages
2,123
Re: My First StarCraft; 1975 18' SuperSport

Hey Chris other than patience do you have any tips for reinstalling the lower unit and keeping the water tube aligned
 

classiccat

"Captain" + Starmada Splash Of The Year 2020
Joined
Dec 20, 2010
Messages
3,409
Re: My First StarCraft; 1975 18' SuperSport

Hey Chris other than patience do you have any tips for reinstalling the lower unit and keeping the water tube aligned

disproportionately long, skinny fingers help :lol:

The water pump on my '83 35Hp is a bugger since it pulls out of the upper grommet (on the powerhead/exhaust adapter). I insert it lightly into the upper grommet then just as the driveshaft engages the powerhead, I feed "my precious" watertube into the waterpump with my smeagol-fingers! :lol:

The '75 70Hp is a piece of cake since the end-flare keeps it locked into the adapter.
 
Top