I have returned... with a Starcraft this time!

BWR1953

Admiral
Joined
Jan 23, 2009
Messages
6,030
That second coat is a tough one, be sure to have as much light as possible as there's NO color difference, only sheen of the fresh paint.

Okay, I'll try to spray it in the daytime. Can't be out there tonight anyway.
 

Decker83

Commander
Joined
Apr 5, 2011
Messages
2,592
Looking at your pic's. I think you did a excellent job. Watermann is right about the second coat. Make sure you have good light and look at the paint at a angle so you can see the wet paint..
The way your going at it you should have a beautiful job..:llama:
 

BWR1953

Admiral
Joined
Jan 23, 2009
Messages
6,030
I'm learning!

Yesterday I sanded most of the orange peel off the console with 800 and 2000 grit W/D sandpaper, which is all I had on hand. Looked much better.

I wanted to do more, and tried, but got overheated and my heart started pounding so I stopped and went indoors. I didn't have a safety monitor with me. Again. :nono: :p

But we hit it again this afternoon after running some errands this morning.

And after many pattern tests and adjustments, I finally figured that I'd gotten it as best I could. An expert could probably do better but I was satisfied. The pattern was much smoother and didn't have the glob spatters that I'd seen in my prior efforts and which I used for the first coat on the console. This looked much better.

I'd actually mixed up a batch of paint yesterday (with reducer only, no hardener) but didn't use it, so I put a lid on it and left it in the garage.

I decided to use that leftover paint from yesterday to get my pattern test and paint technique experience. After finally getting it fine tuned, I just used up as much of the paint as I could by painting my test cardboard.
Click image for larger version  Name:	3.jpg Views:	1 Size:	277.9 KB ID:	10579445

And here is the result! Note reflection of KF hull in the painted area! :D
Click image for larger version  Name:	4.jpg Views:	1 Size:	278.7 KB ID:	10579446
 

Attachments

  • 1.jpg
    1.jpg
    325.9 KB · Views: 0
  • 3.jpg
    3.jpg
    277.9 KB · Views: 0
  • 2.jpg
    2.jpg
    525.8 KB · Views: 0

ab59

Ensign
Joined
May 10, 2017
Messages
979
Looks great, by the time you shoot the hull it will look like a pro did it. Good work.
 

BWR1953

Admiral
Joined
Jan 23, 2009
Messages
6,030
Thanks guys! It's getting there. I still have plenty more to learn though. :nod: :)

The weather is definitely a factor. When I started painting, the humidity was 68% and 10 minutes later it had jumped up to 90%! :eek:

I sure hope that the paint dries okay. Jeez, with all my years of flying weather satellites, you'd think I'd have more control over that stuff! :lol:

And then there's Alberto headed this way... :rolleyes:
Alberto.png
 

Attachments

  • Alberto.png
    Alberto.png
    653.6 KB · Views: 0

Decker83

Commander
Joined
Apr 5, 2011
Messages
2,592
That console looks awesome.. When you get yours done, you can come and spray mine.. (LOL)
Hope Alberto doesn't do much damage your way.. Saw on the news that a lot of celebrations were being canceled
because of Alberto..
 

Watermann

Starmada Splash of the Year 2014
Joined
Jan 12, 2013
Messages
13,753
I hope you catch a break soon, your due man! Console looks nice, think your ready for the big shoot.
 

BWR1953

Admiral
Joined
Jan 23, 2009
Messages
6,030
Went out this morning between rain squalls to check on things. The paint is dried and glossy. :)

But I'm going to put on a third coat. I found a couple places where I'd applied the paint too lightly and they're in noticeable locations so I want to get them right. More opportunity for me to get my technique better prior to painting the hull. I'll sand lightly with 2000 grit paper before shooting the next coat.

The question is when will I get such an opportunity? Weather. Ugh. Alberto isn't going to cause any damage, just a couple of soggy, rainy days and then we'll be even closer to the normal rainy season here, when humidity remains high pretty much all the time.

I'll be watching the weather carefully with hopes that I'll be able do some painting before we get deep into the rainy season. I don't want to have to wait until October or November to paint!

Yep! Still nice and glossy. But a third coat wouldn't hurt, right? :rolleyes:
2.jpg


And the forecast. Not too great for painting.
1.jpg
 

Attachments

  • 1.jpg
    1.jpg
    385.2 KB · Views: 0

Watermann

Starmada Splash of the Year 2014
Joined
Jan 12, 2013
Messages
13,753
Most guys that have a great finish at 2 coats stop right there, no sense tempting fate.
 

BWR1953

Admiral
Joined
Jan 23, 2009
Messages
6,030
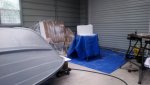
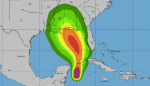
Well guys, remnants of subtropical storm Alberto are still around even as I'm typing, preventing any painting for the last couple of days. When will it end? I dunno. :noidea: :cool:

So I did the next best thing... I got ready! :joyous:

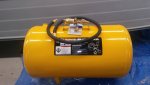
Went to HF and burned up my 25% off discount today. Bought an 11 gallon portable air tank along with goodies to allow me to connect it to my existing compressor/tank setup which will give me a grand total of 19 gallons of air storage for painting or whatnot.

Had to go to HD and Lowes for a couple items not available at HF but they were along the way, so no biggie.

I knew that my compressor/tank had some leaks somewhere and today we took everything apart and cleaned those up then resealed with Teflon tape.
2.jpg


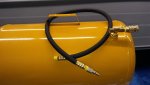
The goodies. New tank, lead hose and fittings. I think I'll add a ballcock shutoff valve so that I can still use the portable tank as a portable tank. Maybe later this week, depending on the rain again. :rolleyes: The boy had already pulled the gauge and hose from the new tank before I got the pic snapped. Cool! ;)
7.jpg


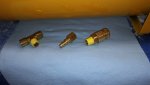
Hose and connectors taped.
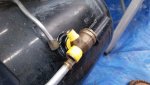
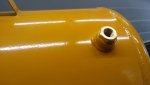
8.jpg


Coupler installed.
9.jpg


Ready to connect to compressor. 11.jpg


Connected to compressor and all worked! 12.jpg


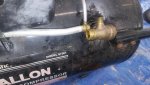
However, after we connected the main air hose to the portable tank, the compressor kicked on again. So we did the soapy bubble test and found that the old connector at the business end of the hose was leaking. Removed the fitting and taped it up and that was solid.

So we tested again and once more, after a longer time, the compressor kicked on again! Hmmm... we double checked all the connections using the soapy bubble method and everything checked out.

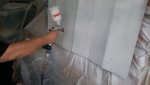
But I did find the culprit. The air blow gun! Air was coming right out of the tip of the thing without the trigger being pulled. I guess because it's a cheap gun. The quick fix for now is to immediately disconnect it when not in use. I'll shop for a better one later.
13.jpg
 

Attachments

  • 2.jpg
    2.jpg
    387 KB · Views: 0
  • 3.jpg
    3.jpg
    324.3 KB · Views: 0
  • 6.jpg
    6.jpg
    381.4 KB · Views: 0
  • 10.jpg
    10.jpg
    252.9 KB · Views: 0
  • 5.jpg
    5.jpg
    240.8 KB · Views: 0
  • 5.jpg
    5.jpg
    240.8 KB · Views: 0

Watermann

Starmada Splash of the Year 2014
Joined
Jan 12, 2013
Messages
13,753
That should take some stress off the little compressor, also add a fan blowing over the compressor head, it will get smoking hot and some have failed right in the middle of the paint job. I would even take that neat looking plastic piece off that covers up part of the head.
 

BWR1953

Admiral
Joined
Jan 23, 2009
Messages
6,030
That should take some stress off the little compressor, also add a fan blowing over the compressor head, it will get smoking hot and some have failed right in the middle of the paint job. I would even take that neat looking plastic piece off that covers up part of the head.

I had the boy blow the dust off the KF this evening. The compressor worked great with the extra capacity. Too late tonight to paint but the boy only has 3 half-days of school left so maybe we'll get lucky with the weather in the earlier parts of the upcoming afternoons.

That plastic shroud covers a fan already built into the compressor. The shroud routes the air around the cooling fins and motor block. Not bad for a cheap HF compressor. Hot air can definitely be felt coming from the exhaust side! And yes, I know how hot it can get. When I was painting last week I bumped my bare leg against the fins. The burn is healing nicely though and shouldn't leave a scar. :rolleyes:


2.jpg


Dust blown off the KF; ready for a final tack wipe. Compressor and new tank standing by.
1.jpg
 

ab59

Ensign
Joined
May 10, 2017
Messages
979
lots of new toys now as well as locked and loaded I see , can't wait to see the paint job on the hull !!
 

Decker83

Commander
Joined
Apr 5, 2011
Messages
2,592
Nice new tank setup you did.. Keeping my fingers crossed for ya on the rain..
I wish you would send some of that rain here to Texas.. Weatherman says its going to be 105 in Dallas Friday..
 

BWR1953

Admiral
Joined
Jan 23, 2009
Messages
6,030
I hope to test the new gear soon. But it was like a monsoon here today! Rained all cotton pickin' day!
 

BWR1953

Admiral
Joined
Jan 23, 2009
Messages
6,030
Murphy BLINKED!! :D


Prepping the paint area.
01.jpg

First coat applied! :peace:
02.jpg

I just can't get that boy to smile for a pic. He was freaking dancing just seconds before I took the photo! :lol:
4.jpg
 

Attachments

  • 4.jpg
    4.jpg
    274.7 KB · Views: 1
  • -3.jpg
    -3.jpg
    424 KB · Views: 1
Top