Honda BF130 problems, needs input

Nicktr23

Petty Officer 3rd Class
Joined
Oct 25, 2017
Messages
96
While possible, unless the leak is right next to the valve I would not think the source is the exhaust valve. But repeat the test on the intake side. If you have an intake that is leaking the same way, then that is almost surely a source, though maybe not the only one.
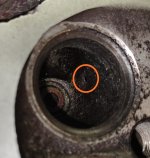
You're correct, the leak is NOT the exhaust valve itself. However when I piur water into the exhaust port, water was trickling out. When I piur water into the intake hole, it held fine. But... After removing the intake valve, I find the hole. Question now is how the heck that happened??? But I'm now certain this is the reason why cylinder 4 was not doing it's thing.

Ahick, Matt Fl, if this hole is patched well, can I get a reconsideration that this will fix my issue.
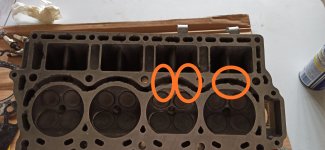
 :)? I measure the block, the piston does not go beyond the block. Meaning if I take a straight ruler and place it across the cylinder, at TDC, i can slide the ruler across without touching the piston. However, I see divot on the piston face, which is to provide clearance for the valve??? But making adjustment to valve clearance can help? Or is this a bad head and it won't work?
 

Attachments

  • IMG_20210110_210659.jpg
    IMG_20210110_210659.jpg
    662.2 KB · Views: 4

Nicktr23

Petty Officer 3rd Class
Joined
Oct 25, 2017
Messages
96
I think a new head will be better choice. There will be a better seal with a new head cylinder. The picture show the worried area where seal is lost due to corrosion.
 

Attachments

  • IMG_20210110_220430.jpg
    IMG_20210110_220430.jpg
    2.8 MB · Views: 2

ahicks

Captain
Joined
Sep 16, 2013
Messages
3,957
IMHO, junk that head for sure. It's not even worth thinking about.

The engine doesn't care about what the old #1 in the firing order was, or if the #1 piston is coming up on the compression stroke or the exhaust.

The ignition fires that plug every time it comes the piston is at TDC regardless. The second unnecessary spark is an extra that doesn't hurt a thing and is 100% normal - makes things much simpler regarding the electronics used to fire it. Sometimes called a "maverick" spark. Your lawnmower and most other motors all do the same thing.

The CAM timing is what determines the top of the compression stroke, and of course you'll be setting that when re-installing the timing belt. -Al
 

MattFL

Master Chief Petty Officer
Joined
Oct 20, 2010
Messages
836
Basically that head most likely will not be reliable, so if you want a reliable motor then a new head is the way to go, but if you're OK with the risk in exchange for fun then go for it with that head. As you suspect, valve clearance (and higher than spec compression) may be an issue after the machining. Now that you know the pistons don't protrude out of the block, the next thing to test is the valve to piston clearance with the valves operating. One way to test is put it back together, timing belt and all, then with the spark plugs out turn it over slowly by hand and make sure it spins freely. You can also put some clay on the pistons, spin it over, disassemble and the impressions in the clay will tell you how much clearance you have. There may be thicker head gaskets available which could help resolve compression and clearance issues. I don't know if you can get away with multiple stacked up head gaskets on that motor or not, but that's another potential solution.
 

Nicktr23

Petty Officer 3rd Class
Joined
Oct 25, 2017
Messages
96
Basically that head most likely will not be reliable, so if you want a reliable motor then a new head is the way to go, but if you're OK with the risk in exchange for fun then go for it with that head. As you suspect, valve clearance (and higher than spec compression) may be an issue after the machining. Now that you know the pistons don't protrude out of the block, the next thing to test is the valve to piston clearance with the valves operating. One way to test is put it back together, timing belt and all, then with the spark plugs out turn it over slowly by hand and make sure it spins freely. You can also put some clay on the pistons, spin it over, disassemble and the impressions in the clay will tell you how much clearance you have. There may be thicker head gaskets available which could help resolve compression and clearance issues. I don't know if you can get away with multiple stacked up head gaskets on that motor or not, but that's another potential solution.
I normally take the boat out in the open water so I need it to be reliable. I'm lucky that this problem didn't left me stranded the last couple time I went out. Yikes...
 

Nicktr23

Petty Officer 3rd Class
Joined
Oct 25, 2017
Messages
96
IMHO, junk that head for sure. It's not even worth thinking about.

The engine doesn't care about what the old #1 in the firing order was, or if the #1 piston is coming up on the compression stroke or the exhaust.

The ignition fires that plug every time it comes the piston is at TDC regardless. The second unnecessary spark is an extra that doesn't hurt a thing and is 100% normal - makes things much simpler regarding the electronics used to fire it. Sometimes called a "maverick" spark. Your lawnmower and most other motors all do the same thing.

The CAM timing is what determines the top of the compression stroke, and of course you'll be setting that when re-installing the timing belt. -Al
I'm going over the steps to take when i'm in the process to put the head back onto the engine. my thought process is to align the T mark on the camshaft cogwheel to the T mark on the plastic cover. I would then put on the timing belt and loosen the adjusting tension nut by 2/3 turn, then remove the 6x100 bolt, push the tension towards the belt. Tighten up the adjusting tension nut. Then just rotate the crankshaft 2 full revolution and make sure all the timing mark are lined up? Does the flywheel have to come off?
 

ahicks

Captain
Joined
Sep 16, 2013
Messages
3,957
The smaller stuff I work on (40-90hp) do not require that either pulley needs to be removed.

The rest of your question seems reasonable, but I'm not sure where your timing marks are or where they are supposed to line up. That should all be covered fairly well in the manual.

The last piece, regarding turning it over 2 turns (minimum) then checking/confirming your timing marks, is a habit I practice religiously. It's not hard to be a tooth off. -Al
 

Nicktr23

Petty Officer 3rd Class
Joined
Oct 25, 2017
Messages
96
The smaller stuff I work on (40-90hp) do not require that either pulley needs to be removed.

The rest of your question seems reasonable, but I'm not sure where your timing marks are or where they are supposed to line up. That should all be covered fairly well in the manual.

The last piece, regarding turning it over 2 turns (minimum) then checking/confirming your timing marks, is a habit I practice religiously. It's not hard to be a tooth off. -Al
It all went back into smoothly. Well not really. :( I made the mistake of installing the valve stem seals before putting in the valve spring seat. Oops. That mean all the stem seals have to be removed and discarded. They weren't the easiest to take off since I didn't have the correct tools to take off. Lesson learned. :) But after that, everything went smoothly. I was able to test the engine on muff and did the cylinder drop test and now all cylinder are operating as it should. Hopefully the weather gets better so I can take the boat out to give it the true test. Thank you for everyone's input. I definitely learned a lot throughout this process.
 

ahicks

Captain
Joined
Sep 16, 2013
Messages
3,957
Lesson #1 I hope, is that the Honda's, or 4 strokes in general, are NOT that difficult to work on - assuming only that you have a well charged patience hat to wear while doing that.

Fingers crossed for your water test, but my bet is you are good to go....

GOOD JOB !!!
-Al
 

MattFL

Master Chief Petty Officer
Joined
Oct 20, 2010
Messages
836
Great job! Did you end up re-using the old head or obtaining a better one? Cool project, keep us informed!
 

Nicktr23

Petty Officer 3rd Class
Joined
Oct 25, 2017
Messages
96
Great job! Did you end up re-using the old head or obtaining a better one? Cool project, keep us informed!
I went ahead and bought a new cylinder head. I didn't want to chance it and having it break down on me on the water. The old head was in pretty rough condition. Also, head gasket isn't cheap so it was better to spend the money for a new head.
 
Top