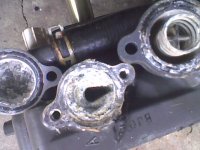
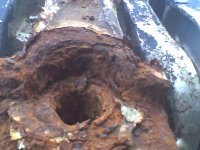
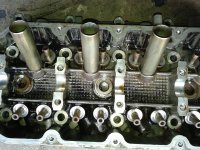
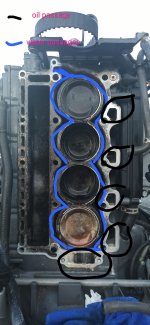
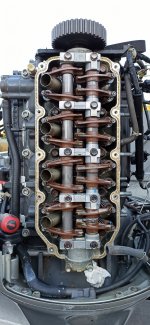
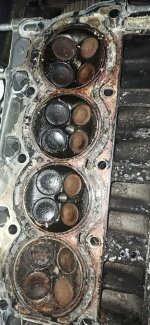
Honda BF130 problems, needs input

MattFL

Master Chief Petty Officer
Joined
Oct 20, 2010
Messages
840
Thanks for the correction, I was looking right at the intake valve pockets and called it the block, caffeine hasn't kicked in yet today. :)
 

Nicktr23

Petty Officer 3rd Class
Joined
Oct 25, 2017
Messages
96
3rd picture is the head, which I hope we're already planning on removing. With patience that buildup isn't too hard to remove with the head sitting on the bench. The block may be a different story.

With the condition of the motor now more clear, I'd be wasting no time in getting that head off for an inspection of the sealing surfaces to see what you have to work with. Fingers crossed for you at this point.....
I hope it's not too bad. :) I've been studying the manual on how to remove the head. I haven't work on 4 stroke engine before so I'm treading slowly. I cleared most of the salt buildup from picture 3, and it looks like maybe water was able to trickle or pass thru, since the clog isn't packed into the passageway (if that even make sense). But more teardown to come. I'm just hoping no cracked block or cracked head.

Quick question, since the PCV breather tube is throwing some milky oil into the intake manifold, while i have the intake manifold off, before reassembly, would it hurt anything to hose the intake manifold with a hose and let it dry?
 
Last edited:

ahicks

Captain
Joined
Sep 16, 2013
Messages
3,957
I have access to a small, very noisey 1.5hp air compressor and use that to blow away crud after I've been chipping for a while. An engine like this is going to be a big mess is my bet.

Water isn't going to hurt anything, it just makes for an even bigger mess!

Don't let the fact it's a 4 stoke intimidate you. Sure there's more to it, but following the manual for tear down should keep you out of any trouble. You may find, like I have, there's no need for rocket science here. Just patience....
 

MattFL

Master Chief Petty Officer
Joined
Oct 20, 2010
Messages
840
Water itself isn't going to hurt anything. The exterior metal and cooling passages are all painted or coated so no risk to those, and even other parts like the head and valves are OK to get wet, just be sure they get dried so they don't rust. For those non-protected parts it's a good idea to hit them with a thin layer of oil for rust protection if they're going to be sitting out for any length of time. Any spray oil like WD40 or silicone spray would work fine. Also if you use water on the main parts of the motor, be careful that water doesn't wash salt and dirt into places where you don't want it. i.e. if you've got the head off and you're cleaning out the cooling passages in the block, don't let water wash anything down into the oil pan if there's an exposed opening, etc..
 

Nicktr23

Petty Officer 3rd Class
Joined
Oct 25, 2017
Messages
96
I'm having trouble removing the timing belt driving pulley. Any tips? I don't have the special tools describe in the manual. It seems like a good impact driver would loosen it, my dewalt 20v impact didn't do anything. Also with the timing belt off, when removing the pulley, you probably don't need to line the timing mark to tdc anymore right?
 

ahicks

Captain
Joined
Sep 16, 2013
Messages
3,957
No need to remove the pulley I don't think. I usually remove the idler pulley and just slide the belt up and off the cam pulley. Pretty easy. Tie the belt so its forward, out of your way while you're at it....

Timing marks won't be needed until you are reassembling.
 

Nicktr23

Petty Officer 3rd Class
Joined
Oct 25, 2017
Messages
96
No need to remove the pulley I don't think. I usually remove the idler pulley and just slide the belt up and off the cam pulley. Pretty easy. Tie the belt so its forward, out of your way while you're at it....

Timing marks won't be needed until you are reassembling.
The manual said to remove the cam pulley, and that sucker ain't moving. So if I don't have to remove it, that's even better.
 

Nicktr23

Petty Officer 3rd Class
Joined
Oct 25, 2017
Messages
96
No need to remove the pulley I don't think. I usually remove the idler pulley and just slide the belt up and off the cam pulley. Pretty easy. Tie the belt so its forward, out of your way while you're at it....

Timing marks won't be needed until you are reassembling.
Thank you. I was able to remove the cylinder head without removing the pulley. The manual instructed to remove several other parts too and they didn't need to be removed.
Well, I don't think the cylinder head looks good.
- Near cylinder 4, on the exhaust side, I see a pinhole and missing aluminum. Maybe I can clean out the oil and exhaust and weld it up. it's really small. no cracks.
- No cracks on the cylinder block I think. I don't see much obstruction on the block side of the engine.
- Head cylinder, lots of salt build-up. Very very packed. I'm looking at pictures of what the head suppose to look like and those water passages are suppose to be cleared/have grooves and channels for water flow? It's pretty gunk up around cylinder 1, between 2 and 3 and 3. All on exhaust side.
Can you guys take a look at the pictures and provide me with some insight?
This is an old engine, per engine frame, it's a 2003. So 18 years, and probably spent a lot of time in salt water in Bay Area. When I bought the motor, the guy showed me maintenance invoices and what not, i can't remember when the motor was last run by them. But I bought it and used it probably 20-30 times. Again I always had issue with telltale constriction, but it always started up and run, and compression isn't that bad.
My thoughts on this engine right now is that if I can just clean up the salt build up/gunk, patch the exhaust pinhole and then sand the head flat. Then reinstall with a new head gasket. At least then the water passages are cleared, maybe I can get couple years on this motor?
The other option would be to get a new cylinder head, which is more than $600 itself, then add in the cost of all the other parts, might be in the thousands. hmmm decisions.
 

Attachments

  • IMG_20210105_195130.jpg
    IMG_20210105_195130.jpg
    2.8 MB · Views: 10
  • IMG_20210105_201051.jpg
    IMG_20210105_201051.jpg
    4.4 MB · Views: 11
  • IMG_20210105_201323.jpg
    IMG_20210105_201323.jpg
    2.9 MB · Views: 9
  • IMG_20210105_201716.jpg
    IMG_20210105_201716.jpg
    2.5 MB · Views: 9
  • IMG_20210105_162446.jpg
    IMG_20210105_162446.jpg
    1.7 MB · Views: 10
  • IMG_20210105_165548.jpg
    IMG_20210105_165548.jpg
    1.2 MB · Views: 9
  • IMG_20210105_170947.jpg
    IMG_20210105_170947.jpg
    2 MB · Views: 9
  • IMG_20210105_171150.jpg
    IMG_20210105_171150.jpg
    1.4 MB · Views: 8
  • IMG_20210105_171402.jpg
    IMG_20210105_171402.jpg
    1.5 MB · Views: 8
  • IMG_20210105_171419.jpg
    IMG_20210105_171419.jpg
    1.8 MB · Views: 10

Nicktr23

Petty Officer 3rd Class
Joined
Oct 25, 2017
Messages
96
That third picture where the block is completely plugged up, that would convince me to try one of the chemical solutions for removing that stuff, assuming you cannot physically get to all of it after disassembly. Get on youtube and look for videos using rydlyme or barnacle buster to dissolve that kind of thing. The chemicals work, the chemistry makes sense, the question is the risk to the metal, especially any anodes in the motor. But in your case, if that were my motor, I would take the chance. The method that makes the most sense to me is removing the thermostat(s) and the lower unit, attaching a small pump to the water pick-up tube, put a bucket under the motor and use the pump to keep the fluid re-circulating around the motor for a while. Here's an example of one of the chemicals working:
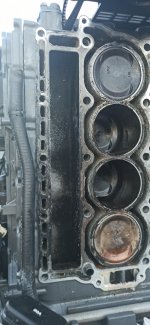
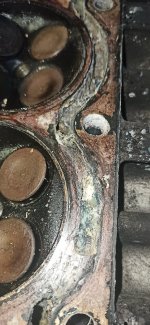
this looks promising. I just fear it will eat up the aluminum. :) But now that I have the head apart, chisel, hose and air compressor hopefully will help.
 

durban

Master Chief Petty Officer
Joined
May 27, 2011
Messages
894
023.jpg When i replaced my cylinder head it had a crack between no 1 and no 2 cylinder the newer cylinder heads the water passages are machined better to prevent it i put anodes in between the sleeves to prevent salt build up the depth is sufficient so i cut the adenoids to half the lenth of the depth . Also while you at it check the rubber mount that bolts onto the yoke
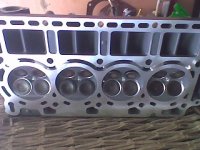
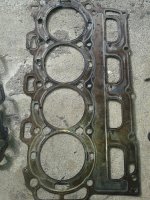
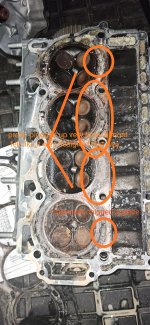
 

Attachments

  • 205.jpg
    205.jpg
    96.6 KB · Views: 2

durban

Master Chief Petty Officer
Joined
May 27, 2011
Messages
894
What you can also do is behind your cam shaft you have 2 welsh plugs get some adenoids unscrew the welsh plugs and drill and tap and bolt the anoids to the inside of the welsh plugs this will prevent salt build up inside the cylinder head where you cannot see .the new cylinder heads look like this
 

Attachments

  • 022.jpg
    022.jpg
    46.5 KB · Views: 4

durban

Master Chief Petty Officer
Joined
May 27, 2011
Messages
894
Clean up your flush port as well i completely desalted my motor using Durbans nitric acid desalting formula
 

Attachments

  • 025.jpg
    025.jpg
    97.4 KB · Views: 2

durban

Master Chief Petty Officer
Joined
May 27, 2011
Messages
894
Check your yoke too i fixed mine and put 4 coats epoxy after sandblasting
 

Attachments

  • 136.jpg
    136.jpg
    99.7 KB · Views: 4
  • 138.jpg
    138.jpg
    99 KB · Views: 4
  • 156.jpg
    156.jpg
    1.8 MB · Views: 4
  • 158.jpg
    158.jpg
    2.1 MB · Views: 4

durban

Master Chief Petty Officer
Joined
May 27, 2011
Messages
894
check replace this seal too and clean up salt builds up in there its on top of the pan where the gear shaft goes through
 

Attachments

  • 216.jpg
    216.jpg
    61.1 KB · Views: 2

durban

Master Chief Petty Officer
Joined
May 27, 2011
Messages
894
the welsh plugs i was referring to put good thread sealant on if you gona drill and tap
 

Attachments

  • 283.jpg
    283.jpg
    2.4 MB · Views: 5

Nicktr23

Petty Officer 3rd Class
Joined
Oct 25, 2017
Messages
96
What you can also do is behind your cam shaft you have 2 welsh plugs get some adenoids unscrew the welsh plugs and drill and tap and bolt the anoids to the inside of the welsh plugs this will prevent salt build up inside the cylinder head where you cannot see .the new cylinder heads look like this
doesn't that look like a beauty. :) 
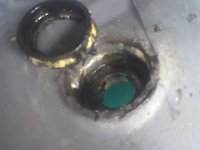
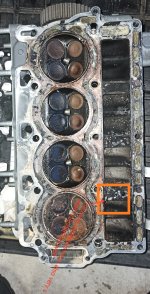
I meant the new cylinder head you attached.
 

ahicks

Captain
Joined
Sep 16, 2013
Messages
3,957
First, I'm not an expert on 130's. My experience is all on 40-90 hp. The bigger stuff is too hard for this old man to handle easily, and the small ones keep me as busy as I want to get....

Clearly you have a mess with that head, especially as concerning the areas that have perforated. I'd say that's where you water and oil are mixing.

If you have access to welding, I'd say get it all cleaned up, then make up your mind about whether or not you want to replace the head. Concern here would be regarding the potential for other holes to appear. A little poking around with a sharp awl/pick in order for sure.....

I would second the idea of having a good look at that steering arm/yoke with the amount of salt this engine has seen. This is a pretty common issue, and not just with Honda. For some stupid reason, these are made from what appears to be cast iron, and do very poorly in a salt water environment. I've seen the steering arms break right off....

1000 sounds like a lot of money at this point, but if that leaves you with a solid motor for years to come, I'd consider that a pretty good investment. You darn sure aren't going to replace a motor like this for any less....
 

MattFL

Master Chief Petty Officer
Joined
Oct 20, 2010
Messages
840
Try really hard to identify where the water was getting into #4, was it coming past the head gasket somewhere? I don't think the missing metal on the exhaust side was the water source. Also I suspect that whole area where the hole is, is probably very thin metal at this point. If you weld it, try not to get enough heat in the head to warp it or you'll need to machine it flat again to get proper head gasket seal. If you can weld up that hole yourself, I wonder what a local machine shop would charge to clean up the head and make sure it's flat? Option 2, see if you can find a used take-off head from a fresh water motor for a reasonable price. Great job so far, disassembly was definitely 100% required so good call on that.

PS-> The bolt that wouldn't come off of the cam sprocket; make sure it's not a reverse-thread nut.
 

durban

Master Chief Petty Officer
Joined
May 27, 2011
Messages
894
I will just bring to your attention about these new type cylinder head gaskets .1st they tend to crack 2nd over the years the water friction removes the plastic coating on them and then they start leaking i would replace every 10 years uploaded i one from a mercury 4 stroke and one from honda
 

Attachments

  • Cracked  head gasket 291.jpg
    Cracked head gasket 291.jpg
    2.7 MB · Views: 6
  • Old head gasket water fricksion removes the plastic silicone 290.jpg
    Old head gasket water fricksion removes the plastic silicone 290.jpg
    3 MB · Views: 6
  • Honda  130 hp 292.jpg
    Honda 130 hp 292.jpg
    2.9 MB · Views: 7
  • HONDA Cracked cylinder head gasket 289.jpg
    HONDA Cracked cylinder head gasket 289.jpg
    2.6 MB · Views: 7

Nicktr23

Petty Officer 3rd Class
Joined
Oct 25, 2017
Messages
96
check replace this seal too and clean up salt builds up in there its on top of the pan where the gear shaft goes through

Try really hard to identify where the water was getting into #4, was it coming past the head gasket somewhere? I don't think the missing metal on the exhaust side was the water source. Also I suspect that whole area where the hole is, is probably very thin metal at this point. If you weld it, try not to get enough heat in the head to warp it or you'll need to machine it flat again to get proper head gasket seal. If you can weld up that hole yourself, I wonder what a local machine shop would charge to clean up the head and make sure it's flat? Option 2, see if you can find a used take-off head from a fresh water motor for a reasonable price. Great job so far, disassembly was definitely 100% required so good call on that.

PS-> The bolt that wouldn't come off of the cam sprocket; make sure it's not a reverse-thread nut.
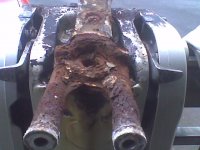
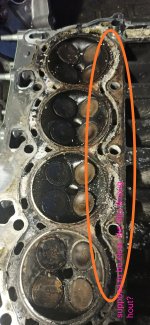
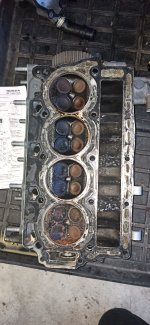
I spent 2 hours chipping away a pathway for water flow. Next would be to remove the valve stem and gonna hose down the head. I already used compressed air, but it didn't do much. The hole in the exhaust connects directly with the water, so I'll need to find a way to plug up the hole. I'm not too fond of welding aluminum so I'm not even going to try. I'll call around to see
I will just bring to your attention about these new type cylinder head gaskets .1st they tend to crack 2nd over the years the water friction removes the plastic coating on them and then they start leaking i would replace every 10 years uploaded i one from a mercury 4 stroke and one from honda
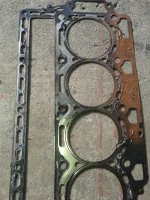
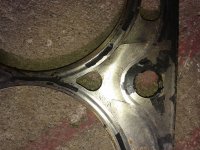
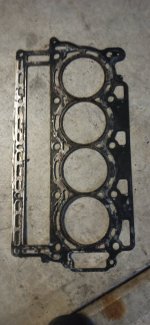
Thank you for the info. 10 years seems fair. If it was just head gasket replacement, it shouldn't be a problem. :) I'll be curious to see how head gasket and water channel looks like after 10 years with routine flushing after use.
Quick question, when I remove the head, I didn't take off the camshaft pulley. Now I'm planning on also removing the camshaft and rocker assembly to remove the valve stem and clean them up. The manual said when installing the assembly back, you want the notch to face up. With the pulley on, I can't or don't know where the notch is. Is the notch opposite of the T mark on the pulley? Does it even matter at this stage? Cause my understanding is that it's going to spin around anyhow?
 
Top