Honda BF130 problems, needs input

Nicktr23

Petty Officer 3rd Class
Joined
Oct 25, 2017
Messages
96
Matt, I searched the internet for a head, they're hard to fine now. Guess 130hp isn't that popular due to so head issues. A new head would cost 600 but that's without new valve stems, guides and what not. I'm guessing they should be replaced together for a better seal right? Or am I just over thinking.
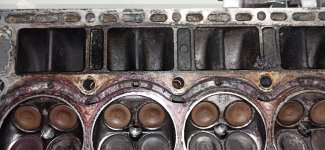
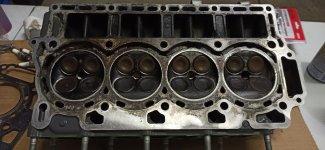
Here are some pictures after the water passage is cleaned up.
 

MattFL

Master Chief Petty Officer
Joined
Oct 20, 2010
Messages
865
I personally wouldn't bother taking the valves out of the head at this point unless there is a specific problem you're trying to fix, a little bit of carbon on the stems won't make any difference so there's not really much to gain. Unless it's just a fun project in which case go for it.
 

Nicktr23

Petty Officer 3rd Class
Joined
Oct 25, 2017
Messages
96
I personally wouldn't bother taking the valves out of the head at this point unless there is a specific problem you're trying to fix, a little bit of carbon on the stems won't make any difference so there's not really much to gain. Unless it's just a fun project in which case go for it.
I'm more concerned about the rust that I see involving cylinder 4. Also, because I've been running on 3 cylinder for who knows how long, I want to see if it's sealing properly. And you're right, this is now just becoming a fun project for me. :)
 

Nicktr23

Petty Officer 3rd Class
Joined
Oct 25, 2017
Messages
96
IMG_20210107_051524.jpgIMG_20210107_051517.jpg
After some chiseling and cleaning. I can now see through the holes by cylinder 1 and 3. So now there's a path for it to flow. Any recommendations on how to clean up the matting surface of the head? I tried brake clean and I razor. The razor didn't do much. Also the intake gasket is horrible. It doesn't want to detach from the head, even with brake clean.
 

ahicks

Captain
Joined
Sep 16, 2013
Messages
3,957
2nd the vote to leave the valves where they are until you have a better reason to remove them. If you'd like, load an oil can (trigger type preferred) up with some motor oil and have at it.

For clean up, I use a 6" square of plywood with 120g sandpaper. Clearly whatever you use with sandpaper must be flat, and ply is generally darn close. Double check it with a straight edge. In use, pay attention to applying even pressure on the ply (avoid pushing down hard on a corner or one side more than the rest) and make sure you are spanning openings in the block and head. What you want to be extremely careful with is where the head gasket seals around the top of the cylinder, and that same area on the head.
You are not a milling machine! Do not remove any more material than you have to. If you see a low (or high) spot while working on the head, you should take it to an automotive machine shop to get their opinion.... -Al
 

MattFL

Master Chief Petty Officer
Joined
Oct 20, 2010
Messages
865
Given that it was leaking, I would price what a machine shop would charge you to check it for flatness and maybe surface it to make it flat again, which will also make it a clean surface. If the price is reasonable it could be money well spent. Also they make a special chemical for removing gaskets, search for gasket remover. That may help you on the block side. If you really want to do it yourself, one thing you can do is place or very thinly glue some sand paper sheets to a piece of glass laid flat on a table, then drag the head around on the sand paper. Typically glass is fairly flat. Resist the urge to use a wire wheel on a drill or anything like that. You'll almost surely end up with a non-flat surface which reduces your odds of success.

If you want a quick sanity check for how well the valves are sealing, lay the head on one side and fill the valve pockets with alcohol, gas, oil , etc.. and see if any leaks past the valves. Flip and repeat on the other side.
 

ahicks

Captain
Joined
Sep 16, 2013
Messages
3,957
Last head I had surfaced was 75.00, but that's been a couple of years. They will require you to remove the cam for that.

They'll ask you if there's a max amount that can be removed spec. anywhere. I haven't seen one if there is. I just tell them to clean up an issue I'm concerned with by pointing at it. Have never had one bite my butt yet...

Nor have I had one fail to seal after carefully using the plywood sandpaper treatment. -Al
 

durban

Master Chief Petty Officer
Joined
May 27, 2011
Messages
894
Do the job properly check the valves you may need to lap them check valve stem clearance and spring heights and replace valve stem seals
 

Nicktr23

Petty Officer 3rd Class
Joined
Oct 25, 2017
Messages
96
I went ahead and brought it to the shop for resurfacing. Save me the time to do other prep work.
 

MattFL

Master Chief Petty Officer
Joined
Oct 20, 2010
Messages
865
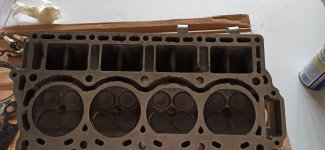
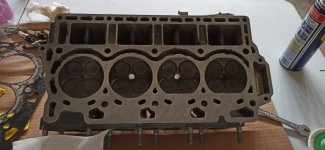
<Edited> The surface looks a ton better, but it looks like they didn't shave it flat; they definitely took more off of those right two cylinders. They deserve a good smack upside the head for that one. When you put it back together, you might put some clay or putty on those flat spots and turn the motor over by hand then remove the head and look at the clay to check clearance. You're looking to see if the pistons are going to hit that part of the head. You might need a thicker head gasket, or to have the head machined out a bit. Hopefully it won't be skewed enough to cause alignment issues with the timing belt.
 
Last edited:

Nicktr23

Petty Officer 3rd Class
Joined
Oct 25, 2017
Messages
96
<Edited> The surface looks a ton better, but it looks like they didn't shave it flat; they definitely took more off of those right two cylinders. They deserve a good smack upside the head for that one. When you put it back together, you might put some clay or putty on those flat spots and turn the motor over by hand then remove the head and look at the clay to check clearance. You're looking to see if the pistons are going to hit that part of the head. You might need a thicker head gasket, or to have the head machined out a bit. Hopefully it won't be skewed enough to cause alignment issues with the timing belt.
It's an older gentleman too. Thought he had the skill see so many heads at his shop. Man...I'll do as you say, and i'll put them back together and hope for the best. Otherwise brand new engine for me on the horizon. :)
I'm praying though.
 
Last edited:

MattFL

Master Chief Petty Officer
Joined
Oct 20, 2010
Messages
865
Also looking at the top left, it appears there may have been a little water passage that he completely machined out. Maybe he needed to take a lot off to get a good surface, but he still should have taken it off square. At least it's a fun project at this point and not mission critical!

Before bothering with the clay, I would just bolt the head on (with a head gasket), torque it, no need to put the timing belt on, then carefully spin it over by hand and see if it spins all the way around. You'll know if one of the pistons meets the head there. If it spins OK, then go back with the clay, just to get some idea for what your clearance is.
 

Nicktr23

Petty Officer 3rd Class
Joined
Oct 25, 2017
Messages
96
I'll put a ruler on the block and see if the piston protrude. Most likely it will that's why you tell me this. :) Yeah it's not mission critical. It's off-season now. Thank you for your input this far. Much appreciated
 

Nicktr23

Petty Officer 3rd Class
Joined
Oct 25, 2017
Messages
96
Given that it was leaking, I would price what a machine shop would charge you to check it for flatness and maybe surface it to make it flat again, which will also make it a clean surface. If the price is reasonable it could be money well spent. Also they make a special chemical for removing gaskets, search for gasket remover. That may help you on the block side. If you really want to do it yourself, one thing you can do is place or very thinly glue some sand paper sheets to a piece of glass laid flat on a table, then drag the head around on the sand paper. Typically glass is fairly flat. Resist the urge to use a wire wheel on a drill or anything like that. You'll almost surely end up with a non-flat surface which reduces your odds of success.

If you want a quick sanity check for how well the valves are sealing, lay the head on one side and fill the valve pockets with alcohol, gas, oil , etc.. and see if any leaks past the valves. Flip and repeat on the other side.
So I filled the exhaust holes with oil. One is seeping. The second hole from the last is seeping oil but it's not seeping out of the valve. Rather it's seeing out of the intake water channel. Internal crack??? I have a borescope coming but I don't know if that would help. It's not a fast leak, just a slow leak. But not coming out of any of the valves.
 

MattFL

Master Chief Petty Officer
Joined
Oct 20, 2010
Messages
865
My bet is corrosion ate a hole in the exhaust valve pocket, just like the holes where you can easily see it. I'm tending to agree with the above, that head is likely not serviceable. It might be fun to put it back together just for the experience and to see what happens (assuming you don't want to keep the rest of the motor either), but I wouldn't trust it further from the dock than you can paddle, unfortunately.
 

Nicktr23

Petty Officer 3rd Class
Joined
Oct 25, 2017
Messages
96
It's clear to me this head is junk
Yeah I think so too. I think that's where my water intrusion coming from? Since water is leaking in from the exhaust, when the exhaust valve open to rid of exhaust, water leak into the combustion chamber and preventing combustion in that chamber?
I'll do more cleaning of the block and motor and inspect the water jacket. If that check out, I'll get a new cylinder head.
 

MattFL

Master Chief Petty Officer
Joined
Oct 20, 2010
Messages
865
While possible, unless the leak is right next to the valve I would not think the source is the exhaust valve. But repeat the test on the intake side. If you have an intake that is leaking the same way, then that is almost surely a source, though maybe not the only one.
 

Nicktr23

Petty Officer 3rd Class
Joined
Oct 25, 2017
Messages
96
Quick question. As I was cleaning the block, I rotate the crankshaft to move the piston to inspect the cylinder walls. I made a make on the belt (attach to the alternator) and the small pulley. Now I'm not sure when cylinder 1 is tdc at compression stroke. Obviously I can see piston 1 & 4 at tdc, but how can I tell which one is at compression stroke, which is at exhaust stroke?? Thank you.
 
Top