Formula 330SS Bulkhead Replacement

tpenfield

Moderator
Staff member
Joined
Jul 18, 2011
Messages
18,092
Re: Formula 330SS Bulkhead Replacement

I would lean toward option two. Replaced my 27 gallon water tank and secured the top with wood braces before I sprayed in the foam. The amount of force which will be pushing up on the bottom of the tank will increase as the foam dries. It would be terrible if the tank was pushed up to far where you would have to remove it again to drop it down. Now I'm sure you would have some time before the pressure when be difficult to over come to set the tank back in, but that amount of time is unknown.

My original water tank had remnants of tubes which went to the bottom of the tank and those tubes were used to release the foam under the tank and have it come up. Once sprayed in the tubes were left and cut off flush.

Yea, Option #2 may be the way to go . . . I can just see if I tried to lower the tank into the expanding foam (a La Option #1), I may not get it set properly and have a heck of a mess on my hands :rolleyes:

Formula uses the hose in the foam 'trick' for the fuel tanks as well as the water tanks to feed the foam into the base of the fuel tank bay. I pointed out one of the hoses in one of my videos. Kind of a neat trick. I would think that they use some amount of pressure to quickly move the foam through the hose.

My rough calculations indicate that I might need upwards of 16 cubic feet of foam to secure the tank. I may plan on 20 cubic feet, just to make sure there is more than enough material. I think that would be 8-10 total gallons of the 2-part stuff at 4 lbs/cubic foot density. I'd have to rig something up to dispense and mix that amount liquid fairly quickly :noidea:
 
Last edited:

alldodge

Moderator
Staff member
Joined
Mar 8, 2009
Messages
42,346
Re: Formula 330SS Bulkhead Replacement

Thought of something else (sorry about that) but I have seen the foam crack a window frame. Wonder how much pressure would be exerted on the bottom of the tank? Also does Formula pressurize the tank during the process to counter?
 

tpenfield

Moderator
Staff member
Joined
Jul 18, 2011
Messages
18,092
Re: Formula 330SS Bulkhead Replacement

Thought of something else (sorry about that) but I have seen the foam crack a window frame. Wonder how much pressure would be exerted on the bottom of the tank? Also does Formula pressurize the tank during the process to counter?

My assumption would be that Formula just secures the tank with the 2 aluminum straps and then injects the liquid foam under the tank via those 'hoses' . . . the foam expands causing it to rise up around the sides of the tank and push up above the level of the tank in most places. Then they cut the excess foam off to be level with the tank once it is cured. there would not really be any pressure on the tank itself, since the foam has a way out along the sides and is free to expand.

I would imagine that if the foam were encased so that it could not expand to the extent that it wanted to during the chemical reaction (like in the case of a window frame installation perhaps), it would exert a fair amount of pressure and possibly break something.

The fuel tank installation is not a process where the foam would be trapped in any way. The tanks do have several internal bulkheads for strength and to prevent 'sloshing' of the fuel, so it would certainly have some strength to avoid any localized pressure, etc
 
Last edited:

bigdirty

Senior Chief Petty Officer
Joined
Oct 4, 2013
Messages
652
Re: Formula 330SS Bulkhead Replacement

...
I would imagine that if the foam were encased so that it could not expand to the extent that it wanted to during the chemical reaction (like in the case of a window frame installation perhaps), it would exert a fair amount of pressure and possibly break something.

The fuel tank installation is not a process where the foam would be trapped in any way. The tanks do have several internal bulkheads for strength and to prevent 'sloshing' of the fuel, so it would certainly have some strength to avoid any localized pressure, etc

I mostly agree, but there is a possibility that if the area along the side of the tank (to be filled with foam) is narrower, or has a bottle neck of sorts, that may allow the foam to start setting before the bigger mass behind it (under the tank) has started to cure, and halt its expansion outwards.. dont think you would want a lot of pressure being put on the hull at that point.. 9its a toss up in my mind, would it lift the tank? or push the hull/glass?)

Helping my friend restore/redo his 4winns 260 liberator a few years ago we were both QUITE surprised at the force/strength of the foam as its expanding.. actually blew apart the top of a battery box/floor section he built in, (3/4 ply, lots of screws AND glassed into place) :embarassed: The area was a little less than the size of a typical battery as it was on one side near the bottom of the boat, and we poured in the foam through a 2" hole.. lesson learned; try to be as accurate as possible calculating mixing amounts, and leave enough 'air' space for the foam to fill up. (don't pour too fast or too much at once) The foam at the 2' hole had stopped expanding and was starting to cure, when we heard the crack/bang.. we both jumped, and hit our heads on his shop roof :laugh: (boat was on a trailer, made for low headroom while standing in the boat) the hull actually had a slight ripple to it after the incident, but nothing serious..

A thought I had.. you could build some bulkhead/crosser type sections beside/under the tank, fill them first and then cut/trim the foam flat after its set.. then your suspension idea at tank install time, and you would only need a small amount of foam to 're coat' over the lower and side sections, and drop the tank in right quick.. then you could do a third mix/pour if required, to go around the sides of the tank..
 
Last edited:

tpenfield

Moderator
Staff member
Joined
Jul 18, 2011
Messages
18,092
Re: Formula 330SS Bulkhead Replacement

I've been trying to find a video (or two) of a tank foaming, but no luck so far. When I foamed my 242 tank in during my re-build, I had too little foam, so it did not expand quite enough . . . neglected to take a video back then. Maybe I can do a time lapse this time around.
 

tpenfield

Moderator
Staff member
Joined
Jul 18, 2011
Messages
18,092
Re: Formula 330SS Bulkhead Replacement

HEY TED, you been holding out on us. The OSO folks have more pics then we do
F-330SS Bulkhead Replacement - Page 2 Post 11 shows 242 tank

Guess I have to sign up for both to get all the skinny :rolleyes:

Nothing intentional about the pics. :D It sort of depends on where the dialog goes after I post updates.

I do have the thread going on in 2 places . . . Here on iBoats, 'cuz there is a lot of expertise and nice folks . . . and on the OSO Formula forum, since I may get some input particular to Formula's and their construction, since a few of the guys over there have restored older Formulas.

Interestingly enough, the folks at Formula boats are following my thread on OSO :noidea: They mentioned that when I contacted them about bonding the cockpit sole to the stringer grid.
 

tpenfield

Moderator
Staff member
Joined
Jul 18, 2011
Messages
18,092
Re: Formula 330SS Bulkhead Replacement

Just to make things even . . .

Here is the 242 fuel bay and tank from the OSO posting :D

IMG_0472.jpg

IMG_0593.jpg

I'm not sure if I will do the same sort of thing with this tank re-installation . . . still thinking about it. :rolleyes:
 
Last edited:

alldodge

Moderator
Staff member
Joined
Mar 8, 2009
Messages
42,346
Re: Formula 330SS Bulkhead Replacement

Interestingly enough, the folks at Formula boats are following my thread on OSO :noidea: They mentioned that when I contacted them about bonding the cockpit sole to the stringer grid.

I've seen it on Formula as well. Also tried leading many of them to iboats do to expertise here. Many of the questions have little to do with Formula. Also noticed Formula does not have a steady following of folks, many make a post and never get a response.

Just having a little fun :D
 

bigdirty

Senior Chief Petty Officer
Joined
Oct 4, 2013
Messages
652
Re: Formula 330SS Bulkhead Replacement

Interestingly enough, the folks at Formula boats are following my thread on OSO :noidea: They mentioned that when I contacted them about bonding the cockpit sole to the stringer grid.

Now, not saying formula doesn't build a good boat, but it just seams with makes from all manufacturers i have seen or worked on over the years, they ALWAYS have things about them that make me scratch my head.. how/why it was built 'that way' or 'that seams like they cheeped out'... My buddy that had the 4winns i spoke of now owns a formula 31pc; Very nice boat, but pulling some seating apart to recover (its ..time :laugh:) he has found a lot of what seams to be 'short cuts' or simply using scraps butted together to make a longer piece (a 3' long seat back/frame can easily be cut from a 4x8 sheet of ply.. so why are there two smaller pieces butted together?) I'm not saying 'I am so smart, and I know better' but i've seen a LOT of factory built stuff that is just poorly engineered in my opinion, or they cheeped out in the build process, and it could always be done better.. even walking around the half mill $ + big boats at the toronto boat show didn't impress me all that much.. :lol: keeping in mind i work in the machine trade, so i'm kinda picky, and have built/designed/reworked or repaired a lot of things over the years.. and anything I build i tend to over do, and consider making it last as long as possible, or at least be serviceable.. I doubt that was or is a huge consideration (by ANY boat builder) for anywhere past say 3-5 years after the boat is sold 'new'..
 

tpenfield

Moderator
Staff member
Joined
Jul 18, 2011
Messages
18,092
Re: Formula 330SS Bulkhead Replacement

I generally look at how the hull and the stringer system is done. Formula uses ribs in the hull, which you do not see in a lot of boats. Also, Formulas tend to have a deeper V hull than similar boats, and that gives more depth to the stringer system, which makes the boat stronger and stiffer. Another thing is how the engine(s) is/are mounted . . . and thru-bolting that Formula uses is far superior to the lag bolting that many boats use.

So, those are my take-aways, having been in the guts of 2 Formula boats over the past few years.
 

tpenfield

Moderator
Staff member
Joined
Jul 18, 2011
Messages
18,092
Re: Formula 330SS Bulkhead Replacement

I've seen it on Formula as well. Also tried leading many of them to iboats do to expertise here. Many of the questions have little to do with Formula. Also noticed Formula does not have a steady following of folks, many make a post and never get a response.

Just having a little fun :D

The OSO forums are generally more focused on the Go Fast Be Loud (GFBL) crowd. There is a fair amount of discussion about very high performance engines and exotic components for the boats. There are some regulars and a few 'hit and runs' as you mentioned.
 

GT1000000

Rear Admiral
Joined
Jul 13, 2011
Messages
4,916
Re: Formula 330SS Bulkhead Replacement

Hello Ted,
I have been quietly following along and gotta offer a huge attaboy on the work you are doing so far...
I also wanted to pop in and share my limited knowledge of the foaming issue.
The guns that are used by boat manufacturers to "spray" the foam is actually a specialized gun that mixes the foam right at the nozzle. This makes it possible to keep the hoses full of separate parts, A/B, and just clean the mixing nozzle portion...
The guy spraying it also has the past experience of several goof ups to learn just how much liquid to spray without wasting too much...
You should be just fine if you want to make several small pours of foam, until to fill the cavities around the fuel tank.
The foam adheres to itself perfectly well and pretty much finds almost any void it can to occupy...
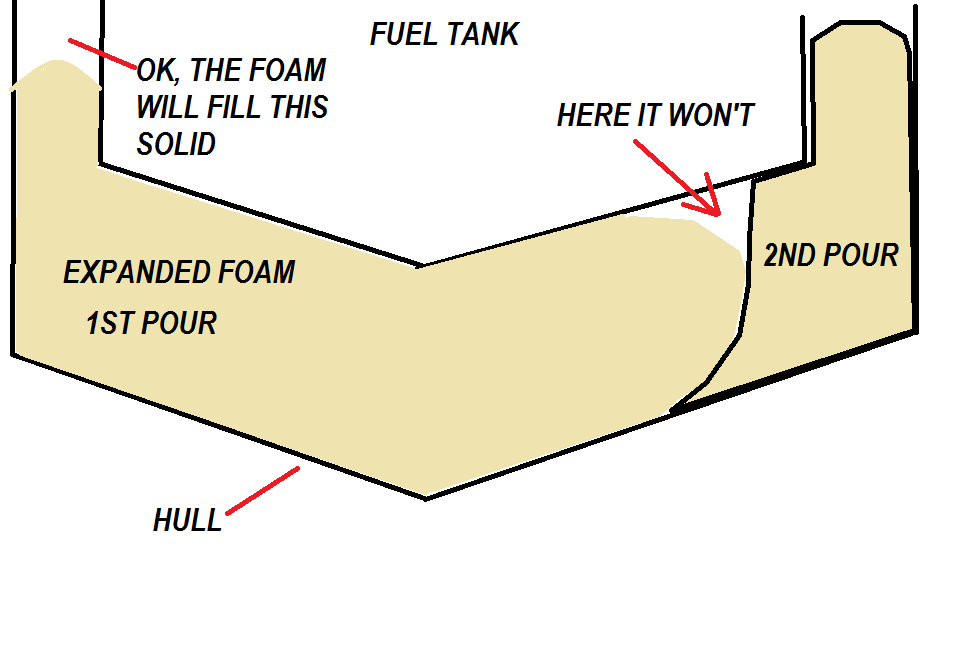
A note, if the previous pour of foam doesn't allow the the next pour to rise almost straight up to fill a cavity, in other words, creates a vertical dam, the next pour won't be able to rise up and wrap around the top of the previous pour...not sure if that makes total sense, but here is a quick sketch to try and clarify a bit better...


The best way to avoid the problem is to pour enough liquid foam to completely fill the bottom of the fuel tank in the first pour.
Afterwards you can cut off any excess, break up the foam into small pieces, so they don't go to waste, dump them back into any remaining space and foam around them with subsequent pours...
Hope this helps.
GT1M:)
 

tpenfield

Moderator
Staff member
Joined
Jul 18, 2011
Messages
18,092
Re: Formula 330SS Bulkhead Replacement

Hello Ted,
I have been quietly following along and gotta offer a huge attaboy on the work you are doing so far...
I also wanted to pop in and share my limited knowledge of the foaming issue.
The guns that are used by boat manufacturers to "spray" the foam is actually a specialized gun that mixes the foam right at the nozzle. This makes it possible to keep the hoses full of separate parts, A/B, and just clean the mixing nozzle portion...
The guy spraying it also has the past experience of several goof ups to learn just how much liquid to spray without wasting too much...
You should be just fine if you want to make several small pours of foam, until to fill the cavities around the fuel tank.
The foam adheres to itself perfectly well and pretty much finds almost any void it can to occupy...
A note, if the previous pour of foam doesn't allow the the next pour to rise almost straight up to fill a cavity, in other words, creates a vertical dam, the next pour won't be able to rise up and wrap around the top of the previous pour...not sure if that makes total sense, but here is a quick sketch to try and clarify a bit better...

The best way to avoid the problem is to pour enough liquid foam to completely fill the bottom of the fuel tank in the first pour.
Afterwards you can cut off any excess, break up the foam into small pieces, so they don't go to waste, dump them back into any remaining space and foam around them with subsequent pours...
Hope this helps.
GT1M:)

Thanks for the 'attaboy' GT !!! I definitely see the issues that you point out and getting a complete fill on the first pour is probably the best approach. In order to do that I will want to estimate/calculate with good accuracy the amount of cubic feet (cured foam) I will need to foam in the tank.. My rough calc's have it at around 14-16 cubic feet. So, I will probably factor that number up a bit . . . more in the 20 cubic feet range and re-purpose or dispose of any waste.

I am thinking about using a mixing nozzle, and feeding the two liquid 'parts' to the nozzle through hoses with about 5-10 lbs of pressure. I recall foaming in the tank on my 242 and the process of trying to quickly mix the foam and then pouring it in along the sides of the tank. Not really sure if it made it to the keel and if it had voids, etc. I'm hoping a pressurized spray will get the liquid down to the keel and then let it expand up the sides.

Still looking for a good video of a tank foaming though :noidea:
 

alldodge

Moderator
Staff member
Joined
Mar 8, 2009
Messages
42,346
Re: Formula 330SS Bulkhead Replacement

My water tank was WAY smaller then your tank. I used cans of stuff-it and attached semi hard tubing over the end of the tube coming from the can. Use the handy mans secret weapon (Red Green) duct tape to keep the two pieces together. Once the can was empty, unscrewed it off the can and screwed it back on another and continued.

You could start that way just to get it down low at the Vee, then go to mix and pour. Shouldn't need to be in a hurry except when mixing. Could foam in the bottom, let it set up or get close then do some more.
 

Woodonglass

Supreme Mariner
Joined
Dec 29, 2009
Messages
25,928
Re: Formula 330SS Bulkhead Replacement

Based on GTIM's pic, Logic says that if you poured simultaneously from both sides equal parts of the foam it should flow to the middle and fill to the sides and upward and therefore if you were a bit short on your calculations you would be ensured that the lower section would be full and both sides adequately filled to allow for the next pour to prevent any voids. Any way, that's just an Old Dumb Okie's observations on the subject!!!!:D
 

tpenfield

Moderator
Staff member
Joined
Jul 18, 2011
Messages
18,092
Re: Formula 330SS Bulkhead Replacement

I got the fuel tank up out of the fuel bay today. It took pretty much the whole day, but it is up on the sunpad now. I can lower it down to the ground next time I work on the boat.

Overall, the tank looked pretty good. I found a small pit in the base of the tank in the area were I spotted the void in the foam last time.

Here is a video of the day, I'll post some pics later.


tpenfield

Moderator
Staff member
Joined
Jul 18, 2011
Messages
18,092
Re: Formula 330SS Bulkhead Replacement

Here are some pictures from the day of removing the fuel tank from the boat.

First, I got 3 lines under the tank and used 2x4 lumber as 'lifting' levers. The deck hatch actually came in handy as a place to lift from using the 2x4's.
IMG_3724.jpg

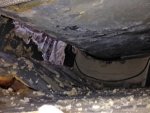
During the process of lifting the tank, I took this picture of the space underneath the tank . . . it looks like it separated fairly cleanly from the foam. That made it easier to take out, but also further indicates that it needs to be re-installed after being re-painted, etc.

Usually, foamed in tanks are much harder to take out than this, because the foam is supposed to stick to everything and not let go.
IMG_3714.jpg

Once I had the tank elevated to about deck height, I lifted the rear portion of the tank so that I could get some boards underneath, essentially making a 'ramp' for the tank.
IMG_3730.jpg

I used a couple of PVC pipes so that I could 'roll' the tank up the ramp that I created with the boards. This gave it very little friction, which is both 'good' and 'bad'.
IMG_3733.jpg IMG_3745.jpg

As I progressively lifted the tank, which proved to be quite heavy (or maybe I'm getting weaker), I used some 2x4 lumber to brace the tank

IMG_3736.jpg

At one point in the process, the tank flopped over and became unstable. So, I had to back it down the ramp and re-engineer things a bit. I also added a second 'safety line' around the lower end of the tank to give the tank a bit more stability, etc.

* * * continued on next post * * *
 
Last edited:

tpenfield

Moderator
Staff member
Joined
Jul 18, 2011
Messages
18,092
Re: Formula 330SS Bulkhead Replacement

The tank did finally make it out of the boat

IMG_3742.jpg

until it reached a point where I could lift it up onto the sunpad. . .

IMG_3746.jpg

This gave me a full look at the fuel tank bay . . .
IMG_3748.jpg

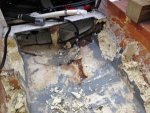
Lots of paint left behind. Only the forward face of the tank had the foam come with it. The rest separated via the paint.

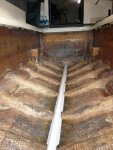
You can also see the bulkhead area that I removed at the outset of this project. Once I pull the remaining foam out of the fuel tank bay, I can then re-focus on the bulkhead. I will have to finish cutting the bulkhead remnants around the edges and also expose the butt end of the center stringer.

In parallel, I can work on inspecting, prepping and re-painting the fuel tank. Upon a quick inspection, I found only one area where there was a small pit in the early formation stages. Hopefully, that will be 'repairable'. The fact that the tank is 0.190" thick aluminum helps in that regard. My previous tank was only 0.125", which is more easily compromised.

I have been giving some thought to a revised installation method that will provide the benefits of foam installation, as well as an 'air channel' underneath the tank along the keel. I will post some drawings of this concept for comment.
 
Last edited:
tpenfield

Moderator
Staff member
Joined
Jul 18, 2011
Messages
18,092
Re: Formula 330SS Bulkhead Replacement

FUEL TANK INSTALLATION METHOD (Plan A):

Yea, so I have done some searching on the web and have reviewed various methods for installing aluminum fuel tanks in boats. Some of the methods that I found on forums, etc. were down-right wrong and inconsistent with USCG regulations.

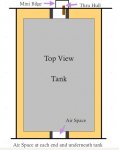
Here is what I am thinking about as a revised installation method for the tank. It is a blend of the 'foam' and the 'air space' methods. . .

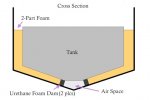
I would adhere some urethane foam strips along the belly and up the ends of the tank to create an 'air channel' long the keel, as diagrammed below. There would be a thru-hull in the bulkhead to the engine bay that can drain into its own separate 'mini bilge'. I could use a plug in the thru-hull, but it is possible that the plug could allow some leakage if it came loose or was not 100% water tight.

Here is a cross-section showing how the urethane foam dams would create an air space channel below the tank along the keel.
F330Tank1txt.jpg

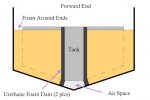
The urethane foam strips would be adhered to the tank before it is installed and secured into the fuel bay. These strips would act like a dam for the pour-in foam. The air space 'channel' created by the urethane foam strips would also go up the ends of the tank . . .
F330Tank1B.jpg

This would allow the foam to wrap around the corner of the tank, which would retain a fair amount of the strength/benefit of foam installation.

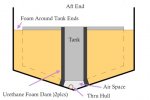
The aft end of the tank would be similar to the forward end, except there also would be a thru-hull that can drain into a mini-bilge.
F330Tank1C.jpg

Here is a top view of the installation, showing the two end channels . . .

F330Tank2A.jpg

Here is an isometric (sort of) diagram showing the tank and the urethane foam strips.

F330Tank3.jpg

The belly pieces would need some precise measuring for the cutouts for the ribs, etc. Positioning of these 2 foam strips on the tank would also need to be precise.

I'll want to do some research on the best adhesive(s) to use to secure the urethane foam strips to the tank so that they stay there and are very moisture proof.

Thoughts, comments on the installation idea ???
 
Last edited:

Top