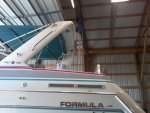
Formula 27PC Transom Work

Status
Not open for further replies.

alldodge

Moderator
Staff member
Joined
Mar 8, 2009
Messages
42,056
Tank removal day, hoist setup
Photo473.jpg

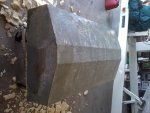
All that was holding it was on the starboard side bottom, and small area next to fuel fill
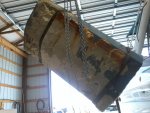
Photo474.jpg

Seadoo stand works pretty well, had about a gallon left n the tank
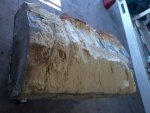
Photo476.jpg

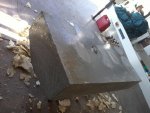
The worst spot is where I my saw was to close to the edge, least at the weld it is thickest. Maybe some JB Weld before painting
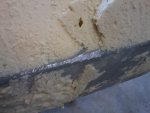
Photo477.jpg

All scraped off
Photo479.jpg

Photo480.jpg
 

tpenfield

Moderator
Staff member
Joined
Jul 18, 2011
Messages
18,040
Nice . . . Tank looks OK from afar, but you will want to give it a good close-up inspection for pits, etc. The paint certainly stuck well, which is probably why you had so much difficulty in getting the tank to come up out of the foam.

That saw cut along the side is a bummer. Hopefully, it will be OK.

What does the fuel bay look like now that it is opened up?
 

alldodge

Moderator
Staff member
Joined
Mar 8, 2009
Messages
42,056
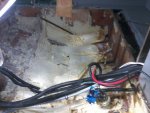
Fuel bat looks good, next to no moisture at all. Appears the water was concentrated next to the engine side
Photo478.jpg

Now some more bad news. The tank looks great all around except for the saw mark and the engine side. The pits are deep to my thinking. Depth gauge came up with .042 and .057. I will also say that the surface of the tank is not perfectly flat so variances are allowed. Figuring the tank is made from .125 (1/8) aluminum, there can be a spot or two which half the skin is gone.
Photo481.jpg

Photo482.jpg

Might be looking at a new tank
 

kcassells

Fleet Admiral
Joined
Oct 16, 2012
Messages
8,715
Those are some lousy pitts you have there. I had some on my tank when I removed it. Tried to "patch" weld it with some of that new doo-hickey stuff out there but made the tank "bloat" expand where the heat was applied. At the end of the day my salvage concern went towards safety so i'm into a new tank. Plastic or aluminum at this point. Whichever makes more sense.
I just did not want to have to dig the old tank back up after burying it to save a couple of bucks/safety.
 

Tail_Gunner

Admiral
Joined
Jan 13, 2006
Messages
6,237
Looking around at that nice shop and well appointed at that....then there is the boat.....Hmmm have ever thought about going thru that tank removal again? I vote new tank.:ranger:...carry on.
 

tpenfield

Moderator
Staff member
Joined
Jul 18, 2011
Messages
18,040
Check the tank label, if you have not done so already . . . it may be 0.190" thick aluminum (as my tank is). If it is only 0.125", then you are about 1/2 way through the metal.
 

alldodge

Moderator
Staff member
Joined
Mar 8, 2009
Messages
42,056
Tag was under some paint and it was manufactured in June 93, and thickness .125

Sure looks like new tank to me, sure don't want to spend the money but see no other safe way of doing it unless I find someone willing to weld, but then again, they don't put trailer hitches or luggage racks on a hurst
 

Scott Danforth

Grumpy Vintage Moderator still playing with boats
Staff member
Joined
Jul 23, 2011
Messages
49,548
I would just replace the one skin. then again, I have access to a bunch of welders and material.
 

alldodge

Moderator
Staff member
Joined
Mar 8, 2009
Messages
42,056
Scott, Have all kinds of folks around here which weld aluminum, but none willing to do a gas tank.

kcasselle, Tail Gunner, Agree don't want to dig it back out ever, but will go aluminum to reduce the chance of leaking water down the side.
 

tpenfield

Moderator
Staff member
Joined
Jul 18, 2011
Messages
18,040
+1 for the new tank. How far away is Florida Marine Tanks factory?
 

alldodge

Moderator
Staff member
Joined
Mar 8, 2009
Messages
42,056
+1 for the new tank. How far away is Florida Marine Tanks factory?

There now in Henderson NC

Looks like in the 2 weeks from last discussion the tank went up from 1096 to 1196, also to get the gray Ceramkote applied is an additional 200. So just sent authorization for 1396 and will be ready from 6 to 8 weeks
 

Tail_Gunner

Admiral
Joined
Jan 13, 2006
Messages
6,237
Hold on 1400 for that tank are you serious? Do you know of any HVAC sheet metal guy's in your area???
 

tpenfield

Moderator
Staff member
Joined
Jul 18, 2011
Messages
18,040
The price seems pretty good to me, as long as it is an identical tank (AD - you should verify that they have the exact drawings, etc. There may be a reference number on the label of your existing tank).

The tank has several internal bulkheads, plus an internal vent line, and the fuel pickups are internally angled so that they can be located on the starboard side. So, lots of details going on inside that tank. Plus painted.
 
Last edited:

alldodge

Moderator
Staff member
Joined
Mar 8, 2009
Messages
42,056
FMT makes the tanks for Formula and the 27PC. Formula sent me the tank drawing and FMT sent me theirs and they are the same with only slight variations in layout. I would post but it's a PDF and the system doesn't like it. The tank has 6 fittings and all in the bottom right corner.
1-gas fill
1-vent
1-return
3-fuel pickups
 

Attachments

  • 8083.pdf
    316.5 KB · Views: 2

Arawak

Chief Petty Officer
Joined
Aug 27, 2010
Messages
486
AllDodge said:
The worst spot is where I my saw was to close to the edge, least at the weld it is thickest. Maybe some JB Weld before painting

I'm curious, because I'm in the same "boat", so to speak... what are you planning to paint it with?

I have been looking at coal tar epoxy, but it's pretty pricey.
 

Arawak

Chief Petty Officer
Joined
Aug 27, 2010
Messages
486
Interesting. I have been contemplating what to do about my tank. It has some minor pitting on the bottom, where it sat in the bilge, and two large-ish pits where someone left tape on it. It's not leaking and the inside is clean shiny metal, so I'm not really wanting to drop $500+ to replace it. I'd like to fill the two bigger pits and then coat it with something that will prevent water from contacting it again. It will go back into a sealed compartment as well... I was thinking about foaming it in place, but your experience is making me reconsider that :)

I am currently contemplating using epoxy to glass 6oz cloth onto the bottom and sides but will wait until after I'm done the stringers to decide.
 

tpenfield

Moderator
Staff member
Joined
Jul 18, 2011
Messages
18,040
Interesting. I have been contemplating what to do about my tank. It has some minor pitting on the bottom, where it sat in the bilge, and two large-ish pits where someone left tape on it. It's not leaking and the inside is clean shiny metal, so I'm not really wanting to drop $500+ to replace it. I'd like to fill the two bigger pits and then coat it with something that will prevent water from contacting it again. It will go back into a sealed compartment as well... I was thinking about foaming it in place, but your experience is making me reconsider that :)

I am currently contemplating using epoxy to glass 6oz cloth onto the bottom and sides but will wait until after I'm done the stringers to decide.

There are some regulations and best practices when it comes to fuel tank installation, particularly aluminum tanks.

I will post some comments to your thread or send you a PM, so as not to distract from AllDodge's thread.
 

alldodge

Moderator
Staff member
Joined
Mar 8, 2009
Messages
42,056
Interesting. I have been contemplating what to do about my tank. It has some minor pitting on the bottom, where it sat in the bilge, and two large-ish pits where someone left tape on it. It's not leaking and the inside is clean shiny metal, so I'm not really wanting to drop $500+ to replace it. I'd like to fill the two bigger pits and then coat it with something that will prevent water from contacting it again. It will go back into a sealed compartment as well... I was thinking about foaming it in place, but your experience is making me reconsider that :)

I am currently contemplating using epoxy to glass 6oz cloth onto the bottom and sides but will wait until after I'm done the stringers to decide.

As Ted mentioned there are USCG regulations for tank installation. The only reason my tank failed is because water got in. If you build it to where the water stays out there shouldn't be an issue. I'm planning on it going back in as it was so not and try to figure out if the tank is in correctly. My main issue will be sealing it.
 
Status
Not open for further replies.
Top