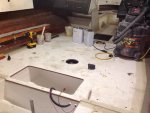
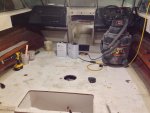
Chaparral 2000 SL Sport floor, and more?? [SPLASHED Sept 2017]

ripazka

Petty Officer 1st Class
Joined
Jul 30, 2016
Messages
246
Looking good!

Where did you find that blower? I need one aswell.
 

AShipShow

Lieutenant Commander
Joined
Jul 8, 2016
Messages
1,792
Chuck,

This thing is looking awesome... I'm late to the game but I've read through all the posts and this has been a great one to follow thusfar. Also, just realized I don't live too far away. I'm in York Co near Pinchot. I see your in Chambersburg, I spent 2 years of my life down at PSU Mont Alto. I love it down there. My family and I love going to Caledonia and Michaux to go for hikes. We were just down there last weekend to go for a hike at Long Pine Run Reservoir.
 

rad1026

Chief Petty Officer
Joined
May 1, 2006
Messages
443
Well Chuck, I have been reading back through your thread because I thought I was ready to install my transom assembly. My transom is not flat. I am going to have to grind, fill and re-gelcoat. Can you tell me WOG's fairing formula? You said, " I used WOGs formula of poly resin, phenolic bubbles, a little cabosil to bring it to the right consistency, and surfacing wax." Where did you get the phenolic bubbles?
 

rad1026

Chief Petty Officer
Joined
May 1, 2006
Messages
443
US Composites says their phenolic micro balloons are for epoxy resin only
 

rad1026

Chief Petty Officer
Joined
May 1, 2006
Messages
443
maybe its glass bubbles that you used? Says glass bubbles are for minor surface filling of small scratches and holes though, that doesn't sound like the right stuff?
 

Baylinerchuck

Commander
Joined
Jul 29, 2016
Messages
2,726
No Title

maybe its glass bubbles that you used? Says glass bubbles are for minor surface filling of small scratches and holes though, that doesn't sound like the right stuff?

Yes I used phenolic micro balloons for this and worked well. Like making peanut butter, the formula can be modified some. I use polyester resin, so the micro balloons worked fine. I posted Woodonglass original post below. It really worked well!
 

Attachments

  • photo265477.PNG
    photo265477.PNG
    366.8 KB · Views: 6

kcassells

Fleet Admiral
Joined
Oct 16, 2012
Messages
8,715
** Use with epoxy resins only** per spec.. whoops. At he end of the day enjoy the boat. Let's see if there are any other chimes ins. Can't really read wogs post.
 

Baylinerchuck

Commander
Joined
Jul 29, 2016
Messages
2,726
Chuck,

This thing is looking awesome... I'm late to the game but I've read through all the posts and this has been a great one to follow thusfar. Also, just realized I don't live too far away. I'm in York Co near Pinchot. I see your in Chambersburg, I spent 2 years of my life down at PSU Mont Alto. I love it down there. My family and I love going to Caledonia and Michaux to go for hikes. We were just down there last weekend to go for a hike at Long Pine Run Reservoir.

Well howdy neighbor. I used to live in York Springs and worked in Lewisberry, so I know exactly where you are. Though the Pinchot lake is electric only right? Where do you run the StingRay?
 

Woodonglass

Supreme Mariner
Joined
Dec 29, 2009
Messages
25,927
Here's the recipe...

Fairing Material Recipe

250ml of Unwaxed Polyester Resin
400ml of Glass Bubbles
Add Cabosil as needed to get the thickness you want
1 teaspoon of Surfacing Wax
1% MEKP
I like the Fairing Material to be like Mayonaise
You?ll have about 30 minutes to apply it, so don?t mix to much
For larges pathes double the mix but keep the MEKP ratio at 1%
 

AShipShow

Lieutenant Commander
Joined
Jul 8, 2016
Messages
1,792
Well howdy neighbor. I used to live in York Springs and worked in Lewisberry, so I know exactly where you are. Though the Pinchot lake is electric only right? Where do you run the StingRay?

Got it late last summer.. so far we've had it up to selinsgrove a few times, long level once and raystown once..
 

Baylinerchuck

Commander
Joined
Jul 29, 2016
Messages
2,726
No Title

Finally can post more progress. Was vacationing on a big ship in the carribean. I did get to see some really amazing off shore racing boats in Cocoa Beach Florida which was really cool. Any way, I had a foam order come in while I was away. I got cracking on the foaming this morning. I tried to minimize the amount of 2" holes in the deck by adding 1/2" relief holes. I was thinking the relief holes would allow the foam to expand into all the corners since any trapped air could get out. That idea flopped, and I ended up drilling a few more pour holes. The second side I only drilled pour holes up the center. This seemed to be the best method. I have two more small cavities to fill in the bow. I used the 4 pound foam.....this stuff is very rigid. I got a little carried away on one pour, and got a huge mushroom.
 

Attachments

  • photo266302.jpg
    photo266302.jpg
    91.6 KB · Views: 18
  • photo266303.jpg
    photo266303.jpg
    96.3 KB · Views: 18
  • photo266304.jpg
    photo266304.jpg
    97.7 KB · Views: 18

tpenfield

Moderator
Staff member
Joined
Jul 18, 2011
Messages
18,040
Finally can post more progress. Was vacationing on a big ship in the carribean. I did get to see some really amazing off shore racing boats in Cocoa Beach Florida which was really cool. Any way, I had a foam order come in while I was away. I got cracking on the foaming this morning. I tried to minimize the amount of 2" holes in the deck by adding 1/2" relief holes. I was thinking the relief holes would allow the foam to expand into all the corners since any trapped air could get out. That idea flopped, and I ended up drilling a few more pour holes. The second side I only drilled pour holes up the center. This seemed to be the best method. I have two more small cavities to fill in the bow. I used the 4 pound foam.....this stuff is very rigid. I got a little carried away on one pour, and got a huge mushroom.

That is the idea that we talked about via PM, right? I think in order for the 'air relief' holes to work, you have to pour in the center of the cavity, have the relief holes at the corners of the cavity and plug the 'pour' hole right after you pour.

Trying to minimize the number of pour holes probably defeated the purpose since you were not pouring in the middle of the cavities.
 

Baylinerchuck

Commander
Joined
Jul 29, 2016
Messages
2,726
That is the idea that we talked about via PM, right? I think in order for the 'air relief' holes to work, you have to pour in the center of the cavity, have the relief holes at the corners of the cavity and plug the 'pour' hole right after you pour.

Trying to minimize the number of pour holes probably defeated the purpose since you were not pouring in the middle of the cavities.

Correct, this was the idea. Perhaps implemented improperly on my account. The foam also seemed to want to mound up in the center of the pour instead of spreading out evenly. Since this was my first go with this pourable foam, I wasn't expecting it to mound. I just assumed that the foam would level and expand evenly. I also was very leery of mixing too much at one time. I mixed 40 oz. total at a time. I really didn't want to make a mistake and waste any. This stuff is quite pricey.
 
Top