86 Sea Ray Restoration [Splashed Oct 2017]

JASinIL2006

Vice Admiral
Joined
Feb 10, 2012
Messages
5,667
:welcome: Hey Merc, thanks for the tip, before its all said and done we're gonna be glassing celebrities :photo: out here stomping with the big dogs!!!:rolleyes: My problem was $$$, originally, i wanted to order extra fiberglass materials so i could practice before jumping on the boat. Unfortunately, Fiberglass Mats are high as a Giraffe's *** so i only got what was needed :D I have a bubble roller and a corner roller and honestly i haven't really used either one. I think we just have to ride out this learning curve, here are some tips for laying up 1708 that may help out newbies coming behind us...

UPDATED 06/14/14

These tips are not in order, just random thoughts to help out noobs...
  • wet out the chopped strand side before placing it, by dipping in disposable roasting pan or rolling out on card board
  • don't mix big batches that force you to rush causing mistakes, there's nothing wrong mixing up a pint and tabbing a few pieces at a time
  • have everything ready and in the boat before you drop in that hardener
  • prep your surfaces so that they are smooth and seemless, any gaps, dips and or raised areas are prone to trap air, imagine laying a blanket over a basket ball or over a hole in the ground, that area around the basketball and in the hole is air, air is fiber glasses worst enemy, well, maybe second, first would probably be mixing in the incorrect amount of hardener (mekp)
  • don't be embarrassed to mix it light, the more time you have the better
  • as much as you can roll from the inside out, don't just roll back and forth, roll with intent (to push air out from the middle to the edge)
  • when tabbing, the most crucial area to keep air free is the part of the tab that lays on the boat
  • fillet transitions should swoop or curve, no angles
  • dip for fingers in resin, hold the right side of air area with right hand to keep it stationary, then use the left hand fingers to smooth out the air pockets from right to left, sometimes you can finger smooth with one hand, sometimes you cant, usually on flat areas you can but complex corners and areas as such you will most likely need two hands
  • when you wet out the chopped strand side, let it set for a minute or two, then be advised that once its wetted out be careful how you handle it as it will stretch out
thanks to Tp for the dipping idea
thanks to George for the carboard idea

I will try to update and refine this list as i go, all you gurus out there can help me tweak it (add or subtract from it) I think it would really help out new noobs coming in :cool:

One tip I learned here that helped a LOT was to brush over fillets before they harden with some catalyzed resin. I used a chip brush. The resin smooths out the surface of the fillets, leaving no 'craggies' or snags that cause air bubbles when you tab over the fillets. It's much easier and quicker than sanding/grinding before tabbing.
 

Goldie627

Lieutenant Junior Grade
Joined
Oct 28, 2013
Messages
1,010
1708 Layup Tips & Tricks

UPDATED 06/16/14

These tips are not in order, just random thoughts to help out noobs...
  • Wet out the chopped strand side before placing it, by dipping in disposable roasting pan or rolling out on card board
  • Don't mix big batches that force you to rush causing mistakes, there's nothing wrong mixing up a pint and tabbing a few pieces at a time
  • Have everything ready and in the boat before you drop in that hardener
  • Prep your surfaces so that they are smooth and seemless, any gaps, dips and or raised areas are prone to trap air, imagine laying a blanket over a basket ball or over a hole in the ground, that area around the basketball and in the hole is air, air is fiber glasses worst enemy, well, maybe second, first would probably be mixing in the incorrect amount of hardener (mekp)
  • Don't be embarrassed to mix it light, the more time you have the better
  • As much as you can roll from the inside out, don't just roll back and forth, roll with intent (to push air out from the middle to the edge)
  • When tabbing, the most crucial area to keep air free is the part of the tab that lays on the boat
  • Fillet transitions should swoop or curve, no angles
  • Dip your fingers in resin, hold the right side of air area with right hand to keep it stationary, then use the left hand fingers to smooth out the air pockets from right to left, sometimes you can finger smooth with one hand, sometimes you cant, usually on flat areas you can but complex corners and areas as such you will most likely need two hands
  • When you wet out the chopped strand side, let it set for a minute or two, then be advised that once its wetted out be careful how you handle it as it will stretch out
  • Brush over fillets before they harden with some catalyzed resin, the resin smooths out the surface of the fillets, leaving no 'craggies' or snags that cause air bubbles when you tab over the fillets. It's much easier and quicker than sanding/grinding before tabbing.
  • Take care not to over roll it. Once it's down, flat, and clear, you're done. No more rolling needed. Move on.
  • For tight spaces use a little 4" or even a 2" wallpaper roller works well in tight spaces
thanks to Tp for the dipping idea
thanks to George for the carboard idea
thanks to Woodonglass for the over rolling warning and smaller rollers tip
thanks to JASinIL2006 for the catalized resin over fillets tip
thanks to Friscoboater for the having everything ready tip

I will try to update, refine and re-post this list as I go, all you gurus out there can help me tweak it (add or subtract from it) I think it would really help out noobs coming in :cool:
 

Goldie627

Lieutenant Junior Grade
Joined
Oct 28, 2013
Messages
1,010
Yup...Nice Job!! Work from the middle out to push the air to the edges. You're figuring it out!!!! A little 4" or even a 2" wallpaper roller works well in tight spaces.
mini-2-paint-roller-frame-785-p.jpg


Take care not to over roll it. Once it's down, flat, and clear, you're done. No more rolling needed. Move on. Are you going to cover the entire Transom with a full layer of 1708?

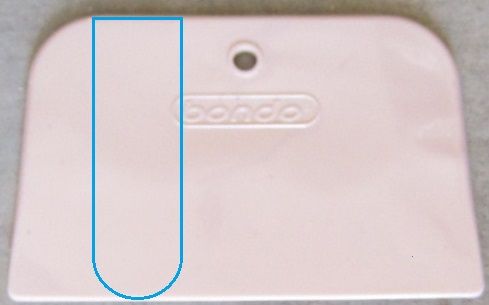
When it comes time for the Stringers and bulkheads take a Bondo Spreader and cut out a "Tongue Depressor" Shaped piece to make your fillets. Make it about 1 1/2" wide. Works Just like "Betty Crocker"!!!:lol:

I really want to do 1 layer of 1708 over the entire transom followed by 1 layer of 1.5 CSM. I must say though im a little intimidated by laying up such large pieces. I know you said to tape the top to hold it in place but i would appreciated a few more details. Also how far down on the bottom hull (bilge area) does that full layer piece come?
 

Goldie627

Lieutenant Junior Grade
Joined
Oct 28, 2013
Messages
1,010


Day 46 Clip 1 Prepping Transom For 2nd Tabbing
 
Last edited:

Goldie627

Lieutenant Junior Grade
Joined
Oct 28, 2013
Messages
1,010


Day 46 Clip 2 Laying Up 2nd Transom Tabbing
 
Last edited:

tpenfield

Moderator
Staff member
Joined
Jul 18, 2011
Messages
18,038
Goldie . . . just a few pointers, if I may.

A large disposable baking tray would be so much more effective than trying to wet out the fiberglass by pouring it out over the glass cloth.. You'll be done in 1/2 the time with much less rolling, etc.

I just pour the resin into the tray and then dip the pieces in and let'em soak up the resin for a minute or so.. Additionally, the resin will generate less of its own heat if poured out in a tray versus remaining in the mixing cup

You are doing a good job, it just that with an entire boat worth of structure to go, you will need to have a faster method of effectively wetting out the glass.
 
Last edited:

Goldie627

Lieutenant Junior Grade
Joined
Oct 28, 2013
Messages
1,010
Goldie . . . just a few pointers, if I may.

A large disposable baking tray would be so much more effective than trying to wet out the fiberglass by pouring it out over the glass cloth.. You'll be done in 1/2 the time with much less rolling, etc.

I just pour the resin into the tray and then dip the pieces in and let'em soak up the resin for a minute or so.. Additionally, the resin will generate less of its own heat if poured out in a tray versus remaining in the mixing cup

You are doing a good job, it just that with an entire boat worth of structure to go, you will need to have a faster method of effectively wetting out the glass.
Thanks for the acknowledgment and advice. I really like your wet out method and I will use it again, however, the only down side is that for me, the 1708 pieces seem to have excessive stretching when I pick them up out of the resin tray to place them. Maybe its the way I'm picking up the pieces, i'll figure it out the next time I try your wet out method.
 

tpenfield

Moderator
Staff member
Joined
Jul 18, 2011
Messages
18,038
I found that the 1708 pieces were OK to handle as compared to Woven Roving or Chopped Strand Mat (CSM), because the stitching holds them together. Anyway, whatever method works for you.

The key is to get a good wetting of the glass so that it is highly transparent. If the glass is not wetted enough, then it could delaminate, particularly in the high stress areas, like the stringers and bulkhead joints.
 

Goldie627

Lieutenant Junior Grade
Joined
Oct 28, 2013
Messages
1,010
I found that the 1708 pieces were OK to handle as compared to Woven Roving or Chopped Strand Mat (CSM), because the stitching holds them together. Anyway, whatever method works for you.

The key is to get a good wetting of the glass so that it is highly transparent. If the glass is not wetted enough, then it could delaminate, particularly in the high stress areas, like the stringers and bulkhead joints.
Yea, 1708 is in fact ok, but... for me it stretched alot. Its probably the way I picked up the wet cloth. We'll see what happens when I layup the stringers with the dipping method. Stay tuned :cool:
 

Goldie627

Lieutenant Junior Grade
Joined
Oct 28, 2013
Messages
1,010
Goldie, You need to "Pin" yourself on the iBoats Map... iBoats Members Map
I'm added ;), hey wood please read post 203# or just answer this question please, im going to the boat this afternoon after work to layup my entire transom cover piece, 1 1708 and 1 csm, they cover the entire transom but how far onto the bottom of the boat do the come? Are those pieces supposed to come down off the transom and overlap my bottom tabbing thats laying on the floor? Thanks
 
Last edited:

JASinIL2006

Vice Admiral
Joined
Feb 10, 2012
Messages
5,667
I'm not Woodonglass, but I did sleep in a Holiday Inn recently... :D

When I covered my transom, I allowed the first layer to overlap on all edges about 6" and the second layer about 10". I assumed the more you're tying together the transom to the hull, the better. The only place I couldn't do so was on two bumpouts molded into the fiberglass hull on the upper part of the transom.

Good luck!
 

Goldie627

Lieutenant Junior Grade
Joined
Oct 28, 2013
Messages
1,010
Hey JASinIL2006, that was hilarious :lol: "sleeping in a holiday inn" it must be a inside joke but it sure sounds funny, thanks for the quick reply but I didn't make it to the boat today. :grumpy: I was offered some extra overtime in addition to my built in overtime, was a sweet piece of work, they made me an offer I couldn't refuse :nod:. So this weekend im going to be a boat building fool!! Im gonna go hard all this weekend and get as much as I can accomplished.

Thanks for the advise
 

Goldie627

Lieutenant Junior Grade
Joined
Oct 28, 2013
Messages
1,010
I picked up my paint this week, I really wanted Valspar but availability was sparse at best, so I settled for Majic. TSC had everything I needed but the clear. I will document my experience with this paint as I go through the process. The exterior hull and trailer painting is probably three weeks away as i must first get these stringers bedded in before i go jacking up the boat and or putting pressure anywhere on the bottom.
 

Woodonglass

Supreme Mariner
Joined
Dec 29, 2009
Messages
25,927
JASinIL2006 is "Spot On" 6" and 10" would be Perfectamundo!!! You can order the TSP Clear Coat Online!!!
 

tpenfield

Moderator
Staff member
Joined
Jul 18, 2011
Messages
18,038
Hey JASinIL2006, that was hilarious :lol: "sleeping in a holiday inn" it must be a inside joke but it sure sounds funny. . . .

It is from the Holiday Inn commercials of quite a few years ago . . . I notice that they don't run those anymore :noidea:
 

Georgesalmon

Lieutenant Commander
Joined
Apr 14, 2012
Messages
1,793
FWIW, I agree that you should run the transom glass min of 6" onto the sides and bottom of the hull. Always overlap edges of glass at least 2" on each layer. The transom to hull joint is important so that's why 6", next layer 2" or 4" farther.
 
Top