77 Starcraft Holiday 18 i/o - rebuild with pics galore

sprintst

Commander
Joined
Apr 18, 2009
Messages
2,066
Re: 77 Starcraft Holiday 18 i/o - rebuild with pics galore

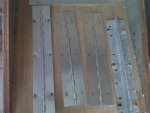
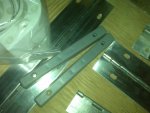
I've got some pics. The hinges came in today from Veada...fast shipping. The new hinges are the same thickness and a bit wider which is good as I don't want the holes too close to the edge of the seats.

I also received the cooler blocks and bungees that let you attach a cooler to the deck so it doesn't bounce around.
 

Attachments

  • IMG00623 (Medium).jpg
    IMG00623 (Medium).jpg
    51.8 KB · Views: 1
  • IMG00624 (Medium).jpg
    IMG00624 (Medium).jpg
    51.9 KB · Views: 1
  • IMG00633 (Medium).jpg
    IMG00633 (Medium).jpg
    56.4 KB · Views: 1
  • IMG00632 (Medium).jpg
    IMG00632 (Medium).jpg
    55.3 KB · Views: 1

sprintst

Commander
Joined
Apr 18, 2009
Messages
2,066
Re: 77 Starcraft Holiday 18 i/o - rebuild with pics galore

I also recoated my old yucky tarp with canvas waterproofing. I used a spray bottle to saturate the tarp as the paint brush approach was taking way too long. My work was cut short as something wicked this way comes.

I also got some shots of the tarp eyelets that I replaced.

Wed. is actual boat work...
 

Attachments

  • IMG00627 (Medium).jpg
    IMG00627 (Medium).jpg
    44.2 KB · Views: 0
  • IMG00628 (Medium).jpg
    IMG00628 (Medium).jpg
    38.1 KB · Views: 0
  • IMG00631 (Medium).jpg
    IMG00631 (Medium).jpg
    60.6 KB · Views: 0
  • IMG00629 (Medium).jpg
    IMG00629 (Medium).jpg
    40 KB · Views: 0
  • IMG00630 (Medium).jpg
    IMG00630 (Medium).jpg
    34.2 KB · Views: 0

sprintst

Commander
Joined
Apr 18, 2009
Messages
2,066
Re: 77 Starcraft Holiday 18 i/o - rebuild with pics galore

I need to focus on getting the transom done and soon. Also wondering on the best way to close up any screw holes in the hull. Seems JB Weld is the way to go.

I also got the boat home and measured out the location of the speaker holes in the gunwale supports. I'll cut and epoxy the openings tomorrow.

I also bought a boat dash from an 83 Starcraft that is made of alum. I'll see if I can frame out the dash to support the alum or make a new one if this doesn't work. Worst case I've got some more guages and switches. At least this can be painted to match the boat.
 

Attachments

  • new dash (Medium) (Medium).jpg
    new dash (Medium) (Medium).jpg
    40.5 KB · Views: 3
  • newdash1 (Medium).jpg
    newdash1 (Medium).jpg
    54.6 KB · Views: 3
  • newdash3 (Medium).jpg
    newdash3 (Medium).jpg
    36.2 KB · Views: 3
  • newdash4 (Medium).jpg
    newdash4 (Medium).jpg
    41.5 KB · Views: 3
  • IMG00636 (Medium).jpg
    IMG00636 (Medium).jpg
    77.5 KB · Views: 3

BobsGlasstream

Commander
Joined
Sep 11, 2009
Messages
2,128
Re: 77 Starcraft Holiday 18 i/o - rebuild with pics galore

sprintst,
Looking good, I really like that new dash.
Nice job.
Bob
 

wrfalpacas

Chief Petty Officer
Joined
May 1, 2009
Messages
486
Re: 77 Starcraft Holiday 18 i/o - rebuild with pics galore

Nice Dash:eek::D, I agree on the JB Weld for screw holes.
 

sprintst

Commander
Joined
Apr 18, 2009
Messages
2,066
Re: 77 Starcraft Holiday 18 i/o - rebuild with pics galore

I took a longer look at the stern area of the boat and is there ever a lot of holes drilled. What kind of jacka** makes swiss cheese of the one area you can't get at.

I'll fill the holes with JB Weld and put a piece of starboard over the area slathered in 5200 to cover the previously mounted pitot tubes, transducer, etc.

I'm still debating running a dash speedo or going all electonic as it's more accurate anyway.
 

ezmobee

Supreme Mariner
Joined
Mar 26, 2007
Messages
23,767
Re: 77 Starcraft Holiday 18 i/o - rebuild with pics galore

Ditch the speedo. I did. They aren't worth the holes or the trouble.
 

HopeSheFloats

Lieutenant Commander
Joined
Jun 12, 2009
Messages
1,674
Re: 77 Starcraft Holiday 18 i/o - rebuild with pics galore

Nice score on the dash, hope it works out for ya...:cool:

Speedometer's are useless, there's only two speeds on a boat anyways...stop or wide open :D
 

ezmobee

Supreme Mariner
Joined
Mar 26, 2007
Messages
23,767
Re: 77 Starcraft Holiday 18 i/o - rebuild with pics galore

Actually the original Starcraft one that came hooked up on my SS was dead on accurate during our sea trial. Still don't need one though.
 

sprintst

Commander
Joined
Apr 18, 2009
Messages
2,066
Re: 77 Starcraft Holiday 18 i/o - rebuild with pics galore

True. My sentiments are that I go electronic so I don't have the swiss cheese probelms.

The only nagging thing is someone will come onboard and say "Hey...your speedometer doesn't work" and I will have to hold them under water until the bubbles stop :)
 

CheapboatKev

Vice Admiral
Joined
Oct 4, 2008
Messages
5,813
Re: 77 Starcraft Holiday 18 i/o - rebuild with pics galore

True. My sentiments are that I go electronic so I don't have the swiss cheese probelms.

The only nagging thing is someone will come onboard and say "Hey...your speedometer doesn't work" and I will have to hold them under water until the bubbles stop :)

LOL!!!! If ya install a bait tank...................
 

sprintst

Commander
Joined
Apr 18, 2009
Messages
2,066
Re: 77 Starcraft Holiday 18 i/o - rebuild with pics galore

Nice score on the dash, hope it works out for ya...:cool:

Speedometer's are useless, there's only two speeds on a boat anyways...stop or wide open :D

I hope the dash works out too.. Odds are it will be too wide, the angles will require a dash reframing, etc. If it does work out it then it will be sweet as it will be painted to match the boat with new trim rings, etc.
 

SKIBUM1M

Chief Petty Officer
Joined
Jul 17, 2009
Messages
604
Re: 77 Starcraft Holiday 18 i/o - rebuild with pics galore

Sprintst, looking good. How long till its ready for water? Ive been so busy with the boat I havent had time to keep up with other threads
 

sprintst

Commander
Joined
Apr 18, 2009
Messages
2,066
Re: 77 Starcraft Holiday 18 i/o - rebuild with pics galore

I'm hoping a month or less. The transom will go in the next week or so. The engine has been rebuilt and the leg has been double checked and I have supplied all new seals, hoses, carb, transom kit (gimbal bearings, bellows, etc.)

I also have the parts for the gas tank, hoses, seals, fittings, etc so I should be ready to go. The day it goes in for the engine and leg work then the wood will go in for upholstery.

I'm being optimistic but I will fish in this thing in a lawn chair if I have to. The dash stuff can wait until later.

I still have to look up in all the threads I have been following who got their electrical harnesses and wiring redone. One dude sent off their harness for a rewire and he got it back in all the right color code, the right guage, etc and a great price.
 

SKIBUM1M

Chief Petty Officer
Joined
Jul 17, 2009
Messages
604
Re: 77 Starcraft Holiday 18 i/o - rebuild with pics galore

I rewired mine myself. It wasnt hard at all. If you are interested Ill give you my email and I can walk you thru it
 

sprintst

Commander
Joined
Apr 18, 2009
Messages
2,066
Re: 77 Starcraft Holiday 18 i/o - rebuild with pics galore

I might take you up on that. I have the diagrams and color codes but the guy who sent it off got it done for what I can buy the wire for. I'll see if I can dig that up in the next day or so and then I start it myself.
 

BobsGlasstream

Commander
Joined
Sep 11, 2009
Messages
2,128
Re: 77 Starcraft Holiday 18 i/o - rebuild with pics galore

Hey sprintst,
Just a couple notes, If some one says your speedo doesn't work just hook the bilge to a respirator that way you don't even have to get your hands wet. :D
I hope that you get everything done it the time frame you have planned.
If you can get it rewired for less then it would cost you for the wire that's the way to go. But if not it's really not that hard to do yourself.
Keep it rolling.
Bob
 

sprintst

Commander
Joined
Apr 18, 2009
Messages
2,066
Re: 77 Starcraft Holiday 18 i/o - rebuild with pics galore

I finally started with the whole work smarter not harder approach. I slid my rub rail guide forward one side at a time. I used a tip from the forum and unbolted a section of my rear rub rail guide just enough to get at rivets holding the rear top cap. I drilled out the rivets on each side at she slid right out.

There still is the question of what to do with the overlap onto the transom from the transom supports. I'll just bend these tabs up instead of cutting. I'll just hammer them down flat after the transom is in as this piece supports the weight of who's on the rear top cap.
 

Attachments

  • IMG00644 (Medium).jpg
    IMG00644 (Medium).jpg
    53.6 KB · Views: 3
  • IMG00645 (Medium).jpg
    IMG00645 (Medium).jpg
    85.5 KB · Views: 3
  • IMG00646 (Medium).jpg
    IMG00646 (Medium).jpg
    40.1 KB · Views: 3
  • IMG00647 (Medium).jpg
    IMG00647 (Medium).jpg
    78.8 KB · Views: 3
  • IMG00649 (Medium).jpg
    IMG00649 (Medium).jpg
    72.9 KB · Views: 3
Top