77' 16ft Starcraftt ss

classiccat

"Captain" + Starmada Splash Of The Year 2020
Joined
Dec 20, 2010
Messages
3,412
Rehab is coming along nicely! :thumb:

Did your SS & my SS have the same P.O.? :facepalm:

I assume that this is under the knee-brace tab?

fetch


If so, fixing this is definitely on the upper-half of the suckometer (but still fun!) if you want to make it bomb-proof :madgrin:

involves removing the knee brace, removing the corrosion, cleaning/treating the surface & filling. Then hit it with an external patch.

Good Luck and Have Fun!
 

GoldDuster360

Petty Officer 2nd Class
Joined
Feb 2, 2015
Messages
110
Rehab is coming along nicely! :thumb:

Did your SS & my SS have the same P.O.? :facepalm:

I assume that this is under the knee-brace tab?

fetch


If so, fixing this is definitely on the upper-half of the suckometer (but still fun!) if you want to make it bomb-proof :madgrin:

involves removing the knee brace, removing the corrosion, cleaning/treating the surface & filling. Then hit it with an external patch.


Good Luck and Have Fun!

Anybody hand any luck welding up holes like that?
 

g0nef1sshn

Lieutenant
Joined
Feb 24, 2015
Messages
1,291
Rehab is coming along nicely! :thumb:

Did your SS & my SS have the same P.O.? :facepalm:

I assume that this is under the knee-brace tab?

fetch


If so, fixing this is definitely on the upper-half of the suckometer (but still fun!) if you want to make it bomb-proof :madgrin:

involves removing the knee brace, removing the corrosion, cleaning/treating the surface & filling. Then hit it with an external patch.


Good Luck and Have Fun!


you hit the nail on the head. two of the holes and the one rivets is the port side knee brace rivet line. Pics coming up.

Due to the amount of time I actually get to work uninterrupted with an almost 1 and almost 3 year old, Military, and HOA requiring this boat to be hiding in the garage, it'll be fun and an ongoing procedure.

I wanted it to be ready for water by next duck season, but i am looking forward to the learning cure ahead of me.
 

g0nef1sshn

Lieutenant
Joined
Feb 24, 2015
Messages
1,291
This is some king of caulk that was between transom wood and the inside of the transom. where it was bubbling there was corrosion with that with powdery stuff. took some time today to clean this side up some. there was some previous jb weld patching going on also, when cleaning it up i found this hole.


1.jpg 2.jpg


Pic of hole from outside transom. Its not huge, but the pitting on the inside can make it bigger quick.

2.1.jpg


I sprayed some napa stripper over the white caulk then used a wood chisel and scraped off majority of it. then started with the 3m disc on the drill.

3.jpg 4.jpg


There is pitting on the inside transom.

5.jpg


The through hole I found going through old jb weld type material.

6.jpg


Here is the part that I may or may not enjoy, only because I never have all day in one shot to really focus on it. pic explains it.


7.jpg 8.jpg 9.jpg


The pressure washer did take this stuff off and I wasnt gonna worry about it, but that leaky bastard pin hole was in stuff like this, sooooo. time for more clean up and sure enough the is pitting under this crap.


10.jpg

Looks like ill be removing more than planned to get this inside hull cleaned up right.

11.jpg

Cleaned shot around my enemy.

12.jpg
 

classiccat

"Captain" + Starmada Splash Of The Year 2020
Joined
Dec 20, 2010
Messages
3,412
I think my rotten-hull has met it's match! :eek:

Did the PO try to repair the holes from the outside...squirting schmutz into the corrosion holes?

Check out using a Nyalox Orange (not blue...too weak) cupped brush for removing the crud; they're great for preserving aluminum (including rivets) and remove the corrosion...selective.

51HnvfR1wEL._SY355_.jpg
 

g0nef1sshn

Lieutenant
Joined
Feb 24, 2015
Messages
1,291
C cat I get too into your resto and rivets and patches and my ears smoke. I will be asking you a lot of questions.

To start, how exactly did you remove the rivets to the knee brace? did you chisel the inside off and drill through the rest?

what type of rivets are those sticking out of all your pics?

I just asked a buddy about a price for aluminum same thickness as the transom 68" x 17 1/2" for the transom and he ball parked 40$. that seems legit right?
 

Watermann

Starmada Splash of the Year 2014
Joined
Jan 12, 2013
Messages
13,787
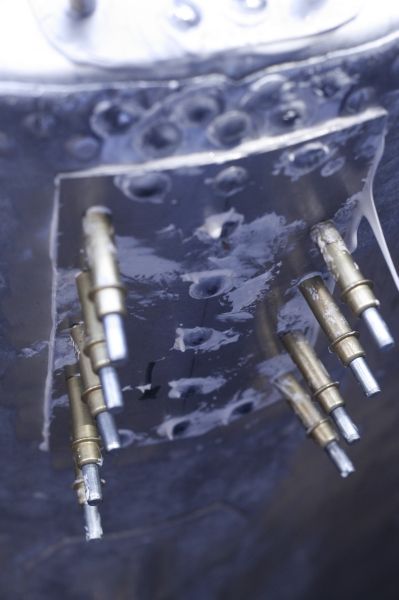
Those things sticking out are called Clecos and every serious tinner should have a set!

Normally the SC AL transom thickness is .100 and the bottom is .080
 

g0nef1sshn

Lieutenant
Joined
Feb 24, 2015
Messages
1,291
Those things sticking out are called Clecos and every serious tinner should have a set!

Normally the SC AL transom thickness is .100 and the bottom is .080

Thanks watermann, just watched a video on them, they make sense now. Ill find out tomorrow what the cost is for the AL patch I asked about. I took a pic of the transom width against a tape measure and he guessed it at .09. If its at 40$ for the size I need I think itll be good.
 

dozerII

Admiral
Joined
Oct 25, 2009
Messages
6,527
You can get a real nice 25 piece set of 3/16 Clecos with the tool on Ebay for under $25.00
 

classiccat

"Captain" + Starmada Splash Of The Year 2020
Joined
Dec 20, 2010
Messages
3,412
C cat I get too into your resto and rivets and patches and my ears smoke. I will be asking you a lot of questions.

To start, how exactly did you remove the rivets to the knee brace? did you chisel the inside off and drill through the rest?

what type of rivets are those sticking out of all your pics?

I just asked a buddy about a price for aluminum same thickness as the transom 68" x 17 1/2" for the transom and he ball parked 40$. that seems legit right?

Good/clean rivet removal is really important. I probably documented 5 different methods in my thread as I learned. The best way I've found is to core-out the rivet stem...using a drill smaller than the rivet hole (for a 3/16, stay below 5/32") so you don't elongate the rivet hole, use a chisel to pop-off the bucktail or head, then punch-out the rivet. I like going from the bucktail side because there's less risk of the bit drifting and damaging the hull skin. I stop drilling just when I clear the bucktail. Once you chisel off the bucktail, then you can resume drilling now that you know where the center of the hole is. The best is when you see the rivet start spinning as you drill...then you know that it lost its grip and isn't going to distort the hull skin when you punch it out.


The knee-brace is tricky since you can't drill a good hole from the bucktail side, so it would be best to core-it from the outside...it's really important to get that hole centered. If you can see the dimple, you already know where center is. If the dimple was rubbed-off (i.e. from sanding), then don't go higher than 1/4" bit size, then chisel-off the rivet head; this way you'll be able to see the rivet stem...now you have a clear shot at removing as much rivet material without damaging the hull skin.

+1, The Starmada was made aware of Clecos a little over a year ago (Thanks Astor!) and now I bet every member has (or will have) a set!
 

dozerII

Admiral
Joined
Oct 25, 2009
Messages
6,527
Good/clean rivet removal is really important. I probably documented 5 different methods in my thread as I learned. The best way I've found is to core-out the rivet stem...using a drill smaller than the rivet hole (for a 3/16, stay below 5/32") so you don't elongate the rivet hole, use a chisel to pop-off the bucktail or head, then punch-out the rivet. I like going from the bucktail side because there's less risk of the bit drifting and damaging the hull skin. I stop drilling just when I clear the bucktail. Once you chisel off the bucktail, then you can resume drilling now that you know where the center of the hole is. The best is when you see the rivet start spinning as you drill...then you know that it lost its grip and isn't going to distort the hull skin when you punch it out.


The knee-brace is tricky since you can't drill a good hole from the bucktail side, so it would be best to core-it from the outside...it's really important to get that hole centered. If you can see the dimple, you already know where center is. If the dimple was rubbed-off (i.e. from sanding), then don't go higher than 1/4" bit size, then chisel-off the rivet head; this way you'll be able to see the rivet stem...now you have a clear shot at removing as much rivet material without damaging the hull skin.

+1, The Starmada was made aware of Clecos a little over a year ago (Thanks Astor!) and now I bet every member has (or will have) a set!

I sacrificed a very sharp and moderately expensive wood chisel to rivet removal, carefully put the flat side against the hull at the edge of the rivet, a light tap with a hammer and the head is gone, then a 1/8" flat punch will tap out the buck-tail shank.
 

g0nef1sshn

Lieutenant
Joined
Feb 24, 2015
Messages
1,291
Do I have to use solid rivets for the through hull patch at the knee brace or will pop rivets work? I dont have the tools for those hammer down ones. I could always ask around to borrow if I have to.

My gluvit arrived tonight too. I wont get to that for awhile yet. I gues its time to order some clecos and more rivets before the wife lady repo's the plastic.


Woohoo, Clecos on order be here in a week.

Back to the rivets though, So I want 3/16's closed end rivets right? when Im trying to order some of these there are so many different measurements to them I not sure exactly which one Ill need. Anyone have a link to a full kit of them so I know Ill be in the ball park of the right product.

I guess ill also look for some closed end ones also. which are the right ones for the through hull patches?

I appreciate your help guys.
 
Last edited:

classiccat

"Captain" + Starmada Splash Of The Year 2020
Joined
Dec 20, 2010
Messages
3,412
pop rivets (even closed-end) are not recommended. They're OK in a pinch however I'd consider them temporary especially for a structural application below the waterline like a knee-brace. A solid rivet expands and fills the hole with aluminum while compressing the pieces together.

3/16" brazier-head solid rivets in 1/2" and 5/8" length...the longer they are, the more they have the tendency to fold-over on you. If you have even a small air compressor, you're half-way there. You'll need a riveting hammer, a piece of steel (for bucking), a rivet-set (that goes into the air hammer) and a buddy :)
 

g0nef1sshn

Lieutenant
Joined
Feb 24, 2015
Messages
1,291
pop rivets (even closed-end) are not recommended. They're OK in a pinch however I'd consider them temporary especially for a structural application below the waterline like a knee-brace. A solid rivet expands and fills the hole with aluminum while compressing the pieces together.

3/16" brazier-head solid rivets in 1/2" and 5/8" length...the longer they are, the more they have the tendency to fold-over on you. If you have even a small air compressor, you're half-way there. You'll need a riveting hammer, a piece of steel (for bucking), a rivet-set (that goes into the air hammer) and a buddy :)

Solid rivets it is. Is modified brazier head the same? I just went on two sites, Rivetonline wouldnt display any solid aluminum rivets, and fastenal didnt show both sizes. Ill take a break from looking for those tonight.

Im gonna look into a hobby automotive shop on ft. stewart. They have everything needed to work on cars, they should have the same tools for riveting stuff. Ill just have to trailer the boat in to work on it when I get to that point. I dont have a compressor (yet). I keep my eye out on Clist. but never usually pull the trigger.
 

64osby

Admiral
Joined
Jul 28, 2009
Messages
6,816
You can set solid rivets with a hammer and a backer. It is not as easy and doesn't have the Tim Taylor cool tool factor.
 

classiccat

"Captain" + Starmada Splash Of The Year 2020
Joined
Dec 20, 2010
Messages
3,412
Solid rivets it is. Is modified brazier head the same? I just went on two sites, Rivetonline wouldnt display any solid aluminum rivets, and fastenal didnt show both sizes. Ill take a break from looking for those tonight.

Im gonna look into a hobby automotive shop on ft. stewart. They have everything needed to work on cars, they should have the same tools for riveting stuff. Ill just have to trailer the boat in to work on it when I get to that point. I dont have a compressor (yet). I keep my eye out on Clist. but never usually pull the trigger.

Wow! Ft. Stewart! :cool: I spent a few years at Ft. Stewart ('91-'93)...back when it was 24th I.D. as an 11-Mike. Thank you for your service!!

Regarding the rivets...thats them! Here's a Link. Many of the rivets holding seams together & such are 5/32"...so having a good mix of 3/16 & 5/32.

There are 2 grades offered. 1100 and 2117T4. The 1100's are a little softer but are pure. The 2117T4s are harder but alloyed...and do contain some copper. I used 1100 as the copper scared me away.

However, If i were to do it over again, I would probably get 2117's...time will tell whether or not I made the right decision!
 

Watermann

Starmada Splash of the Year 2014
Joined
Jan 12, 2013
Messages
13,787
All I used for solids were the 2117s in 3/16ths but I did get some of the 1100s too just to check them out but they're super soft. The only 5/32 I used was for my cabin and those were blinds. All of your repairs should be 3/16 and I would recommend using the 2117s.

If your going to apply a patch then length of the rivet is the next concern, bottom .080 + brace .080 + patch thickness ? and some overhead for the sealer. I'm thinking 7/16 would do the job for length.
 

g0nef1sshn

Lieutenant
Joined
Feb 24, 2015
Messages
1,291
Thanks for the info on the rivets guys, that clears things up a lot.

I didnt get much done today but I did get the 8 rivets off between the knee brace and the transom. I tried using some small drill bits at first, but the cheapness of them made that an no go real quick. Then I moved on to the wood chisel. pop the heads and punch them out. some heads were a little recessed though so I had to chop the other end first, tap the head and chop it then punch it out. I think for the 8 remaining hull rivets ill get the grinder out and grind the bottoms off and punch the head out.
 

g0nef1sshn

Lieutenant
Joined
Feb 24, 2015
Messages
1,291
Hey thanks Iboats. I had a little surprise in my gluvit package. I will drink this on shift tonight. This 5 hour usually works pretty good for me.

20150321_142329_resized.jpg
 
Top