72' Browning Refurb

bobberstop

Seaman
Joined
Sep 3, 2016
Messages
59
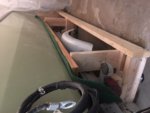
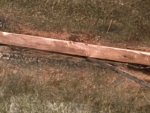
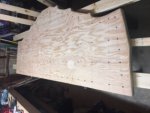
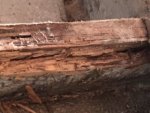
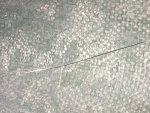
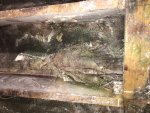
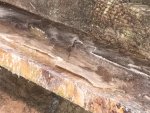
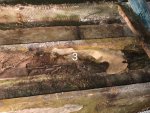
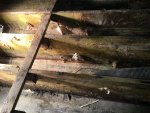
After much thought, I decided to refurb our Browning tri-hull. Didn't have the heart to get rid of it. It will be a great project to spend time with Dad on. My grandfather & father purchased the boat in the late 70's when it was about 5 years old. It's been stored indoors when not on the water, and its not been on the water longer then a 48 hour stretch at any one time.So its in good shape for its age. That being said thanks to the swim ladder and a kicker motor mount, water has made its way into the transom. The worst was on the starboard side of the transom where the kicker bracket was, the transom looked more like pulled pork then plywood. The port side was better but not much. So out with the old transom and sand and sand and sand and sand and so on. Which brings me to my first round of questions, How do I know when I've sanded enough? I've read 100's of threads on iboat (which is an amazing source) and people talk about going until you see the pink hue of the fresh layer of fiberglass. The boat is green so I haven't really seen a pink hue, I do see red veins in the fiberglass, is that the same? I'm using a 4" angle grinder and a 5" orbital sander. The pic showing the whole transom (lower LF) shows the more polished area around the key hole, that is where i went back over with the orbital sander w/ 60 grit. The white area to the left is where I've just hit it with the angle grinder w/ 36 grit. In the close up pic (top LF) you can see the hint of the red veins I was referring to. Is that where I want to get to? or do I need more sanding? The photo on the upper rt shows the build up around the perimeter, does that have to be completely removed or just smoothed out to facilitate good tabbing? Lastly, the stringers were rotten where the met the transom. I cut back about 8-10 inches(lower Rt) and got clean wood, can I sister in that 8-10" and layover that or is it best to replace the stringers? I haven't removed the the rest of the floor yet to investigate conditions forward, that was phase II of my plan. Obviously if the stringers are ugly forward I would remove and replace the whole stringer. Just wondering if it turns out to be just that 8-10 inches, do I have options?
Any guidance would be greatly appreciated, Thanks


IMG_2764.JPG
 

Baylinerchuck

Commander
Joined
Jul 29, 2016
Messages
2,726
It's interesting that your hull is green. You only need to grind until you get to the good clean fiberglass. You definitely shouldn't grind more than you have to. Thinning out the fiberglass is a big no-no. As far as the stringers are concerned, drill a few core samples to ensure the rot isn't further forward. If not, remove what was rotted, sister in new wood and be done with it. No need to do a complete gut if you don't have to. My opinion.
 

bobberstop

Seaman
Joined
Sep 3, 2016
Messages
59
Thanks for for the reply's. I will take another look at it this weekend to make sure I'm in good clean fiber glass, does that include tabbing? They built up tabs from the transom to the side walls 1/2"-5/8" thick or better. I smoothed it out and it looks like good clean glass, hopefully looks aren't deceiving.
 

bobberstop

Seaman
Joined
Sep 3, 2016
Messages
59
I'm starting to order supplies as I'm finishing up grinding. I have heard nothing but good things about us composites so I had planned on ordering everything from them, that is until I got the shipping estimate. They are in Florida, I'm in Minnesota, shipping was almost $300, Ouch!! So I started looking closer to home and of course shipping was much cheaper but the product was more so in the end it was a wash for most places that I checked out.All excepted one, Merton's. While they are not closer they were cheaper on the resin, mainly the shipping. They ship it in gallon containers to avoid the hazmat fee, but charge the discounted 5 gallon price. Seems kind of sketchy, I'm waiting to hear back in person to confirm shipping cost. My questions are, is Merton's resin a good product? Is there a big benefit to 5 gal. containers vs multiple 1 gal? Is there an issue with getting your resin from one place and fiberglass from another? Lastly does anyone know of a good fiberglass place in or around Minnesota for supplies?
Thanks.
P.S. Merry Christmas!!
 

Woodonglass

Supreme Mariner
Joined
Dec 29, 2009
Messages
25,924
Don't know about Merton's resin. You should FOR SURE confirm it's NON WAXED resin. It's call Laminating resin NO-Wax. There are only about 5 resin MFG's in North America. There's not a lot of difference as long as it non waxed. As for the glass fabric I'd stay away from ebay but as long as you get it from a Glass Dealer...It's gunna be pretty much the same.

You might give these guys a call...http://www.expresscomposites.com/
 

bobberstop

Seaman
Joined
Sep 3, 2016
Messages
59
Thanks for the info. I did check with express composites. They are the same price for the products as us composites was for the product plus shipping. I guess it's the price you pay for the convenience of picking it up the same day. (They are practically in my backyard) The one thing that was different with express they offer 1208 or 1808, the didn't advertise 1708.(that I could see) If I have to choose between 1208 &1808, any suggestions? If there isn't an issue with using either 12 or 1808 I think I will go with express for the convenience of it. Thanks again for the insight it is reassuring to hear from people who have been there done that!
 

bobberstop

Seaman
Joined
Sep 3, 2016
Messages
59
I'm in need of some insight,
So I've been chipping away at the boat, make progress slowly but surely. I've sanded the transom area enough that I could get the transom glassed in, I have cut out, glued (tightbond III) and screwed my two sheets of 3/4" marine plywood together. Still need to remove the screws, fill in the holes, cut the key hole out for stern drive and drill some ooz holes. I have read in various threads about drilling over-sized holes and back-filling them with a filler to protect the wood from possible water penetration around bolt holes through the transom. I plan on doing this where the mooring loops bolt to the transom, my 1st question is would I also do this for the bolt holes around the key hole for the stern drive? There isn't alot of wood between the key hole and the bolt hole, seems like it would weaken it and I would not have room to add another layer of wood to span over the filler,(2" thickness for the transom) is the inner transom plate good enough to span the filler holes if I were to oversize them? Whats the best material to use for the filler?

I have to remove the cap or cut the gunnels to be able to install the new transom. My plan is to remove the cap, feels like less work in the long run. I also have decided that the stringers need to be at the very least investigated further, I initially thought the rot in the stringers was contained to the foot closest to the transom. I'm really starting to question that assessment. I've found more rot and what I believe is de-lamination on some of the stringers. The floor in front of the bilge also seems to not be attached to the center stringer, if I push on the floor there while standing in the bilge the floor gives about an 1/8th -1/4" before hitting the center stringer. So for piece of mind I've decided to remove all of the floor and get a good look at everything. My dilemma is in what order do I proceed? Do I finish up with the transom then remove the floor and correct any stringer issues? My thought is this would give some stability to hull by having either the floor or transom intact throughout the process? Or is it better to get all the demo and dust out of the way before any fiberglass work?

I've attached some pics below of my dolly under the trailer, de-lamination, rot and the new transom so far.
IMG_2799.JPG IMG_2811.JPG IMG_2812.JPG IMG_2814.JPG


Attachments

  • IMG_2799.JPG
    IMG_2799.JPG
    26.3 KB · Views: 0
  • IMG_2811.JPG
    IMG_2811.JPG
    40.6 KB · Views: 0
  • IMG_2814.JPG
    IMG_2814.JPG
    31.7 KB · Views: 0
  • IMG_2812.JPG
    IMG_2812.JPG
    36.3 KB · Views: 0

bobberstop

Seaman
Joined
Sep 3, 2016
Messages
59
No Title

Update, over the last month I have managed to find time to remove the floor and inspect the stingers. Couple of issues I found were, some rot mainly in front of the bilge area and about 3' up from there along the hull edge. There was normal old fashion white styrofoam between the stringers, the stuff closest to the bilge area looked like it had been used to filter the motor oil and damp. The foam in the bow was pretty clean and dry. The stringer themselves were interesting. First there's a lot of them and they're made out of 1"x10". It appears the manufacturer tabbed the stringers in place by only coming up the side of the stringer from the hull about 3"-4". The rest of the stringer looks like it was just covered w/ resin. As a result a lot of the tabbing is de-laminating away from the stringer. The keel stringer has a 2" piece added onto the top of it to reach the bottom of the floor. This addition was not glassed to the main body of the stringer, again just a coating of resin and a couple nailing plates along the way. This had come loose and was the cause of my soft floor. The biggest issue I could see and I'm totally new to all of it, so maybe not that big of a deal but it just seemed like sloppy glass work. It looks like they used roven wovening for a majority of the tabbing and a good amount is not even in contact with the stringer or hull and it creates jagged spikes between the stringers.

So my plan is to remove everything and replace it with new. I got off to a rough start, while removing the floor I managed to put a 10" cut the hull about wear the the capt. chair would be, Rookie mistake not continually checking the depth of the blade!! From what i've read in other posts this is not the end of the world...right? fixable... hopefully? Best way to fix & what materials?

2nd Question I have is while I've started to grind/sand, do I need to remove the layer of fiberglass that went from one wall down over the top of the floor and up the other wall? Or is it ok just to feather the edges to blend it together. I attached some pics below to help. The bow above the floor is dark green and below is light green, do I need to sand the dark down to light green or just sand enough to clean off and rough up the surface of the dark green?

Finally, the bow seating area is attached to the cap including a small floor between the bench seats. This bow floor sat an 1" higher then the rest of the deck, a toe stuber of sorts. Any reason why when replacing the floor I can't raise the deck an inch from the stern to where it would meet the walk through to the bow so I could eliminate that toe stuber?

Sorry not all the photos loaded in the upright view.
 

Attachments

  • photo258316.JPG
    photo258316.JPG
    159 KB · Views: 0
  • photo258317.JPG
    photo258317.JPG
    124.1 KB · Views: 0
  • photo258318.JPG
    photo258318.JPG
    162.2 KB · Views: 0
  • photo258321.JPG
    photo258321.JPG
    173.1 KB · Views: 0
  • photo258322.JPG
    photo258322.JPG
    165 KB · Views: 0
  • photo258323.JPG
    photo258323.JPG
    147.9 KB · Views: 0
  • photo258324.JPG
    photo258324.JPG
    302.4 KB · Views: 0
  • photo258325.JPG
    photo258325.JPG
    316.7 KB · Views: 0

Woodonglass

Supreme Mariner
Joined
Dec 29, 2009
Messages
25,924
Based on the pics, I'm betting that was NOT factory work but that of a previous owner with few skill in glassing!!! You WILL do a much better job with the advice of the members here on iBoats. The cut IS NOT a big deal. Once you have the inside of the hull completely ground down and ready for the GO BACK, we'll guide you thru it. For now, concentrate on getting it cleaned out and ground down to good fresh glass, The Thick woven roving is fine as long as it's still well attached to the hull. Check the 2nd link in my signature line for some good info on what you're about to do.
 

bobberstop

Seaman
Joined
Sep 3, 2016
Messages
59
Thanks, I plan on using that link as my bible when I get around to putting it back together. So it sounds like as long as the existing work is bonded well to the hull, I'm good to just grind/sand it smooth to get clean surface so the new stuff can bond well. That is what I was hoping to hear. Thanks again, with a little bit of luck my next post will be of a clean hull.
 

Woodonglass

Supreme Mariner
Joined
Dec 29, 2009
Messages
25,924
when you go back with new stringers I'd recommend laminating two pieces of 1/2 or 3/4" plywood to make your stringers. They be much stronger than if you use dimensional lumber.
 

bobberstop

Seaman
Joined
Sep 3, 2016
Messages
59
Speaking of that, I used roseburg marine grade plywood for the transom because I could not find the Arauco plywood in my area. It seems to be very good quality and I'm happy with the results. I have since found it and was planning on using Arauco for the stringers and floor until I found that Roseburg offers a ACX exterior rated (not marine grade) oversized 5'x10'x3/4" sheet. The 10' sheet would allow me to cut the stringers out as one piece, my stringers range from 9' to 10' long. But it's not marine grade, will exterior grade work well? I still need to talk to the vendor to see if they can order Arauco in a 10' sheet if they can that's the way I'm going. If they can't I need to decide on Arauco with joints or somewhat unknown without joints. Any thoughts? Anyone used or heard good or bad about Roseburg?
 

bobberstop

Seaman
Joined
Sep 3, 2016
Messages
59
I forgot to clarify, did you mean laminate 2- 3/4" together or did you mean 2- 1/2" laminated together vs. A single 3/4"?
 

Woodonglass

Supreme Mariner
Joined
Dec 29, 2009
Messages
25,924
depending on the thickness you want for your stringers...Yes!!! either 1/2" or 3/4" laminated. a single 3/4" wide stringer is NOT adequate IMHO.
 

bobberstop

Seaman
Joined
Sep 3, 2016
Messages
59
Good to know, I was thinking of a single 3/4" only because it resembled the 1x that is in there now. I think I will go with the 1/2" Arauco 8' sheets and just off set then joints. I like that, seems like a nice upgrade from whats in there now. Thanks for the guidance, not sure how the this project would turnout without it!!! Scary to say the least!!
 

bobberstop

Seaman
Joined
Sep 3, 2016
Messages
59
I got some time on the boat yesterday, removed 6 of the 7 stringers. The keel stringer was the easiest, just had to cut one stapple loose from the bilge bulkhead and lift up. it had de-laminated almost completely. 90% of the tabbing stayed on the hull. I took a couple pics of 3 of the pieces. It looks like it was only tabbed 3"-4" up on each side. The others were not as easy, what they lacked in tabbing they made up for in the material they used to bed the stringers. Close to an inch thick in some places. Between that and random layers of roven woven is extremely uneven.
 
Last edited:

Woodonglass

Supreme Mariner
Joined
Dec 29, 2009
Messages
25,924
It's best to post the IMG Code from photobucket albumns...

5%20stringers%20and%20bilge%20gone_zpsolth00qo.jpg

old%20tabbing%20from%20keel%20stringer_zps76emaxwu.jpg

Hull%20minus%203%20center%20stringer_zpsrtpegnji.jpg

5%20stringers%20and%20bilge%20gone_zpsolth00qo.jpg
 
Top