1997 Bombadier Celebrity 200 Deck, Stringer and Transom Replacement

FBCoach

Petty Officer 2nd Class
Joined
Jun 16, 2018
Messages
146
Ok - back to the real world tomorrow! Planning on glueing the transom pieces together when i get home. WOG and others, a couple of questions.

-If i use titebond 3 to attach the transom pieces together, do i Drill the 1/2 holes before or after glueing them together?

-Also, do i cut the key hole before or after glueing?

-Can you use titebond to attach the stringers to the hull? Trying to minimize drying wait time in this whole process.

thanks guys.
 

JASinIL2006

Vice Admiral
Joined
Feb 10, 2012
Messages
5,680
You don't need to drill the relief holes before gluing together the transom pieces. I fact, it would be easier to do that after the transom piece is glued together (otherwise, it will be tough to get the 1/2" holes to line up as you're gluing and clamping).

I cut my keyhole after gluing together the two pieces of plywood. I figured out where the keyhole needed to be placed when I was dry-fitting the transom core, then cut out the keyhole shape before I attached the transom core to the boat. (I drilled the holes for attaching the sterndrive's transom assembly AFTER all the glassing was done, again, to avoid the hassle of lining up 1/2" holes as I was positioning the transom core and as the thickened resin was curing.) Cutting the keyhole was not hard, even through two layers of plywood. Just go slow and use a sharp blade in your jigsaw or saber saw.

Titebond won't work for attaching stringers to the hull. You need something more viscous, like peanut butter. (It also cures faster, so you won't have to wait 24-48 hours before you move on to the next step.)
 

FBCoach

Petty Officer 2nd Class
Joined
Jun 16, 2018
Messages
146
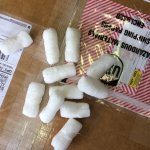
Looks like this is for real! Came home to a US Composites delivery. Can i use the styrofoam popcorn that packed the shipment as the foam spacers under the stringers? See pic.
 

Attachments

  • photo295731.jpg
    photo295731.jpg
    1,006 KB · Views: 0

FBCoach

Petty Officer 2nd Class
Joined
Jun 16, 2018
Messages
146
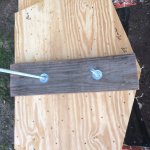
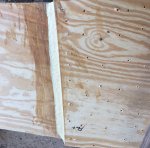
Got the two transom pieces glued. I hope...!!!...
 

Attachments

  • photo295751.jpg
    photo295751.jpg
    1.2 MB · Views: 1
  • photo295752.jpg
    photo295752.jpg
    1.6 MB · Views: 1

AShipShow

Lieutenant Commander
Joined
Jul 8, 2016
Messages
1,802
Did you use any screws or other clamps to glue the two pieces... ideally you would use a ton of clamps or better is a bunch of screws that you then remove after the glue is set...

you could probably use those foam peanuts from us composites as spacers but be careful they don't get wet.. us composites has jumped on the corn starch packing peanut wagon... they aren't real stryofoam.

put one in water and see what it does lol
 

FBCoach

Petty Officer 2nd Class
Joined
Jun 16, 2018
Messages
146
There are about 30 screws on each side of the all thread clamps. If you click on the pic they are more visible. Should this suffice? Thanks much. I’ll put one of the peanuts in water tomorrow with my kids. Also have foam board i can use. Tomorrow will be my first ever attempt at peanut butter and resin. Any advice? Thanks to all again.
 

kcassells

Fleet Admiral
Joined
Oct 16, 2012
Messages
8,737
The trick is making it thick enought so it doesn't run. Should stay on the stick upside down. Works in real nice.
 

AShipShow

Lieutenant Commander
Joined
Jul 8, 2016
Messages
1,802
I usually pour the resin I need in the mixing cup, then measure the hardener and add the chopped fibers... then I add the hardener and stir for a minute or two... the resin will turn a little darker once its mixed well.

once its mixed well, I start adding cabosil a little at a time. I find it you add too much at once a lot of it just blows out of the cup while mixing. Unless you've seen it done before, it's probably gonna take quite a bit more cabosil than you thought...
 

FBCoach

Petty Officer 2nd Class
Joined
Jun 16, 2018
Messages
146
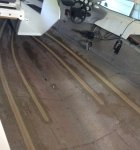
Things went well. Went ahead cleaned and peanut buttered the strakes as i was getting the hang of it. Then added a fillet to the transom. Ready to sand and glass the transom then install.

Two Questions:
1. Cut the key hole before or after water proofing the transom?
2. Drill the drain hole through the transom or cut a semi circle out of the transom above it?
 

Attachments

  • photo295813.jpg
    photo295813.jpg
    686.8 KB · Views: 1
  • photo295814.jpg
    photo295814.jpg
    886.7 KB · Views: 1

JASinIL2006

Vice Admiral
Joined
Feb 10, 2012
Messages
5,680
I cut my keyhole first, then covered it with glass before installing.

As far as the drain hole goes, either way will work as long as you protect the wood from water intrusion.
 

AShipShow

Lieutenant Commander
Joined
Jul 8, 2016
Messages
1,802
I also cut the keyhole first - biggest reason is so you can utilize it for clamping the plywood to the hull when you glue it in.

For the garboard drain, i chose to cut the relief a couple inches above just to try and keep it away from water. Shouldn't matter tho as long as its protected as JAS said.
 

FBCoach

Petty Officer 2nd Class
Joined
Jun 16, 2018
Messages
146
When i install the transom to the hull, should the transom also sit on foam spacers like the stringers do?
 

JASinIL2006

Vice Admiral
Joined
Feb 10, 2012
Messages
5,680
Mine sat up bit, off the hull, and the gaps were filled with peanut butter. You can use spacers temporarily, just make sure the keyhole cut in the transom core matches perfectly with the keyhole cutout in the hull. I also suggest doing a number of dry runs installing the transom core to make sure your clamps, etc., work as you expect. You also want to make sure you can get the core clamped in fairly quickly, to make sure your PB doesn't cure before you get everything clamped down.
 

AShipShow

Lieutenant Commander
Joined
Jul 8, 2016
Messages
1,802
Spacers aren't necessarily needed, but I think its good practice to keep it up off the hull at least a little as JAS suggested.. If anything, it keeps water away from the wood.
 

FBCoach

Petty Officer 2nd Class
Joined
Jun 16, 2018
Messages
146
Now help is really needed! Put a layer of CSM on each side of the transom. Front and back went on well. Tried to wrap the front around the edges. Struggled with edges. Going to have to cut the CSM off the edges and sand and redo. Any advice? Should i cap the edges with CSM or 1708 or what? Want to encapsulate it best as possible before i install it and tab it. Thanks.
 

JASinIL2006

Vice Admiral
Joined
Feb 10, 2012
Messages
5,680
Are your edges rounded or sharp? Sharp edges are really hard to glass. If you round off the edges and work the glass a fair bit with a roller, you should be able to get the CSM to lay down. Some people fray the CSM before glassing edges, and that can help too.

Glassing a sharp 90 degree angle will never be easy.
 

FBCoach

Petty Officer 2nd Class
Joined
Jun 16, 2018
Messages
146
Got it. Grinded the edges. Belvelved tbe corners real well. Used smaller frayed pieces of chop strand. Much easier when you do it closer to right. Waiting for it to dry so i can sand it, knock any rough spots off and patch any air bubbles or low spots. Then she’ll go in!!! Football practice starts in 8 days. Off until then. See what i can get done with all your help!
 

Attachments

  • photo296458.jpg
    photo296458.jpg
    205.7 KB · Views: 1

FBCoach

Petty Officer 2nd Class
Joined
Jun 16, 2018
Messages
146
Got the transom glued to the hull with peanut butter. Camped well. How long should i leave it clamped before tabbing it in?
 
Top