1992 Sea Ray 180 Floor Project Help and Advice needed

MC_What have I done?!

Petty Officer 2nd Class
Joined
Jun 8, 2019
Messages
101
Don't use hardwood ply... Either find a lumber dealer and by marine grade BS1088 rated plywood (lots of money) or do what pretty much everyone here does and use either BCX or ACX(if you can find it) from the big box stores...

Hardwood ply does not use waterproof glue and no matter how well you seal it with polyester or epoxy resin, over time it will still absorb moisture and lose its structure.

I used BCX on mine for the transom, however, I used 1/2" MDO ply for my floor and seat box structures. MDO is an exterior rated plywood that has a resin impregnated face on it... Its used a lot for road signs/etc

Thanks for the information Mad Props, this is probably that most stressful thing I have been trying to figure out(and the right fiberglass materials to use on each section) as a complete rookie and no local boat shops to talk to.

I did end up finding FIR MDO ply at my local Menards, I love that it is all in stock and they even have helper sheets so don't have to buy more than I need which I think will end up saving me some money also! Thanks again!!
 

MC_What have I done?!

Petty Officer 2nd Class
Joined
Jun 8, 2019
Messages
101
The marine grade ply is only $5 more than the MDO for the decking, but it reads like the MDO is better suited for the decking than the marine grade, it is also a bit heavier of a ply. Both the MDO and Marine are double the cost of the ACX ply but I only need a few sheets for the decking so I’m not overly concerned with that part.

Hmmmm.... I hate having so many choices! I’m to indecisive when it comes to things like this!
 

CrazyFinn

Petty Officer 1st Class
Joined
Dec 12, 2016
Messages
357
I checked my Local Lowe’s last night and they don’t stock anything in exterior grade except the normal roof decking which I know has way to many voids.

You don't need absolutely "void free" plywood unless you're building a wood boat where the wood is the only structure. We use to race boats that were made of a very thin plywood hull (for lightness) - and having void free wood was critical.

In your case, the plywood is a "core" for the fibreglass encased transom, stringers, or floor. A few voids will not make any difference. The thoroughness and quality of your glassing to keep the water out of the plywood is really what matters. It doesn't matter what wood you use, if it gets wet, it will rot.
 

MC_What have I done?!

Petty Officer 2nd Class
Joined
Jun 8, 2019
Messages
101
Hey guys, glassing materials will be delivered this weekend and I want to hit it running so I need your expert opinions please.

Transom:
Since my plan is to PB the Transom to the hull, should the layer attached to the hull be done with a Waxed Resin or No Wax resin? Should I put 1 layer of CSM on the side being attached to the hull?

Stringers:
Originals had a 1 inch “nailer” attached to them for decking I suppose, but the OEM failed miserably at glassing them in. If I make supports going from stringer to outside hull instead?
 

Woodonglass

Supreme Mariner
Joined
Dec 29, 2009
Messages
25,924
I never use Waxed resin below the deck. For transom just make sure you give it good heavy coat of resin and when it tacks up smear a LOT of PB on it and the transom skin and then clamp it in place. When the PB oozes out around the edges form a coved fillet and try to be NEAT about it. You want it Nice and smooth cuz PB is NOT easy to sand.
 

MC_What have I done?!

Petty Officer 2nd Class
Joined
Jun 8, 2019
Messages
101
I have watched so many videos and spent hours reading the other threads and I know there is always more than one way to “skin a cat” and sometimes people find better ways to do things, so I really appreciate you guys taking the time answering my questions even if you have already said the same thing on other threads. It’s the details of things that stress me out and cause me to pause what I’m doing and try to find an answer. lol.

I do still have questions on the Stringers though. Original Stringers are only 1/2 with a nailer about the size of a 1x2. I’m worried about my glassing being able to waterproof this, if I use 1/2 for the Stringers but make some 3/4 (left over from cutting the Transom) support braces (heard them referred to as bulk heads before) and the PB the deck to them would I even need the 1x2 nailer on the side of the Stringers if I am not even screwing it down? Or is screwing it down the right way to do this?

I am just not sure what to do...
 

Woodonglass

Supreme Mariner
Joined
Dec 29, 2009
Messages
25,924
If you want to keep the stringers @ 1/2" then You're probably gunna need to attach with a 1 1/2" top cap to ensure a good base for attaching the deck. Most people opt for making the stringers from two 3/4" pieces of plywood to give them 1.5" for deck attachment. Glassing the top cap is a bit problematic on 1/2" stringers but with patience and good technique it is possible especially with shredded CSM. You basically Tear the CSM into smaller pieces making more like cotton candy. You then apply the resin to the wood and then start pressing the strands into the resin and use a chip brush dabbing at the glob of glass fibers and they will conform to about any shape there is. A couple of layers of this and the wood will be sealed from the water. Hope this makes sense
 

MC_What have I done?!

Petty Officer 2nd Class
Joined
Jun 8, 2019
Messages
101
If you want to keep the stringers @ 1/2" then You're probably gunna need to attach with a 1 1/2" top cap to ensure a good base for attaching the deck. Most people opt for making the stringers from two 3/4" pieces of plywood to give them 1.5" for deck attachment. Glassing the top cap is a bit problematic on 1/2" stringers but with patience and good technique it is possible especially with shredded CSM. You basically Tear the CSM into smaller pieces making more like cotton candy. You then apply the resin to the wood and then start pressing the strands into the resin and use a chip brush dabbing at the glob of glass fibers and they will conform to about any shape there is. A couple of layers of this and the wood will be sealed from the water. Hope this makes sense

It makes perfect sense, thank you for the advice. Taking what you said into account but also not wanting to add to much additional weight, what I think I might do is use 3/4 for the Stringers and attached a 3/4 strip maybe 2-3 inches tall the entire width of the stringer for the 1.5 width on top and then just put a small filet on the bottom side for easy glassing. That will give me the extra strength of using 3/4, keep the weight low, and still be able to glass it in properly.
 

MC_What have I done?!

Petty Officer 2nd Class
Joined
Jun 8, 2019
Messages
101
Not sure how many of you have a beard, and I’m not talking about a little chin strap or whatever, but several inches of beard.... word of advice from a rookie, when glueing your transom together be damn careful when you’re clamping it together and inspecting to not get glue in your beard! I thought I was going to have to shave it off!!! Thank goodness I noticed it before it completely dried and I was able to use hot water and soap to clean it out! Made my kids laugh though that’s for sure! Hahaha
 

52FordF2

Petty Officer 1st Class
Joined
May 31, 2013
Messages
372
Just climbing aboard,, Oops I tripped

Even though this is a little early in the build, when re- installing the Gimbel and Transom Plate align the rear motor mounts to the Gimbel bearing. there is a little side to side slop. Center of bearing to center of rear motor mounts holes.

Also check the rear motor mount bushings if they need replaced and the Spline bushing on the motor if it has a little sag in one direction.
Mine is from eight years sitting with front motor mounts sagging.

It will help you from pulling the motor out several more times.
 

52FordF2

Petty Officer 1st Class
Joined
May 31, 2013
Messages
372
I may have missed it, but what's your location?

I'm near Bloomington Indiana.
 

MC_What have I done?!

Petty Officer 2nd Class
Joined
Jun 8, 2019
Messages
101
Just climbing aboard,, Oops I tripped

Even though this is a little early in the build, when re- installing the Gimbel and Transom Plate align the rear motor mounts to the Gimbel bearing. there is a little side to side slop. Center of bearing to center of rear motor mounts holes.

Also check the rear motor mount bushings if they need replaced and the Spline bushing on the motor if it has a little sag in one direction.
Mine is from eight years sitting with front motor mounts sagging.

It will help you from pulling the motor out several more times.

This is great information, thank you! I am actually ready to glue the transom to the hull, been a nervous nelly and put it off for about as long as I can. I need to order some silica tonight and get it done since it is the only thing I missed on my initial order :(

Since you’re close to me, where do you buy most your materials? I have not found a single place local that carries anything except Menards for the lumber.

I may be over over optimistic but I have spent the last 2 weeks working on this thing non stop, my goal is to be back on the water in the next 2-3 weeks. I even burnt a few of my 20 vacation days and took the rest of the week off to work on it. Wife wants back on the water this year also so she isn’t causing any interruptions day to day things either so I’m 100% dedicated to this project.
 

MC_What have I done?!

Petty Officer 2nd Class
Joined
Jun 8, 2019
Messages
101
I have rewatched friscoboaters videos several times and I just noticed something. When he installed his deck, I don’t see any videos where he glasses the bottom of the deck, did he install it without glassing the bottom side? Seems like that would be a really bad idea after all the work he did glassing in the rest of the boat.
 

52FordF2

Petty Officer 1st Class
Joined
May 31, 2013
Messages
372
I get my Resin from a boat shop in Louisville, but order everything else from either iboats or USComposites.
On the transom if you haven't installed yet use a scrap piece of 3/4 inch plywood as an outside backing plate when clamping. Also wrap it in plastic to keep it from sticking. Cover all outside holes with tape to keep the resin from oozing out.

If you need help just ask, the only problem is I'm down in Louisville on the weekend. Because of work I'm a separated household. So after five I could meet up.
 

MC_What have I done?!

Petty Officer 2nd Class
Joined
Jun 8, 2019
Messages
101
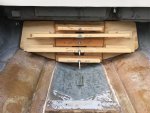
Quick update: Transom installed, tomorrow the plan is to get the tabbing and outer layers of glass done, should be able to get the motor mount and bilge area done as well.
 

Attachments

  • photo316275.jpg
    photo316275.jpg
    1.3 MB · Views: 3

MC_What have I done?!

Petty Officer 2nd Class
Joined
Jun 8, 2019
Messages
101
Didn’t get much done today, helped a friend who bought a 96 bayliner Jazz 120 jet boat for pretty cheap and wanted me to go out with him in case he had any issues.... You already know we had issues, motor runs great but when you open it up the jet never fully kicks. Wouldn’t get above 10mph. I’m a pretty good mechanic but never messed with a jet boat, tried adjusting some linkages and what not but no dice. Loaded it back on the trailer and headed home but I will say that being back on the lake today has only renewed my determination to get my boat done and back on the water this year!

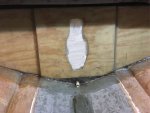
Filets done and first layer of 1708 done, a few air bubbles but for my first layup of any fiberglass bigger than 6 inches I don’t think it’s to bad. Hopefully I’m not wrong? LOL

I have read that 1.5 CSM soaks up the resin but this 1708.... Holy crap Batman!! 1708 drinks the juice like the Sahara Desert!
 

Attachments

  • photo316448.jpg
    photo316448.jpg
    1.1 MB · Views: 1

steve_h7

Chief Petty Officer
Joined
Sep 16, 2018
Messages
401
Looks good from here! :thumb:
CSM is even worse... I just finished off my 16th gallon. :rolleyes:
 
Top