1990 Steiger Craft transom investigation

merch

Cadet
Joined
Oct 20, 2012
Messages
16
Bob at Sound Marine in Holbrook NY makes them for Steiger now. He makes a 120(ish) gal and. 150 gal. He might have the recipe for the old 84 gallon chesapeake tank though. They don't make that one anymore as far as i know. Worth a call. (631) 567-2996
 

jc55

Senior Chief Petty Officer
Joined
Nov 3, 2006
Messages
665
Thanks guys! I kind of committed already. It's an 84 gal sloped tank, welded inside and out, 1/8" thick, baffled, sender included, two pickups, ground tabs, fill and vent welded, mounting tabs, for $675. I can't fathom that kind of fabrication for that price.
 

jc55

Senior Chief Petty Officer
Joined
Nov 3, 2006
Messages
665
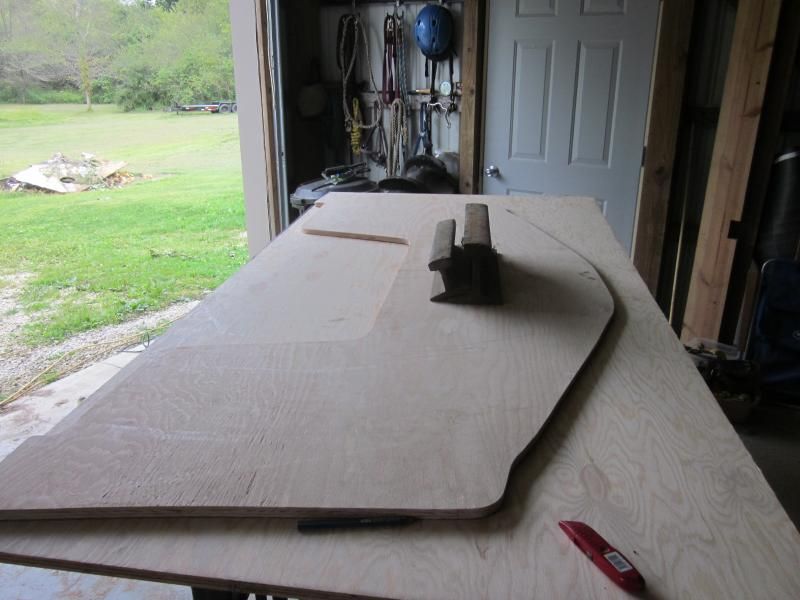
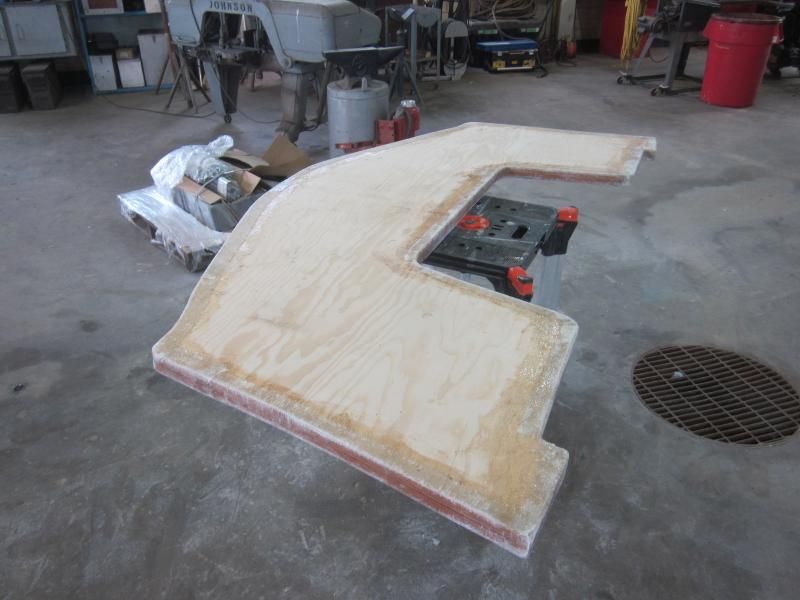
Well took the day off of work to get some "Real" work done. Made a template of the transom using pieces of poster board taped together with packaging tape. The hardest part is the tendency to make it too big. If the transom lays on a curvature, it won't sit flat against the outer skin. I used a small square on the transom to guestimate how close 1.5" of wood will come to the edges. There was a large void due to this overlooked fact originally .
IMG_2317.jpg


First piece of plywood fit perfect! two pieces are not going to slide in easily. I don't know what to do about that. I don't want to cut a gunwale if I can help it.
IMG_2318.jpg


Trace and cut out the 2nd piece..
IMG_2319.jpg


Lined them up and sanded them together. Rounded edges slightly. Non rounded edges can chip and splinter and poly resin doesn't protect against this.
IMG_2320.jpg


My son has been building a car right along side me...
IMG_2321.jpg


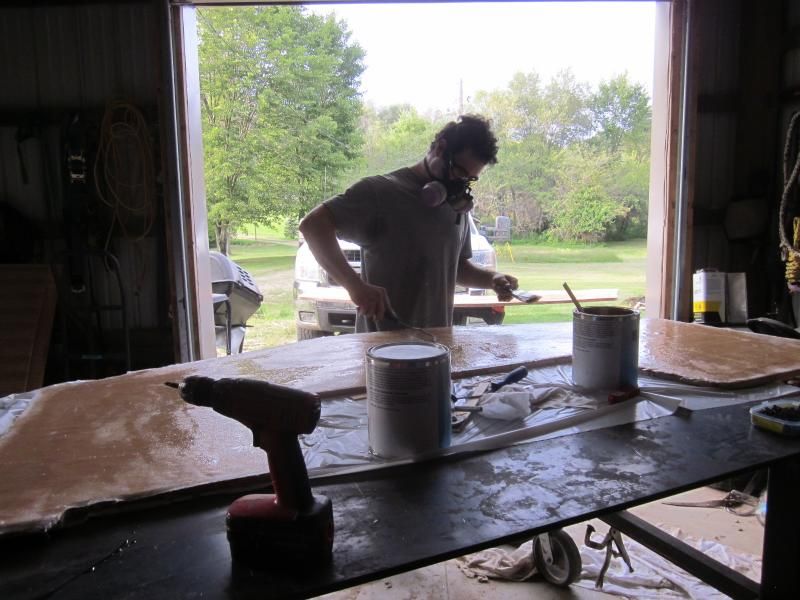
Coated both pieces with Fiberlay ISO P17 resin and layed out precut 1708...
IMG_2323.jpg


I predrilled, and countersunk holes(both sides of top piece only) in a grid before hand. I did this on the Sportcraft transom and it worked like a charm. I'll remove the 1-5/8" drywall screws and fill with PB tomorrow when the transom is cured.
IMG_2332.jpg


Next is grinding for transom, encapsulating entire transom with 1708 before it goes in, and removing tank. New one should be here next week.
 

jigngrub

Fleet Admiral
Joined
Mar 19, 2011
Messages
8,155
Work looks real good jc!

I prefer screwing instead of clamping, especially on a piece of work that big.

Looks like those stringer may need to get trimmed back after all?
 

jc55

Senior Chief Petty Officer
Joined
Nov 3, 2006
Messages
665
Thanks Jig! Screwing really seems to get an even pressure. I think that if I cut one gunwale (boat is painted no gel coat work involved) it should slip in.
 

jc55

Senior Chief Petty Officer
Joined
Nov 3, 2006
Messages
665
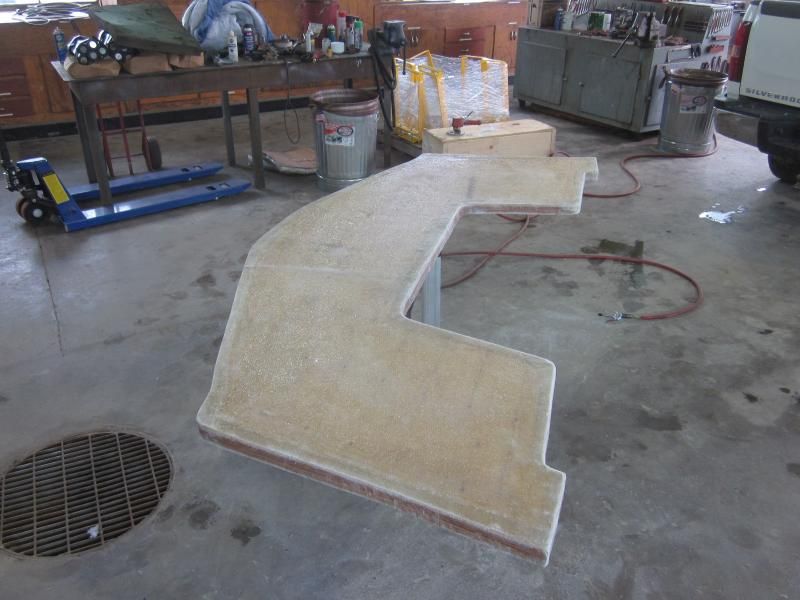
Okay, I have some questions that need answered. Here is my transom so far. I've glassed the edges all of the way around, then placed a layer 1708 on the side of the transom facing forward. (Had to take it to work since my compressor at home is too weak to sand)
Front of transom...
IMG_2333.jpg


Rear of transom, no layer of glass yet...
IMG_2334.jpg


Originally, the transom's glass layer delaminated from the boat's skin. This is not the only boat of this kind to have that happen.

I'm concerned that "gluing" a cured transom using PB to the cured boat's skin is not as effective as allowing freshly installed 1708 to do the job with the PB between the transom and boat's skin.

.My question is, for sake of speed come transom installation time and for adhesion...What is my next step given that the install cannot exceed 25-30 minutes(big transom)?

1. Lay precut 1708 on transom or skin and cover in resin?
2. PB entire back of transom or skin?
3. PB along bottom of hull where transom sits down in
4. Set it in, align and clamp?
 

Woodonglass

Supreme Mariner
Joined
Dec 29, 2009
Messages
25,927
The back side of transom typically does not get a layer of 1708. Does'nt really need it. I'd soak the back side in resin and then if you want put a layer of CSM on it. Once that tacks up, put a 3/8" layer of CSM both on the Transom and the skin of the hull and then install and clamp her up. I also like to drill some Ooze holes in the transom to create a mechanical bond with the hull. This is NOT required. It's just a personal preference of mine. It's all discussed and shown here...Fabricating Decks, Stringers, and Transoms
 
Last edited:

jigngrub

Fleet Admiral
Joined
Mar 19, 2011
Messages
8,155
There's probably a half dozen ways you could do that and it would turn out fine and dandy and better than factory.

Lots of people would do like described above, slather the backside in resin and slap the PB to it and the inside skin and clamp her up tight. If you use enough PB and clamp it tight enough you shouldn't have to worry about making any beds, you should have sufficient "squeeze out" to bed in the bottom and sides and you'll just have to tool for your fillets.

If you want to completely encapsulate your core, you can lay it up the night before and then wipe it down with acetone the next morning to tack it up again it cures hard overnight.

You can chill your PB ingredients in a cooler of ice to give yourself more working time if you think you may need it.
 

jc55

Senior Chief Petty Officer
Joined
Nov 3, 2006
Messages
665
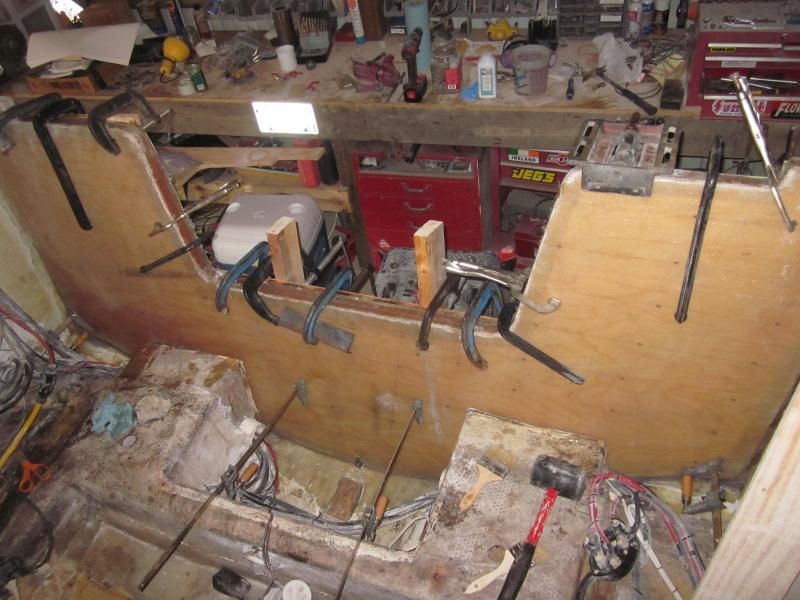
Thank you both! I got her in today (whew) with the help of my dad and kids. I coated the back of the transom with resin and let that set, Installed a layer of 1708 (the only thing I use) CSM side against the transom skin (stronger styrene bond as per your article Wood). Then PB on the hull, and transom skin side, slipped her in without cutting the gunwales or stringers and clamped her up.

This transom was so rigid and so large, that I was pressing the outer skin against the transom, not the transom to the skin like my last boat, if that makes sense. Bolted through the drain hole and used my custom jacking clamps on the inside.

Jig, your cooler trick worked like a charm! Thanks, got the rest on ice for tomorrow's PB filleting.

It ain't pretty but she'll be solid now. 11 days so far.
IMG_2337.jpg


IMG_2336.jpg


The new tank should be in this week so that I can continue on the deck.

Is there any magic in installing a garboard drain and 1 1/4" scupper brass drains? I have the smaller 1" compression tool.

Also, someone went from a small round access hatch over the bilge to a larger rectangular hatch. Is this killing my transom support? That is, having a hatch in front of my deck to transom joint?
 
Last edited:

jigngrub

Fleet Admiral
Joined
Mar 19, 2011
Messages
8,155
If you tab the inside of your transom to those Hugh Jass stringers you shouldn't have any problems with transom support, of course you'll need to tab the sides and the bottom where you can reach too... but I don't really see any problems with a larger rectangular hatch.

Garboard is a goop it up with 5200 and screw it on with supplied fasteners (be careful, you remember what happened with the brass screws on the last boat eh?!)
Drain tubes should flare on just like the smaller 1" with gobs of 5200 there too.
 

saginawbayboater

Senior Chief Petty Officer
Joined
Mar 8, 2012
Messages
677
Thank you both! I got her in today (whew) with the help of my dad and kids. I coated the back of the transom with resin and let that set, Installed a layer of 1708 (the only thing I use) CSM side against the transom skin (stronger styrene bond as per your article Wood). Then PB on the hull, and transom skin side, slipped her in without cutting the gunwales or stringers and clamped her up.

This transom was so rigid and so large, that I was pressing the outer skin against the transom, not the transom to the skin like my last boat, if that makes sense. Bolted through the drain hole and used my custom jacking clamps on the inside.

Jig, your cooler trick worked like a charm! Thanks, got the rest on ice for tomorrow's PB filleting.

It ain't pretty but she'll be solid now. 11 days so far.
IMG_2337.jpg


IMG_2336.jpg


The new tank should be in this week so that I can continue on the deck.

Is there any magic in installing a garboard drain and 1 1/4" scupper brass drains? I have the smaller 1" compression tool.

Also, someone went from a small round access hatch over the bilge to a larger rectangular hatch. Is this killing my transom support? That is, having a hatch in front of my deck to transom joint?

Looks very strong jc:encouragement:
 

jc55

Senior Chief Petty Officer
Joined
Nov 3, 2006
Messages
665
Thanks guys. Went out to Kelley's Island this weekend with the wife, Almincha (took the ferry). Rough water compared to what I'm used to. Got to get her ready for big water next summer.
 

jc55

Senior Chief Petty Officer
Joined
Nov 3, 2006
Messages
665
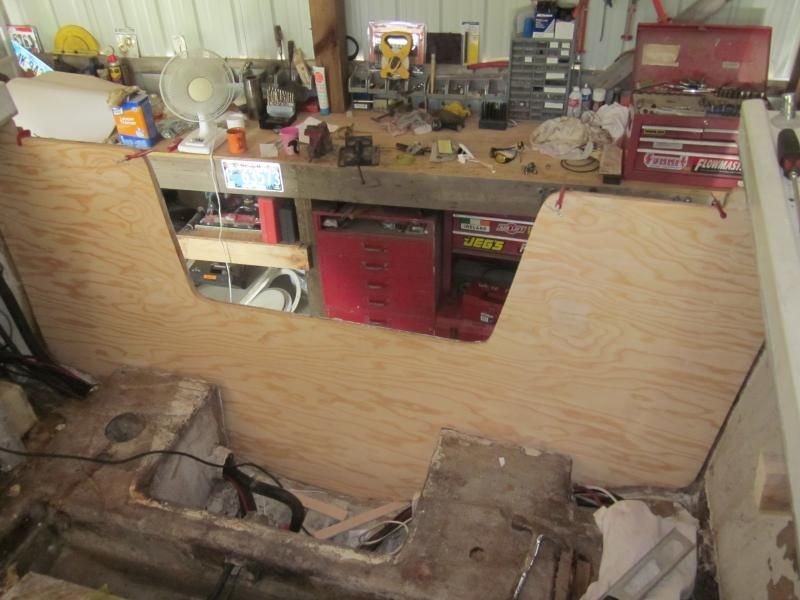
Got the transom tabbed in and on to removing the entire deck up to and under the pilot house. It doesn't appear that the deck was coated with resin originally on the underside. It's also 4 ply and I'm using 7 ply marine to replace it.

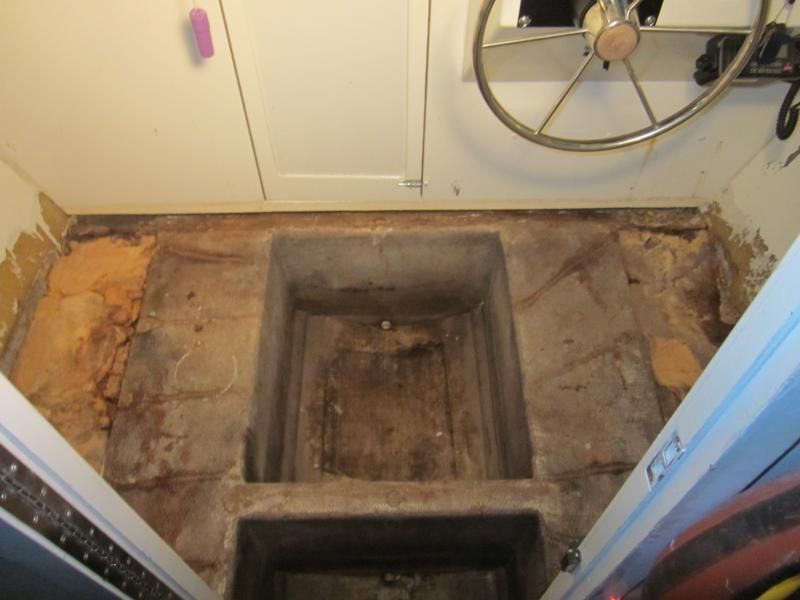
Here's the view of the pilot house. Everything came out from below the cabin walls front and rear nicely.
IMG_2339.jpg


The view from the cabin. It would be a crime not to use these wasted compartments as extra storage. I have a couple of extra Tempress hatches. I'm thinking I'll use Sherwin William's Duraplate 235 again to paint those bilge areas.
IMG_2338.jpg


I'm hoping the gap under the pilot house will allow me to shove one single piece of deck under there.
IMG_2342.jpg


On a side note, I have a strong immune system generally, but this mold has been making me sick. Every time I worked on removing decking, I would become fatigued, headaches, and the onset of feeling sick the next day. Then it would go away after a couple of days of moving on to transom work or something else.. I started wearing a respirator for deck removal. Next step is to use vinegar or bleach and start neutralizing some of the really bad compartments.
 

jigngrub

Fleet Admiral
Joined
Mar 19, 2011
Messages
8,155
How dry is that old foam?.......... I remember your foam phobia and just thought I'd scare the crap out of you for a second.:laugh:

That gap under the pilot house looks pretty uniform and that shows a strong structural build to that boat... I like that!

Looks like you're going to have this little ol' unpleasant task knocked out in short order at the rate you're going.
 

jc55

Senior Chief Petty Officer
Joined
Nov 3, 2006
Messages
665
Yikes, could you imagine removing all of that stringer foam? The tank compartment was flooded so it's "drying out". Leaving the tank foam formed at the bottom so that the new tank has something formed to sit on. Trying to beat the cold weather.

The deck edges were almost 1" away from the hull and caulked with something. I don't want to cabosil/PB the deck edges before tabbing because of the thin hull side. The hull is beautiful and I don't want to see the deck line from the outside due to heat distortion or heavy pounding. Any suggestions? Maybe a strip of thin foam, then some PB?
 

jigngrub

Fleet Admiral
Joined
Mar 19, 2011
Messages
8,155
The deck edges were almost 1" away from the hull and caulked with something. I don't want to cabosil/PB the deck edges before tabbing because of the thin hull side. The hull is beautiful and I don't want to see the deck line from the outside due to heat distortion or heavy pounding. Any suggestions? Maybe a strip of thin foam, then some PB?

Leave your 1/4" gap between the deck and the hull and PB before tabbing like it's supposed to be, you're not going to see any deck line in that heavy old boat... quit being so paranoid dude!

Seriously, if that boat could talk you probably wouldn't believe the s**t it's seen and no little 1/4" gap filled with PB is going to hurt or show on it.

Do you really want to talked bad about by the next owner for putting something somewhere that doesn't belong there? Or would you rather have them brag on you that you knew what you were doing and put the boat together right?
 

jc55

Senior Chief Petty Officer
Joined
Nov 3, 2006
Messages
665
Okay but if my hull develops an extra set of "double chin(e)s" [That was darn funny] I'm gonna come looking for ya :lol:
 

jigngrub

Fleet Admiral
Joined
Mar 19, 2011
Messages
8,155
Okay but if my hull develops an extra set of "double chin(e)s" [That was darn funny] I'm gonna come looking for ya :lol:

If you boat develops double chins I'll give you the GPS coordinates to my front door step.;)

The double chin(e)s got a smile out of me... but the foam "drying out" comment in post #57 made me LMAO!!!:lol:... I'm going to have to get you over that phobia one of these days, just gotta figure out how to do it. Foam is your BFF in a boat.
 
Top