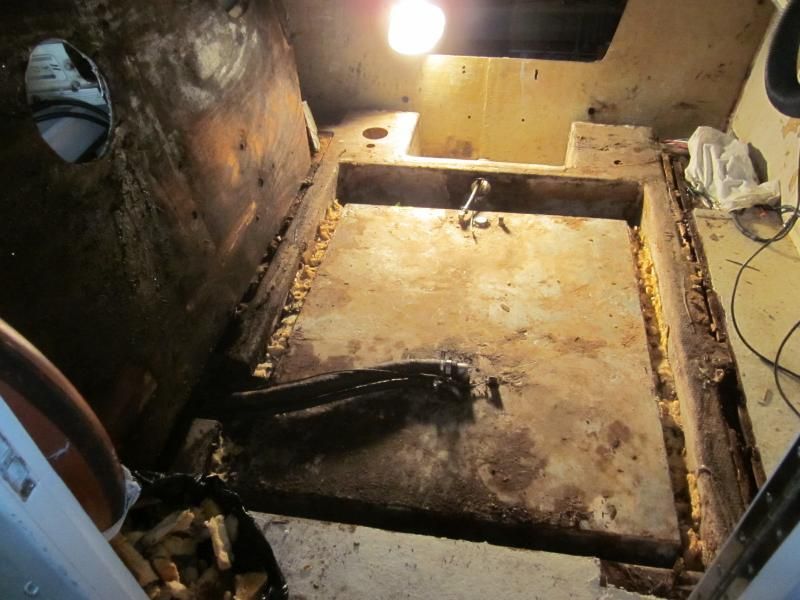
1990 Steiger Craft transom investigation

jigngrub

Fleet Admiral
Joined
Mar 19, 2011
Messages
8,155
You know it's funny jig, one layer of woven roven tabbing from the stringer to the transom (peeled off easily) and not a whole lot of tabbing in general. I think that anything I do will be miles ahead. I think this one went from the top down(rain water). I was going to build transom, fit, completely encapsulate on the bench with 1708, then install. What'ya think?

You going poly or epoxy resin?

If poly resin and you can get it to fit between the stringers and transom skin I say go for it. PB the snot out of it, slide her in and clamp it off and fillet. Tab her in after the cure and maybe another layup of 1708.

If you're going to use epoxy, I'd just give the wood 3 or 4 good coats then slide her in, clamp, and fillet. then tab and layup after the cure.

The epoxy method will give you a little more clearance between the stringer butts and transom skin if you need it.


Of course some people may say the above methods I've described are all bassackwards and I don't know anything about nothing... but it's the way I'd do it, right or wrong.
 

Woodonglass

Supreme Mariner
Joined
Dec 29, 2009
Messages
25,927
You know it's funny jig, one layer of woven roven tabbing from the stringer to the transom (peeled off easily) and not a whole lot of tabbing in general. I think that anything I do will be miles ahead. I think this one went from the top down(rain water). I was going to build transom, fit, completely encapsulate on the bench with 1708, then install. What'ya think?

The transom is one of the most critical structural components of your boat. The heaviest component, other than the passengers will be hanging off of it and placing tremendous torque and pressure on it and therefore it must be structurally sound. Any voids between the hull and the core can cause problems with the overall strength of the transom. Attempting to slide the wood core between the existing inner and outer transom skins is not, IMHO, the optimum method of achieving the best structural bond and ensuring that no voids develop between them. It will be very difficult at best to avoid air from being introduced as the core is being deposited into the pocket and to keep enough bonding agent between the two surfaces. I believe to accomplish this the core would need to be a bit undersized so the adhesive material (PB) could be layered on and not be scraped of during the installation. The use of Regular un-thickened epoxy resin would not be practical IMHO since there's no way to keep multiple coats of it in place during a vertical installation. It would simply run off the transom and down onto the bottom of the hull. Unless you know of a way to keep it from doing that.;) I do believe Jig is correct that Epoxy would be the best adhesive to use due to it's overall better strength and adhesive qualities but I believe it should be thickened with some thickening agent to prevent it from running during clamp up and help with filling the inevitable voids.

Again, It's your boat and you are free to do as you see fit and take any and all advice you wish. My recommendation would be to cut away the inside skin, clamp the new transom to the outerskin to ensure a good solid bond and then laminate a new inner skin to the hull sides and bottom with several layers of new Glass fabric to ensure adequate structural strength was established once again. I am NOT saying the method you are attempting will not work! Just offering a different opinion and approach. Good Luck with which ever method you choose:victorious:
 

jigngrub

Fleet Admiral
Joined
Mar 19, 2011
Messages
8,155
The transom is one of the most critical structural components of your boat. The heaviest component, other than the passengers will be hanging off of it and placing tremendous torque and pressure on it and therefore it must be structurally sound. Any voids between the hull and the core can cause problems with the overall strength of the transom. Attempting to slide the wood core between the existing inner and outer transom skins is not, IMHO, the optimum method of achieving the best structural bond and ensuring that no voids develop between them. It will be very difficult at best to avoid air from being introduced as the core is being deposited into the pocket and to keep enough bonding agent between the two surfaces. I believe to accomplish this the core would need to be a bit undersized so the adhesive material (PB) could be layered on and not be scraped of during the installation. The use of Regular un-thickened epoxy resin would not be practical IMHO since there's no way to keep multiple coats of it in place during a vertical installation. It would simply run off the transom and down onto the bottom of the hull. Unless you know of a way to keep it from doing that.;) I do believe Jig is correct that Epoxy would be the best adhesive to use due to it's overall better strength and adhesive qualities but I believe it should be thickened with some thickening agent to prevent it from running during clamp up and help with filling the inevitable voids.

Again, It's your boat and you are free to do as you see fit and take any and all advice you wish. My recommendation would be to cut away the inside skin, clamp the new transom to the outerskin to ensure a good solid bond and then laminate a new inner skin to the hull sides and bottom with several layers of new Glass fabric to ensure adequate structural strength was established once again. I am NOT saying the method you are attempting will not work! Just offering a different opinion and approach. Good Luck with which ever method you choose:victorious:

The inside transom skin is gone Bubba, we were talking about sliding the transom wood down between the 2 large stringer butts and the outer transom skin:


As for the epoxy resin, I was talking about encapsulating the transom wood with epoxy before installation and then installing it after the resin cures and with the required peanut butter... sliding the transom down between the stringer butts and the outer skin instead of having to cut the stringers back to get the transom in. Do you follow me?

1.Encapsulate transom wood with 3 or 4 coats of epoxy letting cure and sanding between coats.

2. Install encapsulated transom wood with lots of PB sliding it down between stringer butts and outer transom skin.

3. Tab in transom and layup inner skin.
 

jc55

Senior Chief Petty Officer
Joined
Nov 3, 2006
Messages
665
Thanks for the replies guys. I might have miscommunicated on the transom part W.O.G. I want to make a transom that fits, then cover the whole thing in 1708, edges, everything, then take it over to the boat, and clamp it in with PB and tab it in. No inner transom skin exists. There are 2 sections that I still need to remove that are sandwiched between the stringer and the outer skin.

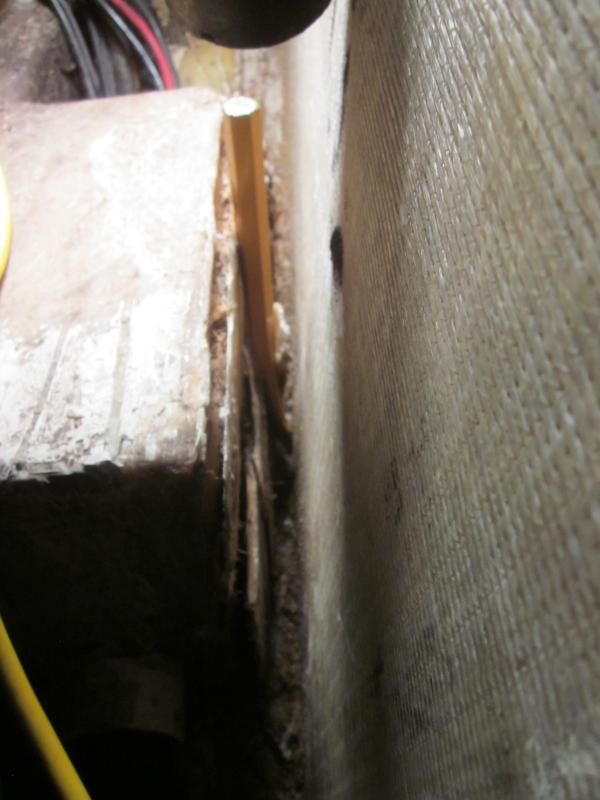
Question: The outer transom skin has completely delaminated from the transom itself. See how clean and resin free it appears in the pics? What's up with that? Almost looks like it was just set in there to begin with.

Jig, Gonna use ISO Poly. Got 10 gallons coming. I never, ever, ever want to have to redo an epoxied transom. Of course I may never have to, but the jury is still out. I don't believe any resin is magic when it comes to sealing out water.
 

jigngrub

Fleet Admiral
Joined
Mar 19, 2011
Messages
8,155
The poly and 1708 will work, and I'm a huge fan of pre-encapsulation before installation... it has something to do with over kill.;)

I was just saying that it's going to be a tight fit between the stringer butts and the outer skin with the 1708 wrapped transom wood... but I'm sure you'll finger that out with the dry fit, maybe a little routing in the butt area of the transom wood will be in order.
 

jc55

Senior Chief Petty Officer
Joined
Nov 3, 2006
Messages
665
Perfect! I will encapsulate first then, thank you. The stringers just end at the transom...there is no end cap on the stringers or flange to speak of so minor trimming should be a cinch if needed. I will try the electric chain saw tonight!
 

Woodonglass

Supreme Mariner
Joined
Dec 29, 2009
Messages
25,927
Sorry for the misunderstanding on my part. Not sure why the outer skin never adhered to the wood core. Can you see any evidence that the outer skin has been replaced...i.e. any evidence that it's been patched in around the edges?? How much space is there between the stringers and the transom skin? Just enough for the thickness of the transom? IMHO that's not a good thing. Based on what I'm seeing in the pics, I'd be more comfortable with cutting the stringers/deck back about a foot and then sistering them back in once the transom was installed. This would be easily accomplished and would make things go alot smoother for the transom install. Of course, It's your boat so do as you see fit.
 

jigngrub

Fleet Admiral
Joined
Mar 19, 2011
Messages
8,155
The stringers just end at the transom...there is no end cap on the stringers or flange to speak of so minor trimming should be a cinch if needed. I will try the electric chain saw tonight!

You may not need to trim those stringers after you get done with that chainsaw!:laugh::lol::laugh:
 

Woodonglass

Supreme Mariner
Joined
Dec 29, 2009
Messages
25,927
Not sure about the outer skin. To me it looks like it may have been replaced from the outside cuz it sure looks suspiciously like new an old glass combined. The interior portion looks like new and the outer looks like old as if its been cut away and re-glassed. I now see what you're talking about and apologize but I keep tellin ya I Am an Old Dumb OKIE!!! My suggestion would be to cut the stringers and deck back about a foot to give you the room to install the transom easily and then sister the stringers back in. This won't hurt a thing and can be done very easily. If you use the poly and PB and get a good clamp up it'll be fine. The 1708 Tabbings and layers will give you all the strength you'll need.;)

You can't encapsulate with epoxy and then glue the transom in with your Poly PB. The Poly wont Stick to the Epoxy. Take a look at this link to see how to build your transom using Poly...Fabricating Decks, Stringers, and Transoms
 
Last edited:

jc55

Senior Chief Petty Officer
Joined
Nov 3, 2006
Messages
665
ATTENTION: IF YOU ARE DOING TRANSOMS AND DO NOT OWN AN ELECTRIC CHAINSAW...STOP! BUY AN ELECTRIC CHAINSAW!

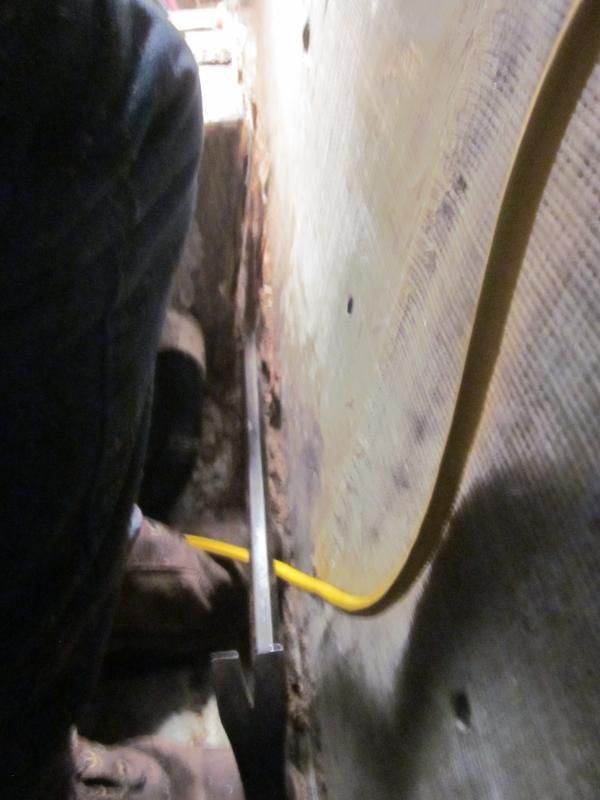
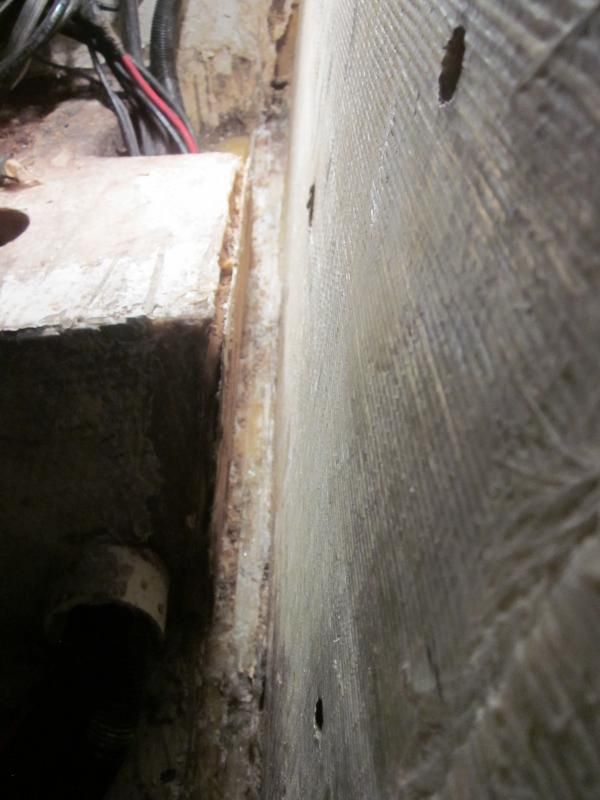
Okay, borrowed my parents electric saw. I have a Stihl MS290 but am not about to use that. This electric saw will cut the imbedded wood right out of the PB. It won't cut further, and it won't cut side to side through fiberglass. This is the cat's meow! The following are pics. Hopefully this can help someone save hours...


The dilema is 2 pieces of 3/4" plywood stuck behind a fiberglass stringer. After the cut, you are left with inner transom skin, middle layer, outer transom skin, and the rear skin of the boat itself...
IMG_2306.jpg


In this pic, I'm left with 3 pieces of fiberglass skin. A chisel turned diagonally to fit the crevice and hit with a rubber mallet all the way down, every few inches (slices very easy in this direction),

IMG_2308.jpg


In this pic, lightly tapping my old harbor freight Crowbar(which has demolished many buildings through the years), along the contour of the hull...
IMG_2309.jpg


I left the transom inner skin for now. Looks like 2" which should allow me to slip the transom in. may or may not remove depending if i can slip the transom in past the rear of the cap. this took about an hour.


The other side requires a "left handed" which doesn't exist, lol. It's proving a bit more challenging.

The delamination is just that. You can see the resin on the transom skin and how it completely released all resin from the rear of the boat skin...

IMG_2307.jpg


W.O.G., I'm going to use polyester for everything, no epoxy.
 

jc55

Senior Chief Petty Officer
Joined
Nov 3, 2006
Messages
665
Another day back at it. I'm not a big believer in the need for excessive grinding. I do a lot of chisel work and then a quick down and dirty grind session. Got the transom all ready for building the transom template, pulling wires, and the grinding session. unscrewed the rub rail and cap halfway to make room for the transom. Did I mention how awesome the electric chainsaw is?
IMG_2316.jpg


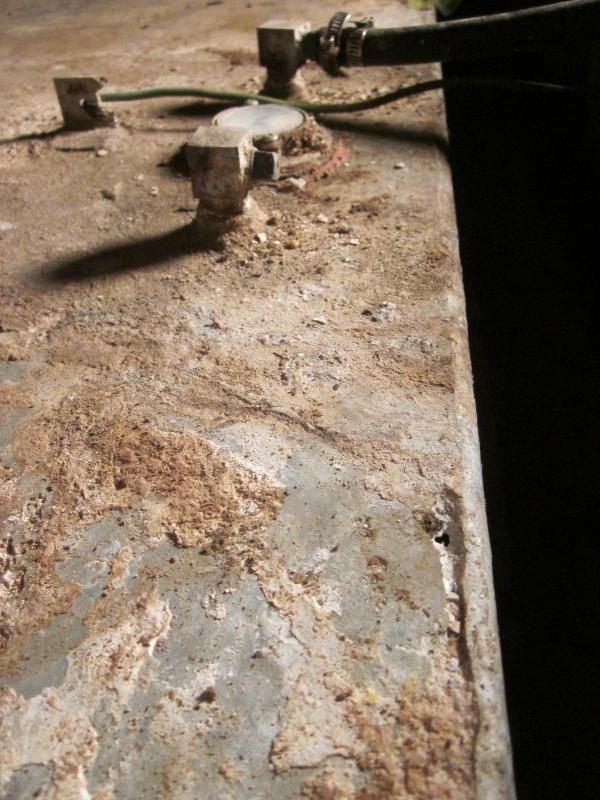
Did a little further exploration. I dug the tank free from the foam. There were 4 bolts holding it down. My "plans" were to pull the tank, D/A sand it, then put a coat of epoxy on it. Reality is that I will be driving to New England to pick up a Steiger tank :facepalm: Lots of corrosion/holes. I don't know what the alternative is for cost effectiveness.

On a positive note, I do like how the tank compartment is closed off to the bilge in case of a tank rupture.
IMG_2313.jpg

IMG_2312.jpg
 

zool

Captain
Joined
Aug 19, 2012
Messages
3,432
yea, that's a good sized hole, I wouldn't try to repair that...the tank you found in NE is new or in better shape?
 

jc55

Senior Chief Petty Officer
Joined
Nov 3, 2006
Messages
665
There's a place that makes them in Holbrook, NY for Steiger Craft. I checked iboats and online. No one seems to make an 84 gallon and above tank only 8.5" tall.
 

zool

Captain
Joined
Aug 19, 2012
Messages
3,432
cool, that's the good thing about quality name brand boats, theres usually an aftermarket solution....NOBODY is making Imperial tanks, but mine wasn't bad, so I skated past that problem, with some JB weld and moisture cured paint ;)
 

jc55

Senior Chief Petty Officer
Joined
Nov 3, 2006
Messages
665
Interesting Zool. Hmmm, I wonder if I could fill it full of water, and lead repair it. I've done some old school leading in the past. Think it's fixable if it's near the top? It would be nice to save a couple grand.
 

zool

Captain
Joined
Aug 19, 2012
Messages
3,432
tanks are a budget buster, if it can be repaired, those freed up funds go along way for other needs..thats the way I saw it. welding or brazing on tanks is sketchy at best, but I read somewhere that they use fire extinquisher foam to fill it, then tig weld. If you can find a radiator shop in your area, those guys do weld gas tanks, would be worth a few bucks to have them have at it.

Ive seen holes that size leaded, but they usually have a backer in place, that's not an option on a sealed tank...since its on top, you could always give the repair a try, and see if your satisfied before spending the bux on the new one.
 

jc55

Senior Chief Petty Officer
Joined
Nov 3, 2006
Messages
665
Thanks for the great info. I showed my wife a new Steiger on ebay for $146,000 and some others for $87,000. Since I have about $10k in mine(LOL), She agreed that there is no price on safety. If we lit off a flare, someone smoked, or we grilled on the boat, it's nice to have that piece of mind.

I have a synchrowave 200 tig, could probably plug with aluminum wire then grind off flush after the weld. We have air movers and ethane detectors at work to be safe. Looking at this thing further though, it seems like there are many areas of low pitted legions that might just come back to haunt me.
 

jigngrub

Fleet Admiral
Joined
Mar 19, 2011
Messages
8,155
She agreed that there is no price on safety. If we lit off a flare, someone smoked, or we grilled on the boat, it's nice to have that piece of mind.

Looking at this thing further though, it seems like there are many areas of low pitted legions that might just come back to haunt me.

... and do you really want to have to go back and rip your nice new deck out to get back to that tank?
 

jc55

Senior Chief Petty Officer
Joined
Nov 3, 2006
Messages
665
Got a quote for a custom .125 wall tank welded inside and out from a company in Florida...dirt cheap. Heck, I may attach a seat and an outboard to it and go boating!
 
Top