Re: 1962 Lonestar "Flamingo" - I finally Started w/pics
My Recommendations on
how to fabricate Decks, Stringers and Transoms. These drawings are based on my experiences and the vast amount of information I have gleaned from all the Pros and Skilled Amateurs and their projects here on the Forum. These are NOT set in stone, only Recommendations. It's your boat, so you
can and should do as you see fit.
Revised 1/22/2018
Decks - Marine Plywood IS the best and the most expensive. A very good alternative is the new Aruaco Plywood is Really Good stuff. I recommend it now for Deck, Stringers and Transoms unless you want to pay the extra. My opinion is if the glass layup is done correctly and Proper care and maintenance is done the Arauco will last many decades. Another good alternative is MDO.
http://www.pacificwoodlaminates.com/...ywoodGuide.pdf
Best way to remove the deck is to use a Circular saw set to about 1/16" less than the thickness of your decking material and cut around the edge. then cut multiple cross cuts to cut the deck into sections and then use pry bars and chisels to lift each section out. Then use a 4 1/2" grinder with 24/ 36 grit resin coated sanding discs and a rubber backup pad to grind the lip off the hull sides.Once the old deck remnants have all been removed and the Gringing/Sanding is done you’re ready to replace the deck
. ***Make absolute CERTAIN that the Hull is in the exact same shape as it was when you took the original measurements!!! If it isn’t you’ll have issues getting the cap back on IF you removed it.
First order of business is to fill any voids in the surface and on the edges with wood filler. If you don’t you’ll get air pockets when you lay down the CSM. Pre-coat the plywood with Resin Paying close attention to the edges. Once this first coat has started to tack up, Check for any dry spots and re-coat. Next roll another thin layer of resin on the bottom of the deck ply and then Lay down a single layer of 1.5 oz CSM. Add additional resin as Needed to wet it out and get it to lay down smooth and clear. Check for air pockets and use a razor blade to cut the area of the mat and roll it out flat. A bubble buster roller comes in handy for this. If you start in the middle and roll to the edges it’ll help to NOT have air pockets. Once it’s all flat and clear, the bottom is DONE!! Once it’s dry enuf (will take from 30 mins to and hour or more depending on the temps), Flip it over and do the Same Process to the Top. Remember you should not be using resin and glass when temps are below 60 degrees. There are methods to work around the temp barrier so PM me if you need guidance with that.
Now you’re ready for the finish coat. If you’re using carpet or vinyl, I’d just lay down one more layer of CSM and you’re good to go. If your Gelcoating or Painting, I’d lay down a Layer of 1708 or Woven Roving and then Gel over that. You may get a bit of Bleed thru on the weave of the Glass but…That can be a good thing if you want a bit of texture on the deck. If you want it smooth…Lay an additional layer of CSM over the Fabric or Roving. Make sure that you fillet the edges where the deck meets the hull sides and use 8” strips of 1708 to tie the deck to the sides of the Hull. This method should yield a strong, Watertight deck that with proper maintenance, will last for decades. One more note, When attaching the ply to the stringers, make sure to Cleat the edges and pre-drill/countersink all the holes and fill em with resin as well as coat all the screws. Common Deck screws are fine for this.
REVISED 03/11/2014
EPOXY RESIN
Epoxy requires
NO CSM (Chopped Strand Mat)! For added structural support for your deck and to attach it to the sides of the hull I'd recommend using 6-8 oz fabric extending 6-8 inches up the sides of the hull. 1 or 2 layers is sufficient. You could also use 1708 Bixial Fabric for the Tabbing. The Resin and Cloth/Fabric is all that's required. Any gaps can be filled with PB just like Poly. You can use various products to thicken Epoxy for filleting. One of the best is Micro Ballons. You
Can gelcoat over SOME epoxies, but generally speaking it's not advisable. Epoxy has no UV protection so it must be coated with some kind of UV protectant, either Marine Varnish (to keep the Natural Wood Look, or Paint to protect it from the sun if it will be exposed to the sun), carpet...Something must cover it. It does have a bit more FLEX to it, it's a bit stronger of a Glue, and offers a bit more water resistance. It's also a bit more pricey than Polyester Resin. It can take up to 12 hours to cure. (poly will tack up in as little time as 25 mins.)
POLYESTER RESINStringers-Updated 03/11/2014:
Epoxy Resin
If you choose to use Epoxy for your Stringers, then you'll only need to use Fabric or Cloth to cover them.
2 layers of 17oz cloth will be adequate. The drawing is basically the same just won't use CSM or 1708. Layup will be a bit more difficult due to the fact that Epoxy cures at a much slower rate than Poly and is a bit more "Runny" so it will have a tendency to want to run off the side of the stringer and Pool at the bottom. You'll need to Babysit it and keep pulling it back up onto the surface of the cloth until it begins to tack up a bit.
Polyester Resin
FILLETING: Once you have your PB mixed, dump it in a Ziploc bag, cut off a corner then use it like a pastry bag to squeeze the pb along the edge where you are filleting. About a 3/4" cut is all you need. Then use a large plastic spoon dipped in Mineral spirits to form the cove. Being neat here will save on sanding later prior to laying the CSM and 1708.
***NOTE*** For I/O motor mounts, It's normally recommended to double the layup. i.e.4 layers of 1708. Again, I always recommend laying the 1708 with the CSM layer facing down so the Styrene in the resin can dissolve it and create a stronger bond. CSM offers very little strength to the layup. It's just a binder. For Strength you need fabric and multiple layers of Glass Fabric. This is what's needed for motor mounts where most of the weight is. The stringer that runs parallel to the mounts and sometimes attached to the mount gets the normal layup.
Transoms (updated 06/28/2016):
Epoxy
When using Epoxy for your transom it's basically the same as for Stringers. You'll use 17 oz Cloth instead of 1708 Biaxial and
NO CSM! You could also use a couple of layers of 8.5oz glass. With epoxy lighter weight glass and multiple layers is sometimes a better method to build bulk and strengthPolyester Resin
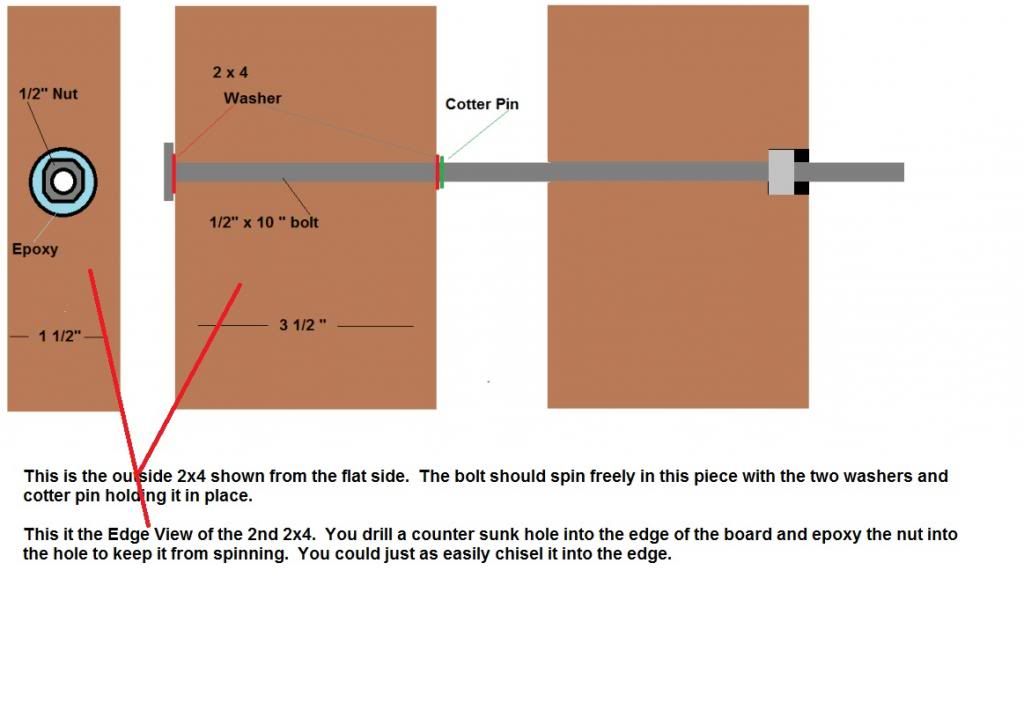
Note: When using screws as clamps, it's best to predrill the holes a bit oversiized on one piece of the transom. This keeps the piece from catching the screw threads and allows the other piece to be drawn up tight against the pre-drilled piece.
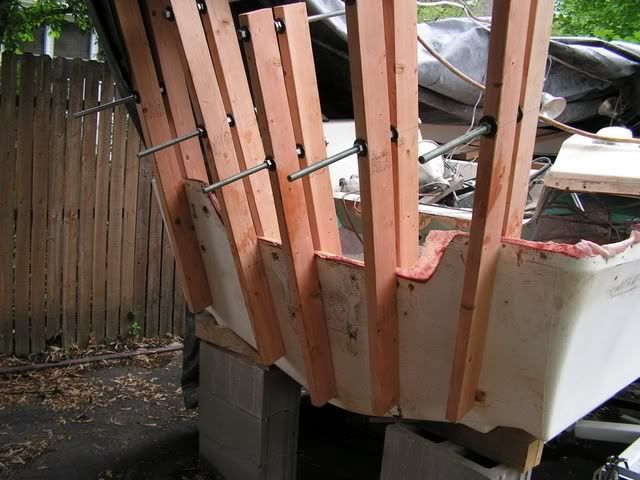
Pics of clamps I recommend for clamping an Outboard Style Transom when the top cap of the boat has been removed. I modified the construction of them just a bit using bolts instead of all thread. Takes a bit longer to build em but I like em better. Doing it this way I can use my 3/8" air drive ratchet to tighten em down which make is a lot faster to clamp em down. You need to be as fast as possible when you are using that much PB. Don't want it to set up on you before you get it clamped in place. Speed is of the essence!!!!

FINISHING UP THE TRANSOM INSTALL.
Note: To avoid any possibility of getting a "Waffling Effect" on the outer transom skin, It's recommended that you use a Plywood "Backer Pad" on the outside before applying the clamps.
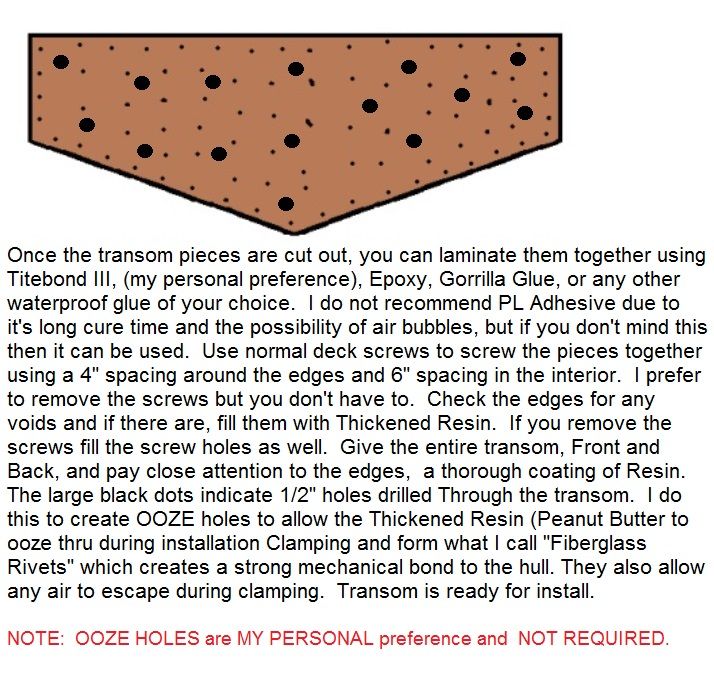
Once the transom is clamped into the boat, All that's left is to form the fillets and lay the glass. During clamp up, If you elected to create the OOZE holes you'll need to be prepared to smooth out the PB as it oozes out of the holes as well as form the fillets from the ooze out around the edges of the transom. You'll probably need to have a bit extra PB to form the fillets. A large Plastic Spoon is a great tool for forming these fillets and a bondo spreader is great for cleaning up the fillets and knocking down the inevitable left over waste and nubs that will occur. The cleaner and smoother you can make these fillets now the less work you'll have later when it all cures. After everything cures in a couple of hours you can remove the clamps and check for any rough spots on the fillets and sand them smooth. Cut your first layer of 1708 glass so it will extend out onto the sides and bottom of the hull approx 4-5 inches. I like to use Masking tape to hold it in place along the top edge of the transom and hull sides while I fit it in place and make my cuts. You can then start applying resin. Once the first layer starts to "Kick" and harden You can prepare to do the next layer and have it extend out onto the hull approx. 8-10". and repeat the resin process. If you want a smoother appearance you can follow up with a layer of 1.5 oz CSM to Hide the weave of the 1708 fabric. The Transom installation is now complete.