1990 Bayliner 2651 resto

tpenfield

Moderator
Staff member
Joined
Jul 18, 2011
Messages
17,712
A judgement call in the fuel tank as to if it can be saved. Check to see if there is a certification label with the material and thickness. I would not go with any pits that are deeper than 1/3 the thickness. Also see if you can get a glimpse inside the tank for any internal corrosion/pits. A decent way to purge the fumes would be to store the tank inverted with the sender hole and fill fitting open to the air. Still caution should be used in handling the tank and avoiding sparks.

If you do need a new tank, a local welding shop can make one from the dimensions of the original. (BTDT).

If you get rid of the thru-hull fitting, I'd do a glass over of the area, inside and out. If you do a Port-a-Pot, get one with a pump-out connection, so you can pump out if desired vs. having to do a sanitary engineering haul when it needs to be emptied.
 

kcassells

Fleet Admiral
Joined
Oct 16, 2012
Messages
8,600
Turn out the underside pc. that threads into the throat of the base. May need a spanner tool to catch inside if it has nipples to turn it.
Alternatively cut the rise nipple inside the boat close to flush with the base.
Make 2 Sawzall slices on remaining interior nipple and chip out that pc. of interior nipple thread.
Use flat 2" chisel to remove base.
Here's some reading.
 

Drivewayboater2

Petty Officer 1st Class
Joined
Aug 21, 2019
Messages
266
Turn out the underside pc. that threads into the throat of the base. May need a spanner tool to catch inside if it has nipples to turn it.
Alternatively cut the rise nipple inside the boat close to flush with the base.
Make 2 Sawzall slices on remaining interior nipple and chip out that pc. of interior nipple thread.
Use flat 2" chisel to remove base.
Here's some reading.
🤔 kcassells… not sure this post was for me? 😂
fuel tank vs. through hull fittings?
 

Drivewayboater2

Petty Officer 1st Class
Joined
Aug 21, 2019
Messages
266
On duh…. My bad
your referring to tpenfield’s getting rid of through hull fittings regarding the toilet. Luckily mine are plastic and are super easy to get out.
 

Drivewayboater2

Petty Officer 1st Class
Joined
Aug 21, 2019
Messages
266
update 7-2
been a crazy June and the weather was not the best.
been busy this weekend.
after getting the fuel tank out it was time to continue with demolition.
removed the aft bulkhead

E8A5E3B2-DCA8-4C68-8A48-3104554449F5.jpeg22E71B27-A256-430D-AB9A-25CAA80AF481.jpeg

then had to clean up the bad area under the fuel tank. Not sure what I’m gonna do to rebuild what was previously there. suggestions will be asked later in this post.
BDA62C87-B010-47C3-9A47-906A3A992B09.jpegD948274A-59A4-4AB3-B9D4-CBB026911C40.jpeg

before

DAE62AC0-68C0-4EFE-9799-B2EA8FC03EE6.jpegD852088F-B58C-4F02-846E-5494BE676C1E.jpeg
after


next up was to make up templates from the existing bulkhead. Pink insulation once again is my friend. The existing piece had one large piece of 1/2 ply extending from port to starboard with another 5/8 piece laminated together. Pretty straight forward. I’ll PL the two pieces together to build the replacement bulkhead.
52D0910A-41EA-43C1-83C0-B15789206681.jpeg5FDA448A-6989-4DE6-B590-47FF7D7233B4.jpeg8E3C8982-1629-4359-8981-8175C029C01C.jpeg

tons of grinding to be done to prepare the surface. That’s gonna be a fun day. its gonna be messy… I figured I’d try and tackle that all in one session. PPE AND ALL THE ESSENTIALS WILL BE USED.


Finally the question of the day.
under the fuel tank originally had a piece of un FG’d plywood under it. I’m trying to save time and effort. I’m considering glassing in supports underneath the tank instead of grinding away what is already there.
here is what I’m considering.
CE47E023-1B35-4A3B-923C-6E34F1BE6F17.jpeg7D21CFDE-8887-4390-8666-F65AF037C094.jpeg
these pieces will be epoxied and probably add a layer of 1700 on both sides. I’d try and level out the existing poly so things are nice and level. Any concerns that these will not work? looking at what I ripped out seems like this would do just fine regarding what little was there originally. Thanks in advance for any help or suggestions y’all have.
 

Attachments

  • F551DC43-BA74-4FE8-9400-16FFADDE244A.jpeg
    F551DC43-BA74-4FE8-9400-16FFADDE244A.jpeg
    1.4 MB · Views: 9
  • B6847AC2-45A3-4BCB-AFBB-013528677DC7.jpeg
    B6847AC2-45A3-4BCB-AFBB-013528677DC7.jpeg
    1.5 MB · Views: 7
  • E9BCCEC5-A26A-4C99-9087-5FD8FD13DA58.jpeg
    E9BCCEC5-A26A-4C99-9087-5FD8FD13DA58.jpeg
    1.8 MB · Views: 9

kcassells

Fleet Admiral
Joined
Oct 16, 2012
Messages
8,600
Yo yo. Millions of opinions here on fuel tank install, materials etc. Typically the CG does not recommend using the hull of the boat as a direct support for the tank, hence a blocked up base to hull then platform. The base needs to be full length and sides/front/back and enclosed as a "coffin".
Leaking would be contained in this area and not allowed to flow to any electronics etc.
Great read by David Pascoe. Comen sense stuff.
Sorry for the late reply.
 

Drivewayboater2

Petty Officer 1st Class
Joined
Aug 21, 2019
Messages
266
Update 7-23
slow and steady but progress nonetheles. been grinding old gel coat and prepping to tab in the aft bulkhead behind the fuel tank. No pics but it was VERY WHITE in the engine compartment. proper PPE used. Suit, goggles and respirator used! Still got more to grind away. Seems like I can do an hour at a time in this summer heat.
meanwhile I took the time to build the aft bulkhead. epoxied ply and three layers of 1700. Dry fit went okay. Old aft bulkhead piece and template shows where the engine stringer/ mounts will go. I’m building the pieces as I go.

6A21CFC1-6072-482B-A684-A879B1C166D4.jpeg67C511BF-4E80-4A7B-92C7-A3A050FFB63E.jpeg2830696E-D1AD-49D2-AADF-DF6C4375C48D.jpeg
 

Drivewayboater2

Petty Officer 1st Class
Joined
Aug 21, 2019
Messages
266
Update 8-15
More grinding… more grinding… y’all know the drill. Hoping I’ll be finished with the major grinding this weekend.
i finally started to cut and epoxy the engine mounts. I had the old pieces to use as a reference. Cutting the angle was done on a table saw. I bought the linear fir last year and let it sit. I wanted to get it completely dry. 2 coats of epoxy. Added glass to the area for water to get to bottom of bilge. The original just had hogged out wood with a pvc tube and very little chopped strand.
88E82769-CE93-4A05-84C9-BCBB43ED7D3C.jpeg2968518B-A65B-4AAB-A272-3739F4883F03.jpegA43754B2-CABC-4D6E-A0CD-0A3F216E4BB1.jpeg242A8D08-6729-4FAF-9CD6-153A1508A3FB.jpeg47CF9E2A-BCCA-469D-8718-F32A2C9E9315.jpeg4824F53D-BD2B-433A-A004-559EB6D8EC68.jpeg

Next up will be to finish laying 2 more layers of 1700 on the transom. Then glass in aft bulkhead. Once that is complete I’ll be able to get the final measurements to fit the engine mounts. Gonna wedge a tight fit up against the transom and aft bulkhead. I’m learning that you can’t do this before you do that with regard to getting things back together.
 

Attachments

  • 90F420D8-03AB-4AA6-9F55-F662DBFB6C9F.jpeg
    90F420D8-03AB-4AA6-9F55-F662DBFB6C9F.jpeg
    1.7 MB · Views: 4

Drivewayboater2

Petty Officer 1st Class
Joined
Aug 21, 2019
Messages
266
Update 8-18
I believe I’ve completed the major grinding in the engine/ bilge area. 🤞🏻
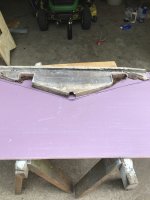
I gave it a wash down with acetone. before and after pics below

8534216A-AAEA-44BE-AA78-67C401E0F7CF.jpeg
before


3AEBA45B-F4D3-46EC-9859-1FC7E9CD7DF3.jpeg

The goal is to mix up thickened epoxy drill some relief holes and set the new bottom mounts in the existing fiberglass and clamp them in.

I intend to go over the entire mount with 2 layers of 1700.
Question …. Will that be enough for strength?


The transom has only been tabbed in.
F5D3E6B1-5490-4E6C-B2F1-6C4A8720CB6F.jpeg


I started rolling out and cutting the 1700 for the transom. Two layers should get me to just over 2 1/8 “ with transom thickness. I cut the pieces from the roll so they will be perpendicular with wetted out. I think I heard on the forum here that this will increase strength. Am I on the right track?

460BB66D-4A7F-436A-BE1C-C01A3250B840.jpeg
2097DA28-4A8D-4D1C-838D-DD83677801E9.jpeg

thanks again to the knowledgeable people on here that have given me the courage to take on this project…..
 

todhunter

Canoeist
Joined
Sep 15, 2020
Messages
1,245
Being done with grinding is a huge milestone. Yes, 2 layers of 1700 should be fine for the mounts. Perpendicular with 1700 shouldn't matter, as it's a 45 degree bias. The stitching runs the direction of the roll and will impact how it lays around bends, but once cured in resin, it carries almost no load compared to the glass fibers. Laying them perpendicular won't hurt anything though, if it makes you feel better.
 

Drivewayboater2

Petty Officer 1st Class
Joined
Aug 21, 2019
Messages
266
Ah gotcha Todhunter… 45 to 45 so basically no gain in strength. Learned something new there!
yes being done with grinding (at least in this) area is huge. I still have to tackle the fuel tank area..

Hows your rebuild going? Too hot down there to get after it?
 

todhunter

Canoeist
Joined
Sep 15, 2020
Messages
1,245
Ah gotcha Todhunter… 45 to 45 so basically no gain in strength. Learned something new there!
yes being done with grinding (at least in this) area is huge. I still have to tackle the fuel tank area..

Hows your rebuild going? Too hot down there to get after it?
I splashed at the end of 2022, and we are reaping the benefits of a fully restored boat now! It was a LOT of work, but the results have been worth it.

20220814_112208.jpg
 

Drivewayboater2

Petty Officer 1st Class
Joined
Aug 21, 2019
Messages
266
Update 8-19

got to put the first layer of 1700 on today. This was over the layer of tabbing I laid back in the spring. very pleased with how the corners wrapped around. Hope to sand it out tonight and get the second layer over tomorrow.
857AB6F0-85F9-4BCF-A198-9FD798C548F8.jpeg

7818DD36-D263-44AF-8C0B-6DAE927323AF.jpeg92E415C3-A237-4876-A0BD-C02AE87028BC.jpeg2F82D4E8-89D5-4645-B9B4-22475932796D.jpeg
once the second layer is done I can then move to laying in the motor mounts. Progress little by little.
 

kcassells

Fleet Admiral
Joined
Oct 16, 2012
Messages
8,600
Just sit back for a few minutes and enjoy your hard work!
Looks great.
Now get back to it.
 

Drivewayboater2

Petty Officer 1st Class
Joined
Aug 21, 2019
Messages
266
Just sit back for a few minutes and enjoy your hard work!
Looks great.
Now get back to it.
I did 🤣
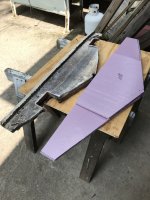
. I cracked open a cold one and dry fitted the second layer. Sanded what cured… then darkness fell and the second cold one opened.

Ordered more epoxy… woohoo.
 

kcassells

Fleet Admiral
Joined
Oct 16, 2012
Messages
8,600
Still playing with outboard tuning uppy thingy. Hopefully the last of parts
get delivered tomorrow, #47 and #34 new jets/orifices. Replaced cracked carb yesterday and was gonna run it and "DUH" order double batch of 34 so
another lost day.
Did get goodies on board to start cuddy lipstick. Starting after my cold beer.
Cheers!
 
Top