198x SS-150 rebuild

SHSU

Lieutenant Junior+Starmada Splash Of The Year 2019
Joined
Mar 8, 2017
Messages
1,724
Taken from a website: When properly squeezed or driven, the shop head of a solid rivet should be one-half the rivet diameter in height and 1.5 times the rivet diameter in width.


SHSU
 

Rasdiir

Petty Officer 2nd Class
Joined
Jul 18, 2011
Messages
167
Taken from a website: When properly squeezed or driven, the shop head of a solid rivet should be one-half the rivet diameter in height and 1.5 times the rivet diameter in width.


SHSU
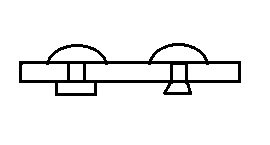
That's why I'm confused, all I can seem to get is a v-shape buck, I tried to draw an example below. The one on the left is what the guides say it should look like, the one on the right is what I get. It still seems solid, but doesn't look quite right. I did receive the rivet gun and bucking bar today and tried a few practice ones. It was definitely easier and I had better results, but it's still more of a V then a flat buck. I am using 2117 rivets and not the soft 1100, maybe that's it?
Untitled.jpg
 

BWR1953

Admiral
Joined
Jan 23, 2009
Messages
6,178
That's why I'm confused, all I can seem to get is a v-shape buck, I tried to draw an example below. The one on the left is what the guides say it should look like, the one on the right is what I get. It still seems solid, but doesn't look quite right. I did receive the rivet gun and bucking bar today and tried a few practice ones. It was definitely easier and I had better results, but it's still more of a V then a flat buck. I am using 2117 rivets and not the soft 1100, maybe that's it?
View attachment 364333
We had that same thing happen with our practice rivets when we used material that was too thick or with tails too long.
 

SHSU

Lieutenant Junior+Starmada Splash Of The Year 2019
Joined
Mar 8, 2017
Messages
1,724
Guessing you hammer isn't hitting hard enough. Can you over buck a rivet or once you get the "V" that is as much as you can get?

SHSU
 

Rasdiir

Petty Officer 2nd Class
Joined
Jul 18, 2011
Messages
167
Guessing you hammer isn't hitting hard enough. Can you over buck a rivet or once you get the "V" that is as much as you can get?

SHSU
If I keep hammering at it it gets a bit of a deeper V, but I don't seem to be able to get it flat. I have to do some more experimenting with air pressure and maybe a heavier bucking bar.
 

SHSU

Lieutenant Junior+Starmada Splash Of The Year 2019
Joined
Mar 8, 2017
Messages
1,724
Yep, so guessing both are undersized/powered for what you are trying to do. You should be able to over flatten a rivet, as it appears you can't think you need some additional muscle.

SHSU
 

classiccat

"Captain" + Starmada Splash Of The Year 2020
Joined
Dec 20, 2010
Messages
3,412
make sure you're not holding the bucking bar to tight to the rivet...you almost want to let it float there and bounce.
 

BWR1953

Admiral
Joined
Jan 23, 2009
Messages
6,178
make sure you're not holding the bucking bar to tight to the rivet...you almost want to let it float there and bounce.
That is very good to know! We've been holding the tail end down as tight as we can. 😲 🤪
 

Rasdiir

Petty Officer 2nd Class
Joined
Jul 18, 2011
Messages
167
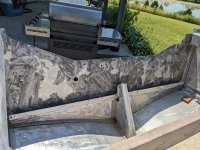
So I have been working on this boat, although the pace is so slow I feel like I'm not really making much progress. Over the last couple of weeks I got the transom corrosion dremeled out, and there is now two coats of JBWeld Marine filling in all the pitting.


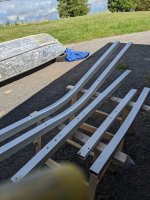
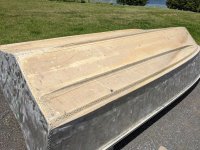
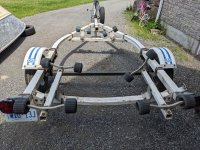
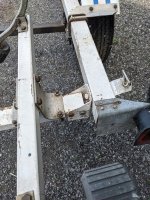
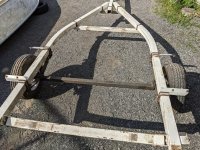
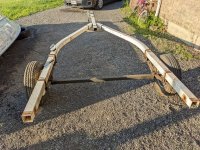
Today I got the hull off the trailer and turtled, and also got a bunch of the trailer parts unbolted. Apparently this trailer tilts (you can sort of see it in the last picture), although I'm not sure if it is designed to or if it's because the back cross member only has one bolt. Regardless, I don't want it to tilt with the bunks on, any ideas? I may be able to remount it, but I would also have to move it forward and drill new bolt holes, and that bar may not be wide enough for two bolts.


When I put the bunks on I think I will reuse the square tube roller mounting bar and just bolt the bunk right on top instead of using a dedicated bunk bolster. This should help provide extra support to the bunk, since otherwise it would have to extend about 14" behind the cross member to get to the transom. Since all of the weight is there the extra support seems useful to stop the bunk from bending or breaking. The front of the bunks will get regular bolsters.


Next steps:

  • Finish removing the cross beams and axle from the trailer
  • Repair the right fender, for some reason it has two cuts on the outside edge.
  • Strip paint from all trailer parts and repaint. I was thinking of the rustoleum rust paint in white for the trailer frame and then do the axle in black. I'm debating whether I want the fender to be white or navy blue to match the topside of the boat.
  • Remount all the hardware and lights. Electrical will be done at a future time once the boat is closer to complete, no point in doing up the connections now and giving them extra time to corrode. The current fender mounts are really solid and enable the fenders to be used as a step without any flexing, but they look horrible. How are fenders normally mounted?
  • Trailer will also get a new winch and larger spare tire, the current spare is only a 12" rim instead of 13" like the trailer, and the spare also has some cracking on the sidewall. When I order decals for the boat I will also get an EZ-Loader one and a few smaller Starcraft ones for the trailer.
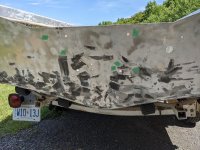
  • Strip paint from the bottom of the boat and see what those epoxy spots are. If they are covering holes then I will have to remove at least one rib completely, and possible another one, to enable me to drill the hole out and insert a solid rivet.
PXL_20220709_191430974.jpg
PXL_20220710_163616349.jpg
PXL_20220710_181312478.jpg
PXL_20220710_181434184.MP.jpg
PXL_20220710_181446283.jpg
PXL_20220710_211211298.MP.jpg
 

Rasdiir

Petty Officer 2nd Class
Joined
Jul 18, 2011
Messages
167
Spent a bit (a lot!) of time stripping paint yesterday, and got a few more things taken apart on the trailer. I also went to town and picked up some Tremclad (Rustoleum comparable) flat white paint and red oxide primer for the trailer frame, as well as a wire wheel kit for the angle grinder. Since I will be redoing the trailer outside I wanted to be able to strip the paint and then recoat with the primer on the same day to keep surface rust off. I ordered the u-bolts I need for the bunk bolsters, although I will need to place another hardware order as I had to cut off one of the frame bolts since it was bent and couldn't be unbolted. The rest of the trailer will be coming apart today.


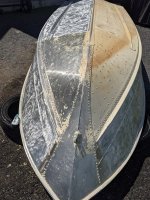
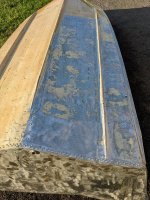
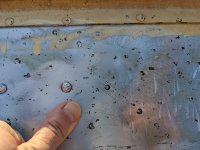
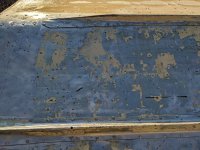
The bottom paint is a bit more difficult to remove then the sides, the pictures are after two coats and a lot of scraping and nylon brushing with the drill. I don't know what the history of this hull is, but something caused widespread corrosion across the entire bottom of the hull, including the heads of a lot of rivets. It seems evenly spaced across both sides and the entire bottom, and a lot of the pits are that curved type, any idea what causes this? I haven't found too many deep ones, most are about 1mm depth. Suggestions on this? Covering with patches is not really feasible due to how widespread it is, I would have to basically make a second hull bottom.

PXL_20220716_232338102.jpg
PXL_20220716_232410040.MP.jpg
PXL_20220716_232418966.jpg
PXL_20220716_232328228.jpg
 

Rasdiir

Petty Officer 2nd Class
Joined
Jul 18, 2011
Messages
167
Yep, so guessing both are undersized/powered for what you are trying to do. You should be able to over flatten a rivet, as it appears you can't think you need some additional muscle.

SHSU
Been a little while, but I have still been busy and I'll have a larger update tonight (preview: unfortunately it's just trailer work), but I have a bit of a break through on my rivet practice! I took another run but this time I cranked the air pressure on both the compressor and at the gun, and was easily able to flatten the shop heads! I need to work on technique as I got really bad smileys on the rivet heads, but at least I know I can actually set them. This is a huge weight off my mind as I was quite worried about the amount of rivets I will have to replace to patch the pinholes under the ribs, but I am now confident it will work. Pictures of my practice rivets tonight :)
 

Rasdiir

Petty Officer 2nd Class
Joined
Jul 18, 2011
Messages
167
A few days late on this update, but I continue to make slow steady progress, especially because I am off work this week. Spending a lot of time on family activities, but I have been getting a few hours each morning on the boat. At this pace I will win the award for slowest rebuild!


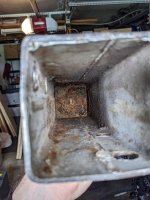
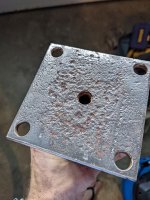
I spent the last 10 days grinding the paint and rust off the trailer frame with an angle grinder. Progress was very slow with the wire brush, the paint was almost gummy and incredibly thick. I finally ended up getting one of the 40gr paint stripper pads for the grinder and that went through it like nothing, but the pads wore out after only one of the long frame pieces and at $16 a pad I'm glad I only needed 2! After all the paint was stripped I wiped the pieces down with mineral spirits and sprayed with Tremclad red oxide primer, and yesterday I rolled on the first coat of white (I ended up swapping the flat white for a gloss white) with a foam roller. The first coat was not a great job, a few bubbles and not fantastic coverage, so I'll give it a light sand before coat 2. My winch tower (pic 1 and 2) is quite a bit more rusted then the rest of the frame, do you guys think I should try and have that bottom plate cut off and a new one welded on? I would have to find a shop for this, as my buddy with a welder is not confident enough to do a structural piece, although he will be taking a stab at fixing those cuts in the trailer fender. I still have to clean up the axle and springs to get it ready for black paint, but they are not horribly rusty so that should go much quicker.


I've also been puttering here and there with vinegar bathing, wire wheeling, and oiling the trailer bolts. The majority are in ok condition and cleaned up nicely although I will have to replace a couple. I would much rather replace all and start fresh, but it's very hard to find the required u-bolts in Canada for a reasonable price, it would be almost $200 to replace them all! My order of u-bolts for the bunk bolsters arrived, so I will also be getting the bunk boards and carpet this week to get ready for reassembly.


Got a few more feet of paint off the bottom, the port side is now 99% complete, just have to hit the last bit with the nylon brush around the rivets. I will be continuing with the starboard side this week and I'm hopeful that paint stripping will finally be done before I have to go back to work next week. Once all the paint is off I need to begin prepping for rivets, it looks like I will have at least 5 spots to patch up on the bottom, and unfortunately 3 of them are under ribs, so those will have to come off too.

Cheers, Jared
PXL_20220808_163229100.jpgPXL_20220808_163323000.jpgPXL_20220810_162230232.jpgPXL_20220810_162832421.jpg
 

DLNorth

Chief Petty Officer
Joined
May 26, 2016
Messages
432
It's been a while sense I've read you progress,
nice work, you are doing well.

As for the trailer, what kind of boat ramps do you typically see/use where you are? Here in MN, where we often have short or unimproved ramps, where the boat has to be winched onto the trailer, roller trailers are the preferred trailer. If on the other hand, you have nice shallow pitched ramps, where the boat can easily be floated on, then the bunk is preferred.
The other consideration is what kind of roads will you be on, if smooth, rollers aren't bad, but if rough (either dirt or surfaced) bunk would be a better choice.

Both of our boats are on roller trailers, though the lighter one with the fishing boat has bunks forward.

Keep the pics coming.
Dan
 

Rasdiir

Petty Officer 2nd Class
Joined
Jul 18, 2011
Messages
167
It's been a while sense I've read you progress,
nice work, you are doing well.

As for the trailer, what kind of boat ramps do you typically see/use where you are? Here in MN, where we often have short or unimproved ramps, where the boat has to be winched onto the trailer, roller trailers are the preferred trailer. If on the other hand, you have nice shallow pitched ramps, where the boat can easily be floated on, then the bunk is preferred.
The other consideration is what kind of roads will you be on, if smooth, rollers aren't bad, but if rough (either dirt or surfaced) bunk would be a better choice.

Both of our boats are on roller trailers, though the lighter one with the fishing boat has bunks forward.

Keep the pics coming.
Dan
Ramps around here vary from dirt to concrete, but the rollers have left large dents in the hull so I'm going with bunks. This boat is so light that winching it up shouldn't be too bad.
 

SHSU

Lieutenant Junior+Starmada Splash Of The Year 2019
Joined
Mar 8, 2017
Messages
1,724
I added King Starboard on top of my bunks. Its very slick. One word of caution though, being so slick you have to make sure you don't change direction quick when the boat isn't tied down.... Almost dropped the boat when trying to put it into the water. lol

SHSU
 

Rasdiir

Petty Officer 2nd Class
Joined
Jul 18, 2011
Messages
167
So despite being off work this week the weather is holding up progress as I don't have an indoor workspace. I got a bit more paint stripping done on the hull, only two more days before the last of it is gone!

I finished the first coat of paint on the trailer frame, and also got the leaf spring assemblies taken off the axle and mostly disassembled so I can wire brush and repaint. The bushings are shot so I ordered those and a few more u-bolts that I need to assemble the trailer again, along with new safety chains and a bow roller. I also picked up the self-etching primer ($27 :cry:) I need for some aluminum braces on the trailer, and also got a spray can of flat black for the axle and leaf springs.
 

Rasdiir

Petty Officer 2nd Class
Joined
Jul 18, 2011
Messages
167
Weather remains wet, and it's starting to get chilly too, probably an average high of 20C for the last few days so I spent quite a bit of time cleaning up the garage and building some shelves for the linen closet.

I managed to get the last large bit of paint off the hull, I just have an hour or so with the nylon brush to clean up around some rivets and the keel. Also got all the trailer suspension bits (leaf spring assemblies, springs, axle) wire brushed and repainted a nice flat black, and I got 2 more coats of gloss white on the frame pieces and all the various aluminum bits, including the fender braces, winch tower, bunk braces, and crossmember hanger. All of the trailer bolts have also been wire wheeled and oiled. The new bushings and bolts arrived, so I'm hoping to finish one final coat of white on the frame and then I can assemble next week. I do still have to order some bunk carpet online and pick up the 2x4s for the bunks, as the local shops and big box stores want $30-40 for a single 12" x 12' piece of carpet!
 
Top